
|
|
#31
 11-15-2023, 09:08 AM
|
||||
|
||||
|
Quote:
It isnt as high tech as either yours or Bens, but it gets the job done and then doubles as a work bench when not in use. The best benefit? Ryan now smiles more broadly. Steve 
|
|
#32
11-15-2023, 09:10 AM
|
|||
|
|||
|
Jim, in regard to the rosette cutter, I see that Elevate Lutherie manufactures one to use with routers. I have not used it but (and maybe others here can chime in) it looks comparable to the Cochran one.
|
|
#33
11-16-2023, 01:00 AM
|
|||
|
|||
|
On this day we will get the neck heel ready for fitting the neck to the body, we will glue on the fretboard, level sand the sides of the body, rout the edges for the purfling and binding, and finish with all the binding and purfling installed on the guitar.
sanding the edge of the top flush to the sides  cleaning it up with a rasp  Level sanding the sides  Cutting the neck angle on the heel  Checking the fit  using the belt sander to refine the heel angle  Marking the outline of the heel  Drilling the hole for a mahogany dowel to reinforce the area where the threaded inserts are installed   Cutting out the shape of the bridge 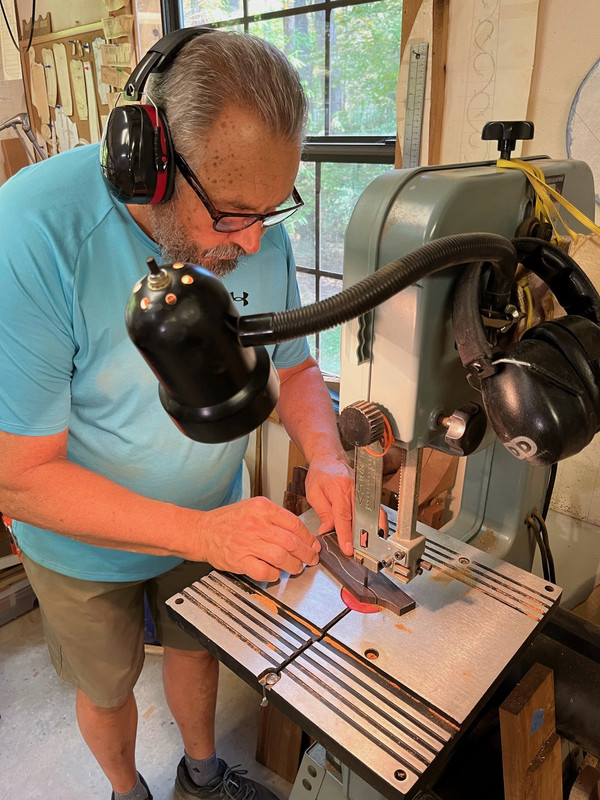 Using a drill guide template to precisely drill the two holes for the threaded inserts  Routing a relief in the heel to ease neck to body alignment  Refining the bridge shape on the sander  Gluing on the fretboard 
|
|
#34
11-16-2023, 01:20 AM
|
|||
|
|||
|
After routing in the cavity for the end wedge using a template, and gluing in the end wedge of fiddleback mahogany bordered by two black/white/black purflings, the wedge is sanded flush with the sides.
 Using a router attached to an articulated arm that holds it vertical to the guitar sides, I am routing the purfling and binding channels for the back and top of the guitar.   Steve guiding me through the process of installing the zip flex abalone purfling between two Black/White/Black purflings  prepping the back edges for purfling and binding  installing the purfling on the back  installing the binding  The top and back are bound   Day four is complete!
|
|
#35
11-16-2023, 02:19 AM
|
|||
|
|||
|
Today I want to highlight a couple of tools and jigs Steve and Ryan have created that make it easier to get their work accomplished. I am always amazed at the practical ingenuity of luthiers. These items are not necessarily pretty, they just work well. Some of these have been built with scrap wood, or a few parts from the hardware store. The bottom line is they just work well and have helped them make hundreds of incredibly beautiful instruments.
Here they are in order of use during the student build. First up is a piece of perfectly flat float plate glass with sand paper on it. The glass is simply clamped into a Workmate table, and now you have the perfect tool to true up the edges of your back and top plates for joining. Simple and effective.  Next we have this simple wood jig that uses wedges to clamp the back or top plates together for gluing. Worked beautifully for gluing up the back of my guitar.  Steve and Ryan make their own reverse kerfing. The kerfing strips need a clean round over on them. This wood jig mounted to a router table with a round over bit, allows them to safely cut a clean round over by just pushing the strips through the box. Very effective, but most importantly safe!  Number four wins the ugly tool award  but it absolutely does the job well. It is a guitar body clamp made from two pipe clamps attached to a two by four. They are spaced perfectly to hold the guitar body without allowing it to fall through to the floor. There is some simple padding from the hardware store on each pipe to protect the guitar body and two scrap hardboard pieces with some cardboard to also protect the body when you clamp it in place. What makes it even better is the two by four board is mounted to the bench by a couple of hinges so it allows the guitar body clamp to swing out of the way when not in use. but it absolutely does the job well. It is a guitar body clamp made from two pipe clamps attached to a two by four. They are spaced perfectly to hold the guitar body without allowing it to fall through to the floor. There is some simple padding from the hardware store on each pipe to protect the guitar body and two scrap hardboard pieces with some cardboard to also protect the body when you clamp it in place. What makes it even better is the two by four board is mounted to the bench by a couple of hinges so it allows the guitar body clamp to swing out of the way when not in use. Finally we have the tool of the day for day 4 of the student build. The articulated arm Steve built from some scrap wood and some square aluminum tubing to hold his router vertical for routing the binding and purfling ledges. It does not take a lot of money to build, but it works perfectly for the intended job. When you are done using it, the tool folds neatly out of the way.  Bonus tool: I do not have one of these and I intend to buy one. It is the flush Trim Robo Sander. I used it on day 4 to sand the bridge to shape using a pattern guide. Much safer than a flush trim bit on a router!!!
|
|
#36
11-16-2023, 02:27 AM
|
|||
|
|||
|
Quote:
I love the combination of those two figured mahoganies throughout the guitar. I saw your first build, the Maple OO. What a beautiful guitar! I can't wait to see the next one you build! Quote:
Steve and Ryan know how to make this a fun experience! Quote:
I checked it out on the Elevate Lutherie site. It may be the best option out there.
|
|
#37
11-17-2023, 12:15 AM
|
|||
|
|||
|
This last section will cover day 5 and 6. On day 5 we installed the frets, carved the neck, Ryan cleaned up the guitar body (thanks Ryan), we fit the neck to the body, drilled the bolt holes and aligned the neck. We came back in on the 6th day for a few hours to finish the bridge, locate the bridge on the body, then finished up by cutting the nut slot.
When all this was done we had a guitar in the white and we posed for some pictures with my completed guitar. I started the day by trimming down the neck blank to a more workable dimension in preparation for installing the frets and carving the neck.    Installing the frets  Filing the fret ends  Using the safety planer to thickness the neck  Cleaning up the heel getting it closer to the desired size    Laying out the dimensions for the volute   Carving the volute 
|
|
#38
11-17-2023, 12:40 AM
|
|||
|
|||
|
Carving the neck with various tools. Working from course tools down to finer tools.
    Until we get to the desired shape. In this case, the Kinnaird standard C shape which I happened to love after having the privilege of playing this beautiful Kinnaird Maple OOO 12 fret all week.  
|
|
#39
11-17-2023, 12:58 AM
|
|||
|
|||
|
While I was working with Steve on the neck, Ryan prepared the body for us to drill the bolt holes to attach the neck. Thanks Ryan!!!! it looks beautiful! I can't wait to see this under finish!
   I love how the fiddleback mahogany logo is framed by the fiddleback mahogany rosette when you look in the sound hole  Bolt holes drilled and countersunk. After the guitar is finished and set up Steve will put two decorative removable plugs in to cover the bolts.  With the neck bolted on we lay out where the bridge will go.  Then Steve aligns the neck with this high tech tool  Here is the guitar at the end of day 5   
|
|
#40
11-17-2023, 01:30 AM
|
|||
|
|||
|
Sometimes you can just get the job done with something laying around the house (Or you "borrow" your wife's stuff)
The best part is these things don't cost anything.High tech tools in order of appearance: Number one - Steve has "borrowed" Billie's pink nail files, because they make the perfect sanding tool for the binding and purfling ledges. You'll spot them in a holder in the right side of the photo.  Number two: This item was most likely gleaned from one of Ryan's kid's snack packs. I can only hope they got to eat it and Ryan did not snag it for himself. (as a side note you can see Ryan's girls' artwork all over the shop. Some of it appears in the previous photo. It certainly brightens up the shop and will put a smile on your face) This little cup made the perfect template for drawing in the neck volute before carving.  Number three: This item was most likely heisted from someone's art or drafting supplies. It is a clear acrylic drafting triangle. Steve and Ryan have scribed in a perfect 90 degree line through the middle and made it easier to see with black ink. It is just the right tool to align the bridge square to the guitar's center line  Finally the most high tech tool of the week: No doubt Steve took this one out of Billie's sewing supply. I asked what tool he uses to align the neck. I was fully hoping he would pull out a beautiful machined aluminum neck center line alignment jig from Elevate Lutherie! But no, Steve pulls out a roll of sewing thread!!!!!! He uses this string to align three points, the center of the fretboard at the nut, the center of the fretboard at the sound hole, and the center of the bridge. Boy was I disappointed! Only thing was it worked perfectly and didn't cost him anything. At least until Billie finds out he has been pilfering her things
|
|
#41
11-17-2023, 02:21 AM
|
|||
|
|||
|
We only worked a few hours on day 6 before I had to leave for the airport. We finished the bridge, cut the nut slot, reamed out the tuner holes through the veneer on the back of the headstock, and made the truss rod cover.
Drilling the bridge pin holes  Shaping the bridge  Final sanding of the bridge  Here it is the finished guitar in the white! I can't believe we built this guitar in 5 days!   Here are the two professional luthiers that made it happen!  Some final thoughts as the guitar will now head out to Tony for finishing and Steve will finish the neck with a subtle fade at the headstock and heel. They will then set up the guitar and send it out to me in Southern California. This week has been the greatest experience for me. I came into the class having already built 15 guitars. I thought I knew a few things about guitar building but you don't know what you don't know until you get to work with two master luthiers like Steve and Ryan. They are both very humble and patient. They listened to my constant barrage of questions and freely gave me information from their many years of experience building over 200 guitars. I'm am very grateful for everything they shared with me and I know it will raise the quality of my future builds. Beyond the class, Steve, his wife Billie and Ryan are great hosts and ensure you enjoy your time there in Nacagdoches Texas. Billie would cook us incredible lunches every day and would accommodate my food allergy even making me gluten free cookies!!! We all had dinner together several times and their apartment was a wonderful place to stay for the week. They are just great people to hang out with. Steve let me play one of his custom guitars for the week which gave me an even greater appreciation for the guitars they make. There were several finished guitars in the shop along with several others in various stages of being built. The work they do is absolutely in the top tier of custom guitar making. Take a look at this koa guitar body that came back from finishing while I was there! Wow!!!!  I can't wait till I see my guitar finished like that! Thank you Steve, Billie and Ryan for just a fantastic guitar building course. I don't know of any other guitar course where you get individual instruction from two professional luthiers. I recommend this course to any one who is interested, from someone who has no building experience to someone who has a lot of experience. There is always so much more to learn and they will taylor this course to fit your experience level. Thank you Ryan for all of your help and instruction. I know you coordinated the class for me and I appreciate all of your work and the gracious way you accommodated some of my requests to personalize this instrument. Getting to know you and your family, Steve and Billie makes this guitar all the more special and one I will cherish forever. If anyone else is interested in this class I highly recommend it. You better get on the list fast. I heard from another student on the list that they are already filling up the class for 2025. I will update this thread when I get pictures of the finished guitar from Ryan. Hopefully we can talk Steve into playing the guitar in a demo video before he ships it to me. Thanks for following this thread. It was a lot of fun for me and killed at least one week of the long, agonizing wait for the guitar to get back from the finisher
|
|
#42
11-17-2023, 08:25 AM
|
||||
|
||||
|
Thanks Jim for the great thread. Loved it all and echo all the nice things you said about the crew especially Billie!
I am pretty sure I know who owns that Koa guitar and Mr. Nemoman is gonna be pretty happy with that I am sure!!! I look forward to seeing the final pics and hearing the video!
__________________
PS. I love guitars!
|
|
#43
11-17-2023, 10:31 AM
|
|||
|
|||
|
Quote:
And Tom--I will be pretty happy with my koa build--but that ain't it!  Mine is made from the sister set to that one and has a venetian cutaway! Enjoy the wait now, Jim!
__________________
2013 Stehr Auditorium (Carpathian/Myrtle) 2015 Stehr Auditorium (Adi/BRW) 2020 Baranik Meridian (Blue Spruce/Manchinga) 2020 Wilborn Arum (Tunnel 14/Coco) 2021 Kinnaird Graybeard (BC Cedar/Bog Oak) 2022 Kinnaird CS Student Build (Adi/Padauk) 2023 Kinnaird FS (Italian/Koa)
|
|
#44
11-17-2023, 01:01 PM
|
||||
|
||||
|
Quote:
Oh no, I hate to be wrong LOL, just ask Kathy. I did not look too close, but I thought the timing was perfect!
__________________
PS. I love guitars!
|
|
#45
11-17-2023, 05:04 PM
|
||||
|
||||
|
Thats a real accomplishment! Its going to be hard to wait for your new guitar to come back from finishing.
|


