
|
|
#1
 09-30-2016, 07:05 AM
|
|||
|
|||
|
First time builder seeking advice on routing the binding channel.
I'm not going to buy an expensive jig but I'd like ideas for the best way to keep the channel parallel to the sides the whole way around the guitar. I'll be using a little Bosch laminate trimmer/palm router. I really don't want to have to buy anything. Thanks, John 
|
|
#2
09-30-2016, 07:50 AM
|
|||
|
|||
|
Quote:
There are probably a dozen variations on aids to assist in keeping the routed ledge parallel to the sides. They all work. Pick the one that fits you budget, jig-making skills and willingness to invest the time. Do an internet search for "binding jigs" and look at the photos: you'll find pictures of most of the common solutions, from very simple to complex.
|
|
#4
09-30-2016, 09:58 AM
|
|||
|
|||
|
Your bindings will vary in thickness and height. Will it look "bad"? Depends on one's definition of "bad". There is a reason that people go to the trouble of making/buying various devices to make the binding channels uniform.
You can always start with the router and bearings, then adjust the channels sizes using a chisel and/or files. You'll need sharp chisels.
|
|
#5
09-30-2016, 11:04 AM
|
|||
|
|||
|
Thanks Charles. I'm not looking for it to be perfect but I'm looking to get the best result with what I have. Like I said, this is my first. I've already made so many mistakes that I might as well start another one but I'm of course finishing this one so I can make some more mistakes in case I actually do every make another.
If I ensure that the entire top and back of the guitar are perfectly level when I route the channels on each side, rather than just running the router across it while it lays on a flat surface, will I have any greater success? Sorry, I haven't done any woodworking in my life except for middle school shop and I'm relatively handicapped when it comes to angles and spacial relationships. FYI, I bought a tilt base for my router trying to get around this problem but the tilt base doesn't fit the STEWMAC router bit. The hole is too narrow. Grrrr!
|
|
#6
09-30-2016, 11:24 AM
|
|||
|
|||
|
You've got most of what you have to have. You need a binding cradle, which just holds the guitar in position while you're routing. They're easy to build, see here:
http://www.luthiersforum.com/forum/v...=10101&t=48341 You also need a "donut" base for your laminate trimmer, it limits the contact area of the base so the curvature of the top and back does not affect the depth of the channel. I made mine from an old plastic cutting board. There are also jigs to keep the router vertical, but that's not too hard to do freehand, which is what I prefer.
__________________
Rodger Knox, PE 1917 Martin 0-28 1956 Gibson J-50 et al
|
|
#7
09-30-2016, 11:33 AM
|
|||
|
|||
|
John,
Check out Kenneth Michael's site and look at the binding router attachment he sells.
|
|
#8
09-30-2016, 01:22 PM
|
|||
|
|||
|
Quote:
This simple-appearing tool is capable of very accurate and smooth results. It elimitates the need for a bearing-bit as well. You also do not need a cradle. I cannot imagine a less-expensive yet highly-effective option (no relation to seller).
|
|
#10
09-30-2016, 02:30 PM
|
|||
|
|||
|
Dumpster dive drawer slides and scrap wood. The same thing can ba accomplished with a rabbet.
 
|
|
#11
09-30-2016, 03:06 PM
|
|||
|
|||
|
I made this guide for my laminate trimmer. It works fine. Adjustment of the guide is with various thickness wedges. Loosening the wing nut and sliding the wedge up and down adjusts the guide in and out. In addition to the 10-24 bolt and wingnut, the movable part of the guide is located with a 5/32" pin (not visible in the photo) that slides in the fixed part on the left.
The radius on the guide surface is curved enough to fit in a tight waist. 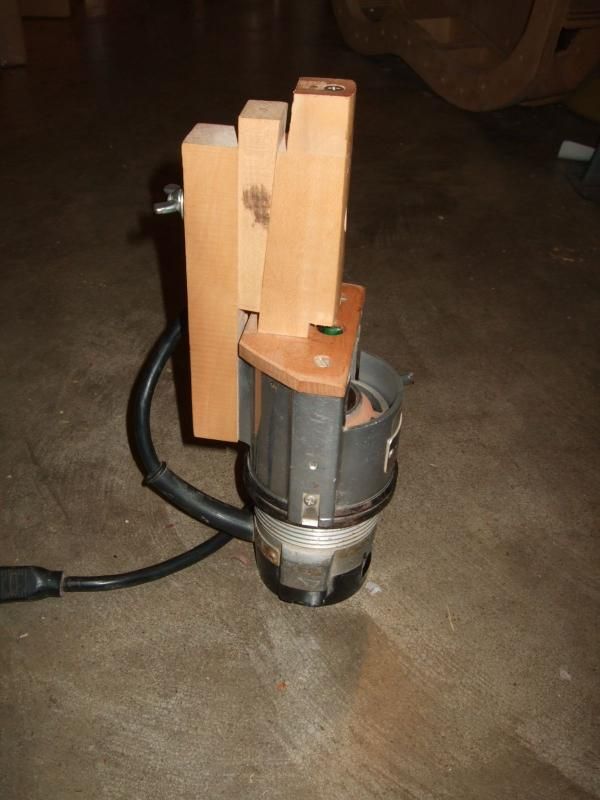 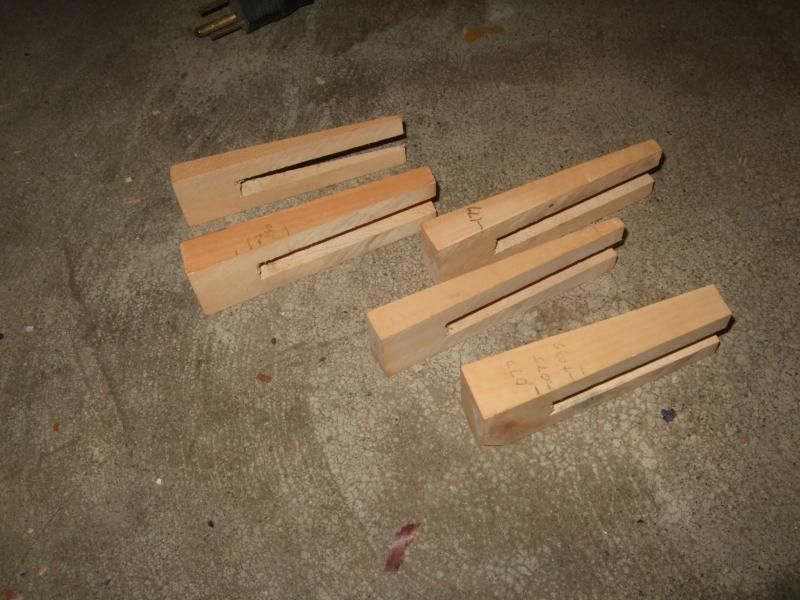
|
|
#12
09-30-2016, 03:53 PM
|
|||
|
|||
|
Quote:
|
|
#13
09-30-2016, 06:19 PM
|
|||
|
|||
|
Quote:

__________________
---- Ned Milburn NSDCC Master Artisan Dartmouth, Nova Scotia
|
|
#14
10-01-2016, 03:30 PM
|
|||
|
|||
|
And yet here's another DIY one for you to look at
 There is a knob in the back to lock off the rounded edge guide which can be moved up or down for depth of cut. The doughnut is simply a piece of door handle hardware, not sure what called. 
|
|
#15
10-01-2016, 03:59 PM
|
|||
|
|||
|
Quote:
|


