
|
|
#46
 02-09-2016, 12:55 PM
|
|||
|
|||
|
Ooh, this is going to be exciting to follow!
__________________
My Guitars 
|
|
#47
02-09-2016, 01:28 PM
|
|||
|
|||
|
Well, it's time to start the wood unveiling. I thought that I would show everyone a bit of a teaser for what awaits us.
Each of the backs and sides were cut from the same billet. Three backs came from the top of the board and one from the bottom of the board offset slightly, and the sides came from the outer edges. The result is four sets of BRW that are as close to consistent as I could hope to get. The backstrip is ebony with a black/maple purfling. I still do not know how to turn my camera on three times in a row and not have something go wrong, so please excuse the quality of the photos, color, etc. I won't be able to study photography until I retire, so until then, this is what you get! I am really excited to see how these guitars come together, and even more excited to see the finished product. First up is the OO The Specs Overall Length (12 fret): 39.00” Body Length: 19.25” Upper Bout Width: 10.25” Waist: 9.00” Lower Bout Width: 14.50” Depth at Neck: 3.50” Depth at Endgraft: 4.25” Scale Length: 24.75” 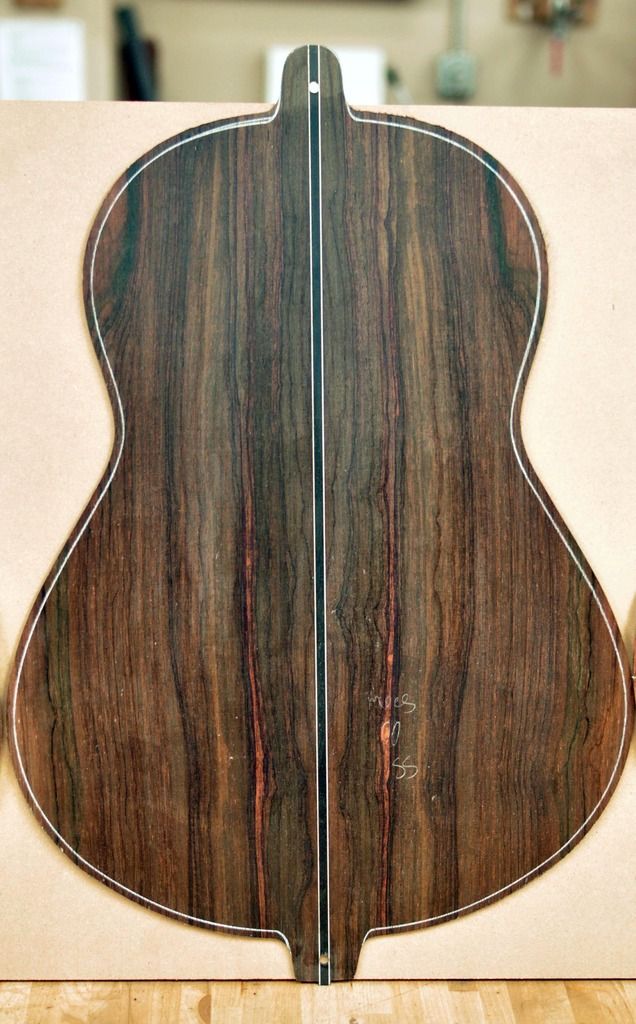 Next is the OM The Specs Overall Length (14 Fret): 40.75” Body Length: 19.50” Upper Bout Width: 11.375” Waist: 9.625” Lower Bout Width: 15.562” Depth at Neck: 3.50” Depth at Endgraft: 4.50” Scale Length: 25.00” 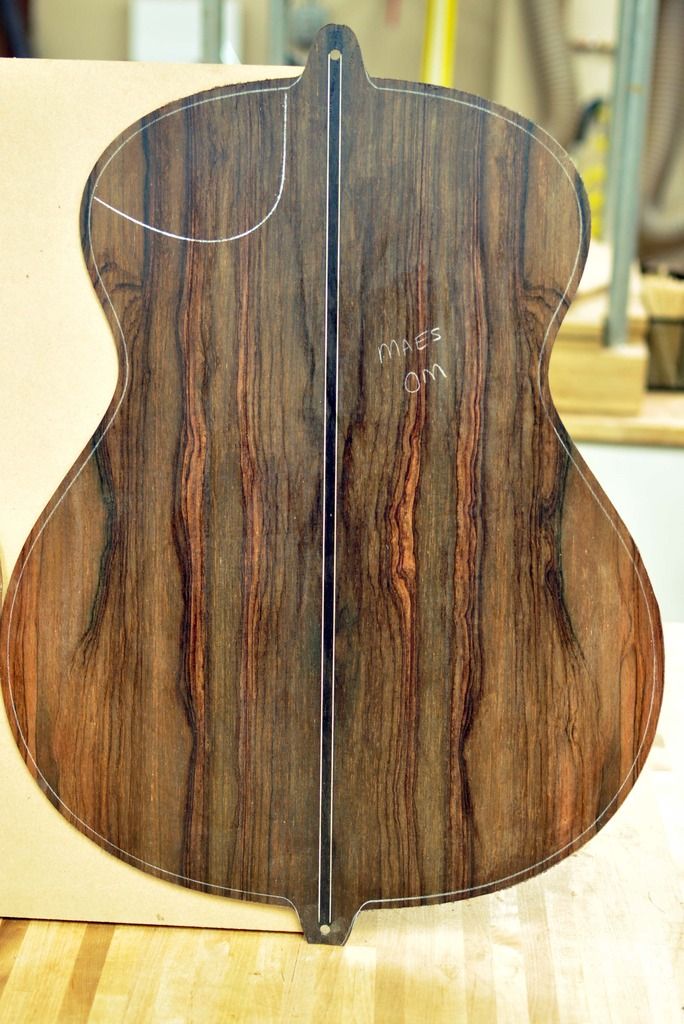 The MD The Specs Overall Length (14 Fret): 41.75” Body Length: 20.375” Upper Bout Width: 11.75” Waist: 10.50” Lower Bout Width: 15.75” Depth at Neck: 4.00” Depth at End: 5.00” Scale Length: 25.25” 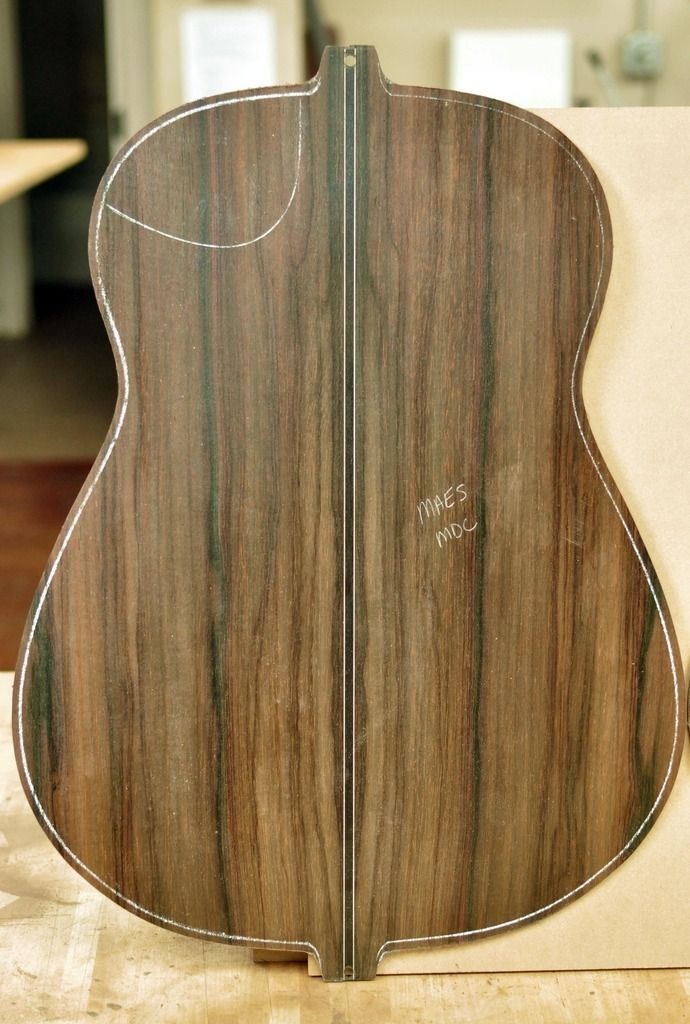 And the Jumbo The Specs Overall Length (14 Fret): 41.875” Body Length: 20.438” Upper Bout Width: 11.25” Waist: 9.00” Lower Bout Width: 16.375” Depth at Neck: 4.00” Depth at End: 5.00” Scale Length: 25.25” 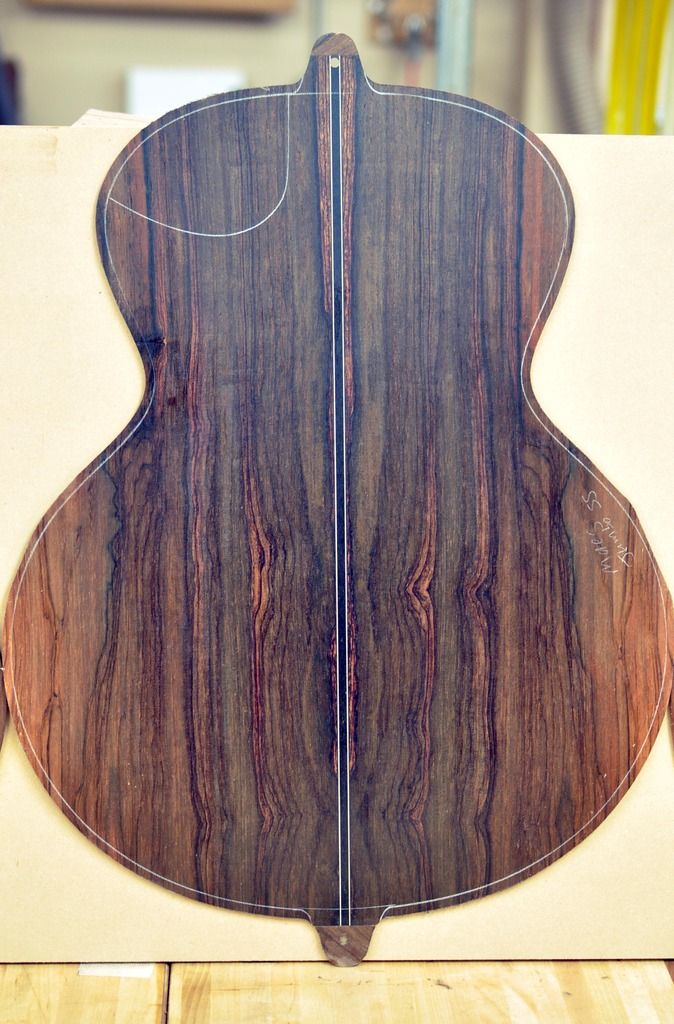 And here is a picture of all four side by side 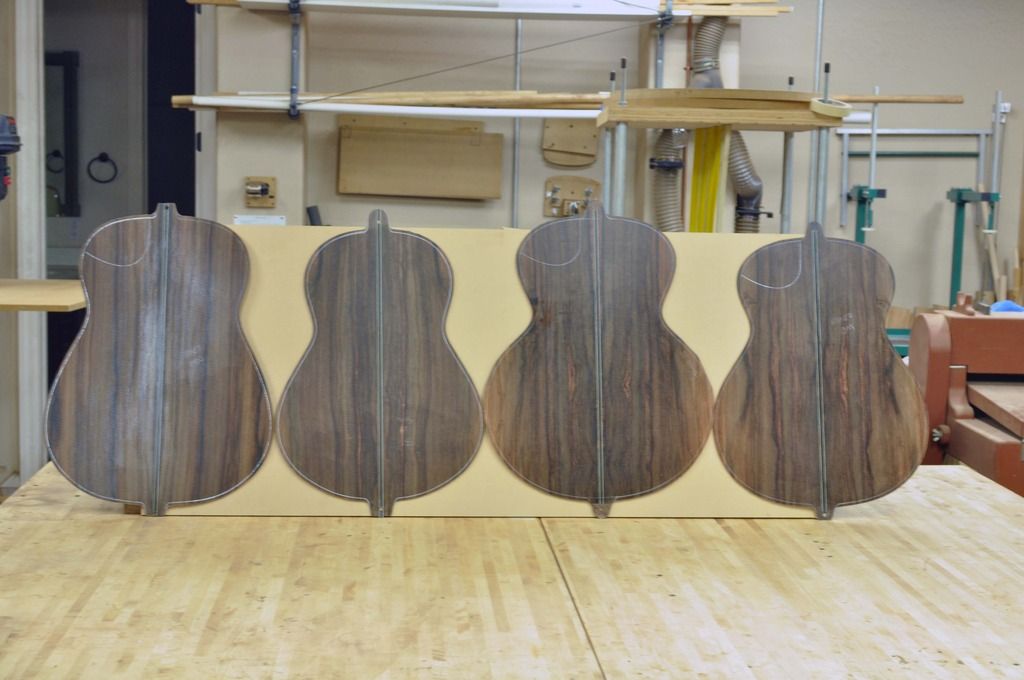
|
|
#48
02-09-2016, 02:06 PM
|
|||
|
|||
|
Wow! What a fantastic project - and an amazing opportunity, not only for Jason (and his lucky customer!) but for all of us to follow this thread and ultimately have the opportunity to hear these guitars compared.
And wow - what a set of backs! If I win the lottery, perhaps I can commission a few more MDs with different wood combinations so we can test those variables too!  I think Steve H may be on to something in terms of this complicating this for your potential customers, in that choosing one of your body shapes is agonising.... Simply because the right answer is one of each! (I'm also holding out for a 12 string, a harp guitar and a baritone  ) Steve was kind enough to let me compare his MD and OM and, as someone who usually prefers larger guitars, I was surprised that I was very nearly swayed by an OM. ) Steve was kind enough to let me compare his MD and OM and, as someone who usually prefers larger guitars, I was surprised that I was very nearly swayed by an OM. But then I could equally have been swayed by the Jumbo... I've not yet had the pleasure of one of those in the flesh, but boy it sounded sweet in the TNAG video. Ultimately I went with the MD because I'd had first hand several of Jason's amazing MDs (4, including comparing two side by side); because it's THE classic modern fingerstyle guitar; and because this will probably be my only opportunity to own a Somogyi-apprentice guitar, so the MD seemed like the right thing to do! One thing that may be worth trying when it comes to recording them is to try recording with a mic (or mics) attached to the guitar body (perhaps in addition to a conventional setup, with mics at various distances so you can hear how the sound comes together depending on how close the listener/mic is). There are various ways of doing this (e.g. the H-clamp, or the clip on DPA 4099s, or attaching a DPA 4060 to the top of the guitar - e.g. using magnets, etc). But it does help eliminate the differences that can creep in when using even relatively close mics (say 6" away) in the same position, as a tiny variations in the player's positioning, etc, can have quite dramatic impacts. It's easier to fix a mic in position (and in the same position, across several guitars) using a clamped mic. Full disclosure here: having spent some time in a former life as a recording engineer, I have both an H-clamp and two DPA 4060s (along with various other mics, including a CAD VX2, DAV and Audient pres, etc), plus an acoustically treated room... so would be very happy to offer my services ... should all four guitars fancy a trip to London for a recording session!  If you're looking for a really neutral mic, something like the Sennheiser MKH series aren't a bad starting point, if your studio has them. Sadly I don't. Anyway, looking forward to following this thread closely! Dan
__________________
danburne.com Bown OMX Lutz/Braz Eastman AR405E & T486 Kostal MDC German/claro and OM Euro/Madrose Larrivee L-05MT Lowden O35cx cedar/EIR, New Lady, Baritone, O12 and O12-12 McIlroy A25c custom Cedar/Kew black walnut Montgomery fan fret parlour Euro/ebony Sands Baritone Swiss/Ovangkol (another due 2022) Wingert Model E German/Braz Yairi 1960s Soloists
|
|
#49
02-09-2016, 02:17 PM
|
|||
|
|||
|
This is a fascinating project, Jason. Thank you for taking the time to document this so carefully. I will be looking forward to seeing your progress over time. This is cool!
- Glenn
__________________
My You Tube Channel
|
|
#50
02-10-2016, 09:12 AM
|
|||
|
|||
|
Jason,
I remember you talking about this project a while back. I'm so glad to see it finally starting! My only sadness is I was secretly trying to the be first with 4 Brazilian Kostals!
__________________
Eric Omega Braz MJ, 2011 Omega MJ Braz Baritone Ryan Cathedral ABW/Bosnian Build thread: 2011 Kostal Mod D Brazilian/German Build thread: 2019 Kostal MDW Brazilian/German Build thread:2019 Bigfoot Mod D
|
|
#51
02-10-2016, 05:50 PM
|
|||
|
|||
|
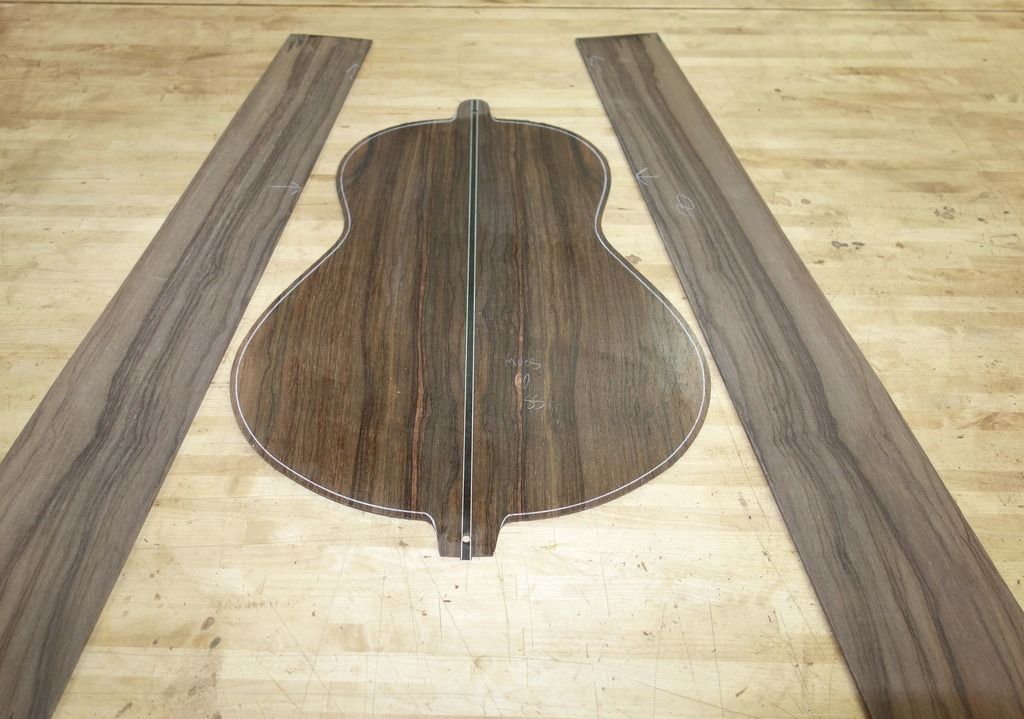
I am doing some neck carving today on Nobo's walnut MDC, but thought that I would take a break to share some more pictures. The first guitar in the queue is the OO. In this picture, there is sanding sealer applied to the back, but not to the sides.
 Rim construction takes a few days per rim, so there is always a bit of a bottleneck when rim construction starts. I have two side benders, and two laminating setups for each of my models, which allows me to do things a little more quickly than I used to, but it still takes time. I start out by bending the two outer sides in the morning, and letting them sit and cool for half the day. I then bend the inner sides and do the same thing. While I have seen people that bend both the outer and inner sides together at the same time on the same bender, I never felt fully comfortable doing that, so I just do them one at a time, with two benders going at the same time. 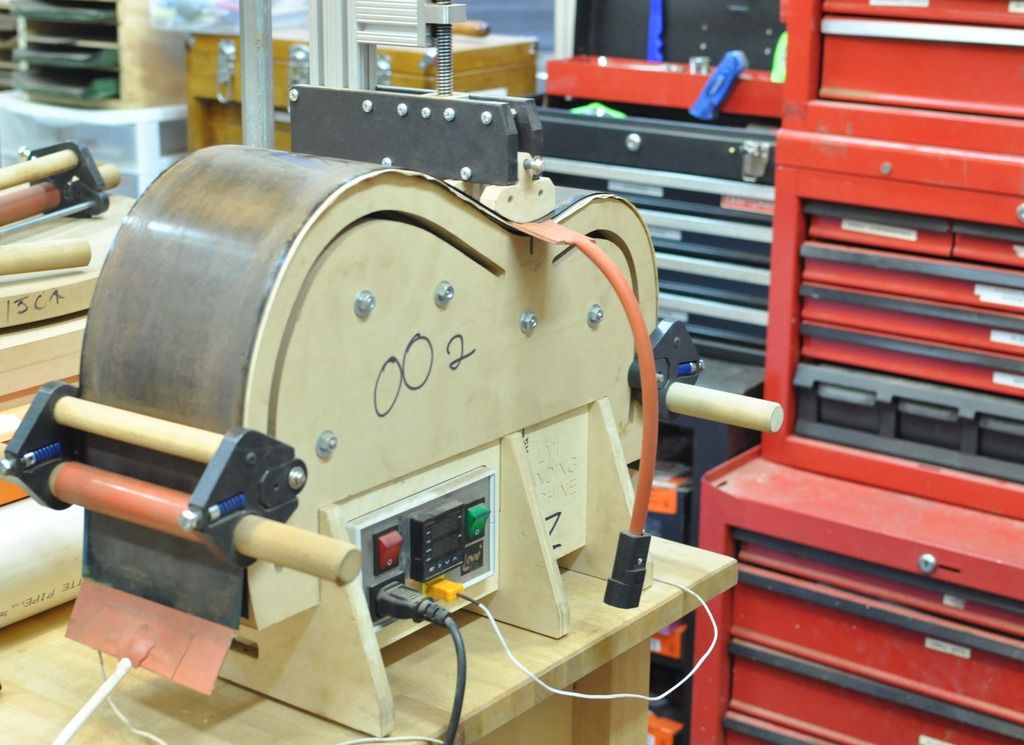 Once the bending is complete, I clamp them to a male template that is smaller than the actual outer shape of the guitar by the overall thickness of the two sides. Meaning that when I clamp the two sides to the caul, the outer surface of the outer side is exactly the dimension and shape that I want it to be when it goes into the mold. 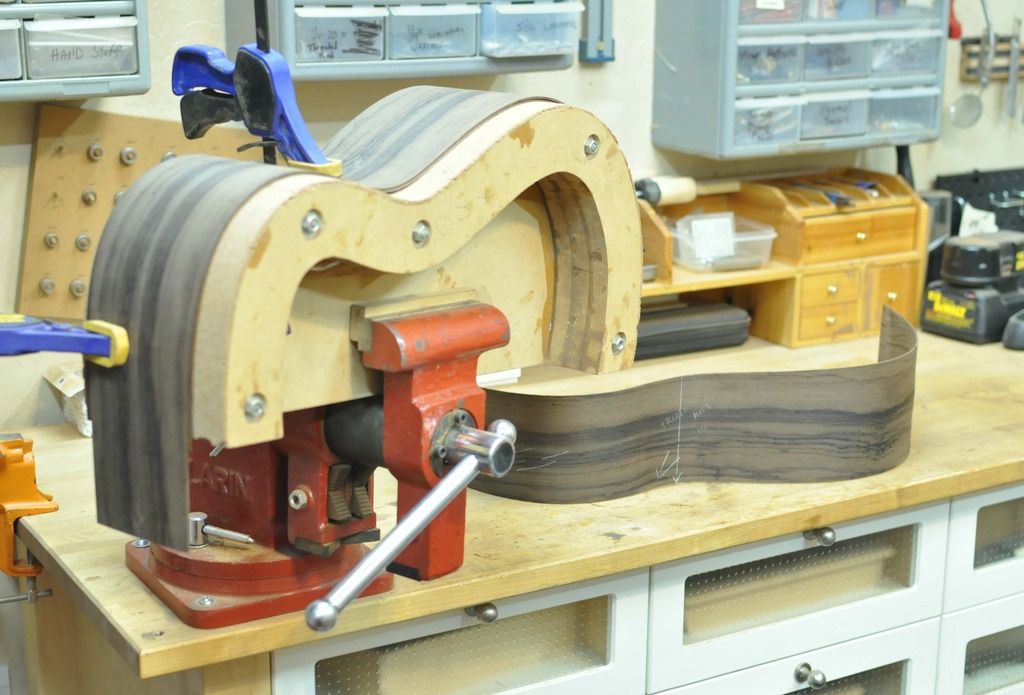 After letting it rest overnight, I laminate the two sides together in the morning. This system is again set up so that the female (outside) portion of the clamping system is the exact shape as my mold itself, and the cauls that clamp it into shape are reduced in size by the overall thickness of the sides together. I use a little bit of cork to take up any slight deviation in clamping pressure, and use epoxy to laminate the sides and let them fully cure for 24 hours. Plastic is placed between the cauls and the sides themselves because nothing makes you look more cool than gluing your laminated side to your laminating system.  Once I have cleaned them up, they form a pretty rigid shape by themselves even before they are blocked up and kerfed. 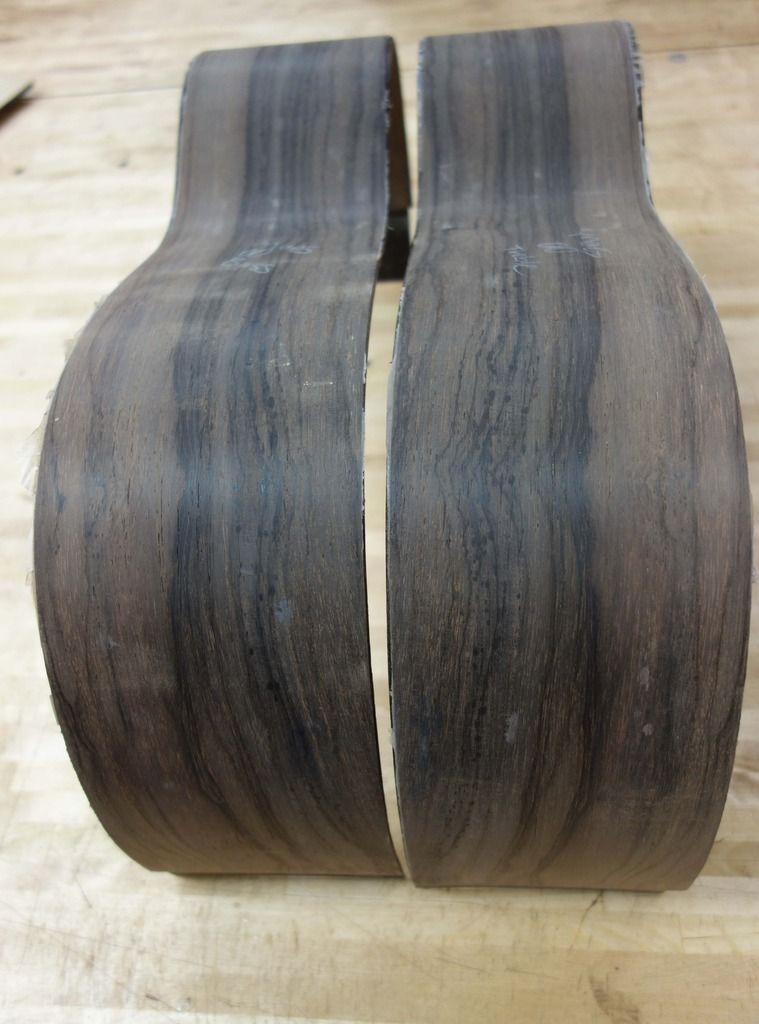 As I mentioned, it takes a lot longer than my past building methods when I just used a single side and could build a whole rim start to finish in an afternoon. I like the rigidity of the rim when constructed this way, I like the crack mitigation that using laminated sides brings to the equation, and I love that the shape created does not move or warp in the construction process. The negative side to this method is greater weight due to having thicker sides and one huge glue joint. Failure to laminate them well will result in a delaminating effect which can really ruin your day, so a lot of care goes into doing it right. After I bend the other sets of sides, the next step will be blocking up the rim!
|
|
#52
02-10-2016, 07:13 PM
|
||||
|
||||
|
Wow, this is an awesome project Jason. I'll be eagerly watching. FWIW, I bend both inner and outer lams at the same time in the same order that they will be laminated. I've never had an issue with fractures or failures even on fragile woods like "The Tree" or on tight Venetian shapes. I would encourage you to give it a try as it would save you some time and improve efficiency.
|
|
#53
02-10-2016, 07:20 PM
|
|||
|
|||
|
Jason, the idea of someone doing a scientific-type study of these guitars is excellent. Would the fellow who commissioned the guitars be in a better place to have them "tested"? It would certainly slow you down to do it, and that's a heavy impact.
I'm not sure of the criteria to test for, nor what value to you or your clients would get from this. It is an intriguing idea though. This is gonna be a fun thing to watch. Bob ps. Start thinking about writing a book on Lutherie. You must have pictures of all the steps in the process by now as well as pictures of different woods, etc. I'm just sayin'
|
|
#54
02-11-2016, 10:41 AM
|
|||
|
|||
|
Quote:
Thanks for the info! I knew that you were one of the ones that does this as described, and I hope to someday try it. Michael Greenfield also showed me the way that he laminates his sides directly on the side bender. Both would be a lot faster and more efficient! I guess I just fear change these days! I still have a big gallon of laminating glue that you recommended to me and I still don't use! I am sure I am destined for a really long counseling appointment sometime in the future to deal with all of my issues, but for now I like my unwavering dedication to doing it the way I always did it! Watching me swim is like watching someone push a brick through the water...no technique, and no skill, and no efficiency...just raw strength and the determination to not quit or die trying. I have to say that attitude has permeated into my guitar building techniques! Please keep telling me about your ideas, and I hope to one day possess the common sense to implement them!
|
|
#55
02-11-2016, 10:42 AM
|
|||
|
|||
|
Quote:
I put this down on my list of things to do when I find some free time in 2055! I know it will be amazing and have already reserved you few copies!
|
|
#56
02-11-2016, 10:51 AM
|
||||
|
||||
|
Fascinating project. I am slowly being won over to the idea of laminating the sides. But, like you, change comes slowly.
__________________
Kinnaird Guitars
|
|
#57
02-11-2016, 12:04 PM
|
|||
|
|||
|
Thank you Jason for taking the time to contribute with photos and commentary- I know such things are time consuming!
It is such informative threads which make the American luthiery community so good and valuable,- The discussion and sharing of information, tips, tricks etc in luthiery makes what we do so much better, constantly being inspired and raising the bar for ourselves and doing it among a great bunch of friends.
|
|
#58
02-11-2016, 02:36 PM
|
|||
|
|||
|
Quote:
I really am a big fan of laminating sides. Twice a year I have the students at the Roberto-Venn School of Luthiery come out to my shop for an afternoon visit. One of the things that I always do when I am talking about laminating sides (which at that point is a foreign concept to them) is that I pass around a kerfed OM rim that is built in the standard method (one side, kerfing and vertical braces) and a blocked up, laminated rim that I have not yet kerfed. The laminated rim is probably 25-30% more stiff without the kerfed linings being added yet. In my opinion, this creates an incredibly rigid rim, like a snare drum, that allows the top and back to vibrate more without as much loss of energy in the sides due to flexion. The added benefit of having a huge glue joint and one side glued to another is that you mitigate the need for vertical braces, and greatly reduce creep should a crack form. Theoretically, the grain lines of the two laminated pieces would not line up, and as long as the glue joint holds, the crack has nowhere to go. One other benefit in the construction process is that clean up and flat sanding the sides is really easy as they don't really dip or move as you are sanding them. It's a bit tricky to decide how to laminate. I have seen people that have great success using vacuum, others use clamping jigs like mine with a million clamps and some have done it far more simply. Like anything, once you find a method that works for you, I recommend sticking with it. The downside to laminating is time, materials, and weight. Laminating takes time, so building a rim suddenly became a little longer then before. Material wise, you can decide what to laminate with. In the beginning, I was laminating BRW sides with BRW inner sides. While this looked amazing and sounded really sexy, the cost associated with this method was ridiculous, and I started having backs with no sides, so I have recently stopped doing that. I currently laminate with Wenge, EIR, Honduran Rosewood or Ebony depending on what I am trying to achieve sonically and visually. If it is non-BRW sides that I am laminating, I will often use the same material as well, meaning a mahogany sided guitar may have mahogany inner laminates as well since the cost is not as great as when I was doing that with BRW. Adding a huge glue joint adds significant weight, as does the thickness of the two sets being laminated. I have seen people thin the two sets down so that, once glued together, they equal a pretty standard set with an overall thickness of about .08-.085". The nice thing about two sides about .040-.050" thick is that bending them is a breeze and laminating them makes them strong. I have seen some people do a variation of wood sides and wood veneers (think a .060" outer side with one .020" inner veneer or two .010" veneers), and I have seen people go over in thickness. Its all up to you, and every option has pros and cons to stability, sound, and construction. If you decide to go this route, take your time and think about what you are trying to achieve and accomplish and then have fun with it. I use TAP plastics epoxy resin. I know Tim McKnight and some others use a laminating glue made for woodworking, and some others use things like tight bond, and other more standard glues. Again, it's up to you which route you take as they all work pretty well once you understand them. Good luck and let me know if I can help when the time comes.
|
|
#59
02-11-2016, 02:37 PM
|
|||
|
|||
|
Quote:
That means a lot to me. It is a bit of a pain, but I have learned a lot through these forum threads over the years, and hope that, in talking about what I do and how I do it, I may be able to help someone out there that is getting started, or one of you guys will show me a better way to do it that I can adopt. Its a win in my book no matter how you look at it.
|
|
#60
02-11-2016, 02:45 PM
|
|||
|
|||
|
Great posts Jason, very inspiring!
According to you, the weight of a rim with laminated sides the way you do it is almost doubled compared to a standard rim with single sides? Thanks q.
|


