
|
|
#166
 05-28-2015, 04:38 PM
|
|||
|
|||
|
Quote:
 Quote:
__________________
-- Nick 
|
|
#167
05-29-2015, 06:42 AM
|
|||
|
|||
|
Quote:
Shorter/thicker/tighter for the treble side to aid in the amplification of higher fundamentals and harmonics. Longer, thinner, lighter for the bass side to free the lower fundamentals. Also, an asymmetrical soundboard can help avoid wolf tones by preventing any single tone to circulate and sympathetically vibrate freely without inhibition. It really has nothing to do with fan fretting at all. The soundboard doesn't particularly care if the string is long or short. The soundboard's main purpose is to amplify the vibrations being applied to the bridge through the saddle.
__________________
---- Ned Milburn NSDCC Master Artisan Dartmouth, Nova Scotia
|
|
#168
05-29-2015, 11:01 AM
|
|||
|
|||
|
Quote:
Quote:
Quote:
__________________
-- Nick
|
|
#169
05-29-2015, 02:28 PM
|
|||
|
|||
|
Quote:
__________________
---- Ned Milburn NSDCC Master Artisan Dartmouth, Nova Scotia
|
|
#170
05-29-2015, 03:59 PM
|
|||
|
|||
|
Quote:
It seems to me that in such a highly complex system with so many variables, being devoted to such a minor nuance of construction in a dogmatic way is a questionable endeavor at best. The question is simple. What does asymmetrical bracing offer and why? I have a hard time believing anyone can offer an answer to that question based on anything other than their own opinion. And those opinions will have equally ardent proponents on the other side by equally skilled practitioners. Not that those opinions are worth nothing, just that I have a hard time accepting them if there is no logic behind the answer without asking questions. However... Assuming I continue with this endeavor past the point of building just 1 guitar, I will at some point most likely build a guitar with Martin "tone bars", just on principle. So much of the heritage and history of the skill I have romanticized and desire to develop is based on that. And it probably behooves me to at least be familiar with it. And I'd like to hear the difference for myself, if there is a difference.
__________________
-- Nick
|
|
#171
05-29-2015, 11:07 PM
|
|||
|
|||
|
Quote:
Multiple braces can be planed at once by clamping them side-by-side in the fixture. The length of the fixture must be as long as the longest brace to be arched: the fixture does not allow braces to extend beyond the ends of the fixture, contrary to the photo below.  The top surfaces of the two pieces of plywood are shaped to exactly the desired curvature of the braces. Each piece of plywood is marked with the longitudinal center of the arch and the center of each brace is marked on the braces and aligned to the mark on the fixture.  The entire fixture can be secured in a vice while a block plane is run back an forth over the surface of the braces that project above the arch of the fixture.  The plane runs in a "track" cut into the top surface of the two pieces of plywood.  The width of the track exactly matches the distance from the edge of the plane's blade to the side of the plane. The track is contoured to the same curvature as the top surface of the plywood. A second "track" accommodates the width of an additional brace. A little wax on the contacting surfaces of plane and plywood allows for a very smooth action. One continues to run the plane back and forth over the projecting surfaces of the braces until the plane no longer removes wood, at which point the brace shaping is finished and ready for gluing.  As necessary, the direction of planing can be reversed, generally, working from the center towards the brace ends for bulk wood removal. An improvement to the fixture is to add spacers to the bottom of the fixture the same width as the stack of braces being planed. This would prevent the fixture walls (plywood) from angling when the screws are tightened.
|
|
#172
05-30-2015, 10:27 AM
|
|||
|
|||
|
Quote:

__________________
-- Nick
|
|
#173
05-30-2015, 12:14 PM
|
|||
|
|||
|
Quote:
You could also shorten the plywood sides. I made the fixture so long ago that if there was a specific reason for having the sides that tall, I don't remember what it was. In recent years, there are a few planes available with "depth skids". This could be used with any convex surface to allow the plane to follow that surface, imparting that contour onto the planed surface. Instead of creating a fixture with "tracks", one could use a plane with depth skids. Doing so would simplify fixture making, but increase tooling costs, particularly if it was one of these: 
Last edited by charles Tauber; 05-30-2015 at 12:26 PM.
|
|
#174
05-30-2015, 02:12 PM
|
|||
|
|||
|
Quote:
 Check my harp guitar bracing, for example: Check my harp guitar bracing, for example: Yes it is still asymmetrical (also the bridge is fatter on the bass side), but certainly not as much as it would be without the pinching of the treble side/widening of the bass, and careful balancing of brace placement and carving. And when I say treble/bass side, they're just labels like left and right, and nothing to do with tonal effects of proximity to certain strings. IMO, the logic on asymmetrical bracing is to reduce phase cancelling of the cross dipole mode (both for external soundwaves, and air pressure inside the box). But in order to do that, one side has to be heavier or stiffer than is actually necessary, both of which I usually don't want to do, so I wind up back on symmetrical. But I do need to play more with asymmetry and see if the gain in non-cancelled sound outweighs the penalties, or at least makes the tone more interesting. Violins are the most extreme case of asymmetrical bracing. Pressure from the bow prevents up-and-down vibration of the strings, and causes side-to-side vibration, so it's almost purely a cross dipole instrument. By putting a post under one foot of the bridge, it translates the side-to-side rocking motion into monopole type pumping up and down of just the bass foot of the bridge. And by that logic, on guitars it may be worth an experiment to choose one side and make it stiffer AND heavier than the other, unlike the usual style of light/stiff treble side, heavy/loose bass side. Reason being, putting both motion limiters on the same side will get more air pumping, like the effect of the violin soundpost. But since symmetrical bracing works too, I have to wonder if the cross dipole is really worth fighting for, or if the cost to monopole mobility is too high.
|
|
#175
05-30-2015, 05:27 PM
|
|||
|
|||
|
Quote:
Quote:
Quote:
But, from what I understand so far, the biggest goal with a steel string acoustic guitar is mostly related to mono-pole action, isn't it? The metalic strings don't need much help generating sufficient mid and high frequency sound. Being made of metal, they excel at that. The greater challenge is giving an instrument sufficient base response. So, things that allow the top to pump in and out as a single unit will generally make for a better sounding guitar. And based on my understanding so far, that can be mostly achieved by minimizing the total weight of the top and the bracing, and making the sound board looser around the edges by perhaps sanding the perimeter or making the bracing thinner towards the edges. All of course while providing sufficient structure to make the instrument stable for decades. No pressure or anything. lol Complex subject. But fascinating.
__________________
-- Nick
|
|
#176
05-30-2015, 05:39 PM
|
|||
|
|||
|
Quote:
There is a stainless steel version that is more.
|
|
#177
05-31-2015, 01:04 AM
|
|||
|
|||
|
Quote:
Here's a shot of the bracing that shows how tall they are. Also note that all the secondary braces are notched into the X at about .100" tall, which I do when building thin plate style to prevent the plate from being left to fend for itself at the brace meeting points.  Another variable that people don't talk about much is the string-height-at-bridge. 1/2" seems to be the general consensus for 6 string guitars, but if you go to extremes, that shouldn't be taken as gospel. This harp guitar uses 3/8", to reduce torque and allow lower soundboard stiffness for better low frequency response. Quote:
15" lower bout, 2mm (.080") plate thickness (rather dense, very stiff sitka with zero runout), and braced like this: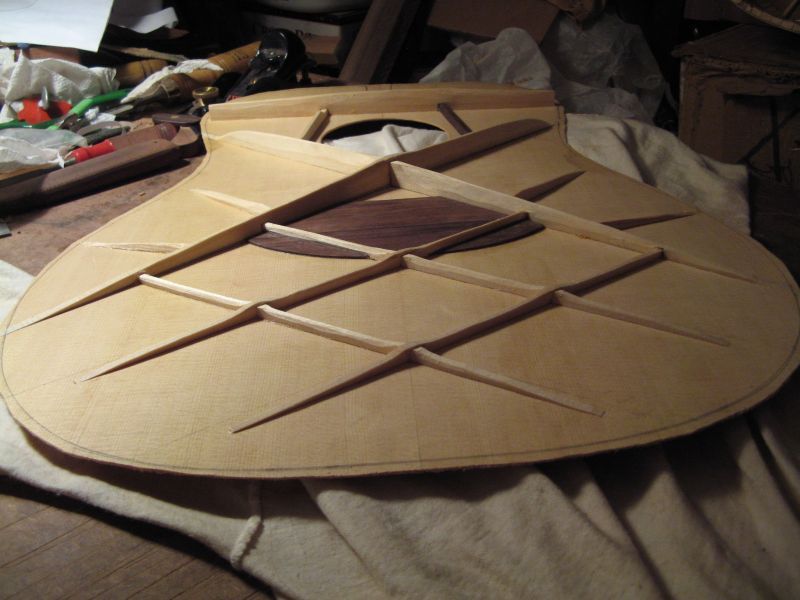 It actually did survive just fine, in the sense that the central area was plenty stiff not to cave into the soundhole, and the large bridge plate prevented deformation and bridge peeling there. But carving the braces so low at the perimeter with such a thin plate allowed the whole central area to pull upward, creating a fairly intense "radius" in the last inch or two before the perimeter. Hollow, nasal sounding trebles. Sort of archtop-like. But the bass was excellent. I think Ervin actually did mention in the book that the perimeter has a lot to do with treble response, and I agree In fact, the main difference between thin plate style and thick plate style seems to be whether the central stiffness comes more from the plate or bracing. With thin plate, it's often equal thickness all over. With thick plate, it's thinned at the perimeter... to about the same thickness as it would be all over in thin plate style. My .080" was too far, though I suspect it could have worked if I left all the braces taller as they approach the edge, and notched them into the linings at maybe 1mm tall to gain back a little perimeter stiffness. I have another in progress to test that theory... 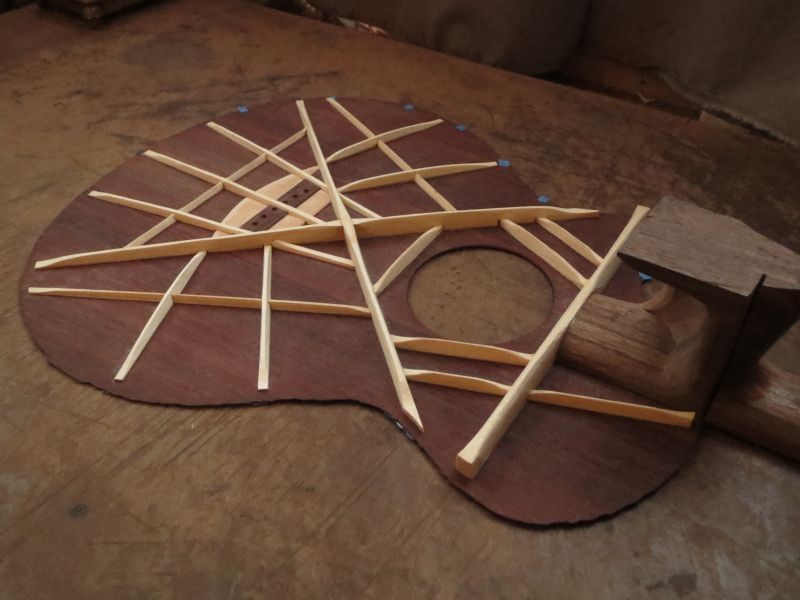
Last edited by dekutree64; 05-31-2015 at 01:13 AM.
|
|
#178
05-31-2015, 12:05 PM
|
|||
|
|||
|
Quote:
Quote:
Good stuff man. Do you have a build thread somewhere I can follow?
__________________
-- Nick Last edited by Viking; 05-31-2015 at 12:13 PM.
|
|
#179
05-31-2015, 12:37 PM
|
|||
|
|||
|
Quote:
 Flexing by hand to feel the stiffness, but not checking often enough. Flexing by hand to feel the stiffness, but not checking often enough.Quote:
Here's the build thread for it http://www.luthiersforum.com/forum/v...=10130&t=37136 which is very old since I only did the rosette at first, and then decided to build some other stuff to gain more experience before bracing it. And I haven't gotten around to updating the thread again since resuming work on it last winter... but that bracing photo I posted is the current state. I can't do any more on it for a while due to high humidity. I have build threads for the harp guitar and some others on that same forum. Just scroll through the list for threads started by DennisK, most of them are near the top.
|
|
#180
05-31-2015, 02:40 PM
|
|||
|
|||
|
Done with the top.
Gluing the fan braces.  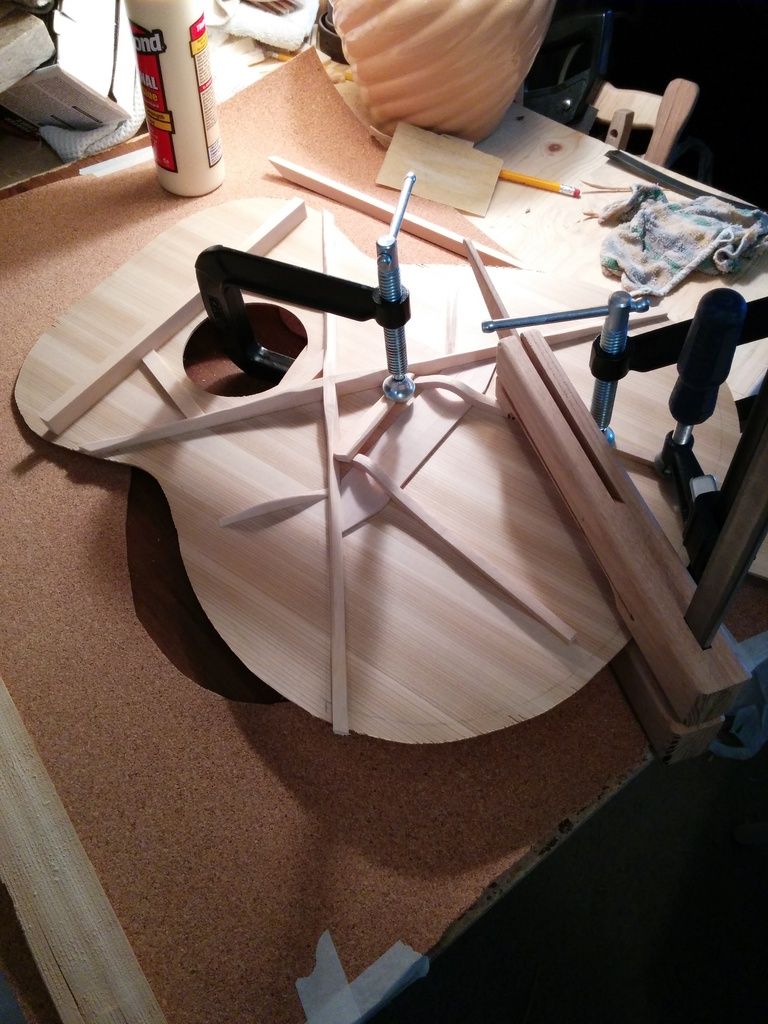 Gluing the x brace joint patch. 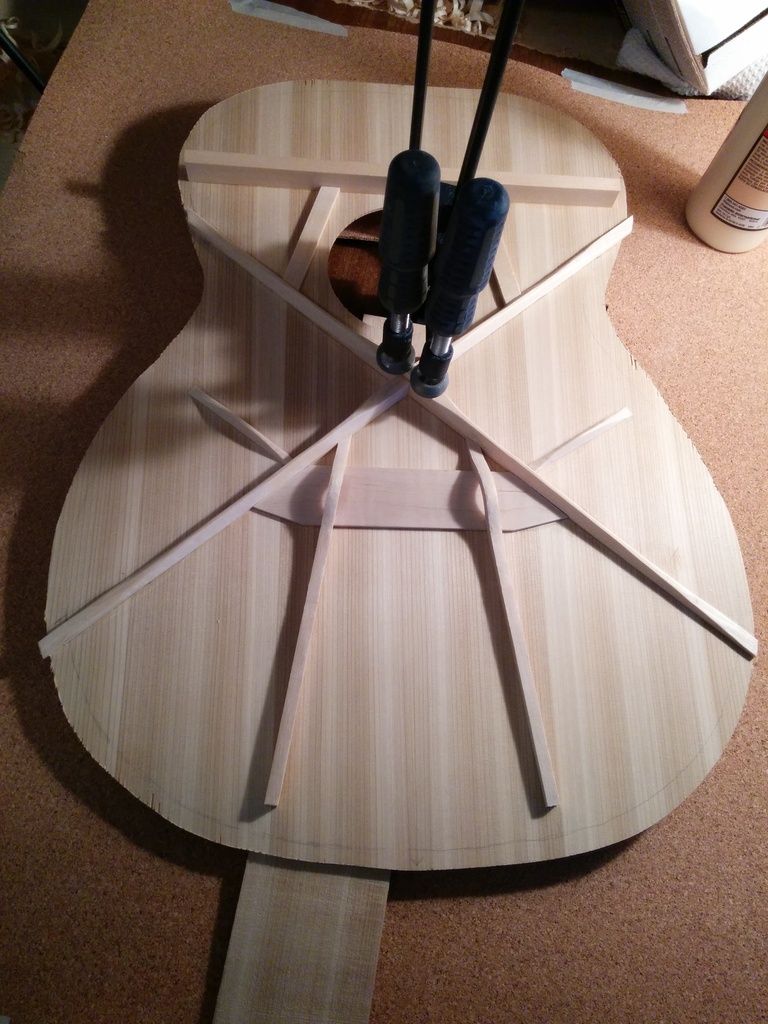 Completed top. 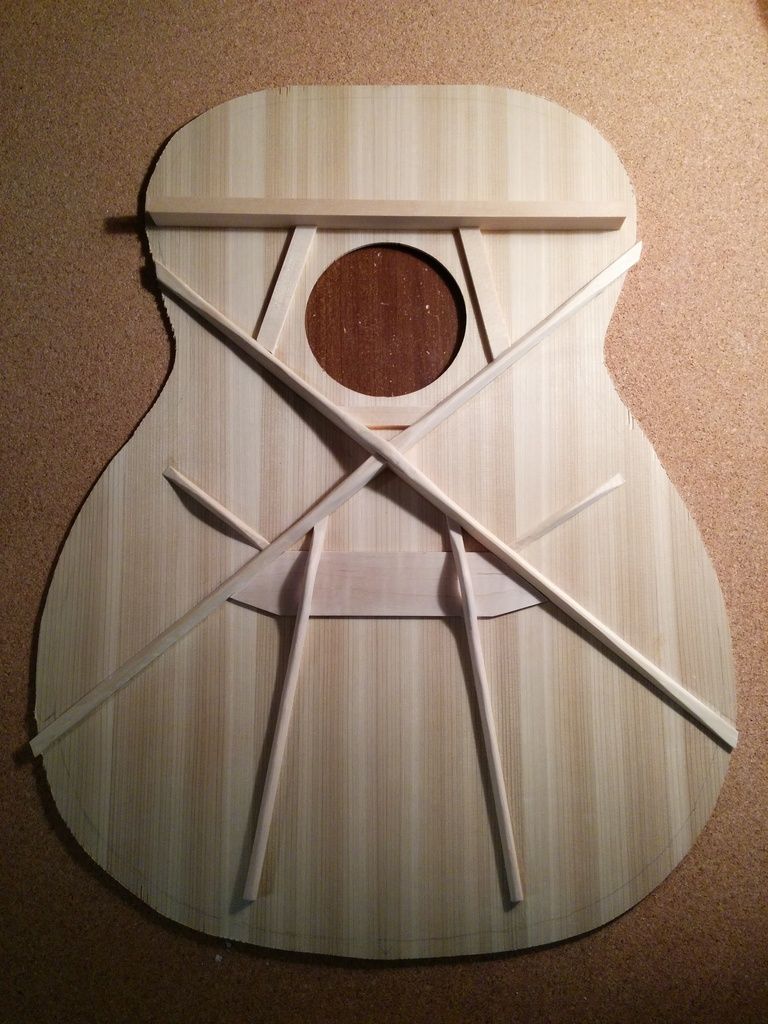 Closeup. 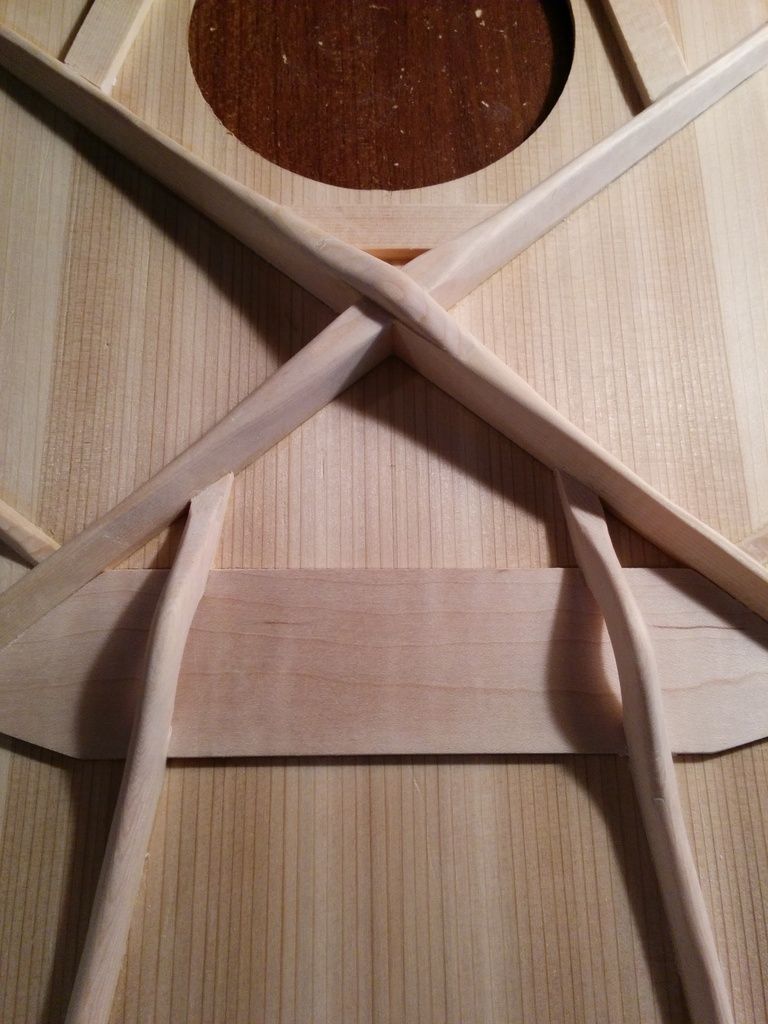 Next up. I'll have to invest a little time on infrastructure. I'm going to build the radiusing jig Charles suggested to radius the back braces. I had to look up the math to calculate the displacement of the arc given a fixed segment of a specific radius. It's been a while since I took geometry. Here's the equation for anyone following along. Radius = (height / 2) + (width^2/(8 * height)) If we plug in the radius of 15 feet and use a width of 26 inches (which is more than enough to cover any size brace I might want to radius), do the algebra and we get a displacement (height) of .47 inches. I'll use some card stock to draw the radius on, set 2 nails 26 inches apart, and a 2 inch wide (or so) piece that I will displace by .47 inches in the exact center. I'll then probably drive a third nail to hold that piece of card stock in place. Next I trace the arch that piece of card stock makes on the card stock beneath it. I'll cut that out and use it as a template to draw the radius on 2 pieces of wood. I'll cut that out on the band saw and probably use files to hit the line precisely. I can't wait for my second build. It'll go by so much faster.
__________________
-- Nick
|


