
|
|
#32
 03-28-2013, 05:34 PM
|
||||
|
||||
|
Thanks everyone! I'm quite happy with how this one is turning out and excited as well to see what comes next!
I had to make a quick trip down to NY this week so not too much new to report. Started bracing the back....  The cross braces are arched, tapered, and ready to glue tomorrow, so hopefully I'll have the back on by tomorrow night! Mike 
|
|
#33
04-01-2013, 08:33 AM
|
||||
|
||||
|
I made some good progress this weekend; here's the back clamped up...
 And glued on!  So, time to start on the top! I spent a good bit of time yesterday drawing out various bracing patterns and decided that this one will have a lattice. Typically my bracing is some variation of an X with three horizontal bars below (usually all three below the bridge plate) but I've had really great results using a lattice whenever I do an elevated neck. One of my main goals in designing a bracing pattern is to evenly distribute the support throughout the top while having braces hit certain key points. I took a couple of pictures of the pattern I came up with, but the pencil lines are a bit too faint to see. I'll take some more pictures today, but for now, here's the sound-hole pad and bridgeplate getting glued...  Thanks for looking! Mike
|
|
#34
04-02-2013, 08:53 AM
|
||||
|
||||
|
Getting farther along in the bracing...
 Doing a lattice like this definitely has its tricky parts, especially the braces that intersect on the bridge plate. Both of those braces are notched out at the proper angle and height to fit perfectly over the bridge plate and the brace on top also has to be notched to fit over the braces underneath as well. To complicate things further, the braces that intersect closest to the tail block are splayed out slightly to get a more even distribution of support. That means a lot of the notches are not only different heights but different angles as well! Today I'll glue on the x-brace and fingerboard pad and start carving the braces and tuning the top. Ideally, the top will go on tomorrow! Mike
|
|
#35
04-05-2013, 06:10 PM
|
||||
|
||||
|
Here are a few more progress pics of the top bracing...
Starts like this...  Ends up like this...  And is now glued onto the body!  Today I got the sides cleaned up and started getting prepared for binding. I'm still not 100% on the design, but here is the basic idea of what the end graft will look like...  My uncertainty is whether or not I want to incorporate any spalted maple. I feel like it would help tie the back design and rosette together nicely by combining elements from both, but I'm not quite sure how I want to do it yet. Hopefully figure it out tomorrow! Mike
|
|
#36
04-06-2013, 08:26 PM
|
||||
|
||||
|
Made some good progress on the binding and end-graft today. Started by gluing up then thicknessing the binding strips...
 Once the strips were ready and I had made my initial binding cut, I started in on the end-graft. I want the center section to be a solid piece with no visible joint, so I cut a slot and fit in a piece of maple...  Next I chiseled out the first "V" part of my design. One of the biggest challenges in this process is figuring out the best order to do everything! Hopefully I'm on the right track...  Then fit in the rosewood and maple strips... 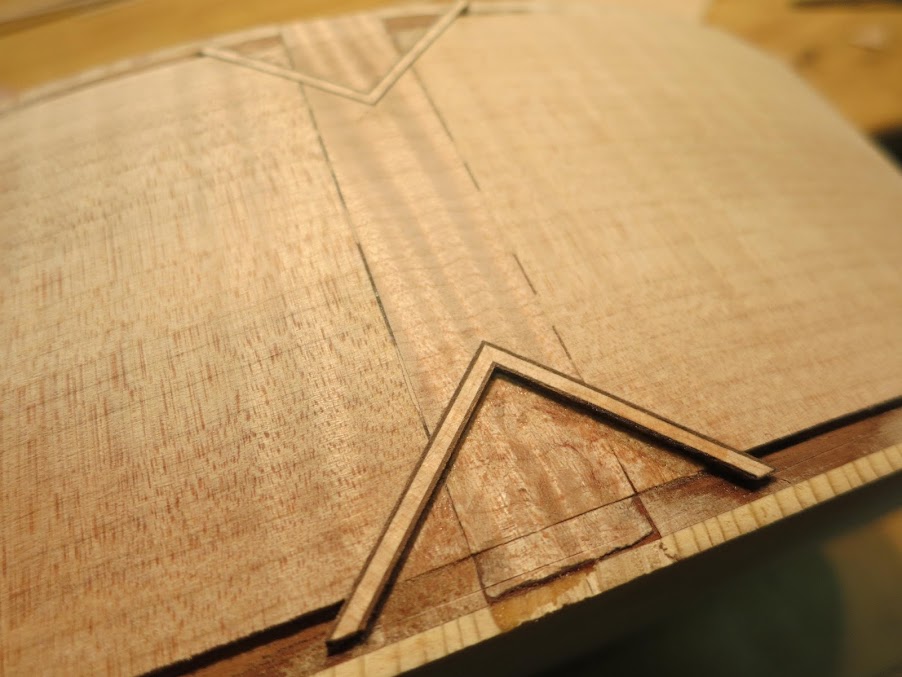 And that's where I decided to leave it at the end of a long day! A whole lot more chiseling and mitering tomorrow... Mike
|
|
#37
04-07-2013, 04:11 PM
|
||||
|
||||
|
Short day in the shop today but I got a little bit farther along. I decided to use some spalted maple in the boxed in sections (and might use it in one other spot)...
 Next I put in some more rosewood and maple strips. Since these strips are less than 1/8" I don't have a good router bit for the job and had to cut the channels by hand (knives and chisels)...  The last thing I did was to start to fit the outer strips of the boxed in section. This is where things are going to start to get tricky...  That's it for now! Mike
|
|
#38
04-07-2013, 04:45 PM
|
|||
|
|||
|
nice work Mike. Cool ideas, clean cuts/miters. looking forward to seeing it in person.
Kevin.
|
|
#39
04-07-2013, 06:43 PM
|
|||
|
|||
|
Beautiful work. I also like the design.
|
|
#40
04-08-2013, 07:31 PM
|
||||
|
||||
|
Thanks Kevin and Tony! This end-graft has proved to be a fun challenge. And, I think I'm finally done. Maybe.
For anyone who's ever wondered how you know what angle to cut miters at, see the reflection?  And now with the boxed in sections fully boxed in...  Fitting in some more pieces of maple...  And after trimming the maple and fitting in one last bordering section...done!  I might still put a small narrow section of spalted maple in the middle. I'll probably do a sample piece tomorrow and tape it on before deciding. Overall though, I'm pretty happy with how it turned out! Now I just need to bind the thing... Mike
|
|
#42
04-08-2013, 08:31 PM
|
|||
|
|||
|
You were at picture 2 when I left....
...Holy cow, it looks amazing! What execution!
|
|
#44
04-09-2013, 04:58 AM
|
||||
|
||||
|
That is just awesome work!!
__________________
--------------------------------------- 2013 Joel Stehr Dreadnought - Carpathian/Malaysian BW 2014 RainSong H-OM1000N2 2017 Rainsong BI-WS1000N2 2013 Chris Ensor Concert - Port Orford Cedar/Wenge 1980ish Takamine EF363 complete with irreplaceable memories A bunch of electrics (too many!!)
|


