
|
|
#1
 01-07-2005, 03:45 PM
|
||||
|
||||
|
I thought I would start a thread to show the process of building my first guitar. I'll post pictures with comments and ask and answer questions. This should be fun and educational for all of us. I am going to build a modified OM with cedar on rosewood, koa binding with a 1 11/16 bolt on neck, 25.4" scale length.
I did not order a kit. I specified all the parts and ordered it from LMI. This is my first order of parts/tools - Professional bending iron Redwood top Rosewood back and side Neck - D heel Indian Rosewood neck Standard headplate, Indian Rosewood BONE NUT, 6X9X55MM TRUSS ROD, DOUBLE ACTION binding, Koa, plain KERFING, MAHOGANY STANDARD BEVEL BRACEWOOD, SITKA SPRUCE BRACEWOOD, MAHOGANY - 1/2-5/8" GOTOH, GOLD 3L/3R FRETWIRE, HARD STANDARD END BLOCK, MAHOGANY Bridge, Indian Rw, Martin-style, string spacing 2 1/8, saddle slot 3/32 BONE SADDLE, 2.4MM X 8MM X 80MM BACK JOINT REINFORCMENT,SPRUCE/BEVEL Ind. Rw w/MOP dot, A=.80; B=.21; C=.18 Rosewood, A=.74; B=.30; C=.25 end pin PLASTIC WHITE SIDE DOT, 2mm" Here are the pictures- Bending ironhttp://groups.msn.com/SLSavilleFamil...to&PhotoID=119 The whole thing. http://groups.msn.com/SLSavilleFamil...to&PhotoID=130 Neck parts. http://groups.msn.com/SLSavilleFamil...to&PhotoID=129 Back http://groups.msn.com/SLSavilleFamil...to&PhotoID=126 Top http://groups.msn.com/SLSavilleFamil...to&PhotoID=135 Sides and binding http://groups.msn.com/SLSavilleFamil...to&PhotoID=134 Add to this list the 14" band saw, laminate trimer, circle cutters, dremel router base, chisels, block planes, cam clamps, curved dishes, go block system etc etc.
__________________
Reason is itself a matter of faith. It is an act of faith to assert that our thoughts have any relation to reality at all. ― G.K. Chesterton Last edited by SteveS; 05-12-2005 at 02:57 PM. 
|
|
#2
01-07-2005, 08:06 PM
|
|||
|
|||
|
Wow, looks like this will be a great project. I hope to try building an acoustic soon. In a week or so I will start building a Les Paul style guitar for a friend of mine. He's supplying all the materials so once they are all here I can get started. It will be a fun project to but I would much rather build an acoustic. I'm looking forward to seeing your progress pics.
Good luck & have fun Dale
|
|
#3
01-07-2005, 09:43 PM
|
||||
|
||||
|
good luck and have fun!
Don't get hooked on this stuff  here are a few of my latest project....in random order. hanging to dry 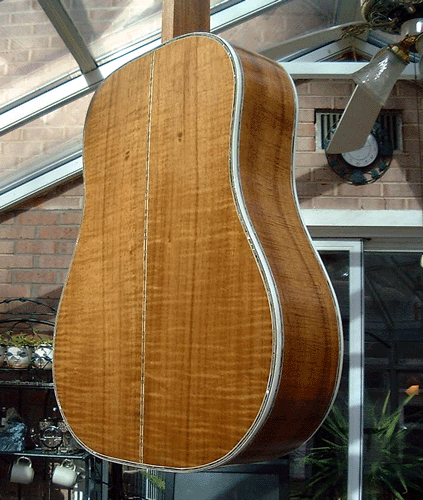 setting neck and bridge 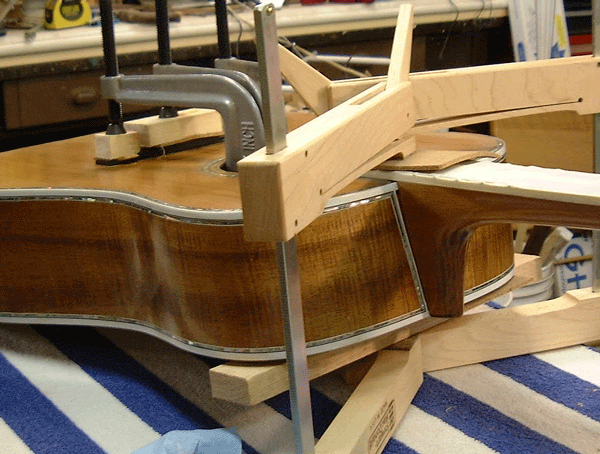 final shaping of neck 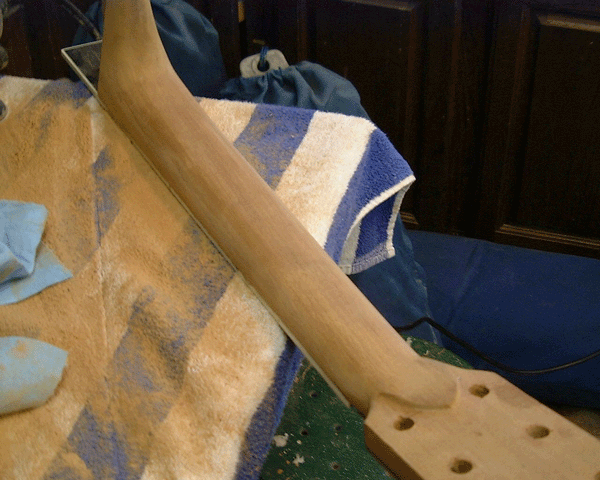
__________________
Bill Nichols www.nicholsinlay.com www.nicholscustominlay.com www.nicholsguitars.com [email protected]
|
|
#4
01-07-2005, 10:42 PM
|
|||
|
|||
|
Cool. I'm gonna be ordering some stuff from Luthier's International soon, including the same type of bending iron. My homemade bending irons just never worked very well.
__________________
Pictorial of Violin #3
|
|
#7
01-08-2005, 07:27 AM
|
|||
|
|||
|
i have made 3 guitars and 15 mountain dulcimers,it is addictive.it seems like you never have enough tools--its so hard to make a perfect instrument.the wood seems to have a mind of its own.one of the important tools in the shop is the performax drum sander to thin the wood.have fun? gordon
|
|
#8
01-08-2005, 10:20 AM
|
||||
|
||||
|
There are so many decisions to make. One of the first decisions I made was to radius the top and back surfaces. So I needed to buy or make radius dishes. I decided to make them. They sell for $75 each, not bad, but I figure I needed to start making things, and getting in the practice with the tools. Plus, how hard could it be?
The idea is to make formers to run a router with a ½ square bit across to dish out material from your blank form. I thought I would just use the old 15rope with a pencil tied to it to mark my radius on a board and the cut it out with my jig saw. Ropes are far too stretchy to get an even line. I tried joining boards together to make the 15 radius too heavy. I ended up using a CAD program to print out the radius and used 3M spray adhesive to hold the paper to the board. One attempt with the jig saw yielded what look like drun ken sail ors effort. The blade is to small and the perspective too close to make a smooth curve out of it. So I went out to buy a 14 band saw. Thats right - Im spending $400 to save $150! Well the band saw was interesting to get home and assemble myself. Those things are heavy. A good saw always has a lot of cast iron. The cuts I made on the band saw with a ¾ inch blade where nice. I made 2 formers with 15 and 2 formers with 25 radius. Next it was time to make a fixture to cut the dishes out by running the router across them. The fixture holds the formers and allows the dish to rotate while you pass the router over the dish. The square block on the router base keeps the router centered between the formers. They came out nice. Here are the pictures. It made mountains of saw dust. Cutting the formers. http://groups.msn.com/SLSavilleFamil...to&PhotoID=118 The dish and formers. Note the pencil under the formers in the center. http://groups.msn.com/SLSavilleFamil...to&PhotoID=121 http://groups.msn.com/SLSavilleFamil...to&PhotoID=120
__________________
Reason is itself a matter of faith. It is an act of faith to assert that our thoughts have any relation to reality at all. ― G.K. Chesterton
|
|
#9
01-08-2005, 12:22 PM
|
|||
|
|||
|
Neat. I made my radius dishes on my lathe, and actually use then on it, too. They are designed for 'ukulele sized instruments, so they're only 15" in diameter, not as large as yours.
Quote:
 Quote:

__________________
Pictorial of Violin #3
|
|
#10
01-10-2005, 12:06 AM
|
||||
|
||||
|
Quote:
I've been looking at these for a while. I was thinking of hand planing instead.
__________________
Reason is itself a matter of faith. It is an act of faith to assert that our thoughts have any relation to reality at all. ― G.K. Chesterton
|
|
#11
01-10-2005, 07:42 AM
|
|||
|
|||
|
When I sand I run my glue up's through after gluing as long as the pieces or both the same thickness before hand. Any drum sander will leave lines no matter when you run them. I use a 25" Performax HD with 220 at a moderate speed for final sanding. After sanding I use a card scraper to achive a smooth surface. A card scraper takes a little getting used to but nothing else will give you a better surface. Even compared to sanding with 400 grit a scraper will give you a better surface because you are cutting the wood fibers and not abrading them. On areas where I can't scrape I will sand up to 400 grit and then follow with 0000 Liberon steel wool followed by burnishing with wood shavings.
For a surface you are going to spray a top coat on you may want to prep your work just by sanding to 320 grit so the top coat has something to grab on to. Also if you are using a water born finish eliminate the use of steel wool and use a scotchbrite pad. Target coatings makes outstanding waterbased finishes. They are low odor and very durable http://targetcoatings.com/ Have Fun Dale Last edited by Dale O; 01-10-2005 at 08:01 AM.
|
|
#12
01-10-2005, 06:04 PM
|
|||
|
|||
|
Quote:
__________________
Pictorial of Violin #3
|
|
#13
01-11-2005, 02:42 PM
|
|||
|
|||
|
thats pretty cool stuff...
My Uncle works at the Taylor Guitar factory in CA and has been there for about 15 years or so. Now he is great friends with Bob Taylor the owner. cool stuff, i got motivated to start playing acoustic guitar and he was able to get me a very good deal on a new Taylor 110 Acoustic. 
|
|
#14
01-11-2005, 03:49 PM
|
|||
|
|||
|
Bill, great looking guitar.....but we would expect nothing less from you! When you going to start your own guitar company?
__________________
Taylor Ltd. 03' Taylor 714ces Ltd. "Summer Strummer" 04' DG Custom Tele "Transient Modulation - The Movement of Sound" Websters
|
|
#15
01-11-2005, 04:00 PM
|
||||
|
||||
|
Quote:
but thanks...
__________________
Bill Nichols www.nicholsinlay.com www.nicholscustominlay.com www.nicholsguitars.com [email protected]
|


