
|
|
#1
 02-17-2022, 10:02 AM
|
||||
|
||||
|
Greetings everyone!
A couple of weeks ago I dove into my next project and I'm excited to share my current progress with you all. This one is going to be a very special Tamarindo OO with a bunch of detail and design work. First, for those who missed my previous thread, Tamarindo (Dialium guianense) is an incredibly unique wood in the guitar world. As far as we can tell, the only guitars ever made from it have come out of our shop. It has a very similar name to the more common Tamarind, but is a completely different tree. When sanded, it becomes a light salmon-ish color but darkens to a beautiful reddish brown. Here's a shot of the back of the Tamarindo cutaway recently put up for sale at Dream Guitars (and I'd highly recommend checking it out!)...  In addition to wanting Tamarindo, the client that I'm building this for liked an older Art Deco style guitar of mine and wanted some similarly intricate work on this one as well. Here's a shot of the back on the older one to give you an idea of where I'm headed (this was also the inspiration for my new logo)...  So, with that background in place, off we go! First up is joining the redwood top... 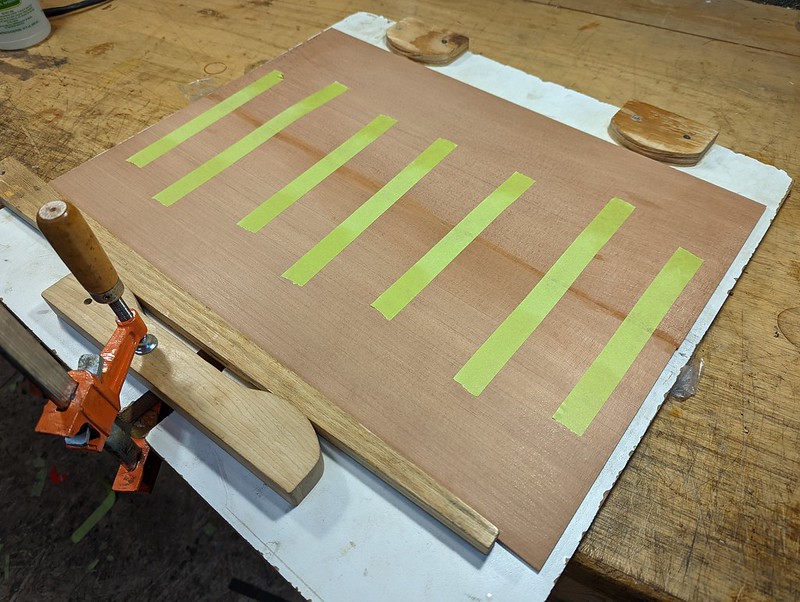 Bending the Tamarindo sides (you can see how much lighter it is sanded)... 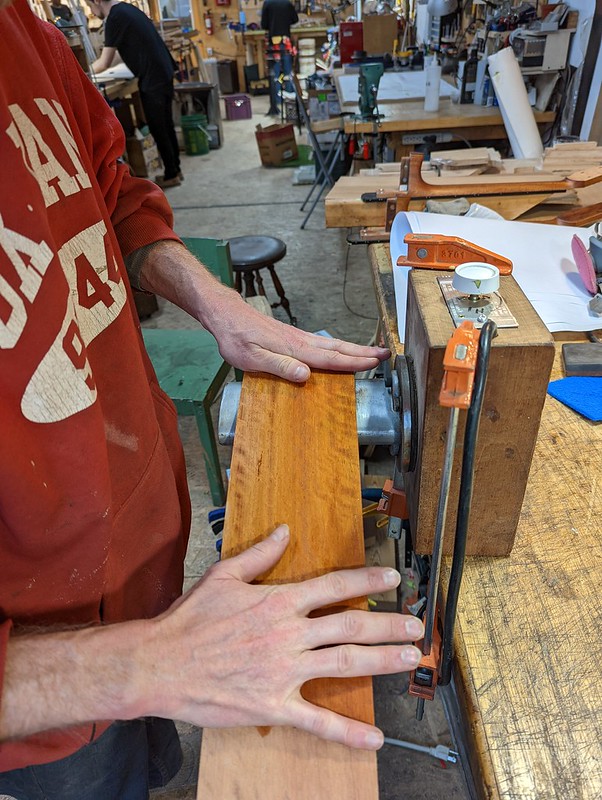 Sides bent and ready for lamination...  The second side in my mold being laminated...  Sketching out the inlay for the back...  This design has a bunch of parallel lines that I wanted to ensure would be as parallel as possible. To help with that, I took a router track, stacked some braces on either side, and trapped that all between a couple pieces of mdf. I could then rout a line, switch a brace to the other side, rout again and in theory end up with perfectly parallel cuts...  I want this inlay to be super clean and elegant so I tried to minimize the number of elements I put in to the design but not sacrifice interest and depth. I decided to keep Tamarindo between the thin maple lines but have a different side of the grain showing than the rest of the back. It will be a subtle effect, but the light should hit those lines slightly differently and hopefully be quite pretty!  And all finished up!  I can't wait to see this design start to pop as the Tamarindo darkens and I get some finish on there. Thanks for looking and lots more to come! 
|
|
#2
02-18-2022, 01:11 AM
|
||||
|
||||
|
Great to see a new thread and I like the intricate work on the back. From what you say, it sounds like Tamarind and Tamarindo are like African and Australian blackwoods, similar in name only.
How did you decide on matching the Tamarindo with redwood? Particular sound in mind?
|
|
#3
02-18-2022, 06:16 AM
|
|||
|
|||
|
I love everything about this, the woods, the art deco, the guitar model, wonderful joyful stuff. And the OM at dreamguitars sounds really good. Keep it coming!
|
|
#4
02-18-2022, 08:46 AM
|
||||
|
||||
|
Quote:
The material properties of that redwood top hit a spot somewhere between cedar and spruce so the goal is to hopefully find a balance between the two. OO's can be snappier than my larger guitars so this should hopefully warm it up just a tad! Quote:
Thanks Dennis, I think this is going to be a pretty special guitar!
|
|
#5
03-26-2022, 08:52 AM
|
||||
|
||||
|
Lots going on in the shop these days but it's past time for an update on this build! As mentioned above, this one will have a redwood top and I'll be carrying the theme of the back inlay throughout the rest of the guitar. First up is "binding" the sound-hole with some radial EI rosewood. Whenever I'm making a radial grain ring for this type of thing, I typically glue up the two halves before joining them together for a full ring. With twelve tiles making up the ring and two angled cuts on each tile, it can be really tricky to get a perfectly formed ring. If the angle is off by even half a degree, that would compound to being 12 degrees off as you work you way fully around the circle. So, I glue up each half, sand the ends to get a good joint, and join the full circle...
 Installed in the top...  Lots of little lines, angles, and joints in this one!  The biggest challenge for this rosette was figuring out how to incorporate the circular element from the back inlay. Like on the back, I wanted to have a rosewood ring bound by maple inside and out, but binding little circles can be tricky. My solution was to take a scrap piece of spruce, drill out a hole the size of the fully bound ring, and then snap that piece of spruce in half. This give me a perfectly sized caul to clamp the maple strips around the rosewood...   I wish I had a clever trick for binding the interior of the circle, but it basically took many many tries at cutting the perfect length and an hour of frustration! Thankfully I'm quite happy with how it turned out... 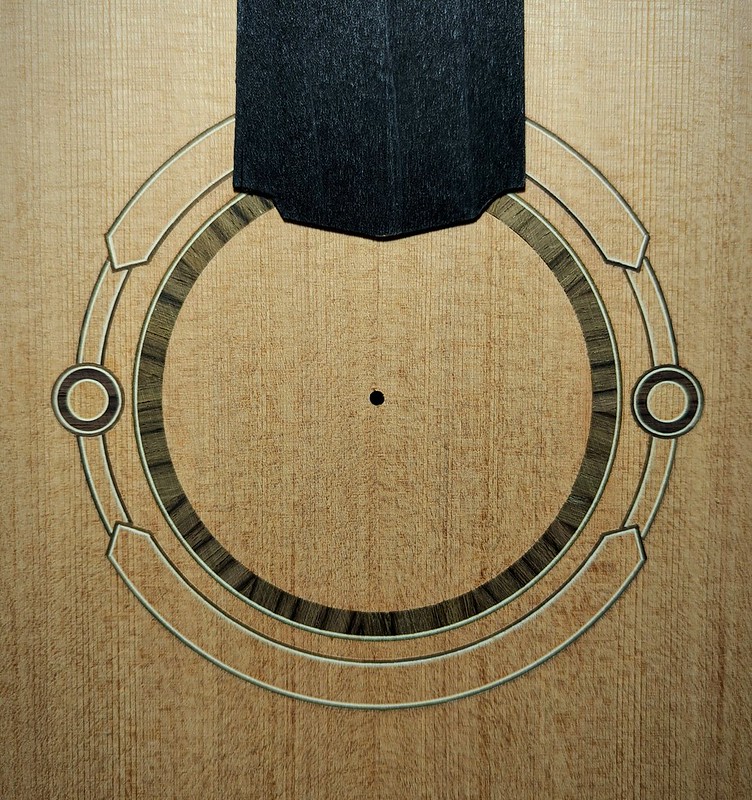 Here I've got the sound-hole pad glued on, shaped, and ready for a tornavoz...  I should have the bracing finished up this weekend and the box closed up not long after. Thanks for looking and more soon!
|
|
#6
03-26-2022, 04:56 PM
|
||||
|
||||
|
I think that has to be one of the coolest rosettes I have ever seen. It must have truly taken hours to get it so perfect.
I also have to put in a plug here! I am very excited that Mr. Kennedy has agreed to display at B.I.G. this year!!!! I think we are in for quite a treat! Wow.
__________________
PS. I love guitars!
|
|
#7
03-26-2022, 06:29 PM
|
|||
|
|||
|
Mike, to say that your woodworking skills are impressive is an understatement. This will be an amazing guitar. Looking forward to more. Thanks, Dave
|
|
#8
03-27-2022, 09:21 AM
|
||||
|
||||
|
Quote:
Quote:
Thanks for the very kind words and definitely lots more to come on this little OO!
|
|
#9
03-27-2022, 04:02 PM
|
||||
|
||||
|
Be a utiful work Mike. Your art deco theme is inspired and so well executed. Did you free hand the diagonals??
__________________
Kinnaird Guitars
|
|
#10
03-28-2022, 06:16 AM
|
||||
|
||||
|
Quote:
|
|
#11
05-04-2022, 09:12 AM
|
||||
|
||||
|
Time for a progress update on this sweet little OO! The box is fully bound and mostly cleaned up after taking a little bit of time to make an art deco(ish) themed end-graft that ties in with the back design. Over the years I've found that one of the most important steps in succeeding with this type of work is figuring out the order of operations. So, it starts very simply with a straight line inlay...
 Followed by lots of messing around with carefully binding/mitering little bits...  To end up with these...  Ready to receive the final piece...  Almost there...  And bound!  With the box mostly cleaned up... 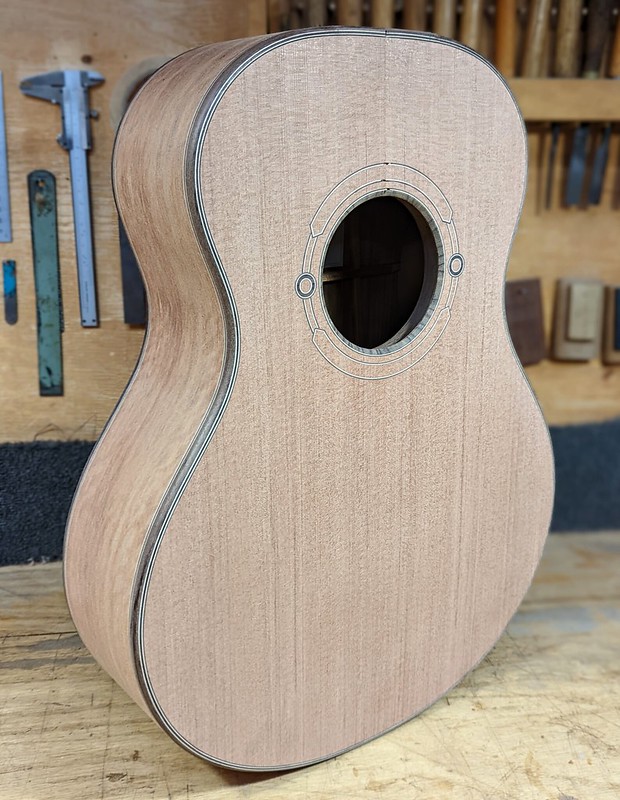  Up next I'll dive into working on the fingerboard which will also have some extra detail work. Thanks for looking and more soon!
|
|
#13
05-04-2022, 07:12 PM
|
||||
|
||||
|
Quote:
|
|
#14
05-06-2022, 01:19 AM
|
||||
|
||||
|
All that inlay is beautiful! Wow
And the Tamarindo is mighty pretty too. This will be a mighty Boss little 00 Cheers Paul
__________________
4 John Kinnaird SS 12c CUSTOMS: Big Maple/WRC Dread(ish) Jumbo Spanish Cedar/WRC Jumbo OLD Brazilian RW/WRC Big Tunnel 14 RW/Bubinga Dread(ish) R.T 2 12c sinker RW/Claro 96 422ce bought new! 96 LKSM 12 552ce 12x12 J. Stepick Bari Weissy WRC/Walnut More
|


