
|
|
#91
 03-21-2022, 06:48 PM
|
||||
|
||||
|
I have to say the photography on this build is simply amazing...the most detailed I've ever seen. Of course, it helps that I've been in that workshop a few times...
But, the guitar itself is shaping up to be spectacular! Love every detail...!
__________________
Jeff Mark Hatcher Pina Parlor Torrified Maple/Cedar Stephen Kinnaird 00 B&W Ebony/Engelmann Spruce Simon Fay African Blackwood/Sinker Redwood Wolfgang Jellinghaus Torres Modelo 43S Maple/Spruce K Yairi CYTM Maple/Cedar 
|
|
#92
03-22-2022, 07:14 AM
|
||||
|
||||
|
Quote:
Quote:
 When one starts a project with a luthier and after you are through selecting a guitar size, tonewoods and ergonomics based on their understanding of your goals and needs, you get into the process of beginning to visualize a guitar that does not yet exist. Some choices for aesthetic appointments are selected together prospectively and others along the way. It is always rewarding to see your vision come to life on the luthier's bench. Regarding the detail of the photos in this build thread, I think we can likely thank Ryan...  . . Many luthier's work solo. Steve having a partner in crime allows them to document things more easily when their hands are busy (Mary does the same for Tim M actually). My goal with all of these build threads with luthiers that I have partnered with is to show how each builder works for others in the future considering commissioning an instrument. Yes, there are different aesthetics associated with each builder, but what is going on "under the hood" matters. Luthiers all face a similar sequence of tasks, but how they approach things is actually quite heterogeneous.
__________________
A bunch of nice archtops, flattops, a gypsy & nylon strings
|
|
#93
03-22-2022, 05:47 PM
|
||||
|
||||
|
Steve has cleaned up the glue-doo off the top, back and sides and leveled the bindings and purflings. You can see how the rosette and marquetry frame the beautiful Randy Lucas Adirondack Spruce top.
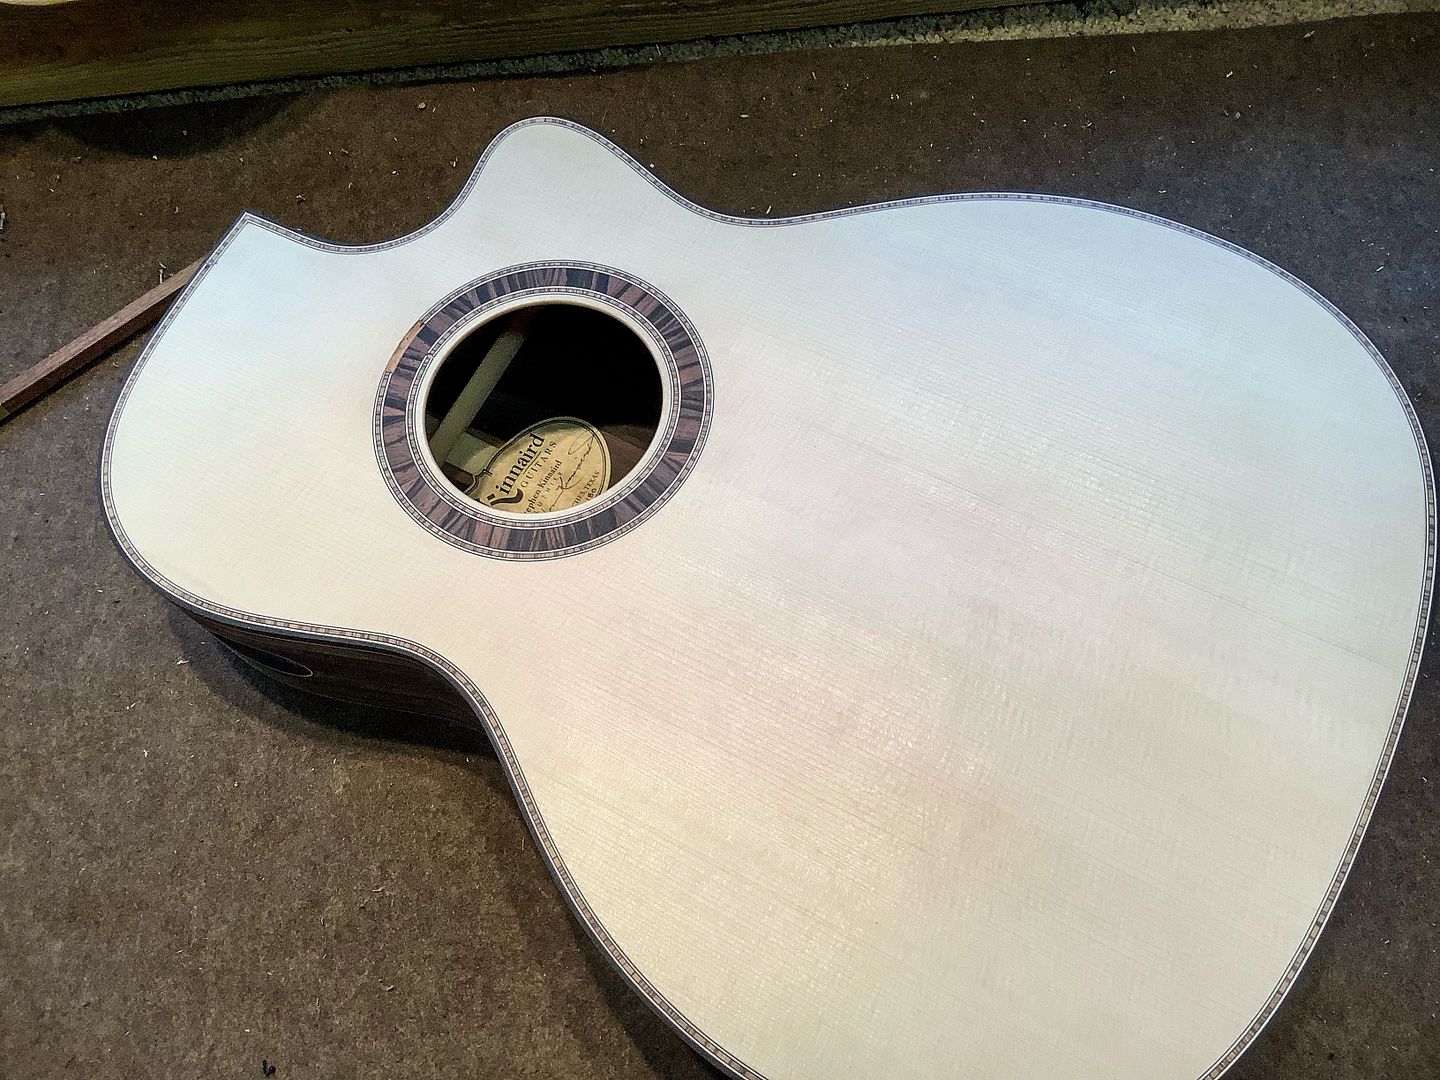 You can see some signs of medullary in the top indicating a well quartered sound board. The aesthetics of the radial striping in the Macassar Ebony rosette and Zebrawood purflings can be seen in detail. 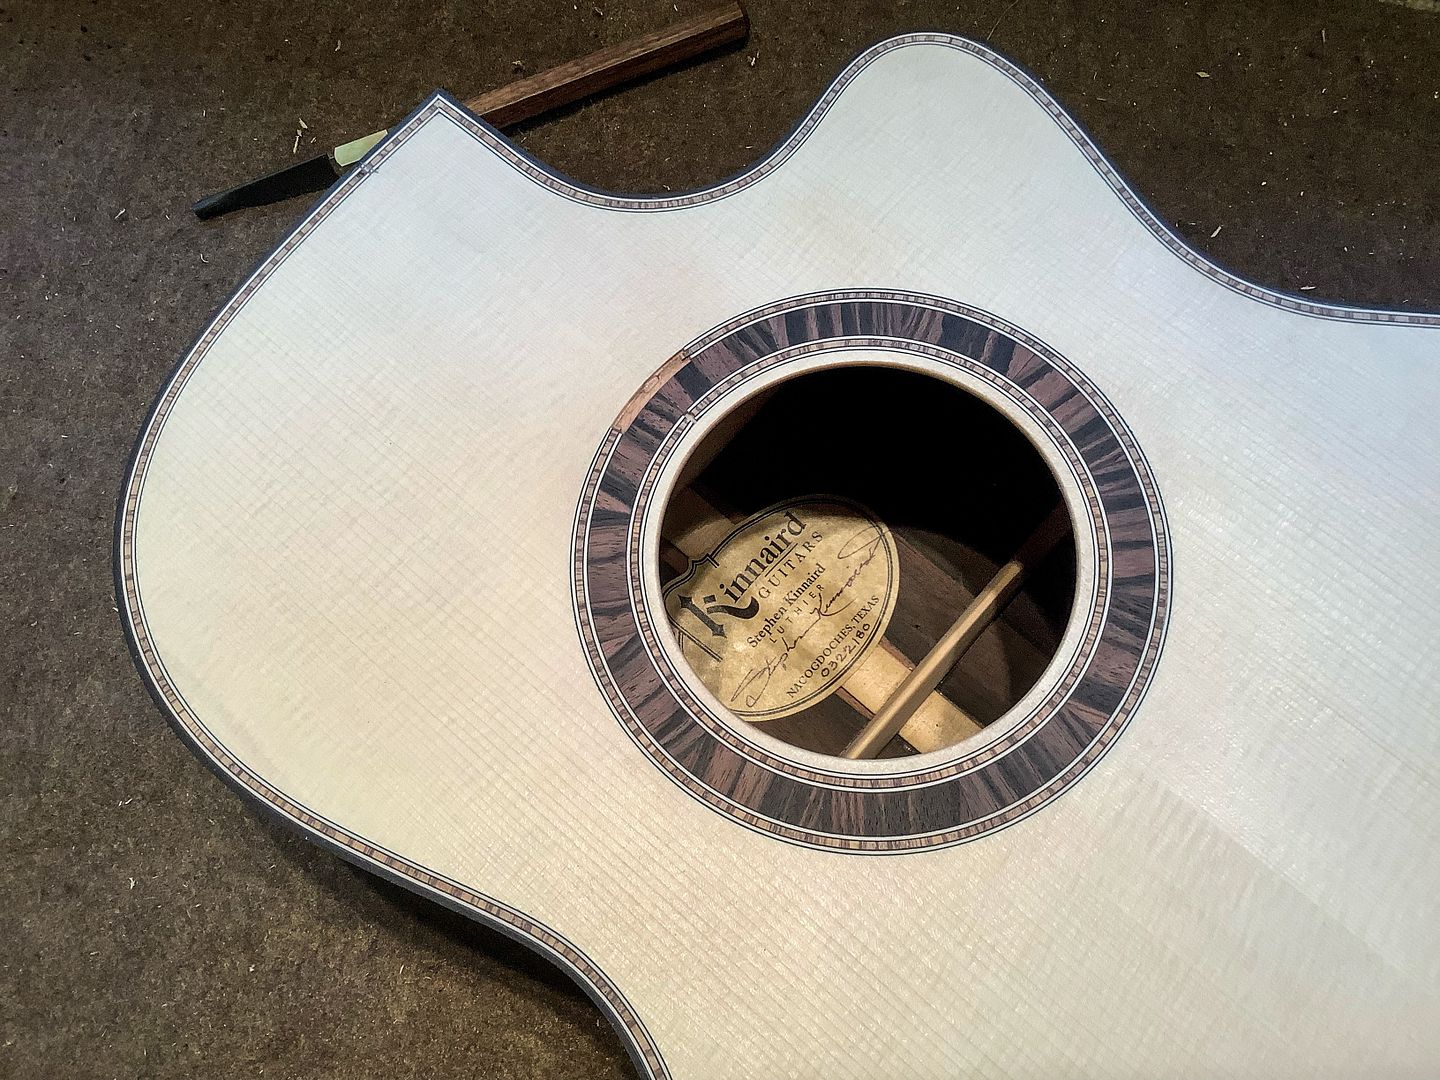 This shot shows the striking striped figure in the Macassar Ebony rims, end graft framed by contrasting mitered black fiber/maple/black fiber purflings. 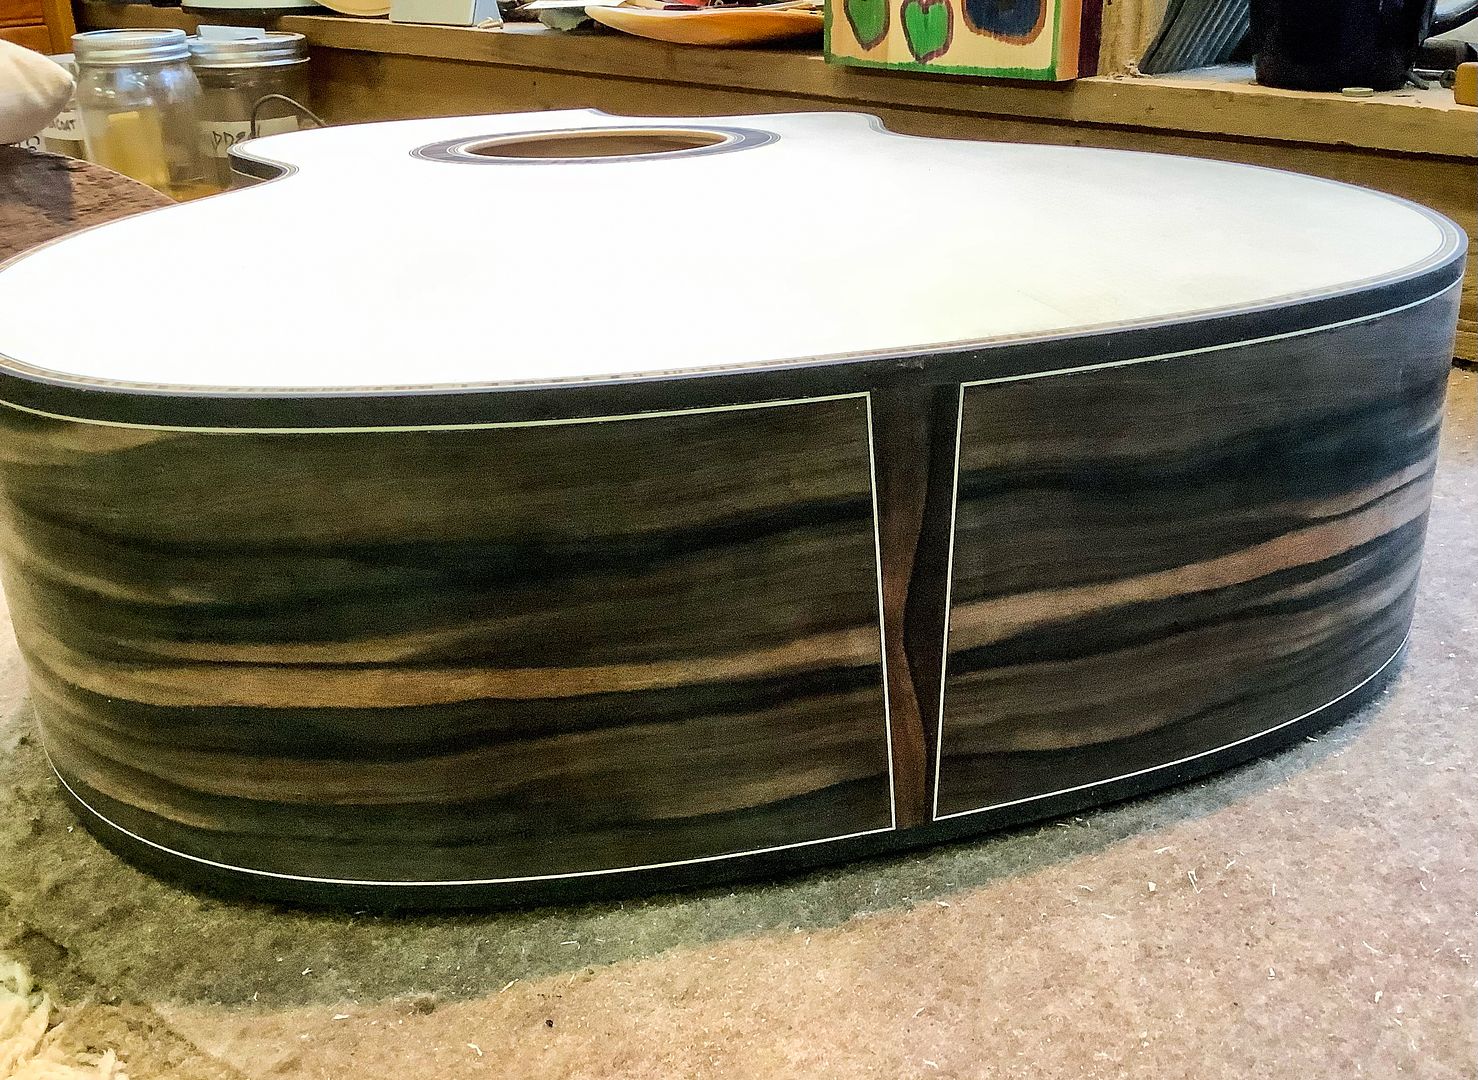
__________________
A bunch of nice archtops, flattops, a gypsy & nylon strings
|
|
#94
03-25-2022, 02:09 PM
|
||||
|
||||
|
Steves belly bridge shape is an hommage to an old Guild bridge shape but he first saw the shape on on a guitar made by luthier/guitarmaking author by David Russell Young.
Steve chose a 1) lighter weight, dark colored Brazilian Rosewood bridge blank for this guitar; 2) laid out 2-5/16 bridge pin spacing and drilled some holes; 3) rough cut the profile and 4) used a profile jig with a robo-sander to clean up the profile. 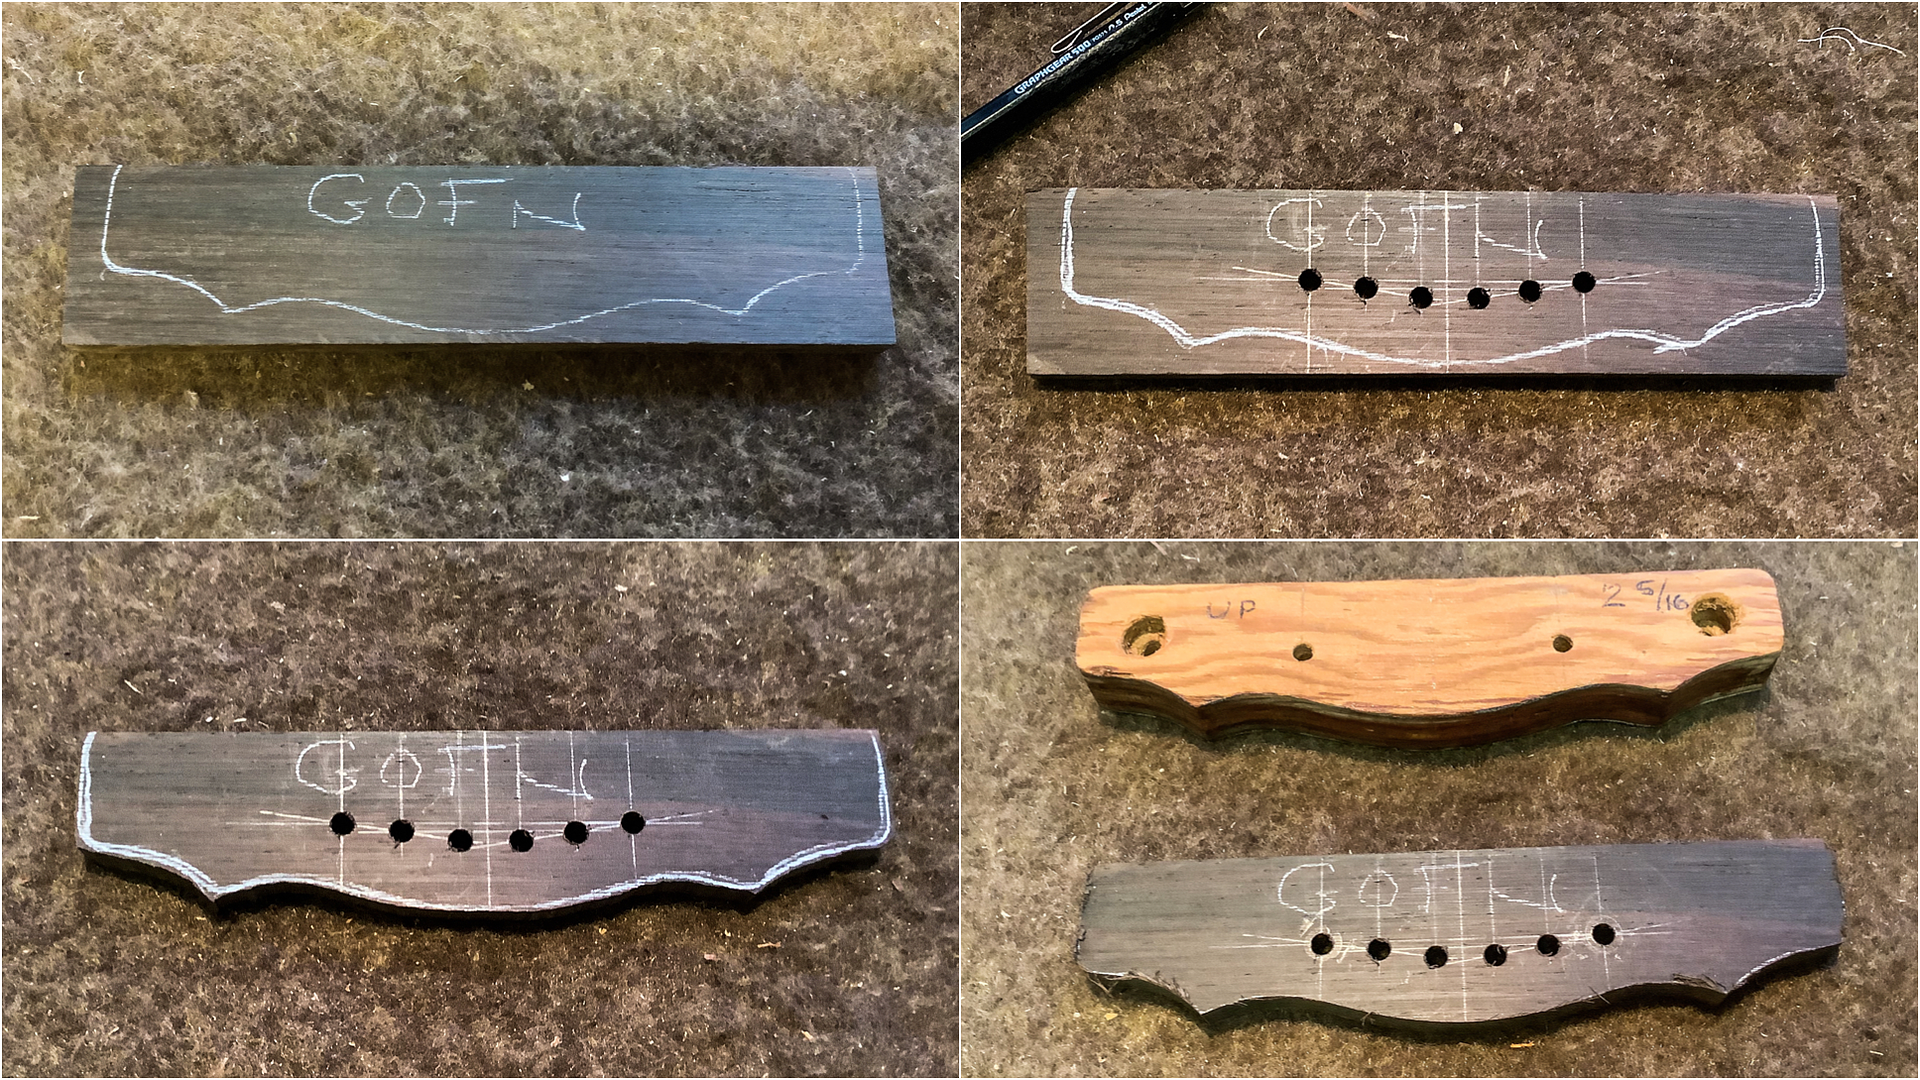 The chalk is used to monitor material removal. You can tell what this homemade jig cocks the bridge at an angle so the router routs the saddle slot for the compensation. Next, a saddle slot is routed in followed by shaping the two outer wings to reduce the bridges mass where it overlaps the x-brace.  Now, Steve rough shapes the bridge while it is affixed to his work stand. 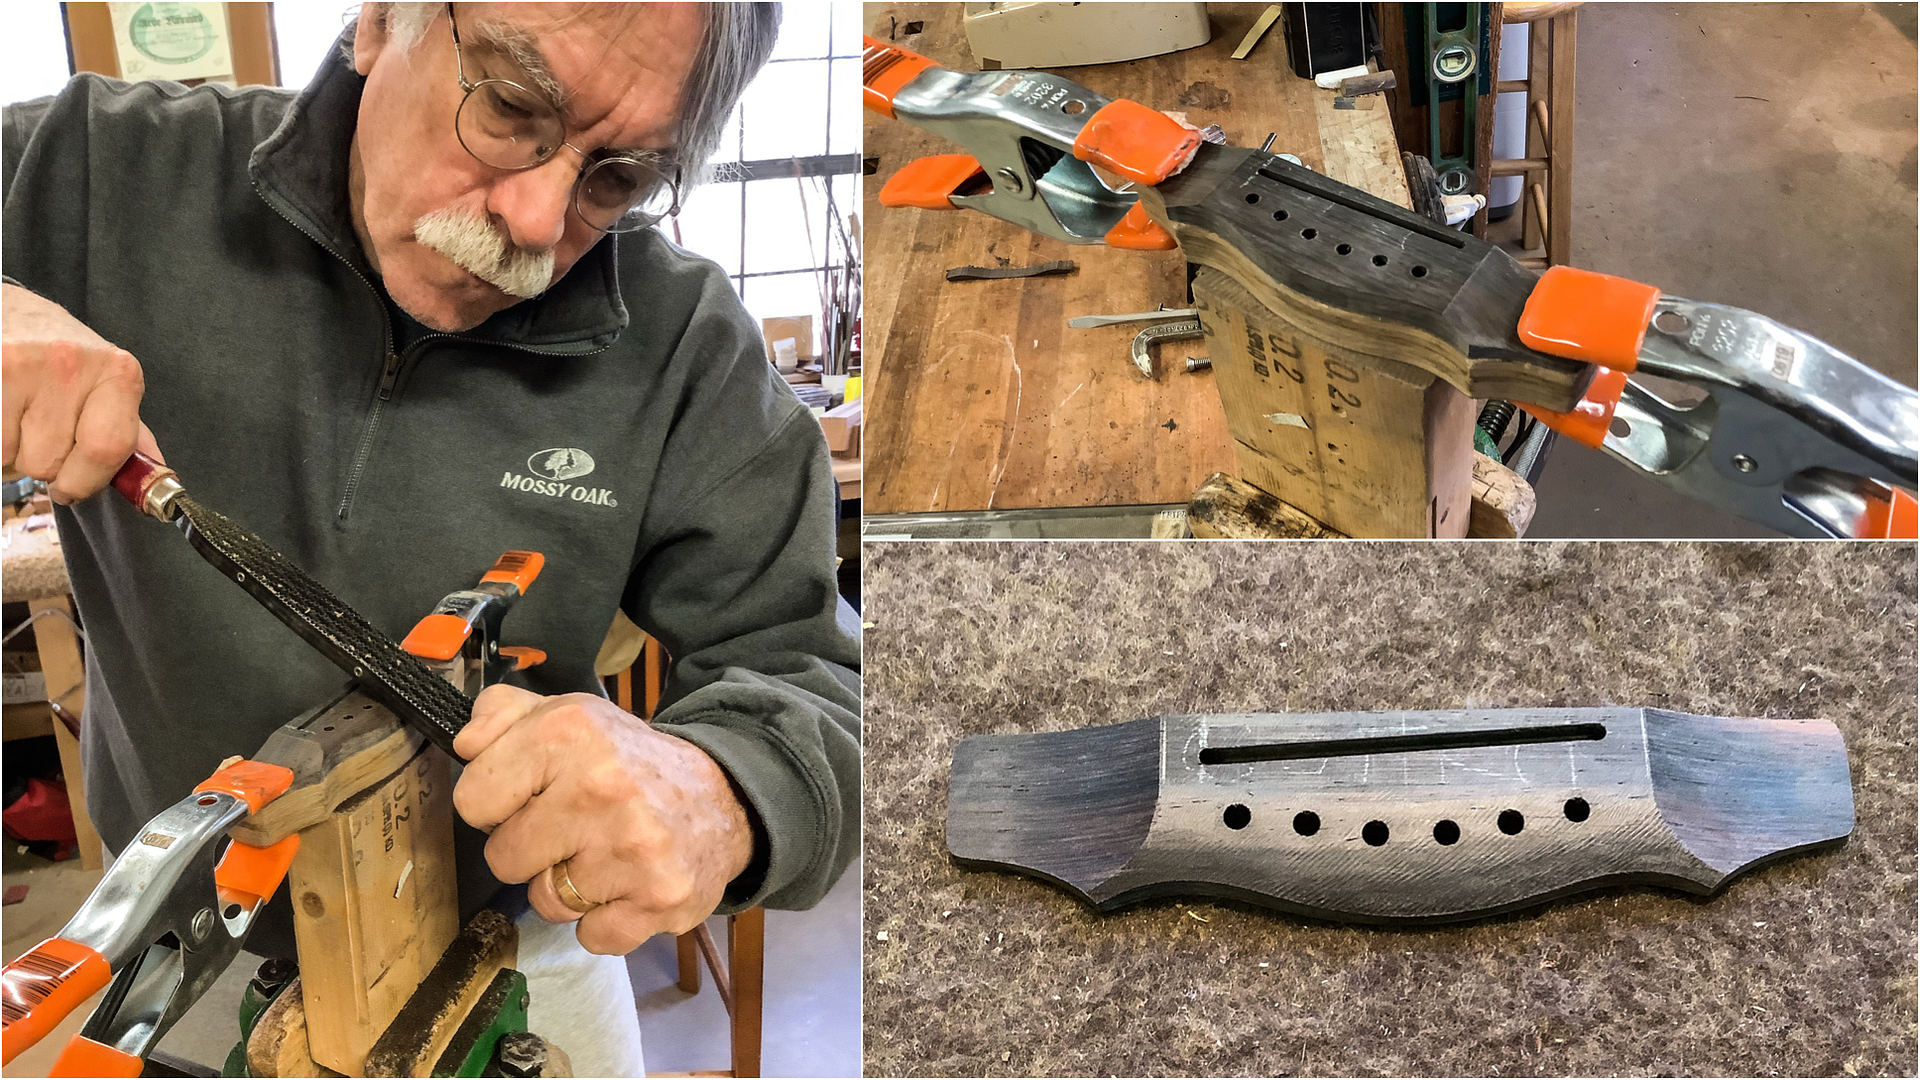 Steve uses a Stewmac Ultimate Scaper to clean up the bridge before sanding it to a 400 grit paper followed by a Scotchbrite pad, paste wax and he buffs it when they are made from porous woods like this one. 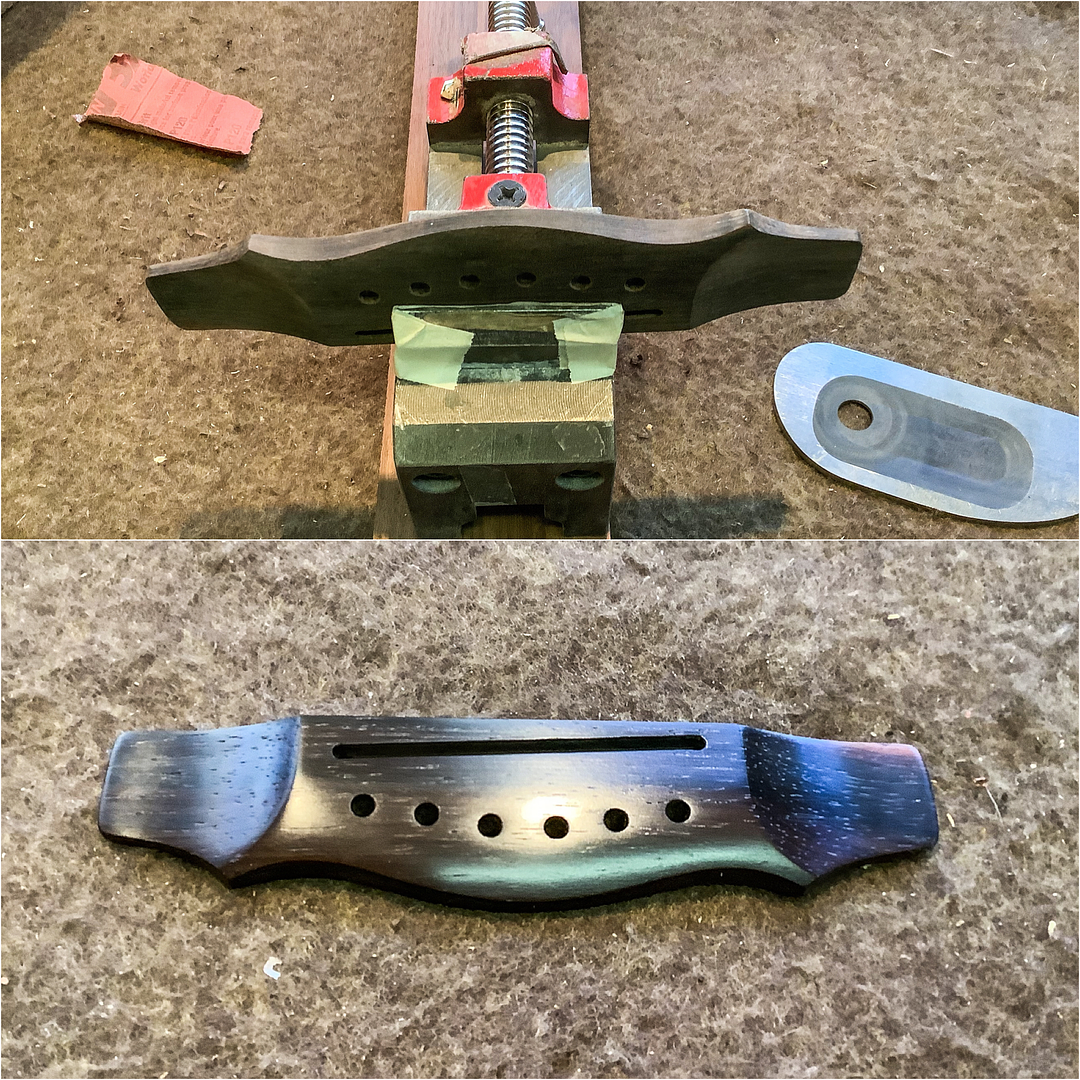
__________________
A bunch of nice archtops, flattops, a gypsy & nylon strings
|
|
#95
03-25-2022, 07:46 PM
|
||||
|
||||
|
We decided that the front headstock veneer should be left undecorated to let the contrasting Macassar Ebony sapwood/heartwood do the decorative “talking”.
To identify the guitar’s maker, we decided to add a simple decoration to the rear veneer. Steve sent the roughed neck to California last week to inlay wizard Larry Robinson. Larry gesturally inlayed Steve’s signature in MOP into the Gaboon Ebony rear headstock veneer. 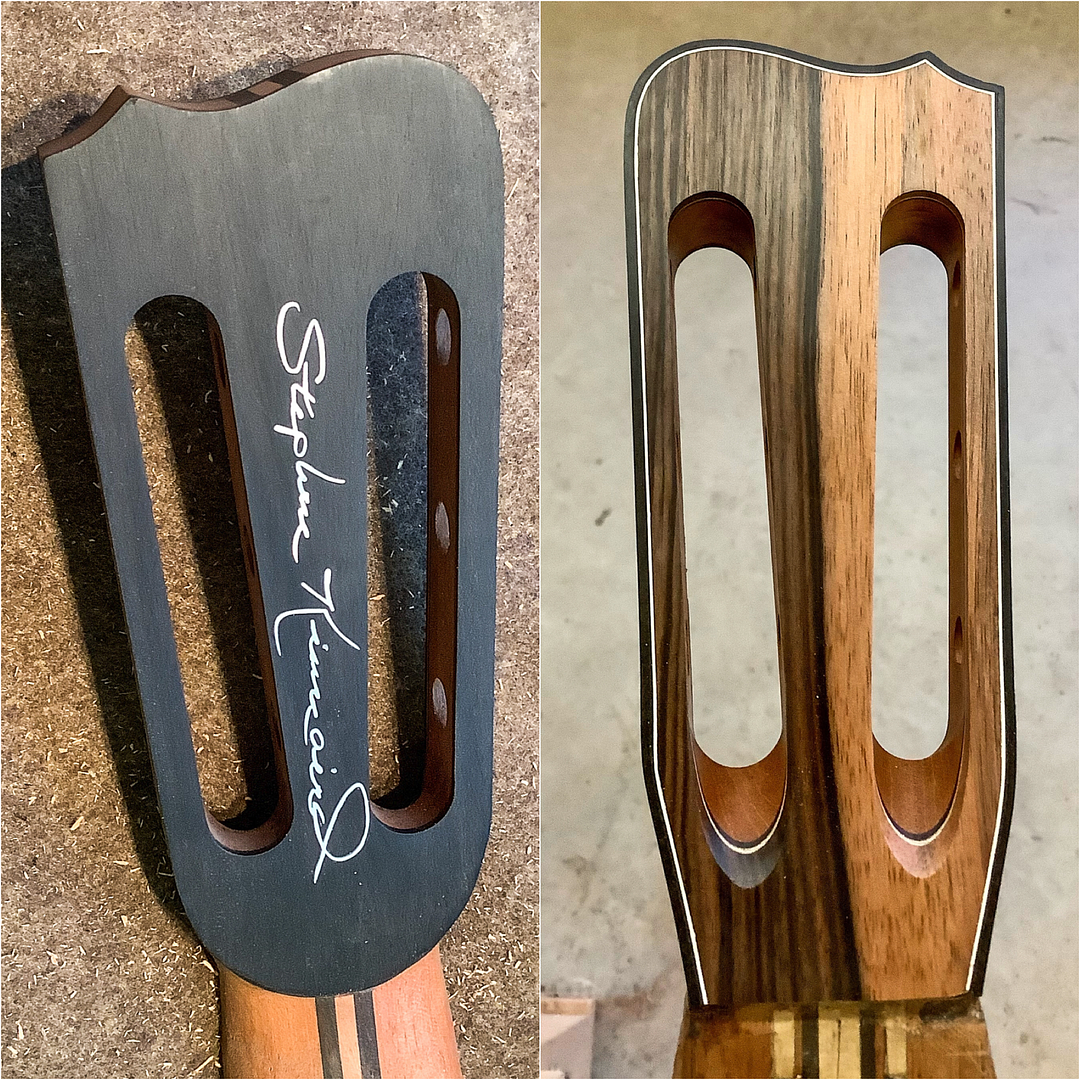
__________________
A bunch of nice archtops, flattops, a gypsy & nylon strings Last edited by iim7V7IM7; 03-25-2022 at 10:16 PM.
|
|
#96
03-25-2022, 08:18 PM
|
||||
|
||||
|
Now, that autograph in MOP is very cool
it beats the K on the back veneer of mine!
__________________
Jeff Mark Hatcher Pina Parlor Torrified Maple/Cedar Stephen Kinnaird 00 B&W Ebony/Engelmann Spruce Simon Fay African Blackwood/Sinker Redwood Wolfgang Jellinghaus Torres Modelo 43S Maple/Spruce K Yairi CYTM Maple/Cedar
|
|
#97
03-26-2022, 06:04 AM
|
|||
|
|||
|
Lots to like about this guitar! The woods are beautiful. I really like what Steve has done with the Zebrawood. The purfling and rosette tie the aesthetics together perfectly. Dave
|
|
#98
03-26-2022, 11:41 AM
|
||||
|
||||
|
Quote:
Quote:
__________________
A bunch of nice archtops, flattops, a gypsy & nylon strings
|
|
#99
03-27-2022, 06:57 AM
|
||||
|
||||
|
While the neck is in a partially carved state prior to defining its profile, Steve glued on a Gaboon Ebony fretboard that has matching Gaboon Ebony binding with a thin white purfling.
__________________
A bunch of nice archtops, flattops, a gypsy & nylon strings
|
|
#100
03-28-2022, 07:11 PM
|
||||
|
||||
|
Steve is fitting the Brazilian Rosewood belly bridge to the 25 radius dished Adirondack Spruce top with the assistance of a series of abrasives using the top to create concave underside.
 To align the neck with the body, a center reference at both the nut end, and the bridge must be in alignment a center reference on the fretboard at the sound hole. The red handled tool seen is their neck bolt tightener. 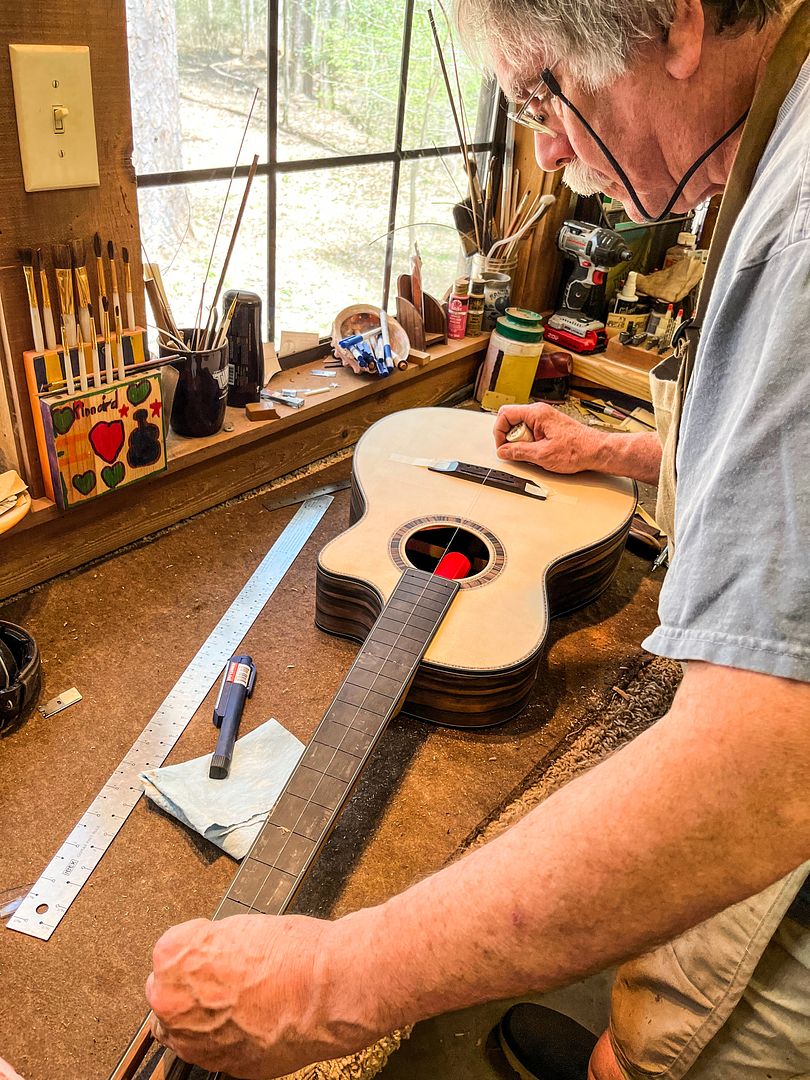 Now the bridge has been located and pinned and the neck has been aligned and set. While the neck is still in the rough, here is the first glimpse of the total package. 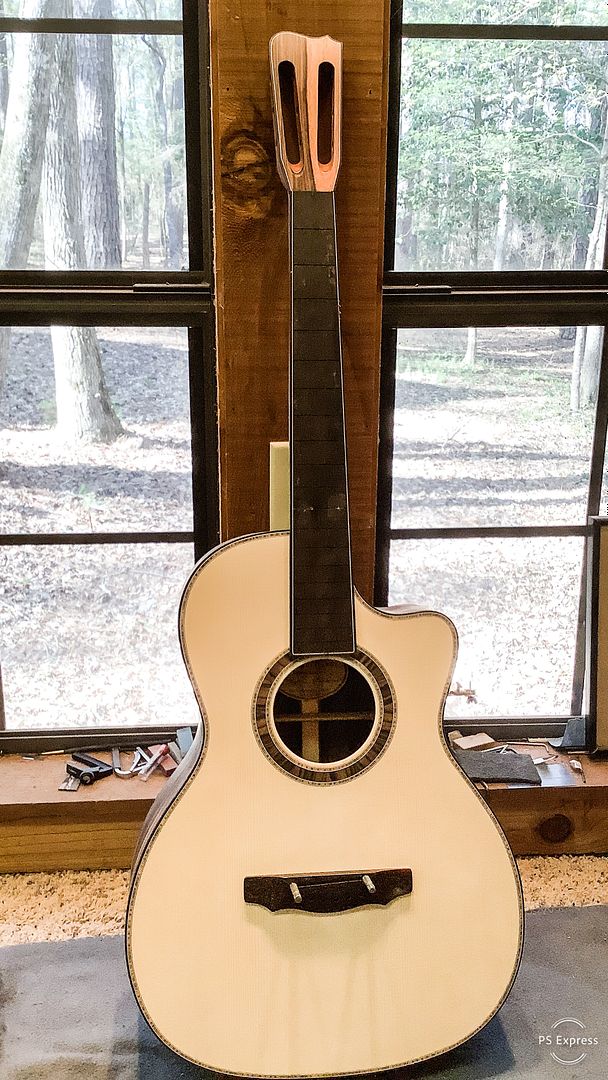 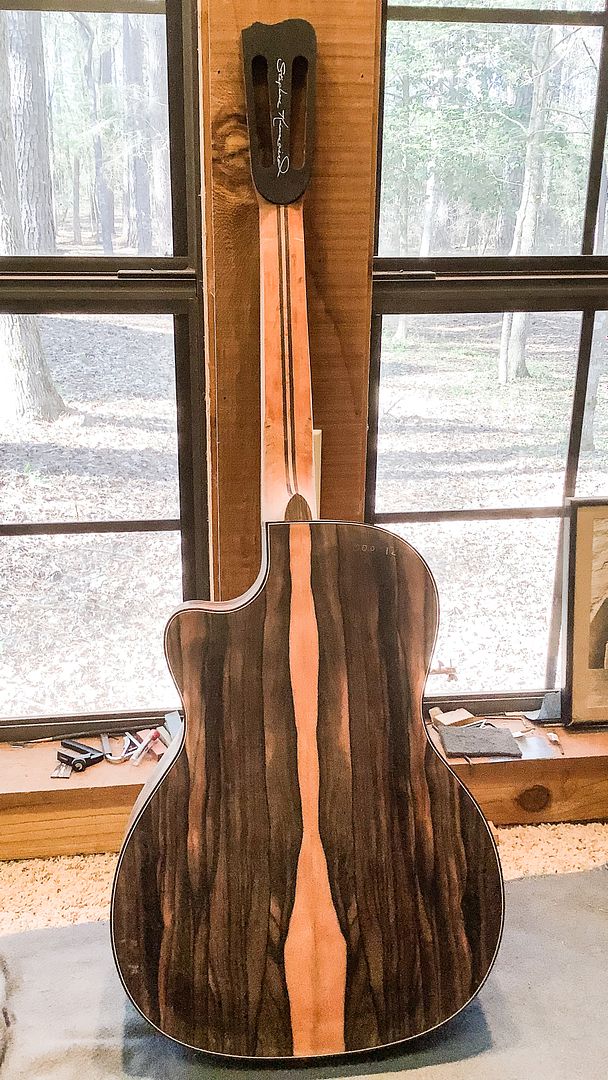
__________________
A bunch of nice archtops, flattops, a gypsy & nylon strings
|
|
#101
03-29-2022, 05:57 PM
|
||||
|
||||
|
Steve and Ryan have completed the guitar body in white and have masked off the top where the fretboard extension and bridge will need to be adhered in advance of sending it off to guitar finisher Tony Ferguson in Michigan. Tony uses a catalyzed polyurethane finish on the body. Steve does his own finishing using nitro on the neck in his shop in Texas. Note the purpose built case to transport the body from Texas to Michigan and back.
__________________
A bunch of nice archtops, flattops, a gypsy & nylon strings
|
|
#102
03-31-2022, 01:10 PM
|
||||
|
||||
|
Steve installed white 2 mm MOP position markers.
 Here is how they cut the nut slot. A unbleached cow bone nut blank is cut and set in place. Then an angled saw guide is brought up to the blank and clamped in place. The nut blank is removed, and that angled face guides a small back saw at the correct position as well as angle. 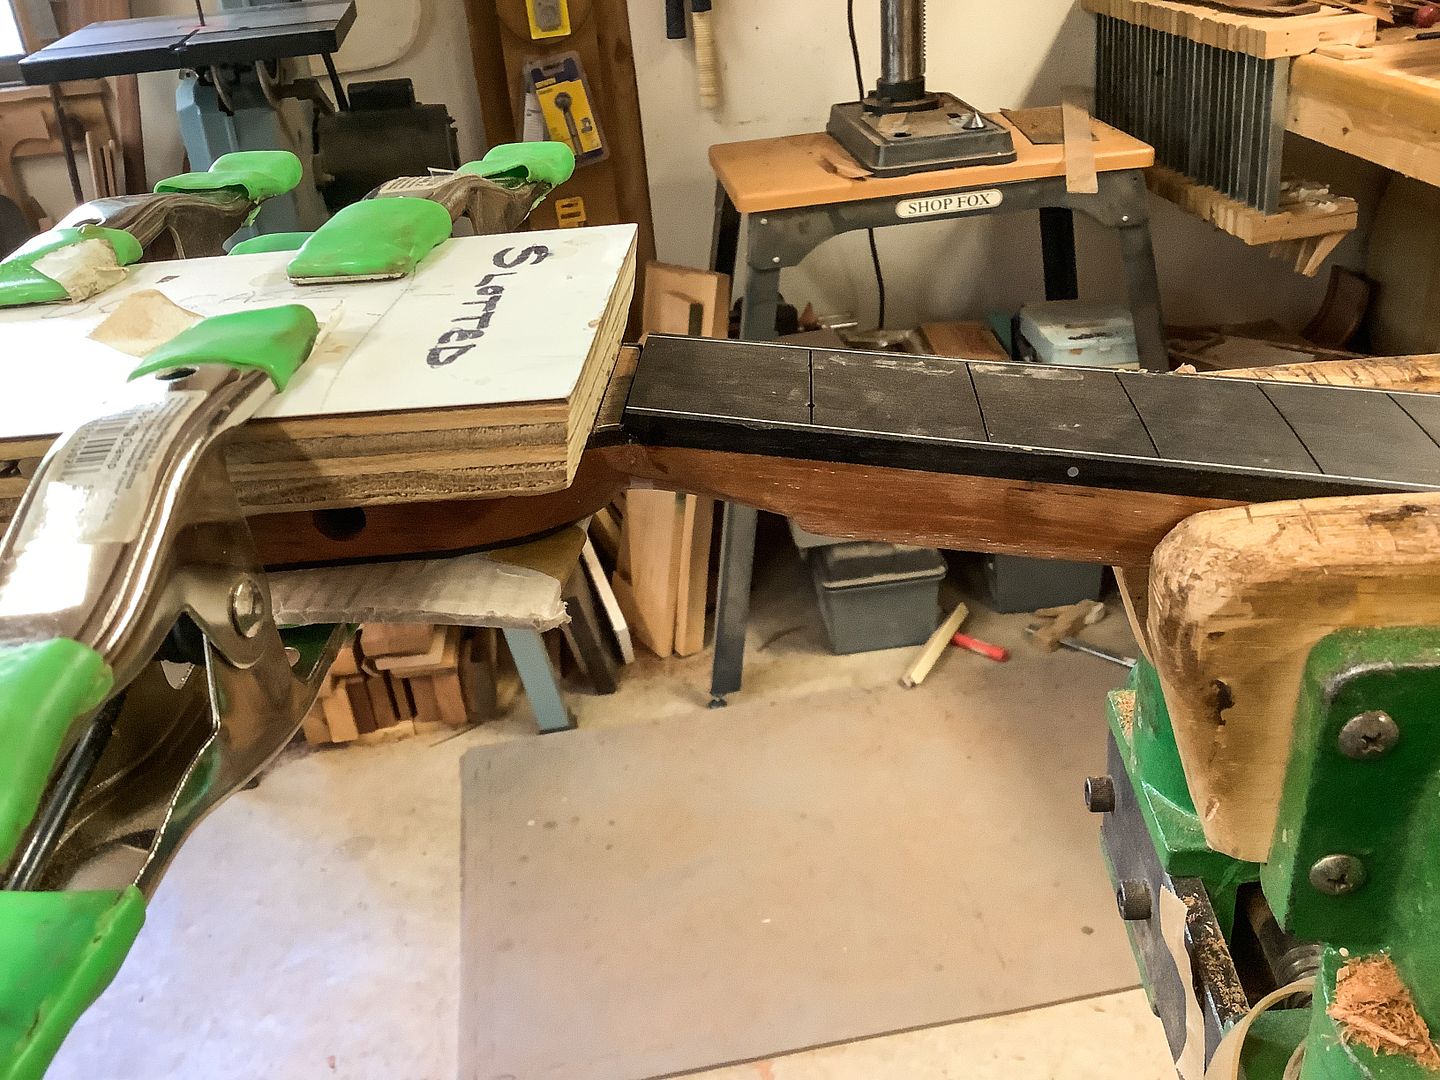 Next, a small chisel is used to clean out the wood where the nut will sit. Then the nut blank having some adhesive-backed 150 grit sand paper affixed to its base is used as a micro sanding block. This is moved side to side to finish cleaning the nut slot and insure a good fit. The 150 grit sand paper will remain on the nut until the finish is finished. Then it will be used again as a sanding block to clean out extraneous finish from the slot (Yes, even though the slot is masked, invariably some lacquer finds its way into the nut slot). That will be removed at set up time, and then the sand paper comes off the nut blank. 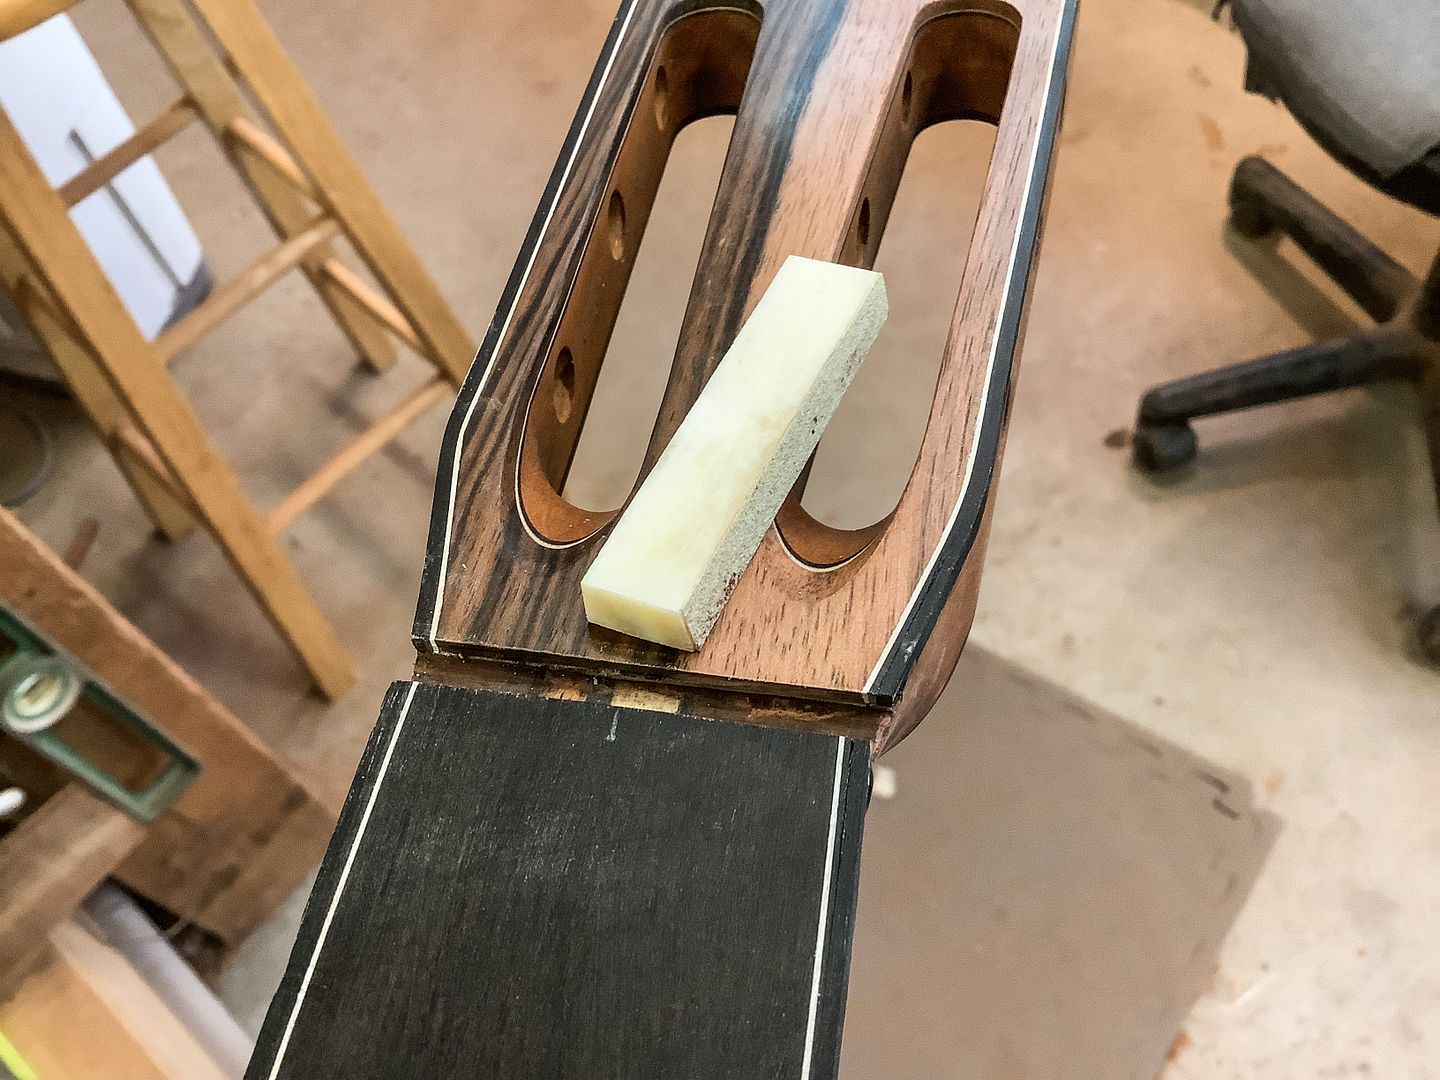 Here is the nut blank resting in its slot. It will remain like this until they ready for set up. Then it will be cut to the proper length and height, slotted and shaped and buffed. 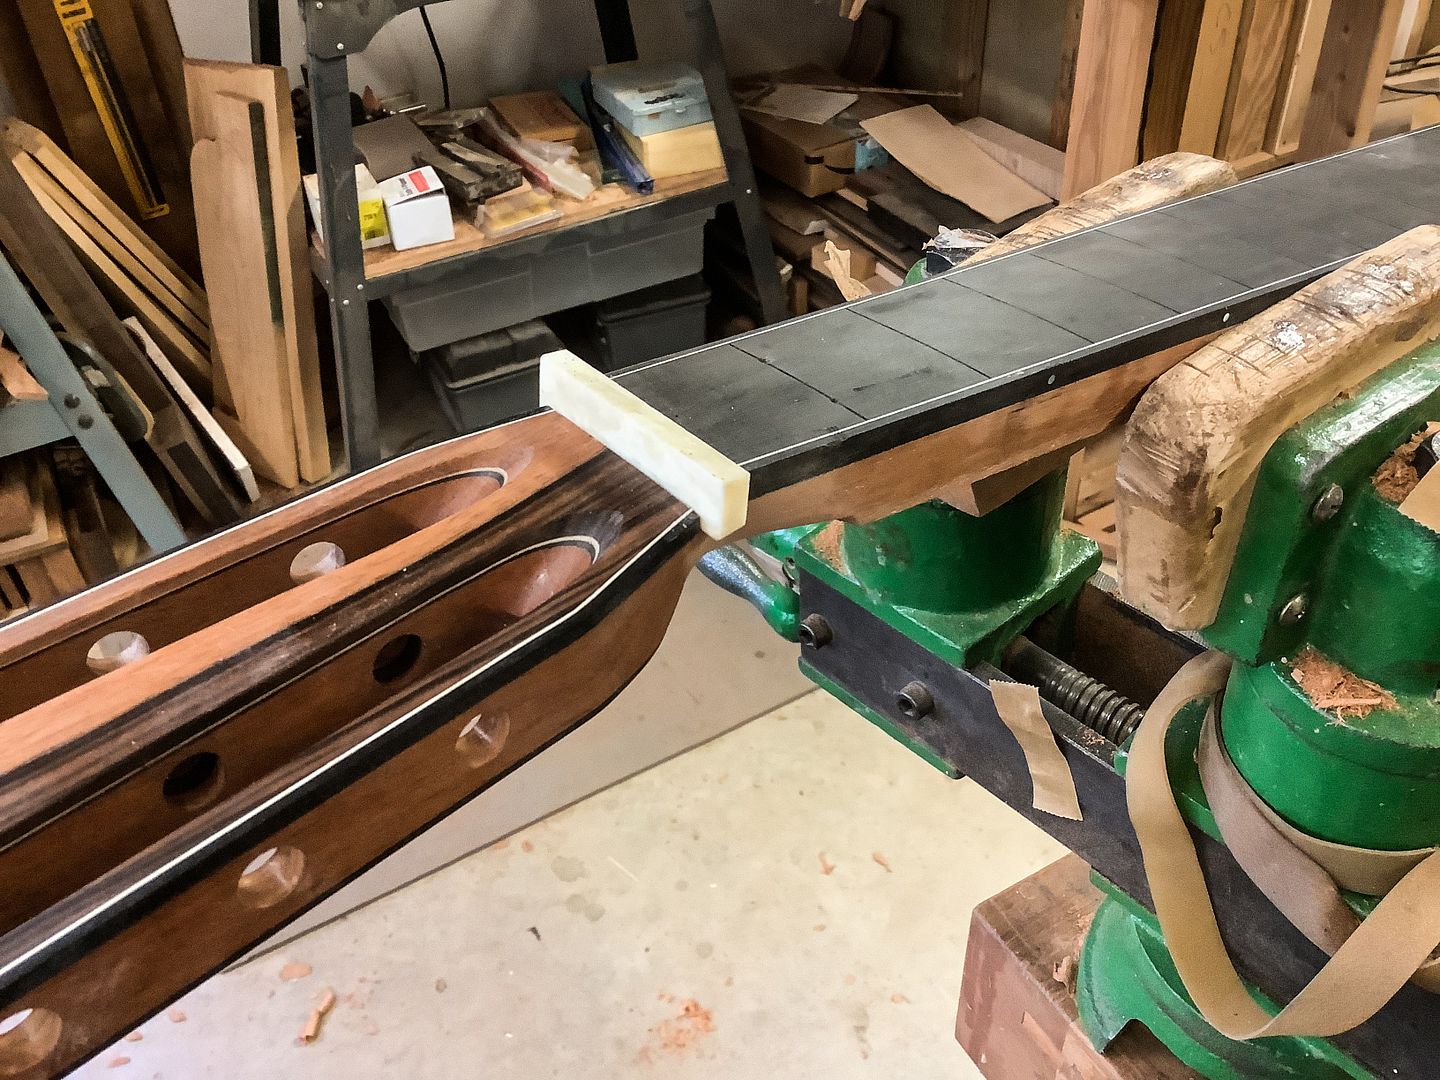
__________________
A bunch of nice archtops, flattops, a gypsy & nylon strings
|
|
#103
03-31-2022, 05:44 PM
|
||||
|
||||
|
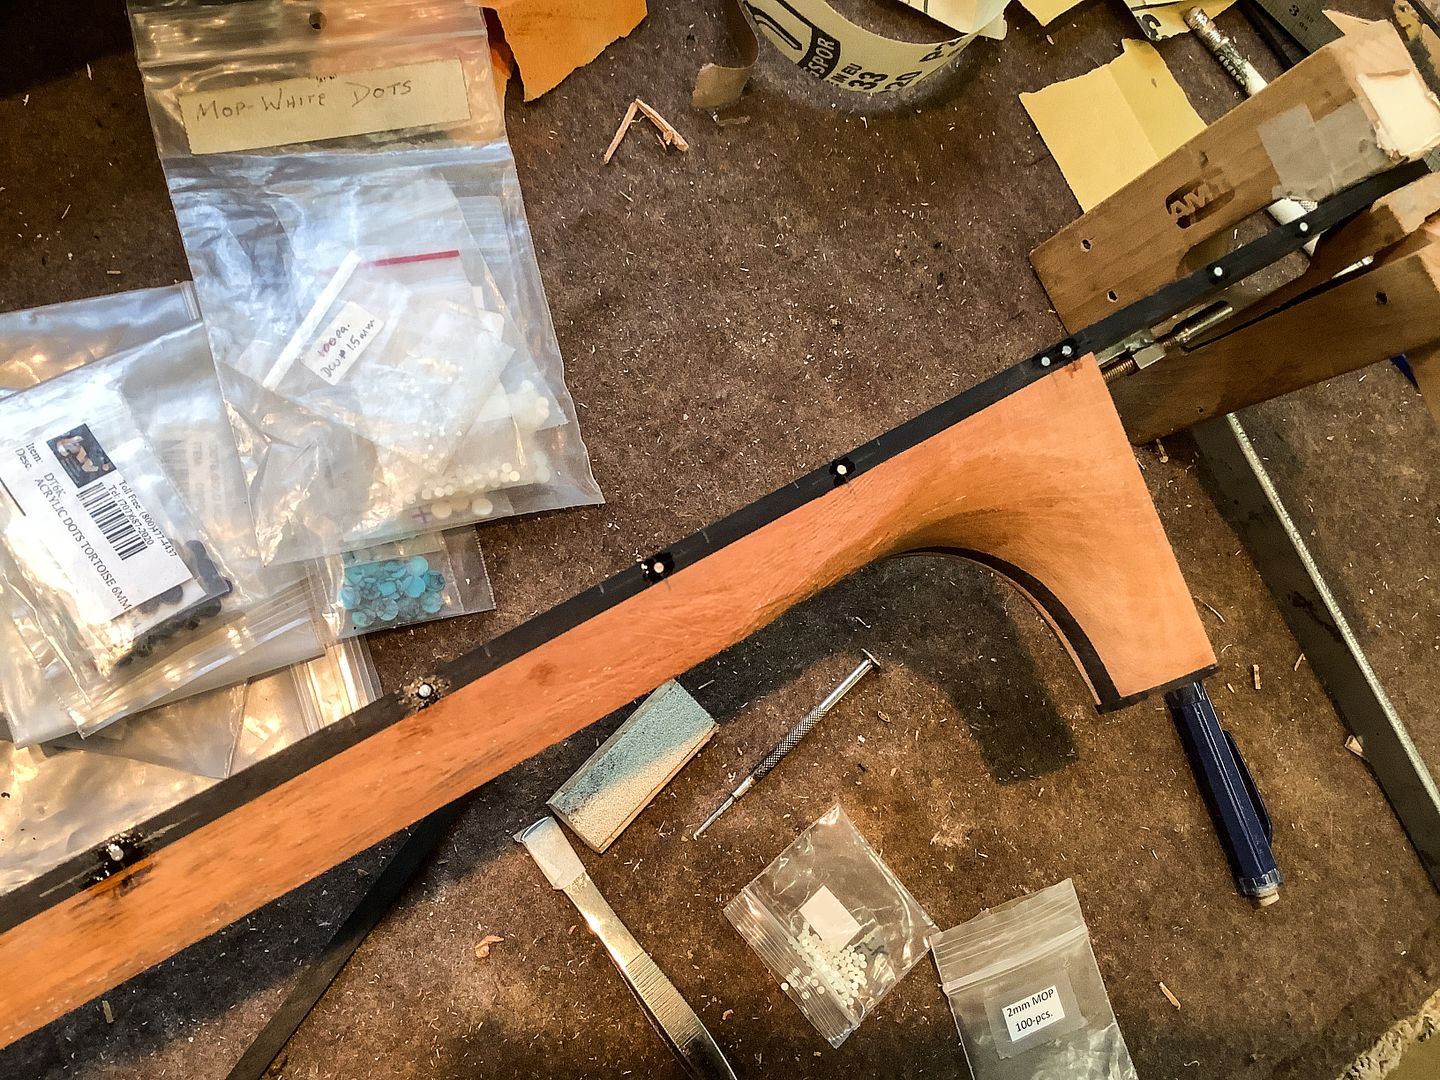
We agreed on some simple white MOP diamond and squares fretboard position markers to give a nod to a traditional, slot head 12-fret 000. Steve got a chance to use his Foredom flex shaft tool with a 3/32” burr cutter to pocket out the fretboard.
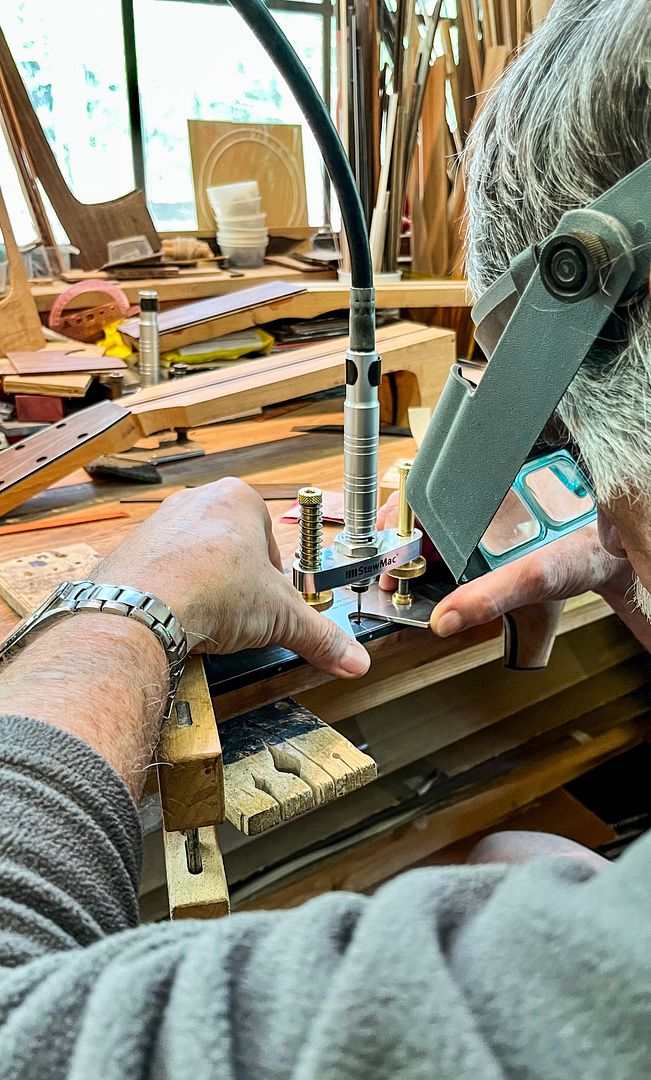 A traditional, diamond and squares short pattern of white MOP installed at frets 5, 7 and 9. 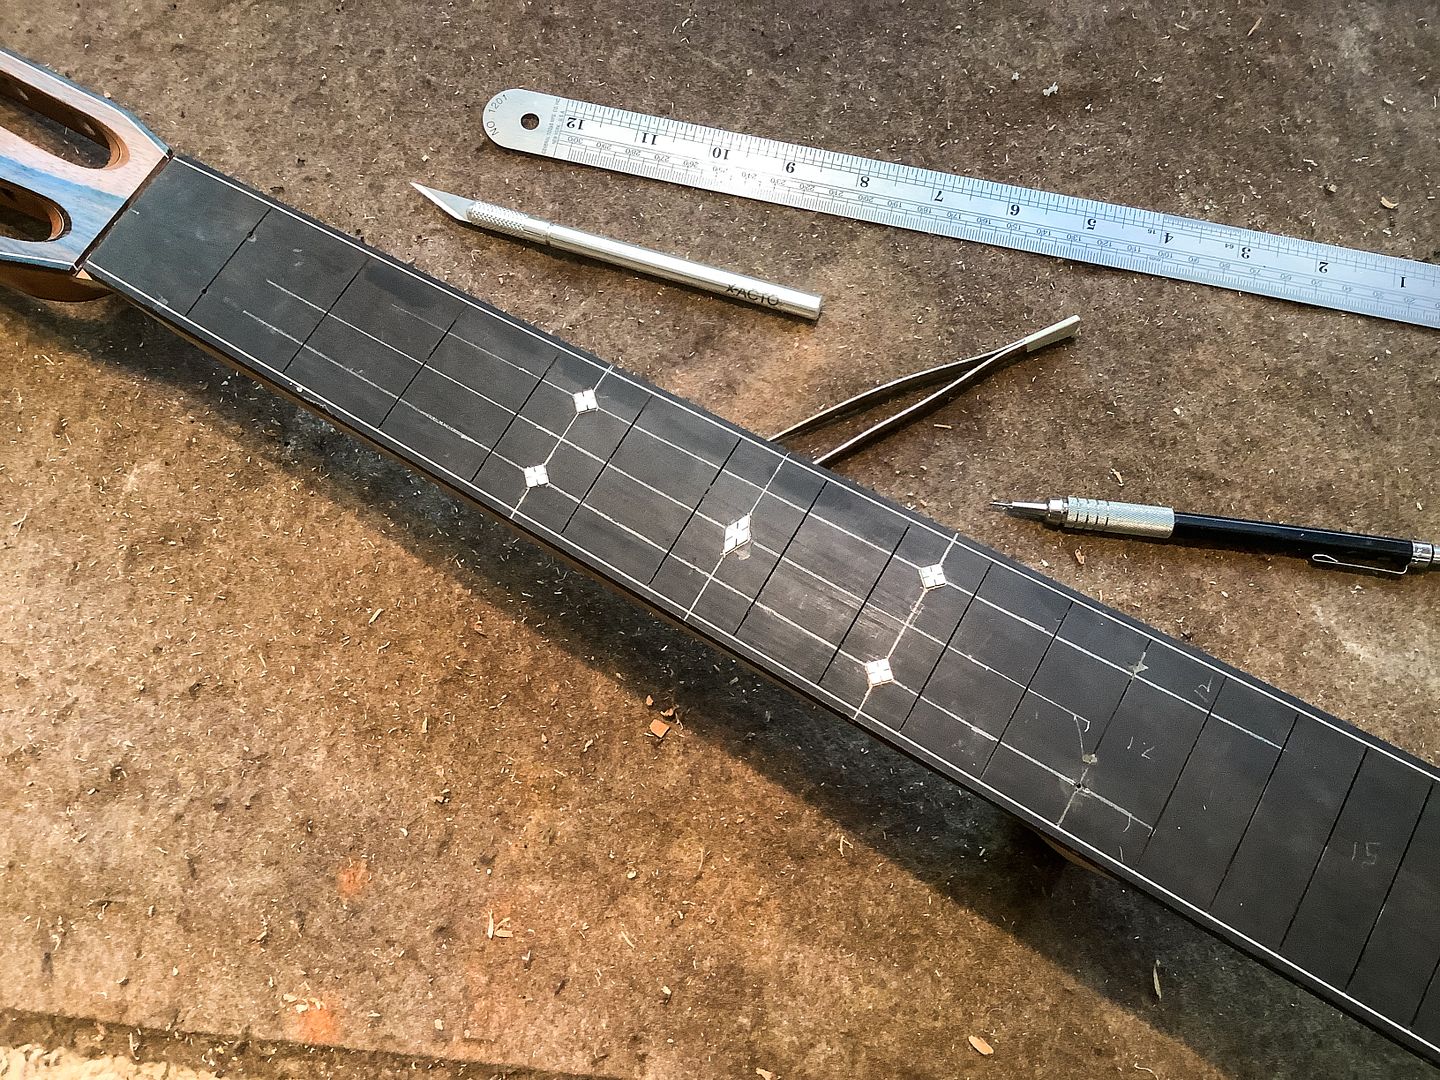 All cleaned up. 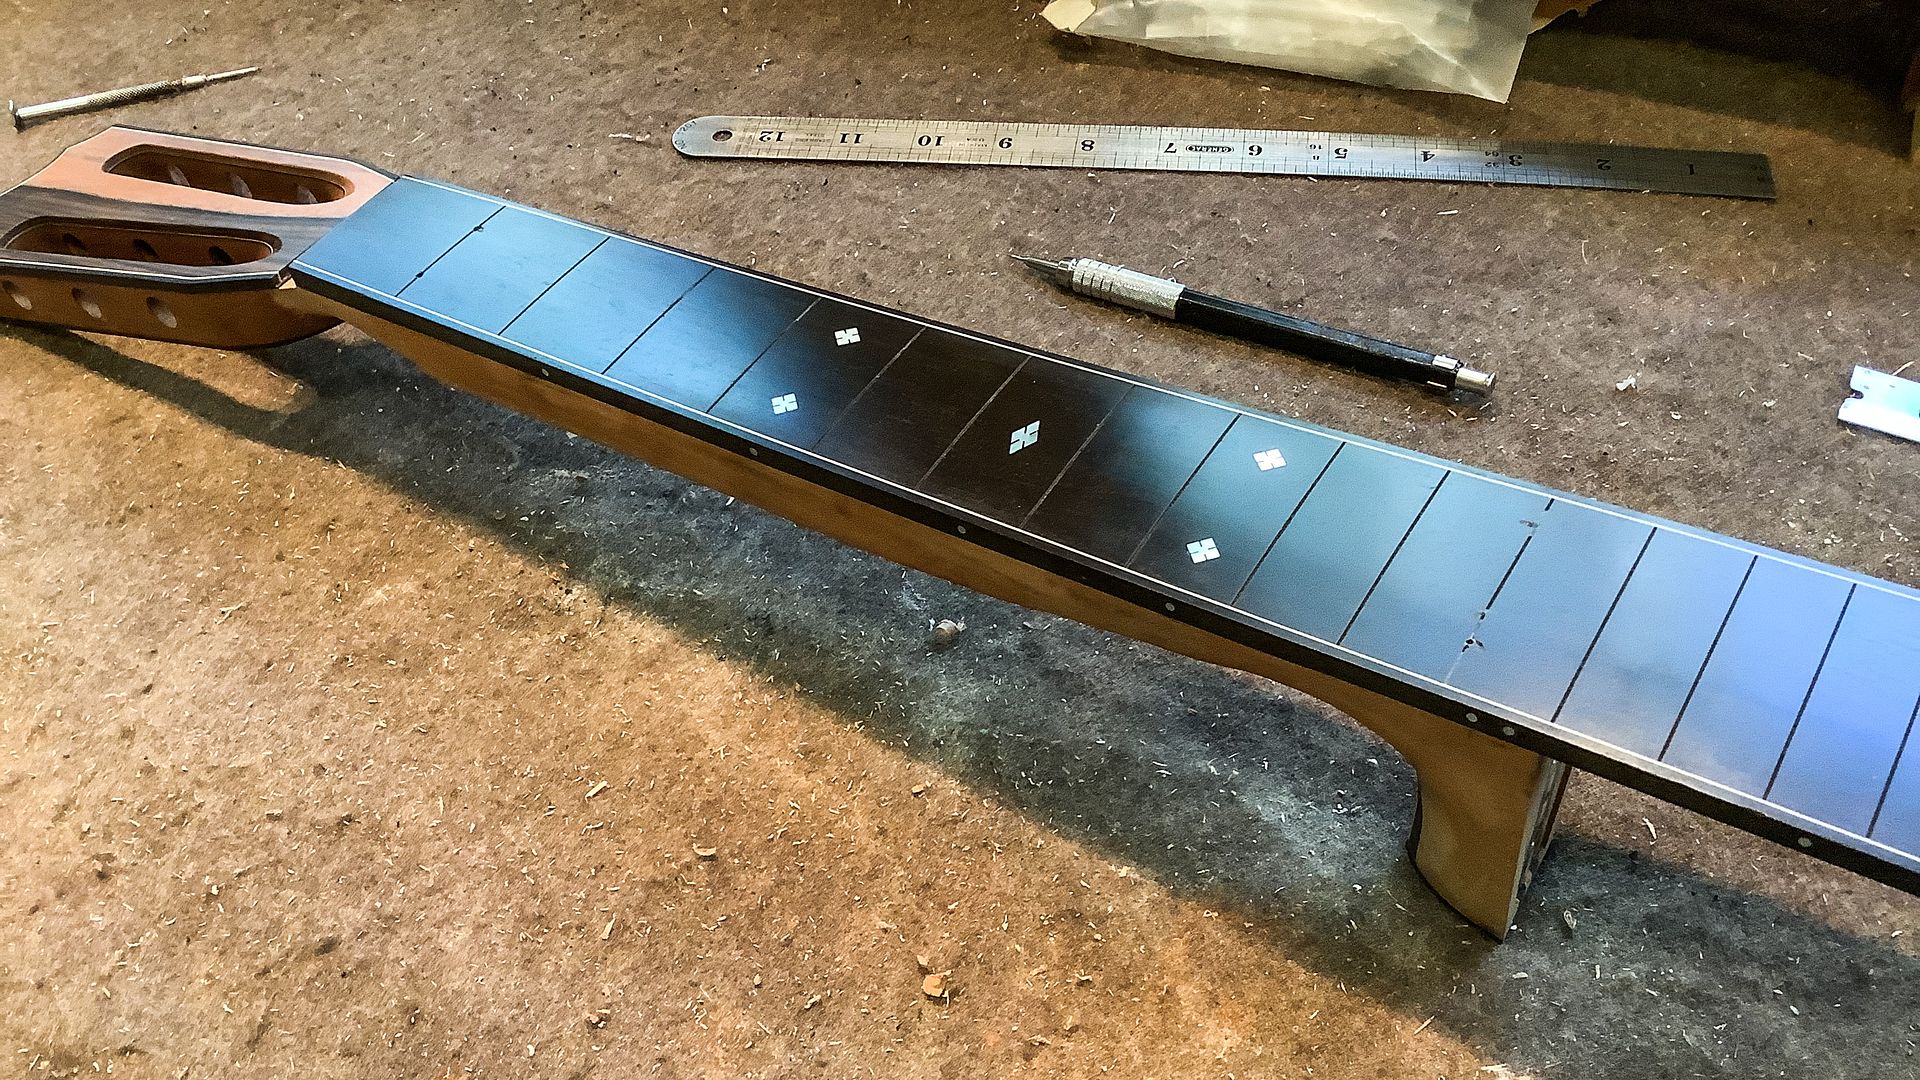 Steve likes to fret his necks before completing the neck carve. Here he is installing Jescar EVO 0.043” x 0.080” fret wire. 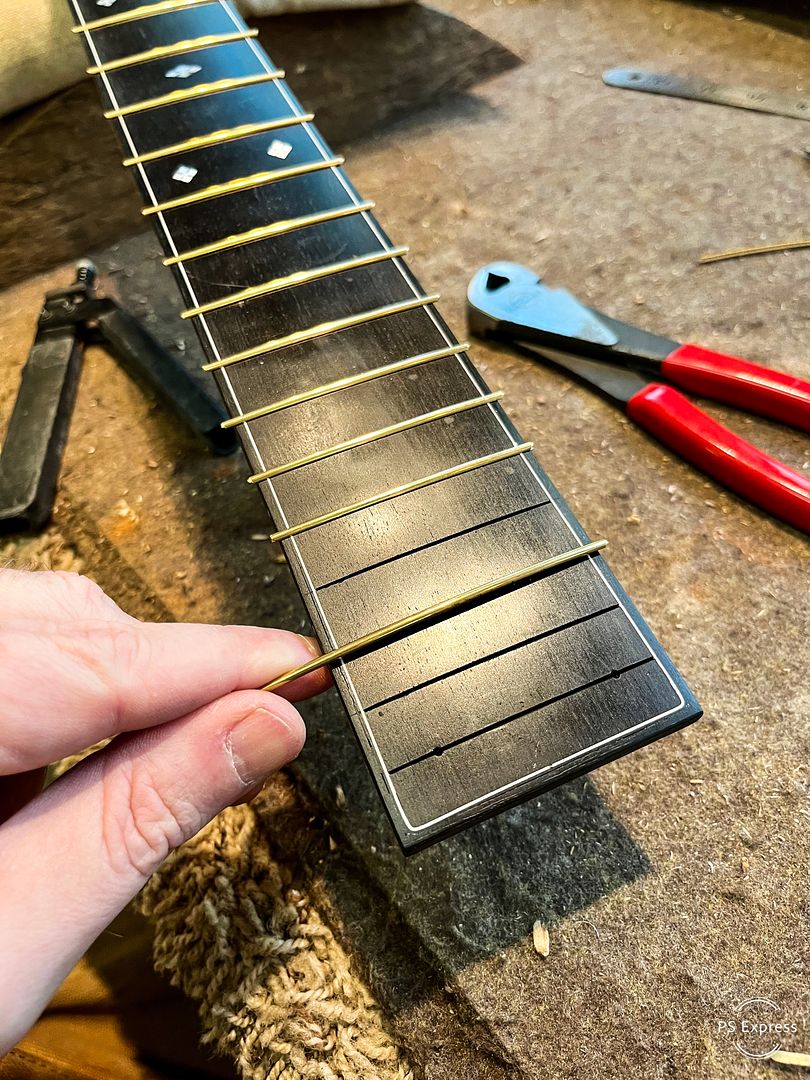
__________________
A bunch of nice archtops, flattops, a gypsy & nylon strings Last edited by iim7V7IM7; 03-31-2022 at 05:50 PM.
|
|
#105
04-02-2022, 05:18 PM
|
||||
|
||||
|
Quote:
Quote:
Thanks for the kind word. Quote:
Quote:
Steve
|


