
|
|
#46
 01-30-2010, 08:05 PM
|
|||
|
|||
|
You may be able to steam out those dents if they bother you. A damp cloth and an iron will most likely do the trick.
The bracing layout looks better now than in your earlier photo. Make sure the X-brace intersects with the wings of the bridge though. 
|
|
#47
01-30-2010, 08:06 PM
|
||||
|
||||
|
That rosette looks pretty cool and a small body guitar! Well done!
__________________
_______________________ Peter M. Cornerstone Guitars www.cornerstoneguitar.com Ukuleles... www.cornerstoneukes.com
|
|
#48
01-31-2010, 08:27 AM
|
|||
|
|||
|
I really appreciate the kind words especially from great builders.
I'm having a bit of a crisis with my back wood as today I noticed a very nasty split running across the grain right in the middle of the board about 7" long and another one about 5" long not too far from that crack. I have a feeling I may need a new set, not sure how it happened but a few other people have been using my shed and probably dropped something on it. Last edited by Coke_zero; 02-06-2010 at 06:48 PM.
|
|
#49
02-09-2010, 05:06 AM
|
||||
|
||||
|
You Go, Man!
I just wanted to say it sounds like you've got some great guitar karma to start with, having found yourself in a place where you can actually do this, with helpful people, good materials, tools and space, and woodworking in your genetic profile. I had the same kind of good fortune when I started out, and I'm into my eleventh year now, 36 guitars completed to date, and loving it more every day. Reading your posts, I just know you're going to do great work. I hope you post some updates of your progress, and please know that we're all rooting for you to have a great success on your first guitar build. Best, -edwinson
|
|
#50
02-09-2010, 05:20 AM
|
||||
|
||||
|
Quote:
If the cracks are clean and discreet, you can repair them invisibly with super glue (cyanoacrilate). Use a pro grade superglue, and be sure to put down some wax paper on your work surface so you don't glue your wood to the table top. Thin superglue will very quickly wick through the crack and make an invisible, permanent bond if everything is lined up right. You can hold it together with hand pressure while it kicks. If it takes longer than 30 seconds, breath on it. The moisture in your breath will speed up the bond. Good luck...That's a pretty set of rosewood, and it would be a shame not to use it. -edwinson
|
|
#51
02-13-2010, 04:47 PM
|
|||
|
|||
|
The cracks were bad, someone told me that they accidentally leaned on it when picking something up. I will keep it and maybe use it for a future build for rosettes or other veneers.
Been a while but here's an update: It's the same post as I put on the Luthiers Forum recently for those who don't browse that site... I waited a while for some stuff to get shipped over from LMI and when it finally arrived I was on duty at work for 7 days straight. I got some stuff worthy of note done this week though. Firstly, I made perspex templates for a few of my plans (parlour, GA and dreadnought). No pictures but they came out pretty good. This way I can make moulds and do things a lot easier. I don't know if I will make another guitar after this one as I will see how it goes first, but I got them all out of one sheet of perspex so no loss there. I got around to scrapping the rosette down and sanded it with 220 grit sandpaper. I am pretty happy with the final result. It obviously needs a more sanding at a later date, but it's amazing how much smoother it got going from 120 grit to 220 grit. Just 30 seconds worth of sanding made it feel like a whole new piece of wood. I was quite surprised indeed. 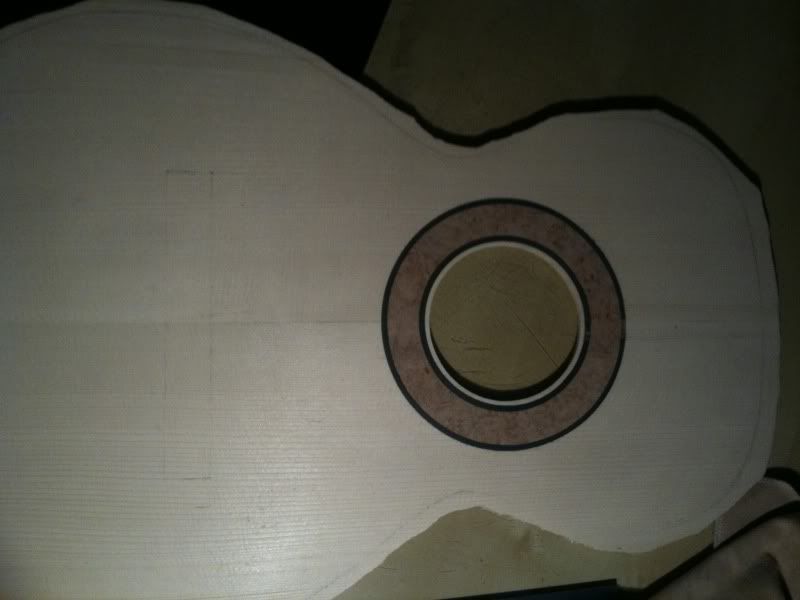 Here is my Peruvian Walnut back thickened down to where I need it. I then cut it out roughly 3/4" away from the template line by hand with a coping saw. I would have used a jig saw but I forgot I loaned it to someone for a small job they had. I decided to go with walnut as I was told it is an easier wood to work with than most. So far, that is 100% true. The back and sides are at the same thickness as the rosewood was and it feels like it will bend a lot easier. It also is less porous and scraps very nicely indeed. 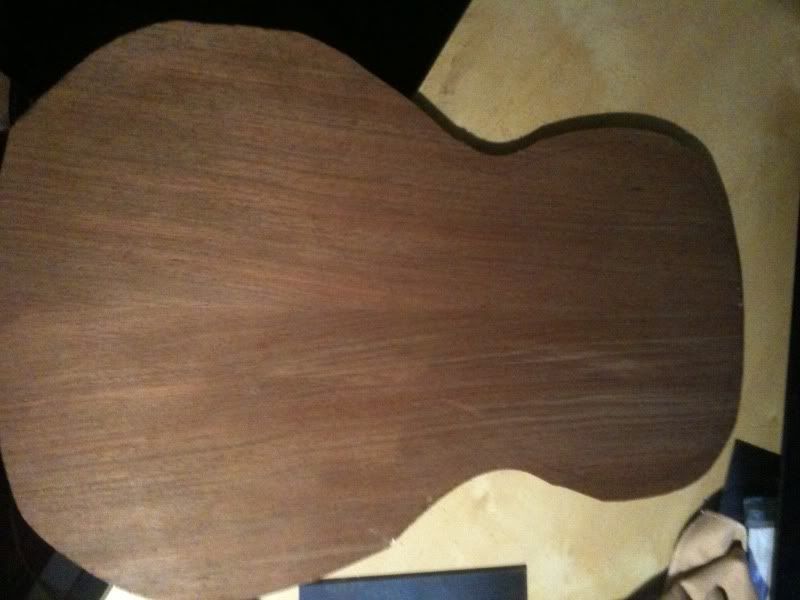 I then glued my spruce back strip on. I don't have a go-bar deck so I improvised using my weightlifting set. I placed a 20" long 4"x2" on the back strip, then stacked heavy weights on that along the length of it. The result was a solid glue joint (phew!). I've scrapped back the overflow of glue and voila. I wasn't sure of how it would turn out at all and I won't pretend I did. I am using advice given to me and improvising when I don't have the equipment. I used at least 100lbs of weights if not more stacked on my work bench and it seemed to do the job! 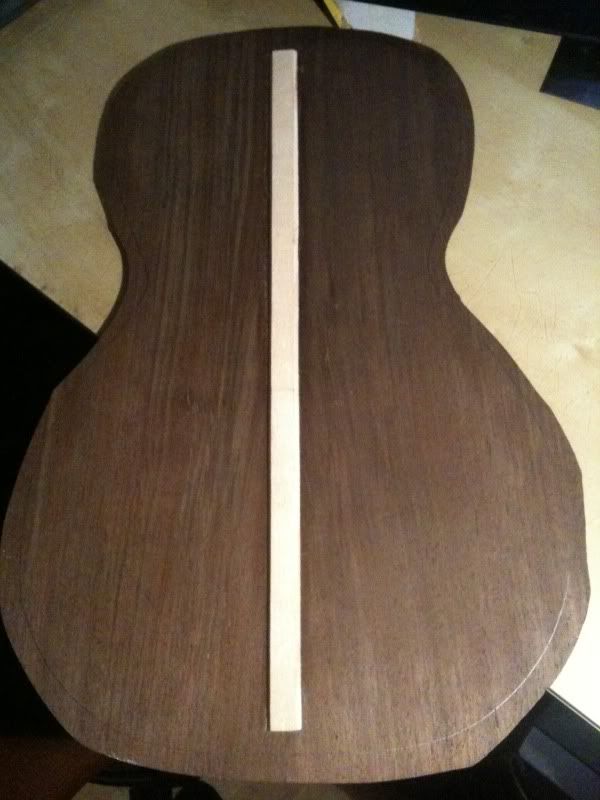 I got a few new router bits today also. I started cutting the pieces of ply for my mould but I was falling asleep with a router in my hand after a late shift yesterday before going onto an early shift today. I have work tomorrow also so I will catch up on some sleep before I start to use power tools again as I would like the fingers to play this guitar when it's finished. I hope to get some work done Monday or Tuesday (touch wood - no pun intended). Last edit. I have talked to a few other experienced builders. As I lack some equipment to do the job properly, I will have a back with a 15ft radii but the top will be flat. This will help me out when it comes to shaping the sides. The original plan was for a very slight radii, but it will be quite difficult without a radius dish in that size. Last edited by Coke_zero; 02-13-2010 at 05:08 PM. Reason: Tired - grammar is awful today!
|
|
#52
02-16-2010, 07:21 PM
|
|||
|
|||
|
Finally a few days off from work!
Not as much done as I would have liked. I finished work on Sunday, went to bed about midnight and woke up at 2pm Monday morning. I guess that's what happens when you pull a few double shifts while already working a 60 hour week  . .I made a new mould though. To do this I borrowed my fathers router as he has a professional quality one rather than a DIY one. I made a 1/2 template out of a scrap piece of ply. Now the only router guide I had was about 30mm so when you cut into the wood, it would effectively make a copy 12-15mm smaller than the original (if that makes sense). So I carefully used a jig-saw to make the template bigger until I got the size I required. A little bit of work, but now I have a "master" for future parlour sized moulds if I ever need to replace one or if I wanted to even make it into a OOO or OM mould. I used a heavy duty door hinge and a strong toggle clip (like you would have on a tool box, just much stronger) to keep the mould together. I could have used a jig saw to cut each piece of the 3/4 ply. This would have taken much longer and what I like about routers is that you can make effectively perfect copies over and over. The final mould isn't the same quality as one from a supplier, but is symmetrical and is fit for purpose. I have no pictures yet and I didn't take any during the build, but I will get a final picture tomorrow. The overall size of the guitar will be a little bigger than a traditional parlour. I also decided to go for a 24.6" scale length rather than a 24". This does complicate a few things but a few people have offered their help on a few other boards. It will be about the same size as a Brook Clyst. I dd a few other things today between going out for a run and fixing my mothers car. Excuses the quality of the pictures, they are taken using my iPhone and I couldn't hold it steady for some odd reason. I cut the notches out of the back strip for the braces: 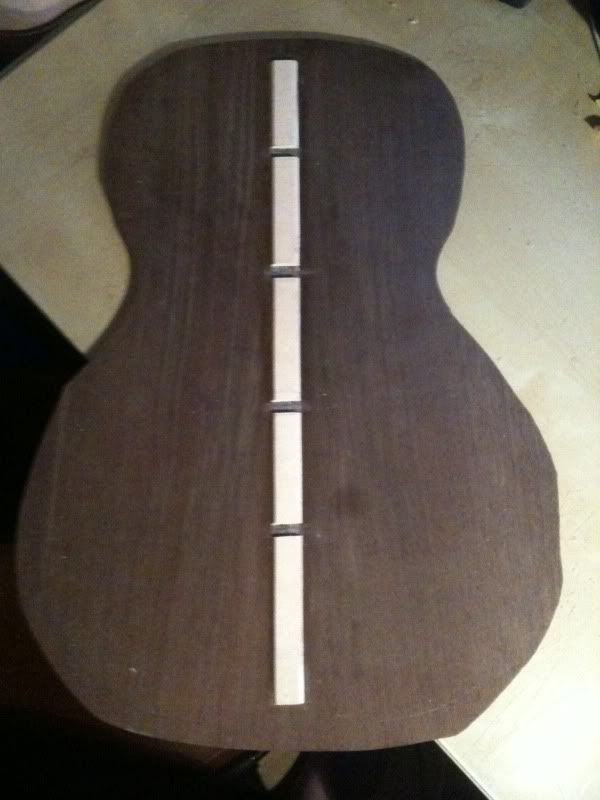 It still needs a little cleaning up between the notches I think to get a good glue joint later on as there is a little bit of old glue & spruce there. I'll go over it with a chisel carefully later. I don't have my radius dish or my brace maker yet but this is the rough layout of the braces. Normal bracing pattern, which I have copied from 99% of builds I see. In fact, are there other types of back bracing? I know they aren't quite straight as obviously they aren't glued and are only loosely in place. 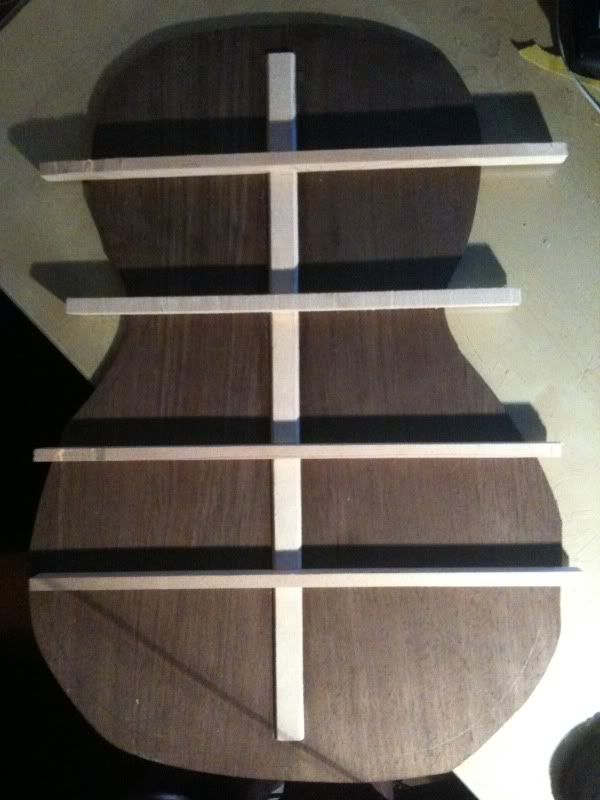 I also sanded my sides a little bit with 220 grit paper on my orbit sander just to get it a little smoother to work with. I also cut the sides to a closer width needed, which is about 3 1/2" or so. I'm still trying to work out my neck. I will probably leave the neck as long as possible as it confuses the heck out of me .I hope to bend my sides tomorrow. If all goes well watch this space, if not, be prepared to see pictures of splinters  . .
Last edited by Coke_zero; 02-16-2010 at 07:43 PM.
|
|
#53
02-17-2010, 10:13 AM
|
|||
|
|||
|
Right. Started to bend my sides today. It took me an over an hour to bend to the first one. After a few frustrating moments and a few burns later, the first side came out pretty good. I haven't done the second yet as I wanted to let my bending iron cool down as I didn't want the element to burn out.
Here's the first picture, this first bend took a bit of work as I was unsure of how much water was needed. Once I started to get it wetter it bend like lead and I could relax: 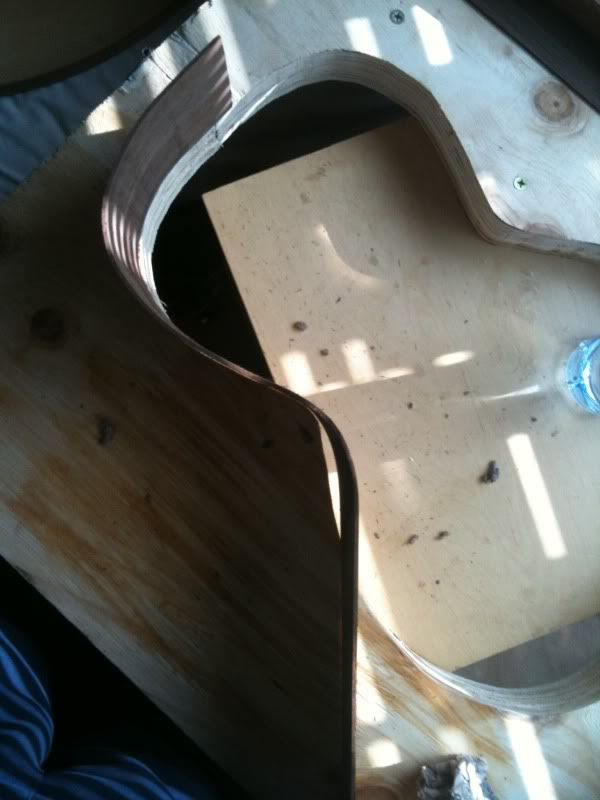 I then started on the waist which was a little tricky. The hardest part was flowing one bend into another. I got there in the end though and I was happy with the result:  The final bend was the easiest as it was a gentle bend which was easy compared to the first couple. It then went into my would for about 5 hours with some shaped blocks clamping it tight to hold the shape:  I will do the second bend later today as I have work tomorrow. All I can say is, when you see these guys on Youtube bend a side in about 6 minutes, they are very skilled indeed. I can see why people get Fox Benders, not because they aren't skillful, but because with a Fox you can bend much quicker and if you are making 2 or 3 guitars you can just spend one day bending all your sides with that. EDIT: I did the sides in a nice warm room as my heater died in my shed and it is about 2 degrees Celsius outside today, hence why you see bare feet .
Last edited by Coke_zero; 02-24-2010 at 03:19 PM.
|
|
#54
02-17-2010, 12:10 PM
|
|||
|
|||
|
I've started my second side. I'm finding it quite hard to get an exact copy of the first. I have half bent it and now it is clamped in the mould to try and get it to the right shape. I will check up on it tomorrow when I get home from work. For now, I will just leave it.
|
|
#56
02-17-2010, 03:39 PM
|
|||
|
|||
|
Thanks Fliss. I thought you might have a look here as the word parlour to you is like honey to a Pooh bear
.I much prefer the walnut than the rosewood now. The dark contrast with the very light Englemann top is nice. When it is bound with maple it should stand out nicely. I've turned a bedroom into a makeshift workshop while my shed is out of action due to the cold and power going out. Much warmer, but there is lot of mess about now .Back to work for a few days now, so I won't get much done until my next few days off which I think is the weekend (a short week for once :o). Last edited by Coke_zero; 02-17-2010 at 06:56 PM.
|
|
#57
02-18-2010, 06:03 AM
|
|||
|
|||
|
Quote:
Looking forward to seeing the next progress pics! Fliss
|
|
#58
02-18-2010, 01:24 PM
|
|||
|
|||
|
The second side is bent. I put my back out at work today so had to bend this one pretty much sitting down. I will post a picture after it has had time to sit in the mould for 3 or 4 hours or so. I took the first side out of the mould today and it was great
. I partially bent the second side last night, but I finished it in less than 15 minutes. Once you get a feel for the heat of the bending iron, how much water you need and how much pressure you need it is easy to bend, but hard to bend neatly. I would say after bending 4 or 5 sets of sides I would start to get the knack for it.Okay, I got around to uploading the pictures: Second side: 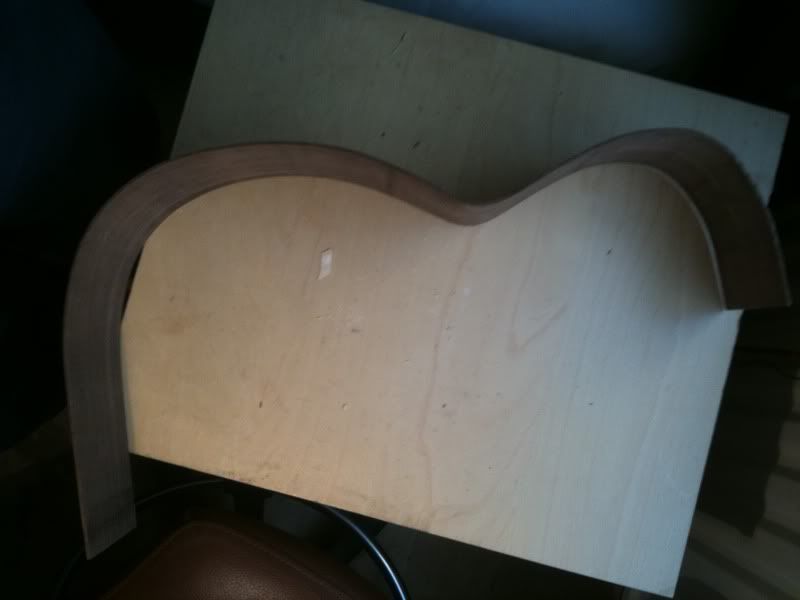 Rough idea of shape. I still need to trim down the overhang: 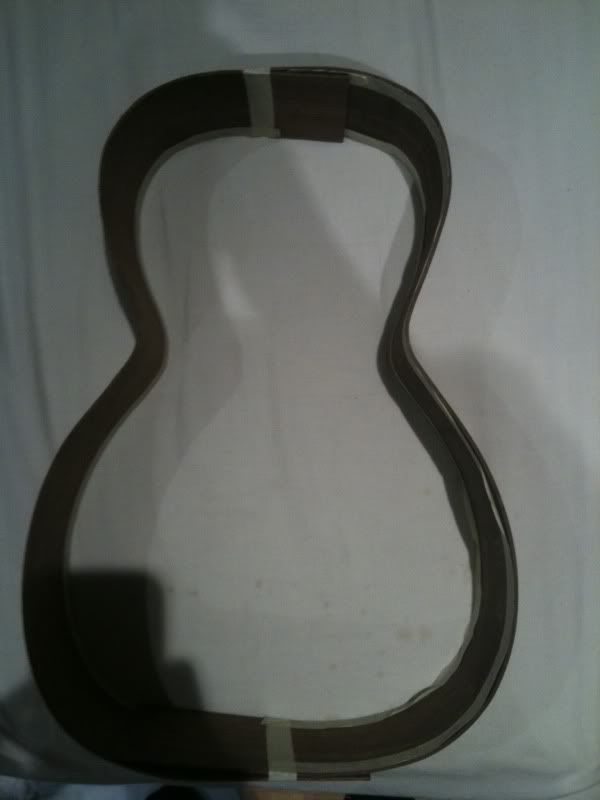
Last edited by Coke_zero; 02-19-2010 at 03:05 PM.
|
|
#59
02-24-2010, 04:39 AM
|
|||
|
|||
|
Wow Unique Guitar!
__________________
Guitar Stand For Sale Best Acoustic Guitar Under 500 Best Acoustic Guitar Strings Acoustic guitar stands for sale Guitar stand best buy Fender starcaster strat pack best price
|
|
#60
02-24-2010, 12:46 PM
|
|||
|
|||
|
Quote:
. I really have no idea how it is going to work out. I'm actually really starting to hope it turns out nice enough to drive me to make another in the future. I don't expect it to compare to anything of note, but we all know how it feels when we do something that takes a long time for it to turn out awful.Only 4 days of work left then I have a day or two off where I can do some actual work on it. Last edited by Coke_zero; 02-24-2010 at 12:57 PM.
|


