The Acoustic Guitar Forum

Go Back   The Acoustic Guitar Forum > General Acoustic Guitar and Amplification Discussion > Build and Repair

Reply
 
Thread Tools
  #31  
Old 04-26-2021, 06:25 AM
Victory Pete Victory Pete is offline
Registered User
 
Join Date: Feb 2011
Posts: 760
Default

Quote:
Originally Posted by RoyBoy View Post
Lighting aside, your last pictures of the guitar show inadequate atomization and poor flowout. You'll end up sanding almost all of your finish off to get it level.

To spray finish, you need a compressor that pushes enough CFM to drive a full size gun, or at least a touch up gun. Your woodwork on the guitar looks real nice though.
Well it is a learning curve with the new gun. The new gun I have has a 1.4 mm needle and I have a smaller gun with a 1 mm needle. I am pretty sure I can get a better spray with practice.
__________________
http://victoryguitarshop.com/
Reply With Quote
  #32  
Old 04-26-2021, 07:25 AM
Victory Pete Victory Pete is offline
Registered User
 
Join Date: Feb 2011
Posts: 760
Default

The guns I have are HVLP, I have been wanting to get an AM-8008/5008 “SmartPak” combo. Since these are LVLP they may be just what I need.

https://homesteadfinishingproducts.c...guitar-making/
__________________
http://victoryguitarshop.com/

Last edited by Victory Pete; 04-26-2021 at 07:32 AM.
Reply With Quote
  #33  
Old 04-26-2021, 11:12 AM
Victory Pete Victory Pete is offline
Registered User
 
Join Date: Feb 2011
Posts: 760
Default

Just ordered the AM-8008/5008 “SmartPak” combo.
Attached Images
File Type: jpg am8008_5008small.jpg (21.7 KB, 152 views)
__________________
http://victoryguitarshop.com/
Reply With Quote
  #34  
Old 04-26-2021, 11:15 AM
Victory Pete Victory Pete is offline
Registered User
 
Join Date: Feb 2011
Posts: 760
Default

Quote:
Originally Posted by RoyBoy View Post
Lighting aside, your last pictures of the guitar show inadequate atomization and poor flowout. You'll end up sanding almost all of your finish off to get it level.

To spray finish, you need a compressor that pushes enough CFM to drive a full size gun, or at least a touch up gun. Your woodwork on the guitar looks real nice though.
I started with Preval sprayers so a rough surface seems normal to me. I have a bigger compressor in my workshop but would love to keep using my small Paasche compressor.
__________________
http://victoryguitarshop.com/
Reply With Quote
  #35  
Old 04-27-2021, 12:08 PM
Victory Pete Victory Pete is offline
Registered User
 
Join Date: Feb 2011
Posts: 760
Default More Sanding And Spraying

I now have 8 oz of shellac flakes down. It is fairly thick. I have a method of determining thickness by using a flashlight, you can see a halo of light and get an idea of how thick it is. The low shiny spots are getting smaller and I will be switching to a softer foam block to do final level sanding when this is dry. My new guns are coming tomorrow so I want to be able to put down the final finish coats with them in a couple days.
Attached Images
File Type: jpg 20210427_124014.jpg (40.2 KB, 148 views)
File Type: jpg 20210427_124118.jpg (22.9 KB, 143 views)
File Type: jpg 20210427_130239.jpg (42.7 KB, 144 views)
File Type: jpg 20210427_130302.jpg (41.3 KB, 145 views)
File Type: jpg 20210427_130321.jpg (42.1 KB, 143 views)
File Type: jpg 20210427_130345.jpg (37.2 KB, 146 views)
File Type: jpg 20210427_131618.jpg (23.5 KB, 143 views)
File Type: jpg 20210427_135518.jpg (32.0 KB, 147 views)
File Type: jpg 20210427_135527.jpg (30.9 KB, 145 views)
__________________
http://victoryguitarshop.com/

Last edited by Victory Pete; 04-27-2021 at 12:15 PM.
Reply With Quote
  #36  
Old 04-27-2021, 04:57 PM
Victory Pete Victory Pete is offline
Registered User
 
Join Date: Feb 2011
Posts: 760
Default Shroud Good

I get fidgety in between coats of shellac, this venture turned out great. I get way more CFMs for less RPMs. Just clears window when closed.
Attached Images
File Type: jpg 20210427_184631.jpg (22.3 KB, 142 views)
File Type: jpg 20210427_171551.jpg (41.8 KB, 140 views)
File Type: jpg 20210427_184750.jpg (35.9 KB, 139 views)
__________________
http://victoryguitarshop.com/
Reply With Quote
  #37  
Old 04-27-2021, 09:41 PM
runamuck runamuck is offline
Registered User
 
Join Date: Jul 2006
Posts: 2,295
Default

Quote:
Originally Posted by Victory Pete View Post
I have a method of determining thickness by using a flashlight, you can see a halo of light and get an idea of how thick it is..
Can you explain how that works?
Reply With Quote
  #38  
Old 04-28-2021, 03:04 AM
Victory Pete Victory Pete is offline
Registered User
 
Join Date: Feb 2011
Posts: 760
Default

Quote:
Originally Posted by runamuck View Post
Can you explain how that works?
If you place a small flashlight like that one on an unfinished guitar surface you will see no light. When there is a bit of finish on the guitar the finish material, if transparent, will illuminate a ring of light. The thicker the finish the more light you will see. I do have to estimate the thickness as I have no way of knowing its actual thickness in a measurable amount.
__________________
http://victoryguitarshop.com/
Reply With Quote
  #39  
Old 04-28-2021, 11:37 AM
runamuck runamuck is offline
Registered User
 
Join Date: Jul 2006
Posts: 2,295
Default

Quote:
Originally Posted by Victory Pete View Post
If you place a small flashlight like that one on an unfinished guitar surface you will see no light. When there is a bit of finish on the guitar the finish material, if transparent, will illuminate a ring of light. The thicker the finish the more light you will see. I do have to estimate the thickness as I have no way of knowing its actual thickness in a measurable amount.
Thank you for that.
If I understand you correctly then, all you know is that there's a thickness but you have no idea what that thickness is. I don't see how that is helpful.
Reply With Quote
  #40  
Old 04-28-2021, 11:51 AM
Victory Pete Victory Pete is offline
Registered User
 
Join Date: Feb 2011
Posts: 760
Default

Quote:
Originally Posted by runamuck View Post
Thank you for that.
If I understand you correctly then, all you know is that there's a thickness but you have no idea what that thickness is. I don't see how that is helpful.
I have an idea if it is an appropriate thickness.
__________________
http://victoryguitarshop.com/
Reply With Quote
  #41  
Old 04-28-2021, 10:02 PM
mirwa mirwa is offline
Registered User
 
Join Date: Sep 2013
Posts: 3,110
Default

Quote:
Originally Posted by runamuck View Post
all you know is that there's a thickness but you have no idea what that thickness is. I don't see how that is helpful.
Yep.. I think if anyone at home wanted to measure material thickness on a build or respray, then something like these may help, just a set of super cheap throat calipers ($30) would IMO be a better choice than a light on the top, they cannot get to the back of the guitar but it is at least something measurable / quantifiable


Personally, if I need to measure material thickness then I use the magi probe setup, cannot speak highly enough of the product.

__________________
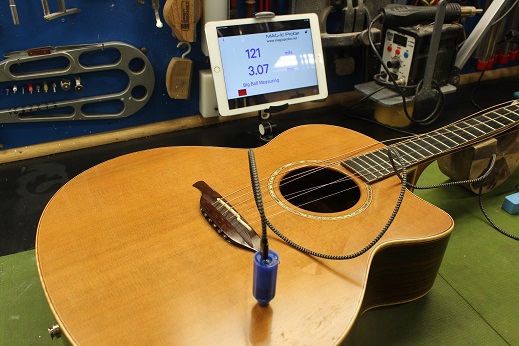
Cole Clark Fat Lady
Gretsch Electromatic
Martin CEO7
Maton Messiah
Taylor 814CE

Last edited by mirwa; 04-28-2021 at 10:57 PM.
Reply With Quote
  #42  
Old 04-29-2021, 03:48 AM
Victory Pete Victory Pete is offline
Registered User
 
Join Date: Feb 2011
Posts: 760
Default

Quote:
Originally Posted by mirwa View Post
Yep.. I think if anyone at home wanted to measure material thickness on a build or respray, then something like these may help, just a set of super cheap throat calipers ($30) would IMO be a better choice than a light on the top, they cannot get to the back of the guitar but it is at least something measurable / quantifiable


Personally, if I need to measure material thickness then I use the magi probe setup, cannot speak highly enough of the product.

I have may sets of calipers and micrometers. That would only restrict you to taking measurements around the soundhole. With my light method I can go anywhere I want. Thickness of material varies depending on the amount of leveling that needs to be done. Most importantly the light will show me if I am getting close to a sand through. Your links do not show up on my page other than a little file symbol. If you are linking to an expensive thickness meter, I have one of those on my wishlist.
__________________
http://victoryguitarshop.com/
Reply With Quote
  #43  
Old 04-29-2021, 04:44 AM
Talldad Talldad is offline
Registered User
 
Join Date: May 2016
Location: Uk
Posts: 113
Default

Just been looking on your website Pete, love your removable go bar press, real meaty threaded bars on there. I did similar but I got so annoyed with constantly winding 8 nuts up and down that I drilled holes and used split pins instead.

On measuring lacquer thickness I might just try your method. Previous I’ve just sprayed a 6” square blank at the same time as the work of I needed reassurance.
Reply With Quote
  #44  
Old 04-29-2021, 04:57 AM
Victory Pete Victory Pete is offline
Registered User
 
Join Date: Feb 2011
Posts: 760
Default

Quote:
Originally Posted by Talldad View Post
Just been looking on your website Pete, love your removable go bar press, real meaty threaded bars on there. I did similar but I got so annoyed with constantly winding 8 nuts up and down that I drilled holes and used split pins instead.

On measuring lacquer thickness I might just try your method. Previous I’ve just sprayed a 6” square blank at the same time as the work of I needed reassurance.
I never thought of spraying a blank sample, that is genius.
__________________
http://victoryguitarshop.com/

Last edited by Victory Pete; 04-30-2021 at 07:50 AM.
Reply With Quote
  #45  
Old 04-30-2021, 09:36 AM
Victory Pete Victory Pete is offline
Registered User
 
Join Date: Feb 2011
Posts: 760
Default Final Coat

I am spraying with the new LVLP QualSpray guns. They spray nice at 29 PSI. I got ahead of myself spraying the back and got a wide run, the whole width of the guitar. I am used to spraying on my flat dolly and was going to again for the final coat but wanted to see how this would go. As things usually go around here I improvised a workaround. A plastic coat hanger hanging from the lights. I think this will be part of my technique, Spay & Hang.
Attached Images
File Type: jpg 20210430_063850.jpg (38.4 KB, 99 views)
File Type: jpg 20210430_071439.jpg (20.0 KB, 101 views)
File Type: jpg 20210430_075541.jpg (49.4 KB, 103 views)
File Type: jpg 20210430_075546.jpg (39.2 KB, 102 views)
File Type: jpg 20210430_112110.jpg (25.5 KB, 101 views)
File Type: jpg 20210430_112117.jpg (30.1 KB, 100 views)
File Type: jpg 20210430_112032.jpg (19.7 KB, 100 views)
File Type: jpg 20210430_112047.jpg (19.0 KB, 101 views)
File Type: jpg 20210430_112410.jpg (23.6 KB, 102 views)
File Type: jpg 20210430_112204.jpg (36.9 KB, 99 views)
File Type: jpg 20210430_112214.jpg (39.7 KB, 103 views)
File Type: jpg 20210430_112223.jpg (36.9 KB, 100 views)
File Type: jpg 20210429_103036.jpg (36.2 KB, 100 views)
__________________
http://victoryguitarshop.com/
Reply With Quote
Reply

  The Acoustic Guitar Forum > General Acoustic Guitar and Amplification Discussion > Build and Repair


All times are GMT -6. The time now is 09:57 AM.


Powered by vBulletin® Version 3.8.11
Copyright ©2000 - 2024, vBulletin Solutions Inc.
Copyright ©2000 - 2022, The Acoustic Guitar Forum
vB Ad Management by =RedTyger=