
|
|
#1
 07-17-2021, 01:59 PM
|
|||
|
|||
|
I have to bend a stripe of herringbone around the edge of the guitar.
Would it be sufficient to wet it and move it over the bending iron ... or must I still do something that it doesn't split or break? 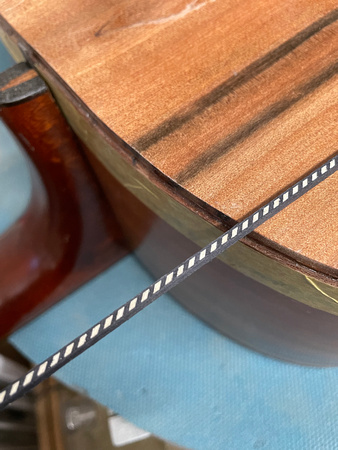
__________________
Thanks!  Martin D28 (1973) 12-string cutaway ...finished ;-) Hoyer 12-string (1965) Yamaha FG-340 (1970) Yamaha FG-512 (ca. 1980) D.Maurer 8-string baritone (2013-2014) and 4 electric axes 
|
|
#2
07-17-2021, 05:45 PM
|
|||
|
|||
|
The outer ledge is normally not a huge problem, but you should back up the rear of the bend with sheet metal to keep it from cracking or blowing out.
Doing tighter bends like a rosette is a bigger challenge, and I cheat by splitting the herringbone down the middle. If it doesn't have someplace to "slip" as it is bent it can be very difficult to get nice even bends. I'm used to referring to "herringbone" as the type with the chevron pattern along the length, so your example binding isn't what I'm used to working with.
|
|
#3
07-18-2021, 12:13 AM
|
|||
|
|||
|
Dan Erlewine did a video about bending herringbone. He separates some of the layers with a heat gun and knife edge.
https://www.youtube.com/watch?v=xU7JYMZ9cGY
|
|
#4
07-18-2021, 01:30 AM
|
|||
|
|||
|
Thanks for your advices!
I´ll try to split my stripe and install it like Dan does in his video. The bending curve on acoustic guitars is moderate because of the bigger radius. It is only tighter in the hip with its shorter radius. But there it is difficult to divide the strip or I carefully cut it there and take care when gluing it back together again to avoid any visible separation line.
__________________
Thanks! Martin D28 (1973) 12-string cutaway ...finished ;-) Hoyer 12-string (1965) Yamaha FG-340 (1970) Yamaha FG-512 (ca. 1980) D.Maurer 8-string baritone (2013-2014) and 4 electric axes Last edited by viento; 07-18-2021 at 02:07 AM.
|
|
#5
07-18-2021, 06:33 AM
|
|||
|
|||
|
I soak mine in the bathtub in hot water for about 10 minutes, then remove and bend around a body shaped 3/4 plywood form. The form has a recess routed in the edge thats twice as deep as the purfling and the same width so that I can bend both pieces at once. I tape the purfling in the recess one stacked on top of the other every inch or so and leave it to dry for a few hours or overnight. Be sure to align the pattern of the purfling so that the mirror image is preserved when you install it on the guitar.
Ive been using this method for many years and it works beautifully. Good luck!
|
|
#6
07-18-2021, 10:43 AM
|
|||
|
|||
|
|
|
#7
07-18-2021, 03:49 PM
|
||||
|
||||
|
Good question. I have never been happy with my results and have tried many approaches. I can add that a heat gun does not seem to be the answer. A steam iron solves some of the issues, and using it with a slightly oversize routed groove, ala Jimmy Caldwell, in scrap material is what I've been most successful with.
|
|
#8
07-18-2021, 05:20 PM
|
|||
|
|||
|
Thanks for your advices!
@GaryJ: that´s the very same purfling I want to use. Your convincing video-link helps me a lot. Thanks!!
__________________
Thanks! Martin D28 (1973) 12-string cutaway ...finished ;-) Hoyer 12-string (1965) Yamaha FG-340 (1970) Yamaha FG-512 (ca. 1980) D.Maurer 8-string baritone (2013-2014) and 4 electric axes
|
|
#10
07-19-2021, 12:01 PM
|
||||
|
||||
|
The OP's herringbone is actually not what I call Herringbone, it is half a herringbone and should bend MUCH more easily.
|
|
#12
07-19-2021, 06:05 PM
|
|||
|
|||
|
Im a rank amateur and have only done it once but it worked out great. Clamped my wifes hair curler to my workbench and set it on high. Used a spray bottle to wet the herringbone about four inches at a time and worked it back and forth over the curler and kept test fitting to the top (Id already routed the channel).
Once it was the right shape I taped the herringbone into the channel and let it dry. The next day it had cupped some at the upper bouts. I removed the tape and herringbone, sprayed water on the portion that had cupped and put a cinder block on it. The next day it was flat and went in great. Keith
|


