
|
|
#16
 10-31-2022, 09:29 PM
|
|||
|
|||
|
The original neck will work just fine- - - no need to spend cash for another one. The fingerboard comes off, the neck gets cut off,. and after cleaning up the now-flush face of the neck, run the neck through a router table (what I use is 3/4" router bit in a router table) and cut a channel for a new tenon. Do the same for the neck block in the body. When done, glue a new tenon (aka 'floating tenon') into the neck, drill holes for fasteners and mate the repaired neck to the body. Rout for the truss rod, ttach the fingerboard, and the neck is now happy. Care, and measuring a zillion times, will need to be important. After that, attach a back.
Good advice about the peddlers. They're geniuses at ginning up needs for left-handed screwdrivers. Your specialty-wood lumberyard is your friend. I paid $30.00 for a quartersawn mahogany plank, cut it up, and I have six necks. Last edited by phavriluk; 10-31-2022 at 09:35 PM. 
|
|
#17
11-01-2022, 07:33 AM
|
|||
|
|||
|
Quote:
Most tools required (including Japanese saws) can be purchased at generic tool or hardware stores or made yourself. Wood can be purchased at better wood stores, some even have guitar wood departments and are typically better priced than luthier supply houses. I do occasionally buy a tool or some material from LMI or SM but they are my last resort. When budget guitar necks are cut off for resets, the necks are usually re-used. Dowelling and bolting on is one choice or the floating tenon mentioned previously. I met a builder recently who bolts his necks on with a butt joint. They looked good. If you do want to build a kit, this one seems to be good value, https://www.lmii.com/discounted-read...y-to-ship.html Good Luck with your journey.
|
|
#18
11-02-2022, 03:48 PM
|
|||
|
|||
|
Thanks Rudy. The suppliers have met their match. They have no idea how cheap I am. This one is turning out to be just chock full of surprises. I took the fretboard off hoping to reuse it and the truss rod. The two surprises I ran into were a rivet near the 10th fret and one between 0 and 1 fret. It came off hard like it was glued the whole way but when I got it off I found this black paper that was somehow used to bond it. I was not expecting this but maybe you have seen it before. Also, another surprise was a CF Martin impressed stamp on the neck block piece glued to the back. It was written backwards though. Why would they have a backward impression stamp?[ATTACH]IMG_7322.jpg[/ATTACH]
__________________
2010 Martin HD-28 1990 Martin B-40 Acoustic Bass 2004 Taylor 815ce 2018 Taylor 814ce LTD NAMM 2019 Taylor Baritone 8 1937 Gibson L-37 2005 Gibson J-45 Historic 2014 Gibson Les Paul Acoustic Prototype
|
|
#19
11-02-2022, 03:56 PM
|
|||
|
|||
|
that black paper - - - I'm taking a SWAG that it's host to some variety of pre-impregnated epoxy that sets promptly with heat, and under pressure so the folks can do them in batches. Cut to size by a vendor/back shop person, assemblers place everything together. put the neck in a mold with its littermates, close the mold, turn on the heat, and there be a bunch of necks with fingerboards. Next batch.
|
|
#21
11-02-2022, 04:34 PM
|
|||
|
|||
|
I suspect you are right about the paper. Here is my DIY steamer. The only thing I had to buy was the #7 Rubber Stopper for $5. It worked great with steam pouring out. I used my football pump needle. IMG_7324.jpgTold you I was cheap. P.S. don't tell the wife I used her kettle.
__________________
2010 Martin HD-28 1990 Martin B-40 Acoustic Bass 2004 Taylor 815ce 2018 Taylor 814ce LTD NAMM 2019 Taylor Baritone 8 1937 Gibson L-37 2005 Gibson J-45 Historic 2014 Gibson Les Paul Acoustic Prototype
|
|
#22
11-02-2022, 07:50 PM
|
|||
|
|||
|
IMG_7325.jpg
I got the neck cut off and it came out pretty well with no additional damage to the existing sides. Now I am going to sleep on the best way to remove the rest of the tenon that is still in the guitar. Easy would be nice but more importantly, I am after a least damage option to the existing block. Router is probably the best choice but I have the threaded bolt on insert to worry about.
__________________
2010 Martin HD-28 1990 Martin B-40 Acoustic Bass 2004 Taylor 815ce 2018 Taylor 814ce LTD NAMM 2019 Taylor Baritone 8 1937 Gibson L-37 2005 Gibson J-45 Historic 2014 Gibson Les Paul Acoustic Prototype
|
|
#23
11-02-2022, 08:49 PM
|
|||
|
|||
|
Quote:
Some people do not remove the tenon and bolt on the neck with a butt joint. Just ideas.
|
|
#26
11-03-2022, 06:56 AM
|
|||
|
|||
|
That's an interesing work bench you have there
 At this point I would simply convert the entire thing to a bolt on butt joint. Very easy to do. Drill two holes, or if possible use the existing one, through the head block. Then carefully measure the bolt holes and transfer those to the neck heel and drill in some 'wood inserts.' Now you have a bolt on neck. I like to use furniture bolts as they look good and the wide head distributes clamping pressure. I also cut a recess in the head block to inset the bolts but this is not necessary. Wood inserts: 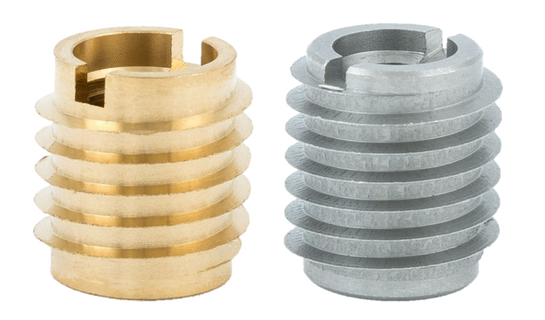 Furniture bolts: 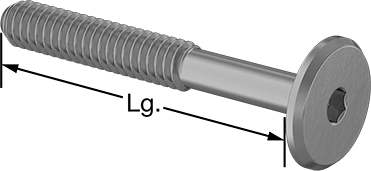
|
|
#27
11-03-2022, 11:25 AM
|
|||
|
|||
|
You guys really are a wealth of information. So much good advice and I'm drinking it up. I checked out the link for the Luthier's Mercantile kit and I really like it. Very likely will be my next "real" project. I don't have an OM and that would be perfect and is priced right. I ended up drilling a bunch of holes in tenon. As also mentioned, I slowly chipped out down the center but left a little that was glued to the mortise. I heated it up with an iron and was able to pry the remaining loose cleanly. I did order a new neck. I'll need to have the headstock shaping skill when I build the kit anyway. I wanted to practice inlays and it will be easier with the fretboard off anyway. If I screw it up, I'll just go with dots on the future kit. As for the radius dish, I was trying to figure out how to best glue the 20 foot radius braces I got from STEWMAC. It seemed like so many repairs are done on loose bracing, I wanted to get this right. I decided the dish would make for the most accurate way to bond using my DYI go-bar deck I made from an old water heater table I got for $10. I also think I will try the two-bolt / furniture bolt change to put the neck on. I like that idea and will give me practice installing the Heli-coil (not sure if they call it that in the Luthier world). Thanks to all of you for sharing your knowledge.
__________________
2010 Martin HD-28 1990 Martin B-40 Acoustic Bass 2004 Taylor 815ce 2018 Taylor 814ce LTD NAMM 2019 Taylor Baritone 8 1937 Gibson L-37 2005 Gibson J-45 Historic 2014 Gibson Les Paul Acoustic Prototype
|
|
#28
11-03-2022, 12:40 PM
|
|||
|
|||
|
Quote:
You could also shape the radius to the brace and then using a flexible slat as a clamping caul on the opposite side of the top, clamp the braces in place which will impart the radius in the top. 
|
|
#29
11-08-2022, 11:44 PM
|
|||
|
|||
|
I have my replacement neck and I'm beginning to do some minor shaping on it. It is perfect. I fit checked it with the fretboard in place and flush (not glued yet). The straightedge comes to the same spot well below the top of the bridge. If I lightly push on the neck block on the back of the guitar edge, it moves inboard (sides flexing). This changes the neck block angle in the direction I would want it to go. I am thinking I can temporarily bolt the neck on and body clamp the guitar until it is just tight enough to get the right action height on the bridge. It doesn't take much pressure to do this. With it like that, I'd glue the back in place. Do any of you see a problem with this? I don't have a body mold for this, but I suspect if I did, it would do this for me. Don't people usually take the body mold off before gluing the back on? That is why I didn't think I'd need one.IMG_7333.jpg
__________________
2010 Martin HD-28 1990 Martin B-40 Acoustic Bass 2004 Taylor 815ce 2018 Taylor 814ce LTD NAMM 2019 Taylor Baritone 8 1937 Gibson L-37 2005 Gibson J-45 Historic 2014 Gibson Les Paul Acoustic Prototype
|
|
#30
11-15-2022, 07:33 PM
|
|||
|
|||
|
I got the neck thing fitting in great and action coming out at the right spot. Had to sand off some glue residue and that's why it didn't come out perfect. It does now. Moved on to trying my hand at adding herringbone purf and binding on the soundboard side. Got the first pass purf routing done and it went well.
Question - I'm replacing the back with East Indian Rosewood but leaving the laminate sides. I like a gloss finish. Would it be OKsoundboard routing.jpg to put coats of lacquer on the laminate sides or is this a bad idea?
__________________
2010 Martin HD-28 1990 Martin B-40 Acoustic Bass 2004 Taylor 815ce 2018 Taylor 814ce LTD NAMM 2019 Taylor Baritone 8 1937 Gibson L-37 2005 Gibson J-45 Historic 2014 Gibson Les Paul Acoustic Prototype
|


