
|
|
#31
 07-20-2018, 03:21 PM
|
|||
|
|||
|
Quote:
__________________
David 
|
|
#32
07-21-2018, 06:23 AM
|
|||
|
|||
|
Looks great. Love the wood choices
|
|
#33
08-01-2018, 09:29 AM
|
|||
|
|||
|
Well its time for another update.
Despite my lack of real progress recently, i have managed to get a few things done. Namely that the fretboard is now shaped, bound and inlayed. This is where I like the Rocklite, the binding really does disappear. Also the headstock is shaped and inlayed. I decided to go in a slightly different direction with the headstock shape. Hopefully it looks good once its actually sanded and fine tuned after the rest of the neck is dealt with. Definitely needs some smoothing to the edge curves though. I also started the neck joint and this is proving to be every bit as fiddly and annoying as last time. I tried a different method to get my neck angle. I used a table saw to cut the neck angle onto the end of the neck and then screw attached a router template to it and then assumed the routing would be at the same angle as required. Well either I miscalculated, or the template moved, or the top has a different radius to what its supposed to thus confusing my calculations, but the 1 degree calculated neck angle (from my CAD drawings) seemed to be routed and cut correctly on the neck but when placed on the guitar in the tenon pocket, it didn't align to the bridge location correctly at all. i'm now having to go slowly and do all further adjustments by hand sanding, very annoying as it fit so well before, just at the wrong angle. I dont really have any pictures from this process as i've been trying (and apparently failing) not to make any more mistakes More stabilised maple for the 12th fret fretboard inlay 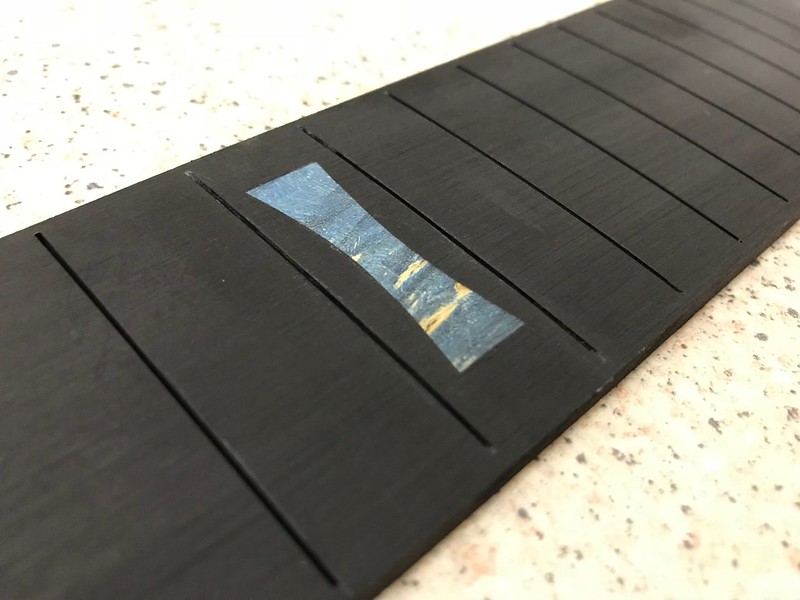 Untitled by David Emm, on Flickr Untitled by David Emm, on Flickrheadstock logo inlay, still needs some sanding to clean it up properly, but I don't want to sand too much more until the side/top shape is completely finalised. 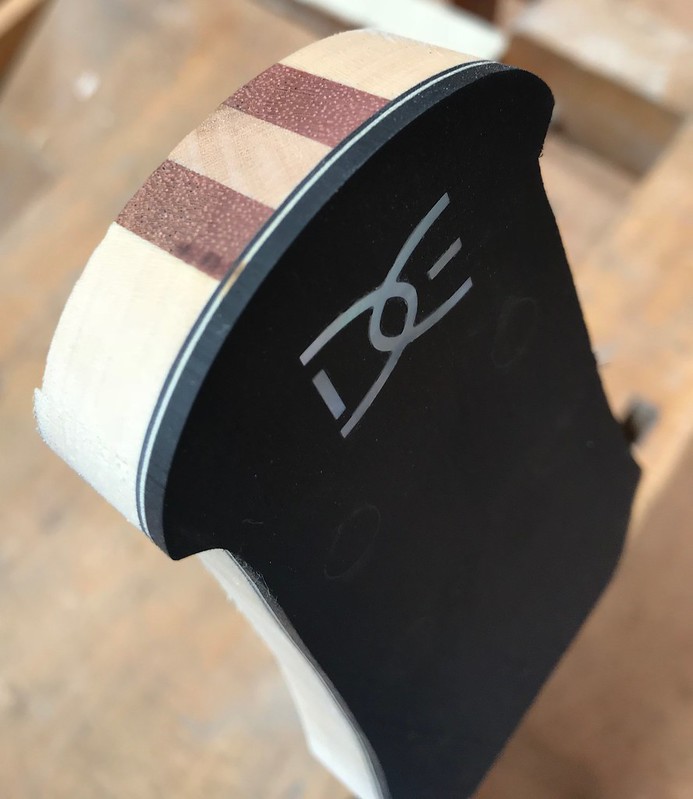 Untitled by David Emm, on Flickr Untitled by David Emm, on FlickrRouting the neck angle/cutting the neck tenon 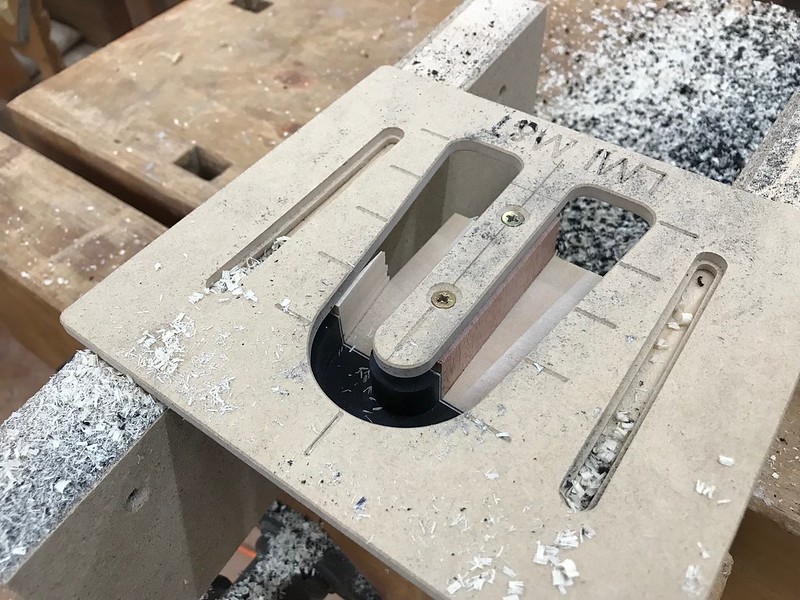 Untitled by David Emm, on Flickr Untitled by David Emm, on Flickr
__________________
David
|
|
#34
08-01-2018, 12:38 PM
|
|||
|
|||
|
Just a comment, since your neck joint didn't turn out perfectly. If you align the jig to the neck by screwing on to the neck itself (as you did) you introduce several places for inaccuracies to occur. What I do is take the same basic template but mount it on a jig that has a long ramp for the neck to sit on, and a keyway that slots into the routed truss rod slot in the neck. the jig is carefully built to ensure alignment side to side, the keyway guarantees the neck is at 90 degrees to the jig, and the long ramp is adjustable for the neck angle you require (I do archtops, so betwee 3.5 and 4.5 degrees for me, but obviously any angle can be done). The idea for mine came from the Benedetto archtop book.
__________________
Brian Evans Around 15 archtops, electrics, resonators, a lap steel, a uke, a mandolin, some I made, some I bought, some kinda showed up and wouldn't leave. Tatamagouche Nova Scotia.
|
|
#35
08-02-2018, 04:38 AM
|
|||
|
|||
|
Quote:
That jig sounds excellent, I think I know what you mean but do you have a picture? The advantage of a jig would be that I could put the neck back on and make adjustments there and re-rout. How does this jig deal with the 'undercut' of the cheeks? That's something that my template idea didn't/doesn't/won't do very well.
__________________
David
|
|
#36
08-02-2018, 11:53 PM
|
|||
|
|||
|
Thats looking good! Nice work Thanks for an interesting thread too. Good luck finishing it off.
__________________
Englemann/Hog OM (Carson Crickmore course custom build), Breedlove Premier Concert (R/W), 1977 S Yairi YD303, Yamaha LJ16, Fender Tele Standard, Furch Little Jane (Cedar), Baby Taylor BT1
|
|
#37
08-22-2018, 03:19 AM
|
|||
|
|||
|
As the workshop I use is now open again after being closed over the summer, i'm back building again.
The latest progress was to actually fix my neck joint and neck joint angle. Once that was done I installed some inserts. One downside to having a multi-laminate neck is that installing inserts is a little tricky, the maple accepted the insert screws differently to the mahogany causing the glue lines to start to split, and holding those glue lines together with a clamp caused the mahogany to crack slightly, i used a horizontal drill press to try and get them to go into the holes 'straight'. One went in perfectly, the other not quite, luckily the cracks are neither large nor deep so happily no structural issues and once the inserts were in place, the cracks could be glued back together. I routed out a pocket for the neck extension as i'm going for a full bolt on - bolt off neck here. I cut a plug out of the only spare piece of hardwood I could find in the workshop that wasn't half a tree, Oak. Pretty sure thats not going to be a problem especially as its not going to be seen from the outside. I haven't glued it in yet or planed it level, thats the next step to be done tomorrow. I was planning for a better fit, but i only discovered after doing 80% of my routing that the plywood I used as a routing template was not flat, thus i left the pocket slightly too shallow and will have to plane the oak level with the neck. I also fretted the fretboard. I much prefer this method of having the fretboard fretted in advance, as i'm still clearly not a fretwork expert, it makes the fretwork significantly easier to do it this way and I don't see any major disadvantages. I'll obviously do the actual final fret levelling process once the fretboard is glued to the neck And now for the obligatory pictures Pretty happy with my neck joint now (eventually) 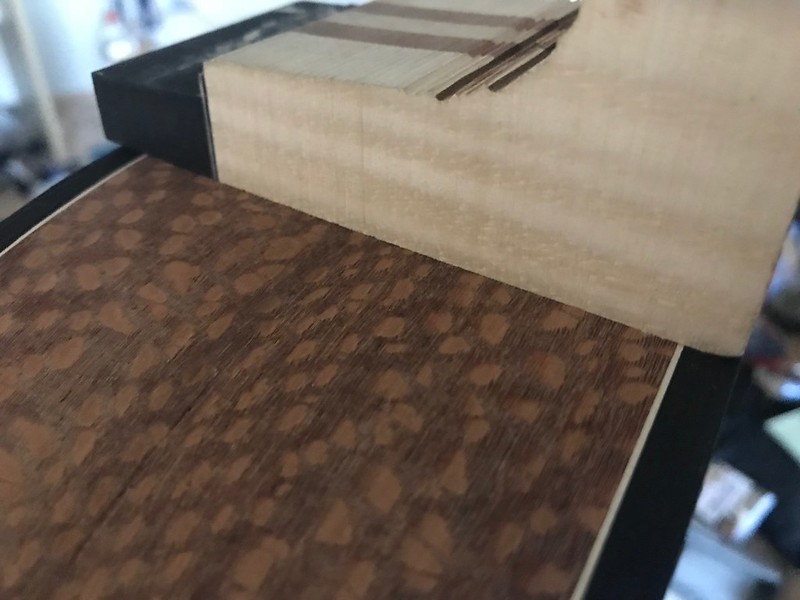 Untitled by David Emm, on Flickr Untitled by David Emm, on Flickrfretwork underway, I also use a screw down fret press once i've bashed them in with a hammer to get the frets both consistently pressed in and to glue them in 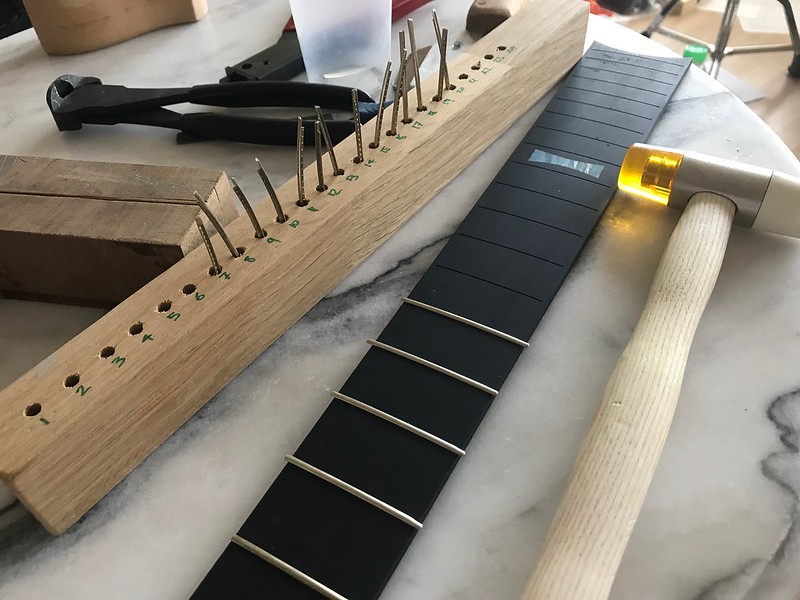 Untitled by David Emm, on Flickr Untitled by David Emm, on Flickrthe very useful screwdown fretpress from GMC luthier supplies. 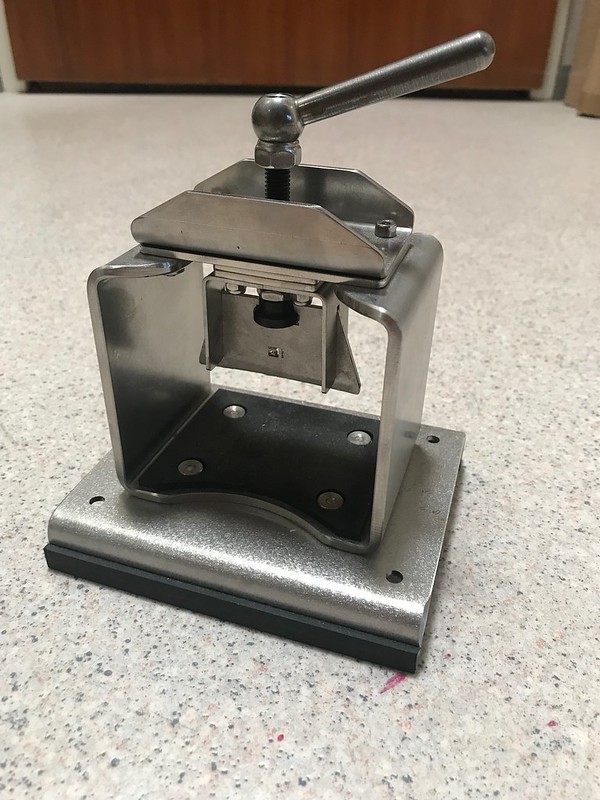 Untitled by David Emm, on Flickr Untitled by David Emm, on Flickrfrets installed but the ends taped off for protection during transport 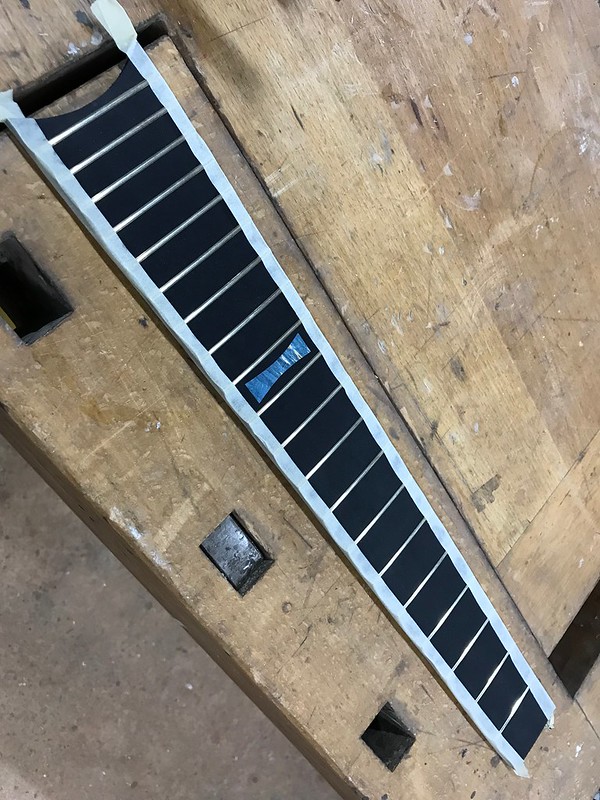 Untitled by David Emm, on Flickr Untitled by David Emm, on Flickrneck extension pocket routing process  Untitled by David Emm, on Flickr Untitled by David Emm, on FlickrOak neck extension sitting in place 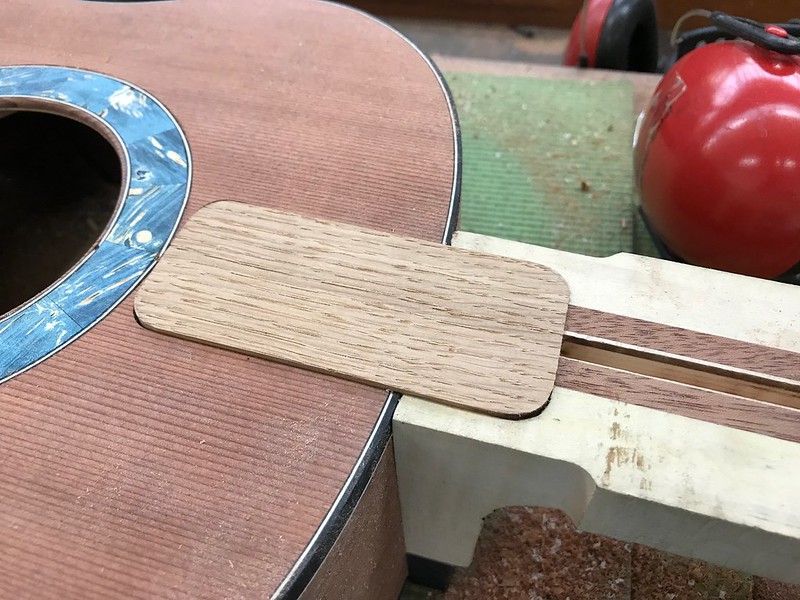 Untitled by David Emm, on Flickr Untitled by David Emm, on FlickrGuitar with neck bolted on and routed neck extension pocket  Untitled by David Emm, on Flickr Untitled by David Emm, on Flickr
__________________
David
|
|
#38
08-22-2018, 02:06 PM
|
|||
|
|||
|
Just got away with almost making a massive error.
I was going to glue my neck extension plug in but literally as i was getting my glue out something made me think to measure how deep an insert is, turns out its 15mm, and my plug is currently 11 and will be have been reduced to about 10 to make it flush with the neck. I will have to rout the pocket to about 16-17mm deep and make a new plug (i have some walnut sitting here at home that i'll take to the workshop tomorrow) that will be deeper than in insert. Had I drilled the hole deep enough to fit, the insert would have been screwed into the neck block and thus the neck would have been bolt-on but never-coming-off again. got lucky there. I should be ok making the pocket deeper but it will make the neck carving a little bit of heart-in-mouth that i don't go too far and carve into the pocket!! from the side view of the picture below, i THINK it looks like i'll be ok though. i thought about routing the pocket shorter, but then i'll be left with a random open hole in the neck, perhaps thats the way forward and i can class it as weight relieving haha.  Untitled by David Emm, on Flickr Untitled by David Emm, on Flickr
__________________
David
|
|
#40
08-22-2018, 06:22 PM
|
|||
|
|||
|
I know a good book which shows you the proper way to make that neck joint!
 One way out of your current conundrum is to use a T nut rather than a threaded insert.
|
|
#41
08-23-2018, 01:42 AM
|
|||
|
|||
|
Quote:
Incidentally, that happens to be the book currently sat on my desk left open at "Chapter 16. The Bolt-on, Bolt-off neck joint" unfortunately i don't take the book back and forth to the workshop with me so some information gets forgotten. It also (and why should it) tell you what to do if you miscalculate and cut the wrong neck angle first. Other than that i'm mostly using your method adapted to using the tools I have at my disposal. I do have a question for you though, in your book your method to get the undercut is use a bandsaw to start with and then a handsaw but that seems to give you a vertical cut relative to the neck plane (unless its on a moveable jig that predetermines the neck angle that i'm not seeing in the pictures) and then you clean it up with a plane, but this is still 90 degrees (to the neck plane) right? lets say for instance i wanted a 1.5 degree neck angle, the band saw can't do that unless i sit the neck on something to hold it at that angle while I cut? is this what you do? or am I missing something? I probably am, and am making things more complicated then they need to be. That is a great spot. I will be heading to the hardware shop very shortly when it opens to go and grab some M6 T-nuts, hopefully i have enough space either side of where my truss rod channel will be for them to fit, and I shall be measuring their depth just it still won't fit in a 10mm depth. I'm going to guess that because i'm using M6, the corresponding T-nuts should small enough to fit ok. Quote:
__________________
David
|
|
#42
08-23-2018, 03:32 AM
|
|||
|
|||
|
Quote:
If you have access to a table saw, the cuts can be done on a table saw by tilting the blade, but there's still the inevitable hand trimming. However, a table saw is a large piece of kit that is unnecessary for guitar building, so a table saw (other than a bench top one used for fret slots) doesn't form part of the book's tool kit. Quote:
|
|
#43
08-24-2018, 07:48 AM
|
|||
|
|||
|
Funny how one persons unnecessary piece of kit is another persons go-to, indispensable tool...
 I essentially fully rough out my necks on my tablesaw, almost nothing is done on the band saw. I rough-cut my blanks, square cut for register, cut the neck angle on the heel, cut the scarf for the headstock if I am doing that, cut the slot for the truss rod all on the table saw. The only thing I do on the bandsaw is rough cut the side shape of the neck, and not even that if I am doing a stacked heel. I cut the cheeks with the router jig, ditto headstock shape. In my world-view, a table saw is capable of precise machining while a bandsaw is not precise at all. Funny how you get stuck in ways of doing things.
__________________
Brian Evans Around 15 archtops, electrics, resonators, a lap steel, a uke, a mandolin, some I made, some I bought, some kinda showed up and wouldn't leave. Tatamagouche Nova Scotia.
|
|
#44
08-24-2018, 10:40 AM
|
|||
|
|||
|
Quote:
__________________
Fred
|
|
#45
08-24-2018, 06:42 PM
|
|||
|
|||
|
Quote:
I almost never use my table saw, but for fret slotting, instead favouring my bandsaw. For me, the bandsaw isn't for making precise cuts for joinery. For me, that's generally done with hand tools.
|


