
|
|
#1
 09-08-2012, 10:15 PM
|
|||
|
|||
|
over the years I've sanded plenty on saddles but it was all guess work and I found a decent pair of digital calipers online the other day and went ahead and bought them to be a bit more precise in what I'm doing. I am thinking about buying a sanding block as well. My previous methods were pretty brutal lol... a pair of pliers and a sheet of sand paper laying on a hard surface. What grit do you use when sanding saddles and nuts and exactly how do you go about securing AND removing a nut? What type adhesive? Thanks!


|
|
#2
09-09-2012, 11:31 AM
|
|||
|
|||
|
Quote:
Quote:
I don't use pliers. Instead, I use a flat block of wood set on top of the sand paper. (The sand paper is attached to or just sits on a flat surface of your choice - glass, plywood, granite block...) The flat block of wood, say 4" x 6" of 3/4" plywood, has a square edge. Hold the nut or saddle against the square edge of the plywood while pulling the nut or saddle across the sandpaper. Doing so helps keep the bottom square. These days, I use a file or abrasive thickness planer, finished, if necessary, with finer sandpaper. Quote:
To remove a nut depends on the guitar and the nut. If the sides of the nut have finish applied as part of the finish application, cut around the nut with a sharp knife to ensure that the finish doesn't chip prior to removal of the nut. What usually works to loosen most acoustic guitar nuts is to take a piece of wood - I use a piece of 1" x 2" about 6 or 8" long - and set the end of the wood against the face of the nut, strings removed. A quick, sharp tap on the other end of the wood with a hammer will loosen the nut in most cases. I don't recommend this for Fender style nuts. For those, I use a sharp chisel under one end of the nut and gentle taps on the end of the chisel. Once in a blue moon, one breaks that way and I'll have to make a new nut. All that said, there are very few things for which I would remove a nut other than to replace the nut. Otherwise most work is done with the nut in situ. Last edited by charles Tauber; 09-09-2012 at 08:13 PM.
|
|
#3
09-09-2012, 12:19 PM
|
|||
|
|||
|
Quote:
|
|
#4
09-09-2012, 02:27 PM
|
|||
|
|||
|
Quote:
Last edited by charles Tauber; 09-09-2012 at 08:15 PM.
|
|
#5
09-09-2012, 08:04 PM
|
|||
|
|||
|
You are getting some good advice from previous posts. But FWIW, I use 80 grit and 2k grit for saddles. I also use a disc sander. There are more details on my routine here:
http://fingerlakesguitarrepair.com/p...e-proletariat/ I remove most nuts by first tapping it with a block of wood and mallet with the block laying on the frets. Then I tap it from the side with a punch. At that point it usually lifts straight up with some end nippers or I just push it out the side of the neck with more light taps from the punch and mallet. You can see the rest of the story here: http://fingerlakesguitarrepair.com/g...ustom-new-nut/ With guitars that have the nut "inlayed" into the fretboard like strats and teles, you risk damaging the fretboard if you attempt to tap the nut free with a block of wood. Better to just use a punch from the side.
|
|
#6
09-10-2012, 08:03 AM
|
||||
|
||||
|
It may be unconventional, but I use a fine lead mechanical pencil to draw my line. I have found it to work great. I draw the line on both sides to make sure i am keeping it square. I actually color in below the line now as well. Take a little at a time and check the fit.
 
__________________
Bryan
|
|
#7
09-10-2012, 08:22 AM
|
|||
|
|||
|
Quote:
|
|
#8
09-15-2012, 06:48 PM
|
|||
|
|||
|
The usual way of sanding the bottom of a saddle is like this:
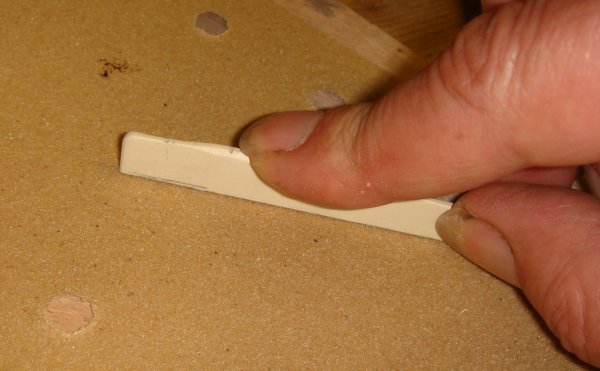 However that can easily result in: 1. The base of the saddle being at an angle instead of 90 degrees 2. The bottom of the saddle being curved rather than flat. 3. sanded fingers An alternative way that overcomes these problems easily. Make yourself a sanding block by using double sided tape to secure sandpaper to a small block of wood. The edges need at be at right angles. (this is a small piece of MDF with two flat sides at right angles to each other)  Hold the saddle sideways down on a flat piece of wood..... rub the sanding block back and forth on the work surface and against the bottom edge of the saddle. 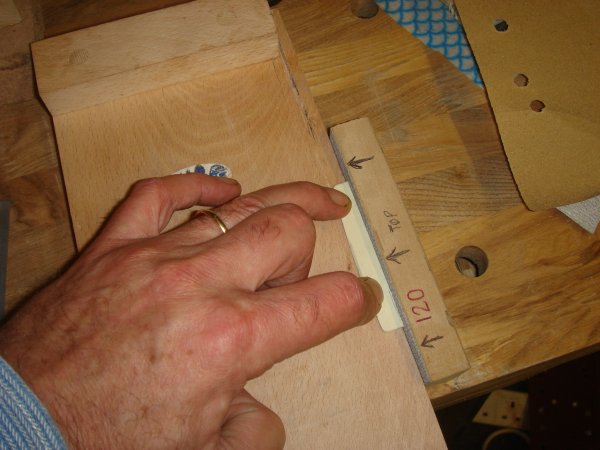 The base of the saddle will always be square and dead flat. Rod
__________________
Rod Neep - England
|
|
#9
09-16-2012, 09:43 AM
|
||||
|
||||
|
Good stuff, Rod. You are right, it is much better to move the block and hold the saddle still. I just recently started doing it just this way. I color the bottom of the saddle with a pencil, so I know it's flat when the pencil marks disappear.
__________________
Bryan
|
|
#10
09-18-2012, 11:30 AM
|
|||
|
|||
|
I have a piece of MDF with four 80 grit sheets of sand paper mounted to it. That single tool gets more use then anything in my shop it seems. I'll just mark the saddle with my 6in rule and scrape the saddle on the sanding board. The technique I've developed is to actually purposely sand the bottom of the saddle on an angle right till it gets to the pencil line. Then I just sand off the point till everything is flush. Been doing it long enough by eye to get the 90 degree angles perfect.
As for nuts, always adjust those with needle files. Removing a nut can damage the finish and it's never going to be as accurate to sand off the bottom rather than mark off the top and file the slots.
|


