
|
|
#76
 09-09-2010, 01:07 PM
|
|||
|
|||
|
mcmaster-carr part #8560K357
http://www.mcmaster.com/#acrylic/=8rwo29 it's best if you use cell cast acrylic (plexiglass) rather then polycarbonate (lexan) for your templates. browse around their site for more specific shapes and sizes. Last edited by arie; 09-09-2010 at 01:16 PM. |
|
#77
09-09-2010, 04:06 PM
|
||||
|
||||
|
I'm glad he said that. Other than our own supplier which is a discount place in Columbus, I had no clue.
__________________
... make a joyful noise ... http://www.mcknightguitars.com AGF MCKNIGHT GUITAR SNIPPETS https://www.acousticguitarforum.com/...d.php?t=663228 I'll continue "Doin' Life ... As a Luthier's Wife" McJam = Guitar private event June 21-22, 2024 [email protected] Pre-sign is required and begins now. |
|
#78
09-09-2010, 04:45 PM
|
|||
|
|||
|
Two Hammy's (code speak for $XV
 ) for a 24"x24" sheet though. ) for a 24"x24" sheet though. What do you guys cut with and do you cut it out in the same way as the mold itself - 1/8" outside the line and sand to the line? I'm using an exacto knife on the cheap stuff and it's not accurate at all. |
|
#79
09-10-2010, 06:59 AM
|
||||
|
||||
|
Tim uses a band saw and cuts almost to the line. Then he hand sands for more perfection. Tim has no problem doing that. I am blind in one eye so it is not as accurate for me to do any cutting.
__________________
... make a joyful noise ... http://www.mcknightguitars.com AGF MCKNIGHT GUITAR SNIPPETS https://www.acousticguitarforum.com/...d.php?t=663228 I'll continue "Doin' Life ... As a Luthier's Wife" McJam = Guitar private event June 21-22, 2024 [email protected] Pre-sign is required and begins now. |
|
#80
09-10-2010, 07:54 AM
|
||||
|
||||
|
Quote:
Here are beautiful laser cut forms. Done. I don't if they have a Kwakitchen stencil. Might be cheaper than making one. I plan on buying his OO pattern. I am thinking of a second one, mounting it on a light box and displaying it as art - they are that nice! 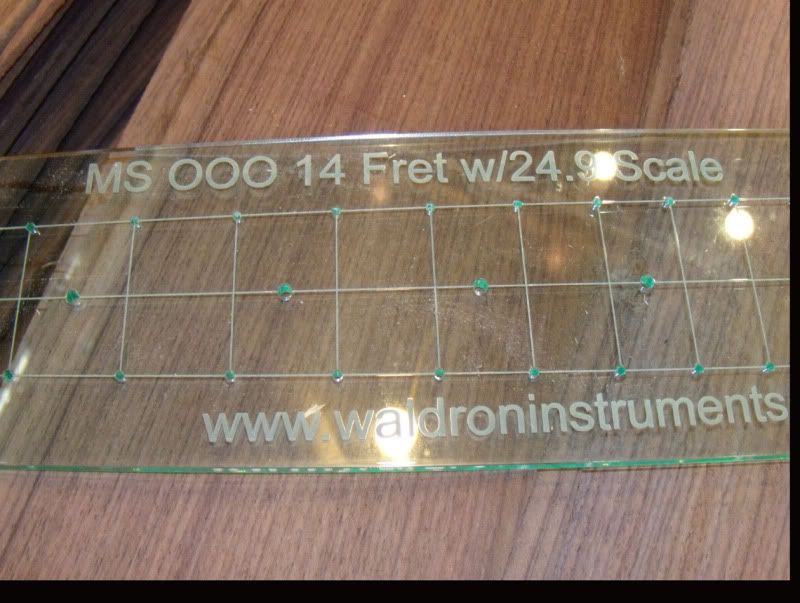 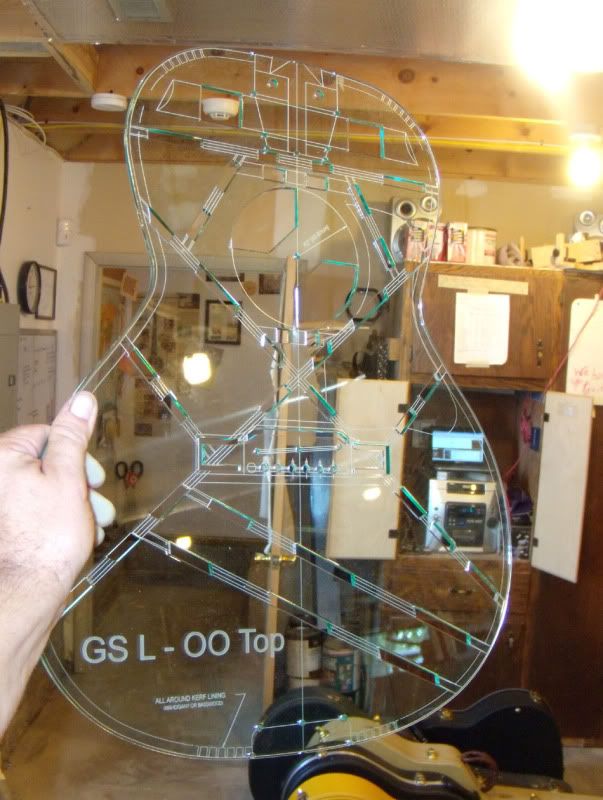 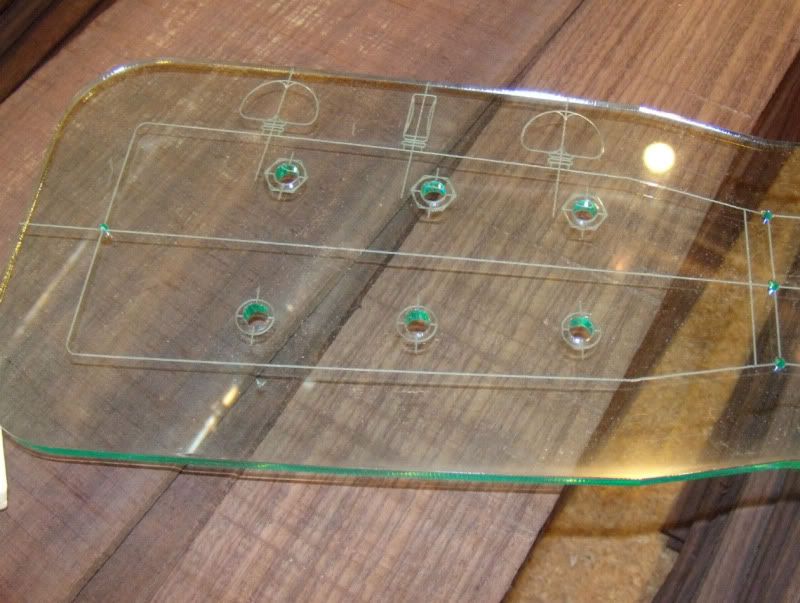
|
|
#81
09-10-2010, 08:13 AM
|
|||
|
|||
|
Yeah, it makes sense to buy a little thicker grade plastic and then use the band saw to cut it without worry of chipping, then some 220 grit to clean up the rough spots and you're good to go, eh?
... but where's the fun in that when I have the cheap stuff here and it's already traced? Last night I was up until 1AM working on my THIRD attempt and I got pretty close. I bought a hobby knife and used a cheap pair of orange safety scissors to cut out a semi-mold that's not perfect - there are a couple of "chips" inside the line and a piece that needs to be glued back on - but close to "good enough" for my purposes. I wish I had a camera I'm so proud of it! The trick is to LIGHTLY score the plastic using short side to side scratching motions for accuracy and removal of material so that you're digging a miniscule trench that will contain the break instead of cutting along the outline and dealing with cracks that seem to have a mind of their own. I may give it another go though. I'm big into self torture like that! First I have a band saw I need to figure out. Then I'm going to go price plywood at Lowe's. BTW YJ, I hear there's a place in Tanger's Outlets that sells reconditioned power tools real cheap! |
|
#82
09-10-2010, 08:57 AM
|
|||
|
|||
|
Quote:
Well, you could always go a little thinner on the material thickness of the template to save some money. Problem is -cutting the thinner stock is harder then cutting thicker stock. For my templates, I use 1/4" plexiglass. I have access to CNC machining centers and CAD/CAM so I'll design the template, program it, and machine it. I'll stick it to the table of the machine with double back tape, set up the mill, press the cycle start button, 10 mins later and it's done. No sanding needed. I realize a lot of people don't have CNC so you can: 1) use a band saw and sand to near final size then finish using a scraper to get the edges perpendicular. 2) use a jig saw and sand to near final size then finish using a scraper to get the edges perpendicular. whatever kind of saw you use it's real important to get at least 2 to 3 teeth in the cut. what this means is that if you laid a saw blade across the edge of the work and perpendicular to it, there should be at least 2 to 3 teeth spanning the thickness of the material. this will elimate chip-out from the saw blade. If you are using a jig saw try to minimize the amout of material you have overhanging the edge of your table when sawing. sometimes it helps to hold the scrap with your other hand to keep it from flapping about. this will help to prevent cracking, chipping and rework/repair to your template. If you are using a bandsaw you don't have to worry about overhang because the material is supported by the table of the saw. hope this helps 
|
|
#83
09-11-2010, 06:48 AM
|
|||
|
|||
|
Thanks, arie! One thing I notice about working with the thinner stuff is that there's not much refraction when tracing. Chip-out has been an issue but I'm "eyeballing" the curve as well.
FWIW I'm considering everything I've cut to this point to be just "rough drafts." The shapes for the bender are "borderline" given that the wood is also sandwiched between a heating pad and two pieces of metal so cupping shouldn't be too much of an issue. The molds OTOH are no good - I'd prefer that the wood be allowed to "rest" in something closer to the final shape and the outlines are way off - more than 3/8" in places. I have even attempted making a spreader yet either. One thing I'm realizing is that up to this point I'm just doing set up and not actually into the build itself - other than the joining and thicknessing we've been doing at YJ's. I want to get the set up right though because as I learn more the bug is taking even tighter hold and I'm thinking about how much easier it would be the next time around. |
|
#84
09-13-2010, 08:42 AM
|
|||
|
|||
|
OK, a little change of pace here - as if there's any pace at all since I'm just doing set up and basically dreaming; very little is actually being accomplished! With regards to materials/specifications I'm still filling in the holes.
MODEL: Official Luthier's Forum Medium Jumbo 14 fret, full body (non cutaway) CONSTRUCTION: Mahogany Blocks/Dovetail Neck Joint BODY SIZE: MJ-14 Fret TOP: Solid Western Red Cedar ROSETTE: TBD (to be determined) TOP BRACING PATTERN: Looks like a standard X bracing with 2 tone bars TOP BRACES: Solid Sitka Spruce 5/16'' BACK MATERIAL: Solid South American Mahogany SIDE MATERIAL: Solid South American Mahogany ENDPIECE: East Indian Rosewood BINDING: East Indian Rosewood TOP INLAY STYLE: Black/White/Black SIDE INLAY: Black/White/Black BACK INLAY: Black/White/Black NECK MATERIAL: single piece South American Mahogany NECK SHAPE: Modified V? NECK JOINT TYPE: Dovetail NUT MATERIAL: Bone HEADSTOCK: Solid/Diamond/SquareTaper HEADPLATE: Solid East Indian Rosewood HEELCAP: East Indian Rosewood FINGERBOARD MATERIAL: East Indian Rosewood SCALE LENGTH: 25.4'' # OF FRETS CLEAR: 14 # OF FRETS TOTAL: 20 FINGERBOARD WIDTH AT NUT: 1-3/4'' FINGERBOARD WIDTH AT 12TH FRET: 2-1/4''? FINGERBOARD POSITION INLAYS: TBD FINGERBOARD BINDING: East Indian Rosewood FINISH BACK & SIDES: Polished French Gloss FINISH TOP: Polished French Gloss FINISH NECK: Satin BRIDGE MATERIAL: East Indian Rosewood BRIDGE STYLE: Belly, looks to be inspired by Taylor Guitars' design SADDLE MATERIAL: Bone TUNING MACHINES: Gold Gotoh 510 with Large Buttons BRIDGE & END PINS: Bone (I'm gonna try Mary McKnight's tea soaking method) PICKGUARD: TBD (most likely clear) CASE: TBD (body is larger than a standard dreadnought size case will fit) Regarding the neck, Yamaha Junkie was nice enough to broker a donation for one. Once again I am humbled and indebted to him and the luthier community for such a gesture. I have in my possession a Martin-style neck with dovetail that is 1.75" at the nut with a pronounced V-shape and a volute. It looks like it was in the process of being readied for installation (the truss rod is already installed) but it failed some QC check. There was some glue slop that ran around the volute to the back of the headstock. I also detect some slight fractures along the length of the headstock. I gave it a little light sanding with a medium grit foam sanding pad and got most of the slop cleaned up and smoothed out the length of the neck. I don't know if it fits with the style I'm going for - that of a more modern fingerstyle instrument along the lines of the R. Taylor Style 1 - but at the very least I will try to make use of it, if not on this build then the next. Sometimes I think it might have been better if I'd just tried to replicate a rosewood Martin dread and I've admired the vintage styling of the D-21 Special... I dunno. I think it'd be pretty bad for to switch gears like that at this point. Am I right? FWIW, I think I'm on the right track with the MJ by taking it slow but I'm getting antsy, ya know what I mean? Jeez, this is worse than GAS. Is this feeling kind of like what expecting mothers feel?
|
|
#85
09-13-2010, 03:20 PM
|
||||
|
||||
|
Your guitar, your way. I do have everything in place for dred's, OM's and even 00's at this point. You created your mountain to climb. But I am a guy who has never pondered the beaten path either

|
|
#86
09-13-2010, 05:05 PM
|
|||
|
|||
|
Quote:
Seriously though, I have high - maybe even unreasonable - hopes for this build. If I feel like I'm in over my head I'll put it down for a bit to get my bearings. I'm just wondering how smoothly it would go once things really get rolling. I'm just trying to save myself some problems in the future - and bear in mind that I may yet do another build or two using these materials. Meanwhile, I scored some scrap acryllic from Home Depot today that's big enough for the template for the unbent sides. It's thicker than the sheet you gave me so we'll see how it goes. BTW, I don't know if I need to do another outline of the top though. I'm on my 3rd attempt using the thinner acryllic and it's come out pretty good. I traced it last night and cut well outside the line this morning on the band saw with little chipping. Then I took your homemade sanding bobbin and with my drill I started sanding it down again with little problem. If it does chip or crack though - the stuff is pretty flimsy - I'll just go back to HD for more of the thick stuff. |
|
#87
09-13-2010, 05:18 PM
|
||||
|
||||
|
I'm honored, Neil.
It may be my opinion, but I think tea soaked bone is pretty on a guitar.
__________________
... make a joyful noise ... http://www.mcknightguitars.com AGF MCKNIGHT GUITAR SNIPPETS https://www.acousticguitarforum.com/...d.php?t=663228 I'll continue "Doin' Life ... As a Luthier's Wife" McJam = Guitar private event June 21-22, 2024 [email protected] Pre-sign is required and begins now. |
|
#88
09-13-2010, 05:59 PM
|
||||
|
||||
|
Dude, you are so far ahead on planning than I am on the one I am wrapping up!
|
|
#89
09-13-2010, 09:24 PM
|
|||
|
|||
|
Quote:
Also, I want to minimize the screw-ups that are bound to happen. Heck, a few already have! BTW, Mary - thanks for that tip. I kind of want this one to have that "earthy" or "organic" look. |
|
#90
09-15-2010, 06:57 PM
|
||||
|
||||
|
You're welcome, Neil.
Some of your scraps will become your friends later on. Find a box to start a collection. I keep a few scraps to use as reminders of what we don't want to do again. "Waste not, want not."
__________________
... make a joyful noise ... http://www.mcknightguitars.com AGF MCKNIGHT GUITAR SNIPPETS https://www.acousticguitarforum.com/...d.php?t=663228 I'll continue "Doin' Life ... As a Luthier's Wife" McJam = Guitar private event June 21-22, 2024 [email protected] Pre-sign is required and begins now. |


