
|
|
#1
 07-19-2013, 02:27 PM
|
|||
|
|||
|
I need to come up with something to cut the channel in back of my guitar since it has a 15' radius.
Looked around the net and found a few different types and styles. Buying one right now is not in the cards. I settled on the design that looks like the Stew Mac one only on a larger scale. My shop is small, and space is limited so I am trying to re-purpose the mortise/tenon jig I am still working on. I mounted the 1 hp router above a removable table. Added a carved board that both moves and locks in place to keep the guitar the correct distance from the router bit. I adjust the height of the router (cutting depth) from the router itself. Theory say's it will work... What do you folks think? Not sure I want to use my newest build for it's first test. Not sure how many passes I should take per channel. Idea's? suggestions? Thanks Stu 
__________________
I'm not a luthier...luthier's know what they are doing. 

|
|
#2
07-19-2013, 02:31 PM
|
|||
|
|||
|
Quote:
https://www.facebook.com/photo.php?f...type=3&theater Cost me nothing. I used some left-over bamboo flooring, which is great because it is strong and very stable.
__________________
---- Ned Milburn NSDCC Master Artisan Dartmouth, Nova Scotia
|
|
#3
07-19-2013, 02:36 PM
|
|||
|
|||
|
Quote:
In a Stewmac type arrangement, the carriage to which the router is attached moves vertically up and down. This allows it to follow the vertical change related to the curved/domed top or back. The constraint on the carriage keeps the router vertical at all times. With the guitar setup in its own "carriage" so that the sides are vertical, the channels cut are then constrained to be perpendicular to the sides. I'm not understanding how that is accomplished in your arrangement. My suggestion is make one of these: http://www.canadianluthiersupply.com...ts/binding-jig 
|
|
#4
07-19-2013, 02:44 PM
|
|||
|
|||
|
Quote:
__________________
I'm not a luthier...luthier's know what they are doing.
|
|
#5
07-19-2013, 02:46 PM
|
|||
|
|||
|
Quote:
and I have no idea what I'm looking at in your picture...
__________________
I'm not a luthier...luthier's know what they are doing.
|
|
#6
07-19-2013, 03:54 PM
|
|||
|
|||
|
Quote:
http://www.handcraftedguitars.ca/201...ding-channels/
__________________
---- Ned Milburn NSDCC Master Artisan Dartmouth, Nova Scotia
|
|
#7
07-19-2013, 04:14 PM
|
|||
|
|||
|
Quote:
|
|
#8
07-19-2013, 04:18 PM
|
|||
|
|||
|
you design needs to allow the router to conform to the curvatures of the top and bottom plates in the Z axis while still being perpendicular to the base of the tool as you either guide the router along the binding edge, or guide the guitar along the binding edge under the router. i'm not quite sure how your current idea accomplishes this?
probably not the encouragement you want to hear  but fwiw, i use one of these: but fwiw, i use one of these: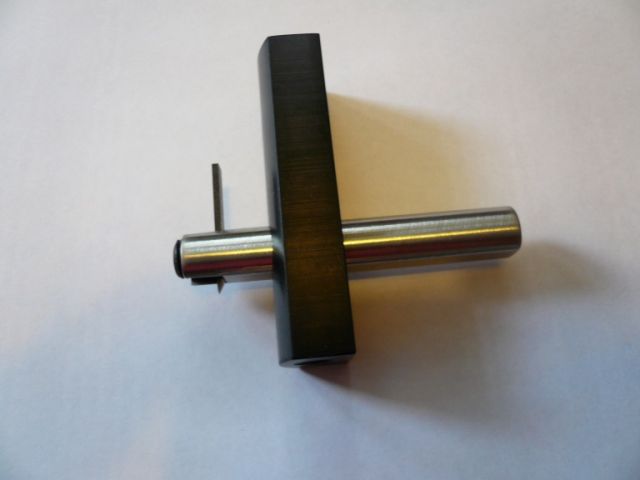 it just doesn't get any simpler or cheaper. Last edited by arie; 07-19-2013 at 04:28 PM.
|
|
#9
07-19-2013, 04:28 PM
|
|||
|
|||
|
Stu, With the wood you already have in that insert you could build one of these. The only thing you would need is the drawer slides:
http://www.ebay.com/itm/GUITAR-BINDI...item3a830a0ea2 PS - looks like you have you neck jig almost done. Have you figured out the template I sent you yet? Make sense now?
__________________
Tim B
|
|
#10
07-19-2013, 04:28 PM
|
|||
|
|||
|
Quote:
__________________
---- Ned Milburn NSDCC Master Artisan Dartmouth, Nova Scotia
|
|
#11
07-19-2013, 06:44 PM
|
|||
|
|||
|
Quote:
A laminate trimmer won't accommodate the curvature of top and back: the trimmer will follow the top or back on which it rests, not staying square to the sides. The result is a rabbet that varies in depth and height. The resulting rabbet can be evened out with a chisel, but is less efficient than other methods that do accommodate the curvature of top and back. Quote:
http://www.youtube.com/watch?v=P58JWSCNxSI
|
|
#12
07-19-2013, 06:58 PM
|
|||
|
|||
|
Stu, for what it's worth here's my setup. An old RotoZip.
Scrap plywood, some bolts and a 3/4 steel rod with brass bushings. Pulls off the rod and packs away nicely. It doesn't look parallel to the guitar in the pic but it is. I like to hold the tool in my hand and not the other way around. .jpg?psid=1) .jpg?psid=1) Scott
|
|
#13
07-20-2013, 10:30 AM
|
|||
|
|||
|
I'd like the one King Cavalier has, and I have one similar to what Ben Had showed. Have not used it yet, but will pretty soon.
I used to have the one that HGC Canada showed (and it's similar to Charles Tauber's as well). I'm thinking I'm going to prefer having the router either stationary like Ben's, as opposed to the hand held one. I always got very nervous using that one. It was probably the noise of the router combined with the noise of the wood being cut off, but I found that part of building the most distasteful. You'll probably be done with yours before I can test mine, so good luck. As was stated, the big problems come with the 15' back and the router not really getting the slot cut properly. Just be sure to inspect the entire cut with a piece of the trimming you are using to see if any place is not deep enough. IIRC, my shallow points were mostly in the waist area. A small enough file with a safe edge and or emery boards are helpful in bringing those parts into alignment with the rest.
|
|
#14
07-20-2013, 12:08 PM
|
|||
|
|||
|
Look up the router jig ideas of Harry Fleishman and Don Williams. Also check out Jim Olson's. The Don Williams one is probably the easiest to build.
|
|
#15
07-21-2013, 08:28 AM
|
|||
|
|||
|
Thanks for all the help and info everyone.
I need to sit down and figure out which one I'm going to build. I did get my binding channel cut buy using my dremel with a piece of .04 plastic taped to the base. Had to make several passes but it actual worked fairly well, and like Bob said, I had to "fine tune" it with a chisel but all is well. Charles is right, there just is not enough power in a dremel to do this kind of work. 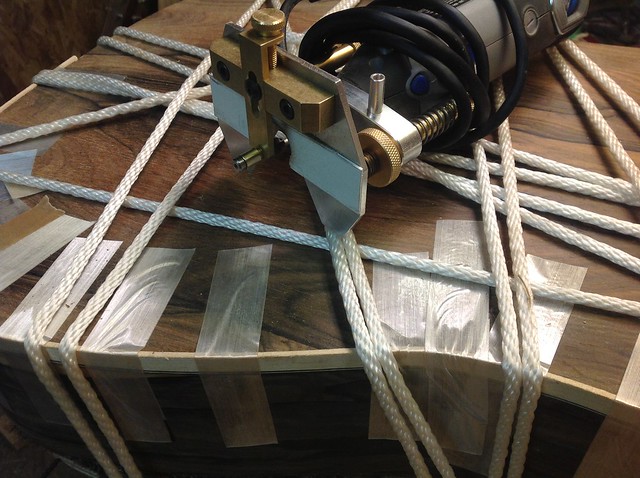 I do own a roto zip it has a 1/8" shank, what bits do you use King? Ned I like your simple design a lot, any more detailed pics? Aire, I looked at the LMII video on the set up and use of the Gramil, looks like a lot of work, but it does interest me. Louie, I looked at several websites and videos of the Flieshman/Williams jig. Alan Caruth modified his to be wall mounted which is what I may have to do with my limited space. Once again thank you all for your help Stu
__________________
I'm not a luthier...luthier's know what they are doing.
|


