The Acoustic Guitar Forum

Go Back   The Acoustic Guitar Forum > General Acoustic Guitar and Amplification Discussion > Build and Repair

Reply
 
Thread Tools
  #31  
Old 05-15-2021, 09:31 PM
mirwa mirwa is offline
Registered User
 
Join Date: Sep 2013
Posts: 3,110
Default

The mold is simply a reference for me, not an item to use to force the sides to conform to a shape, have posted these photos previously

To start with


After back and forth on the hand bender
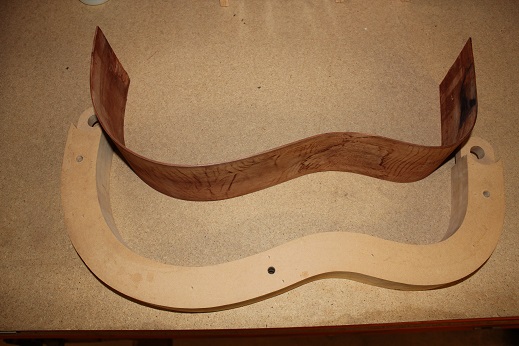


Finished

__________________
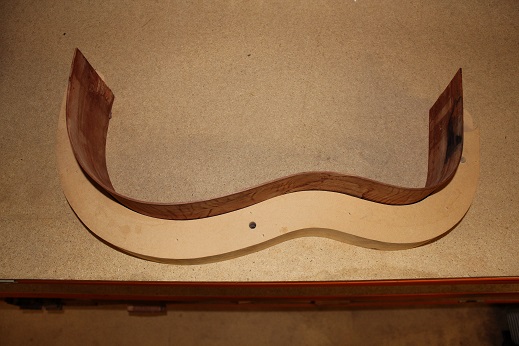
Cole Clark Fat Lady
Gretsch Electromatic
Martin CEO7
Maton Messiah
Taylor 814CE
Reply With Quote
  #32  
Old 05-15-2021, 09:48 PM
redir redir is offline
Registered User
 
Join Date: Aug 2011
Location: Mountains of Virginia
Posts: 7,674
Default

Now that's what I'm talkin' about!
Reply With Quote
  #33  
Old 05-16-2021, 08:30 AM
printer2 printer2 is offline
Registered User
 
Join Date: Dec 2012
Location: Middle of Canada
Posts: 5,130
Default

Gluing on the end blocks.


A mold is handy to not make a mistake. The above guitar has one side that is longer than the other. Cut at the wrong pencil mark and the one bout is wider than the other. Oops. Not enough that anyone would notice unless they measured. Same goes for the alignment of the end blocks. If the mold is made accurately the end blocks will be parallel to each other. I have found a simple way of ensuring mine are if I build onto the top.


Lot of different ways of building, no real right or wrong.
__________________
Fred
Reply With Quote
  #34  
Old 05-16-2021, 08:36 AM
redir redir is offline
Registered User
 
Join Date: Aug 2011
Location: Mountains of Virginia
Posts: 7,674
Default

Printer I saw you post about that method a while back and tried it and found that it works great. I've since gone back to my normal way of doing it but may try that out again.

Do you have a dedicated post (for lack of a better word) for each model guitar you use? Or do you just grab a piece of scrap and cut it to size for each one? Since I use a bolt on neck I was thinking of making a post with a threaded insert for the head block and maybe just a screw for the tail.
Reply With Quote
  #35  
Old 05-17-2021, 11:02 AM
printer2 printer2 is offline
Registered User
 
Join Date: Dec 2012
Location: Middle of Canada
Posts: 5,130
Default

Quote:
Originally Posted by redir View Post
Printer I saw you post about that method a while back and tried it and found that it works great. I've since gone back to my normal way of doing it but may try that out again.

Do you have a dedicated post (for lack of a better word) for each model guitar you use? Or do you just grab a piece of scrap and cut it to size for each one? Since I use a bolt on neck I was thinking of making a post with a threaded insert for the head block and maybe just a screw for the tail.
At the moment I do not have a lot of dedicated jigs, hope to get on it this year. I just chop a piece of 2x2 when needed. I have a few different bending form shapes and my two dishes but otherwise I just wing it. I do bend on a pipe and just let them set on the forms overnight. I may get out the heat blanket and give a shot of heat just to set the shape. I have been trying different methods of doing things and just seeing what will stick.
__________________
Fred
Reply With Quote
  #36  
Old 05-17-2021, 11:53 AM
redir redir is offline
Registered User
 
Join Date: Aug 2011
Location: Mountains of Virginia
Posts: 7,674
Default

Quote:
Originally Posted by printer2 View Post
At the moment I do not have a lot of dedicated jigs, hope to get on it this year. I just chop a piece of 2x2 when needed. I have a few different bending form shapes and my two dishes but otherwise I just wing it. I do bend on a pipe and just let them set on the forms overnight. I may get out the heat blanket and give a shot of heat just to set the shape. I have been trying different methods of doing things and just seeing what will stick.
I was just thinking.... Drill in some large holes near the ends of the position post jig and then you can leave it all in place when you glue the sides down using the large hole as a spot for a C-Clamp. If you get my gist.
Reply With Quote
  #37  
Old 05-18-2021, 10:27 AM
printer2 printer2 is offline
Registered User
 
Join Date: Dec 2012
Location: Middle of Canada
Posts: 5,130
Default

Quote:
Originally Posted by redir View Post
I was just thinking.... Drill in some large holes near the ends of the position post jig and then you can leave it all in place when you glue the sides down using the large hole as a spot for a C-Clamp. If you get my gist.
This one was a ukulele, I did leave the center piece in while gluing on the one side with the clamps compressing the front to back. The second side I think I did without it to be able to reach down far enough. I will keep your suggestion in mind for the next one.
__________________
Fred
Reply With Quote
Reply

  The Acoustic Guitar Forum > General Acoustic Guitar and Amplification Discussion > Build and Repair

Thread Tools


All times are GMT -6. The time now is 10:10 PM.


Powered by vBulletin® Version 3.8.11
Copyright ©2000 - 2024, vBulletin Solutions Inc.
Copyright ©2000 - 2022, The Acoustic Guitar Forum
vB Ad Management by =RedTyger=