
|
|
#16
 07-04-2013, 03:39 PM
|
||||
|
||||
|
Hmmm... How do I adjust my hours to fit in the PR side of McKnight Guitars? It's my favorite part of this work! We eat simple. I don't like to shop. Our 24 year old daughter has decided to join us and is building her own guitar this year. Our kids know where to find us and up until recently could get here by walking winter, spring, summer and fall. As for guitars I tend to see the final wood product in my head long before the item is built.
It isn't always easy for a husband and wife team to "get" each other. My minds eye sees something this way and then I have to be very descriptive to make Tim's hands do what I feel needs done to our guitars to attract a by-passer's eye. It is all blind faith and as many already know I must give the glory to the Lord. Although this guitar is your baby I like the idea of going from the large to small. It is unique and I am all about doing things a little differently. I think your work will better stand out as your own and not as typically expected. A little twinge and a twist makes custom builds more eye appealing.
__________________
... make a joyful noise ... http://www.mcknightguitars.com AGF MCKNIGHT GUITAR SNIPPETS https://www.acousticguitarforum.com/...d.php?t=663228 I'll continue "Doin' Life ... As a Luthier's Wife" McJam = Guitar private event June 21-22, 2024 [email protected] Pre-sign is required and begins now. 
|
|
#17
07-09-2013, 08:39 PM
|
||||
|
||||
|
Well Bob, looks like you're moving right along. It's looking good! Please come by after you get the braces on and we'll talk hands on about how far down to take the braces. We'll make sure it doesn't fly apart but rings out.
I like the transition from larger fleck to smaller. It's a little more dramatic, and I would probably say the same for the peghead as well - though there are advantages to a headplate that's consistent. But, go with your personal preference. Look forward to watching this pull together. Good luck
|
|
#18
07-14-2013, 12:18 PM
|
|||
|
|||
|
It's been a while since I made any progress on this guitar. Someone got me to thinking more about the binding, headstock, etc., that I had got the Sycamore for. It really looked so close to the Mahogany, that I didn't think it would do at all. So I ordered Cocobolo. There wasn't a doubt that it would contrast to the hog. It came in Thursday pm, and I've been messing around with using some of it and some of the Ebony on the rosette.
My initial idea was to imitate some of what Ray Kraut does on his rosettes, but I don't yet have the skills to plan or execute that kind of work. So I'll just make this one a bit unique, and a compilation of other rosettes that I've seen here and there. In cutting the channel for this b/w/b, I used a 1/32" bit from StewMac. Unfortunately these bits come 5 or 6 to the pack for not much money. Not surprisingly, it burns the wood as it goes thru, and that's scarey in that it has to be sanded off and I just pray that there's no damage showing underneath the sanding. It turned out ok, but I'm going to invest in some carbide tipped bits that not only shouldn't burn, but should leave the surface pretty crisp.  Here are some of the pieces of Cocobolo and one piece of Ebony that will go on the rosette. I'm attaching b/w purfling around the perimeter of the Ebony in this pic. A sharp chisel makes sure the mitered joints look pretty good. To set this up, I put pins on the outside of the Ebony piece, then placed the b/w inner piece next to it, pushing pins there to hold it in. Once glued, I took out the pins for the outside of the Ebony and placed the b/w next to it and pinned that in. Just one more piece to put in. Also, the b/w imitates the binding I will do on the fret board. Since the b/w stands very proud of the Ebony, I just tacked it together with super glue. I'll install it all with LMI glue when ready to put into the rosette.  I'm about to decide what purfling to use on the Cocobolo pieces right now, so I'll sign off.
|
|
#19
07-14-2013, 07:41 PM
|
|||
|
|||
|
I need some advice from folks here about what to do about this rosette. Right now, I have put in the 2nd set of purfling strips, and was going to rout out for the 3 pieces I made and framed.
But here's what I'm looking at.  It seems no matter what I sand with, I end up getting the dark residue all over the top. As you can see, it loads up outside the boundary of the 3 pieces I was to inlay. Also, on the left side, you can see some chip out of the spruce top that looks pretty bad. The top is almost to final thickness now, and I'm hesitant to sand anymore for this. What comes to mind right now is to abort this side of the top, and do this on the other side. When you have dark purfling strips inlaid in the top, how do you avoid this? Is this a case where I should have put some sealer on first? All help much appreciated. Bob
|
|
#20
07-14-2013, 08:43 PM
|
|||
|
|||
|
You know more than I do, but I was told that it's always a good idea to seal with a wash coat of shellac prior to routing out for binding to avoid tearout. You got me on why the dust is collecting to the outside of the purfling though. Are you sanding with the grain or along the arc of the purfling? What grits are you using? Have you considered using a scraper instead?
That tearout has me the most concerned given that you claim the top is at final thickness. How though much thinner can you go? Either way, I'd hit it with naptha to get out that dust and seal it with shellac. I really can't offer you much more in the way of advice since I had some real problems this first time around but all I can say is that sometimes the best thing is to walk away from it for a bit and think about what you did and brainstorm on how to solve the problem. Hopefully somebody else here or at KGF will chime in with more seasoned advice. Good luck!
__________________
(2006) Larrivee OM-03R, (2009) Martin D-16GT, (1998) Fender Am Std Ash Stratocaster, (2013) McKnight McUke, (1989) Kramer Striker ST600, a couple of DIY builds (2013, 2023)
|
|
#21
07-15-2013, 12:21 PM
|
|||
|
|||
|
Quote:
if it's just dust collecting there surely you can blow it off or is it embedded? i'm not clear on this. i use a tiny plane then scrape to flush, i don't sand. the use of sealer seems to be the choice but i don't do that either. a new and sharp reverse spiral bit works very well and i've not had any tear out yet. but i do pre-score the cuts with an lmi circle cutter and after that it's just a job of wood removal for the cutter. this way one doesn't have to worry about tear out and cutting the circles/arcs/segments in quadrants ("grain management") -makes life easier and easier is what's best for me  you could swap faces and try again or you could cut out the existing pieces and re-cut the pockets slightly larger to remove the bad areas if you like. but then you'll have to make new, larger inserts as well -your choice. Last edited by arie; 07-15-2013 at 12:49 PM.
|
|
#22
07-15-2013, 09:40 PM
|
|||
|
|||
|
Thanks kwakatak and arie, I flipped the top and started tonight on the other side. I sealed up the top, and routed for the thin b/w/b. It was funny, but before routing, I could actually see the other b/w/b thru the top. I'm pretty sure I didn't go but about .05" deep on the first one, but it was there big as day.
There was no way I was going to salvage the work I did on the other side. The bad thing about this was that it's been a long, long time since I last inlaid a rosette, and I'd forgotten how easy it is to make a slip and really gut a top. I had paid great attention to the back when I braced it, and felt that I was on track doing a good job on this guitar. But just a lapse of concentration and taking things for granted taught me a good lesson. I tested my drill bit at the top so that any mistake would be hidden by the finger board, and cut it out as perfect as I could, right on top of the old one. By the way, the bit I used this time was not one of the cheap bits I'd used earlier. It is a 1/32" bit that cuts very cleanly. I have three that measure .06" (will play with one tomorrow to see how it cuts in spruce), and I also have a 1/8" bit for routing out the larger cavities I'll face later on. I have a very, very tiny plane, one of those Ibex finger planes. I could not find a depth of cut that would smoothly take down the rosette, so went slowly with the smallest chisel I have, and then with a razor blade. So far things look better, but tomorrow night I'll try the b/w/bloodwood/w/b pieces. Since only a small part of that will show, I'll try to terminate them just under the edges of the pieces I cut out to inlay. Last edited by naccoachbob; 07-15-2013 at 09:52 PM.
|
|
#23
07-16-2013, 07:13 AM
|
|||
|
|||
|
Happy to hear you got past that, keep going.
Scott
|
|
#24
07-16-2013, 01:26 PM
|
|||
|
|||
|
Rosettes are something you just don't do every day unless your making guitars for a living.
What I do with mine is I keep the top fat... install the rosette.. thickness sand till flush.. and then flip the top over and thickness sand to the final thickness. Not sure if that's the right way or not, but it works for me. Looking forward to your next post.. Stu
__________________
I'm not a luthier...luthier's know what they are doing. 
|
|
#25
07-16-2013, 07:13 PM
|
|||
|
|||
|
Quote:
I will store that thought for the next one, seriously. A hard lesson learned. Thanks, Stuw and King Cavalier.
|
|
#26
07-21-2013, 05:21 PM
|
|||
|
|||
|
Whew! I finally got the rosette installed. It's not anywhere near what I wanted to do, but I'll have to practice on some scrap and learn more. Also, I need to get a few more bits for the Dremel.
Even though I wanted to try something different than I ended up with, I'm happy with it. I don't recall seeing one like it, so it does have some unique-ness. While working on the rosette, I broke a very good 1/32" bit that left hardly any trace of itself except the hole. The 1/16" bit isn't as good. At any rate, here's the rosette. The small circle is b/w/b and is about 1/32" wide. Won't be making more of these anytime soon  . .Outside of that, flanking the sound hole are 2 pieces of cocobolo, with an ebony piece at the bottom. Prior to routing for those, I put down some of the purfling that I'll use along the top and back (maybe the back). It's black/white/bloodwood/white/black. All totaled, it's about .01" wide. This wasn't the easiest thing I've ever done. Matter of fact, the initial top bit the dust when I tried installing this work on the reverse side. I guess 3rd time is the charm! I put the pieces - all of them - just below the surface of the top. Since I don't have a thickness sander, I'm sanding down with a palm sander to get to where the rosette is flush. By the way, it's not done yet. I have a lot more sanding to do. Then, I'll use a plane on the reverse side to bring it down a bit faster.  In addition to the top, I started work on the finger board. The neck I'm using is semi-carved, but is 1 3/4" wide at the nut. I am using ebony to bind the board along with some white fiber from LMI. I like the way a bound fretboard looks, and have seen Steve Kinnaird's fretboards enough to try mimicking what he sometimes does. When you do one of these, be sure, absolutely sure, of your measurements. After I measured the thickness of the binding strips and the fiber, I found that I had to make the fretboard just about .18" thinner than intended - at both ends. It wore me out trying to convert from decimal to fraction and vice versa. I made all the conversions, marked the board, then walked away. The next day, I did the same math, and checked it against what I had marked. It all lined up correctly. Another WHEW! moment. Here's the board and pieces that I'll put together either tonite or tomorrow.  Thanks for looking, Bob
|
|
#27
07-22-2013, 09:01 PM
|
|||
|
|||
|
Having a really good night tonight. The binding of the fretboard went particularly well (knock on wood).
I first cut the long strips of ebony, and miter cut them with miters at the end nearest the sound hole. I used 45 deg miters on the two long ones, and increased the miter for the piece going onto the end. Since the board is slanted from headstock to soundhole, another 45 wouldn't mate up as well. These came out ok. To start, I taped the end piece onto the fretboard and let it set for 30 min or more. I then put down some tape under the fretboard to hold the long pieces once I glued the two parts together. Placed them in position, and secured one side with tape.  A couple of minutes later, the other side got glued in.  After letting that set for about an hour, I removed the tape, and shaved down some of the white fiber. It was standing proud of the outside strips of ebony. I am very, very, very proud of the shaving I did on those parts. You can see one very long strip that went from one end to the other on the fretboard. I should frame that, as it's the best work of chiseling in my short history of chiseling. I know that chiseling something like this is stupid easy, but I've not yet become a good chiseler. Working on it!!  Since both the fiber and ebony bindings are taller than the fretboard, I went after it with 60 grit paper to bring them down to level. I have a wooden 8" block from StewMac that has a 16 deg radius, so I used that to bring them down. I then cut off the excess at the nut end, and sanded it all flush. Tomorrow, I'll do the bottom surface.  Earlier today I ordered some block gold mother of pearl from Andy DePaule to put in the frets at the usual locations. Should be here by the week's end. Part of me says I should have left the bindings tall and used my Dremel with the StewMac base to cut the inlay. But the other side of me says that I probably didn't have the two bindings perfectly placed, and that there would be some tilt to the inlay pockets. An alternative would be to place a couple of pieces of wood right next to the fretboard and have the Dremel ride on them. The last time I did a bound fretboard, I used white MOP and just rode on the surface of the fretboard. It came out well. Does anyone have any thoughts either way on this? Thanks, Bob
|
|
#29
07-23-2013, 05:12 AM
|
|||
|
|||
|
Earlier today I ordered some block gold mother of pearl from Andy DePaule to put in the frets at the usual locations. Should be here by the week's end.
Part of me says I should have left the bindings tall and used my Dremel with the StewMac base to cut the inlay. But the other side of me says that I probably didn't have the two bindings perfectly placed, and that there would be some tilt to the inlay pockets. An alternative would be to place a couple of pieces of wood right next to the fretboard and have the Dremel ride on them. The last time I did a bound fretboard, I used white MOP and just rode on the surface of the fretboard. It came out well. Does anyone have any thoughts either way on this? Thanks, Bob[/QUOTE] Bob, The issue with inlay is your dealing with a flat non bending inlay and installing it in a fretboard with a radius. If you kept your router on a flat plane your depth of cut would be different. (deeper in the middle, shallow on the sides) I just let the router follow the radius and if there was any "give" in the inlay it would fit in the cut better knowing I still had to sand the high spots down with the radius sanding block. I had one break on me and went too far down into my cut (one on the right), it stands out like a sore thumb, and I'm going to have to sand more to get it to look good. Also I hope you have better luck with the black mop.. the shades varied too much on my inlays and some just disappear into the wood. I'll stick to white or gold mop from now on. 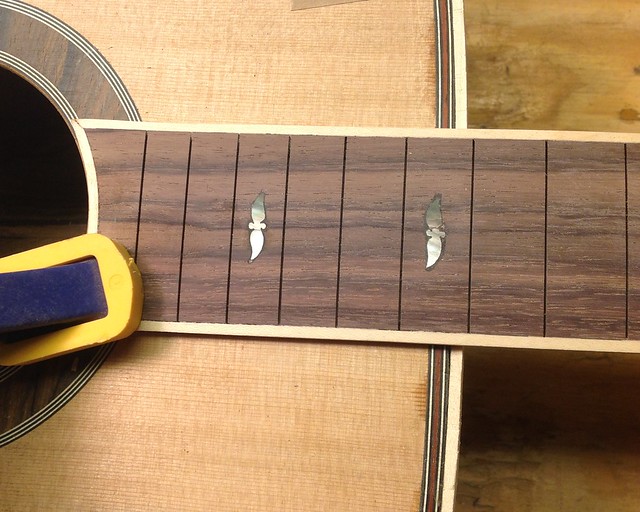 Btw everthing is looking great. Stu
__________________
I'm not a luthier...luthier's know what they are doing.
|
|
#30
07-23-2013, 07:18 AM
|
|||
|
|||
|
Thanks, Stu. It's gold MOP, not black, it's just in block shape. But I'm betting there will still be some variation in coloring. I've never used that color before - looking forward to it.
We'll be able to compare notes on the EVO gold fretwire as well. This guitar is to be a black and gold thing. Maybe subconciously I chose the colors for the local High School - Not Notre Dame!! They're the Nacogdoches Golden Dragons. Well, gold really goes well with black.
|


