
|
|
#61
 02-27-2010, 05:19 PM
|
|||
|
|||
|
Been a while since I updated this thread due to work but I spent a few evenings getting some work done, even if it meant I was exhausted at work the next day, this guitar making thing is getting a little addictive! My shed still has no power and no heating which isn't good for me or the guitar. My bedroom has become a makeshift workshop. I haven't needed to make much dust or mess so it isn't a bother. When I have had to do some sanding I had the vacuum out ready.
Thursday: Firstly I trimmed down the excess length of the sides using a table-saw with the fence as a straight edge. I then got my bending iron back out just to make some slight adjustments on some of the bends to make them more symmetrical. I then left the sides clamped in the mould overnight to let them set. Before going to bed I measured up the kerfing to the length needed. The kerfing wasn't going to bend without snapping so I again used the bending iron to soften up the wood. I got it bend in the tighter areas and clamped it inside the mould with the sides. It was close to 2am and it was time for bed I was due for work for 9 the next day. Friday: I installed the mahogany end blocks and then the kerfed lining for the top side. I had some reservations about the size of the blocks when glued in. I did some looking around on the custom build section of this forum and saw a huge variety in what people use ranging from pretty small to huge which made me feel better. My overall feeling was I would rather make sure my first build is solid than take the risk of under-doing things. The kerfing went in really well and stiffened up the whole rim well. I used cheap spring clamps which have a little more oomph than a clothes peg in places like the waist and bends which worked great. Once again, everything was left in the mould. Another late night, time for bed. Saturday: Today I installed the back kerfing as soon as I got in from work. Went in easily and clamped up perfectly (some things do go right!) I left it to dry for about 4 hours, dinner time  . .Next up I sanded down the overhang of the kerfing. My top will be flat with no radius so I used a sharp chisel to level it out the best I could then used a flat surface with 80 grit sandpaper. The back is a 15 degree radius. So I use a chisel to rough it out again but this time I cut some sandpaper in the shape of my radius dish, glued it to a large sheet of paper and placed it in my dish. Using this I sanded the whole back side of the rim in there so there is a slight radius on the kerfing ready for the back. I think that will work pretty well as I have looked up a few builds I have found elsewhere using the same method. Okay now for some pictures. Doesn't look a lot but I wanted to take my time to get it right. I forgot to take a picture of the cut sides, but we're not missing much there. Top kerfing: 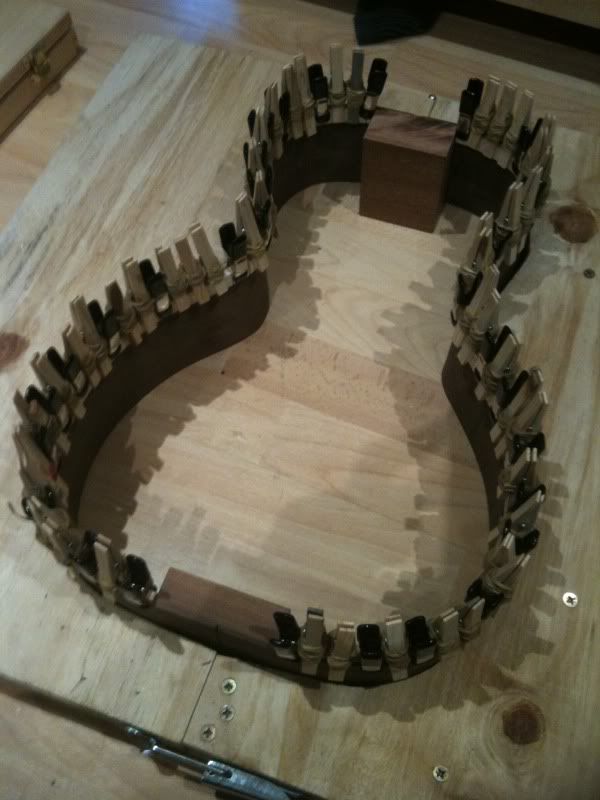 Back kerfing: 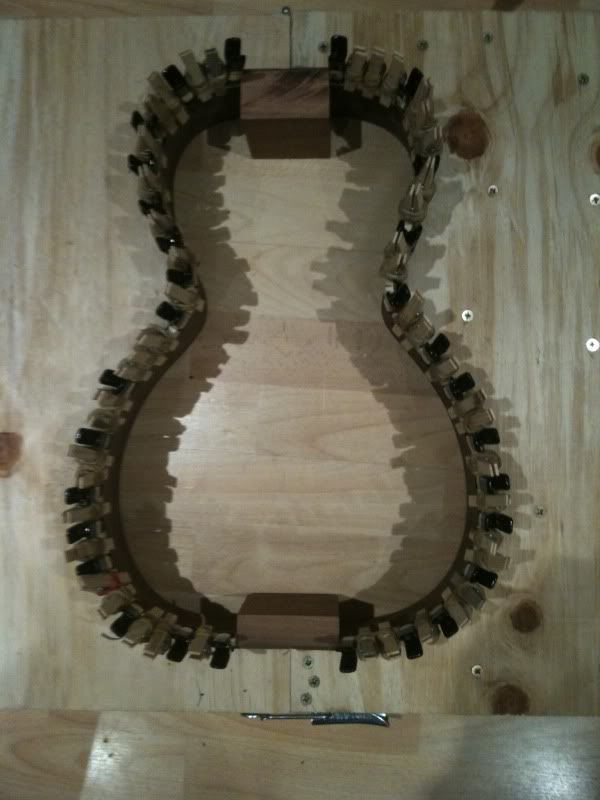 Dried kerfing sanded & ready for a braced top and back. The back is in just so you can get an idea of what it will look like: 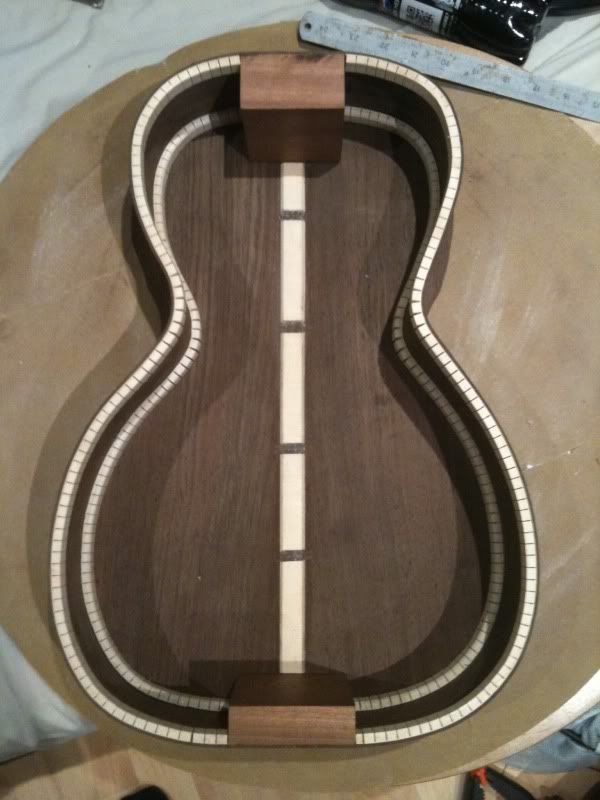 Not a bad few days work as I have had a long week. Only Sunday left to work and I can have 2 days to work. Hopefully I will get my brace maker from Luthier Suppliers (http://www.luthiersuppliers.com/) on my days off and I can make some real progress on the back. If not, I can start bracing the top. Not sure if many people read this, but it is nice to keep a record of what I am doing. For those who do read it and are considering making their own guitar, if you have the money to buy tools or are lucky enought to have the tools at hand to give it a go, just go for it. I had little wood working skills before I started as my previous DIY was bricklaying and other things like that, but I am starting to feel this might actually work. More to come soon hopefully. Pete Last edited by Coke_zero; 02-27-2010 at 05:27 PM. 
|
|
#63
02-27-2010, 05:54 PM
|
|||
|
|||
|
Pete,
It's looking really good. After the problems you had at the beginning, you've recovered very nicely. Your build is taking shape very well. I got my first from a kit and didn't have to bend the sides or shape the neck, so yours adds much more work (and satisfaction I bet), which is very cool. Love to try that later on. Keep at it, you're going to be so happy when you play it the first time. Bob
|
|
#64
02-27-2010, 06:30 PM
|
|||
|
|||
|
Thanks people. I am confident about finishing up the body, I feel I can quite comfortably brace the top and back and get the side reinforcements in easily enough. My real concern is carving the neck, gluing the neck, joining the neck, well basically anything to do with the neck...
|
|
#65
02-27-2010, 06:39 PM
|
|||
|
|||
|
Looks like good, clean work so far. Nice going!
|
|
#66
02-28-2010, 02:07 AM
|
|||
|
|||
|
ey Pete,
Well it looks like you have found a great place to give building a shot! I have to say I'm a little envious. I'm curious as to how little space you can take up in the whole process. Living in a city of 17 million I'm not afforded a ton of space, but would love to try! Please keep us up to date...I know I'll be on daily waiting for pictures and updates (who am I kidding? I'm on daily anyhow).
__________________
Regards, Greg Lawson,
|
|
#67
02-28-2010, 07:40 PM
|
|||
|
|||
|
Greg, I know what you mean. I live in the largest city in Europe (London) and there isn't much space for most people. I am lucky enough to have access to a large shed and a spare room at my folks that I use when I need it. The messy work was all done in the shed (cutting, jig making, routing etc) however a lot can be done literally on your office desk.
Apart from when I need a vice or something like that, I have found I can do a vast amount sitting at my desk. I do light sanding and scraping at the desk with the vacuum cleaner on hand. Gluing is easily done at the desk. I can see why many hobby builders and professionals use large shops especially if they make more than one guitar at a time as it makes life easier but it isn't needed so far in my case. In regards to more pictures, I did nothing today on the guitar. I've just finished a long working week and fell asleep as soon as I got in. I'm off tomorrow and hope to glue in the side supports and maybe brace the top. I really hope some more equipment turns up Monday as without it I can't brace the back.
|
|
#68
03-01-2010, 04:03 PM
|
|||
|
|||
|
What a gripping story! Looks like you are doing pretty well despite some major setbacks early on. Blood, sweat and tears indeed.
Thanks for sharing it and keep it coming, I know I'm not the only one who wants to see a lot more. I feel the stirring of an inkling.
|
|
#69
03-01-2010, 06:17 PM
|
|||
|
|||
|
Long day.
Spent the day doing a few odd jobs to find my mothers head gasket disintegrated on her car so had to go out and strip the engine in the cold. Never got much done on the guitar until it got dark when I finally had an excuse to clean the oil off my hands and have a break. I am bracing the back of the guitar as I type this, or should I say waiting for it to dry. I don't have a go-bar deck which makes things pretty slow as I have to clamp each brace individually and wait for it to dry before doing the neck one. For build number 2 I will order some go-bar sticks and make my own deck. Not only will that save time for bracing, but for nearly every other gluing application such as gluing the bridge, gluing the top/back to the rim and gluing the rosettes etc. They are also more efficient. I believe each go-bar stick gives about 30lbs of pressure (correct me if I am wrong). Not only is that a lot, it is all focused in the space of about the size of the wrong end of a pencil. Times that by 10+ sticks and that is a lot of pressure. I had one minor incident with a brace. When clamping I didn't notice that the brace slid about 1/2" diagonally which meant it dried in the wrong place. Fortunately it wasn't dried 100% so I scrapped the excess glue off first and got the clothes iron out and heated up the brace enough for the glue to melt. It came off nicely. I tidied up the glue and sanded the brace in my 15' dish and it was ready to try again. No big issue, but it did take up an hour I didn't have. I have some violin planes on the way to me ready to carve the back tomorrow if all goes well with the glue joints. I have looked at the back in the radius dish after each brace and it appears to be working as I want it. I will try and get a few pictures up before I go to bed. It is almost half 12 at night here at the moment. I don't have work tomorrow so it may be a late one! Pictures to follow... maybe. One of the reasons I didn't post pictures as I glued each brace is 1, it isn't particularly needed and most importantly, I want to make sure it is okay first. EDIT: Picture as promised. Back bracing glued on to radius. Marked up ready for carving tomorrow hopefully if the tools arrive. I have a little more cleaning up to do but I will save that for tomorrow (well later today now as its 3am  . .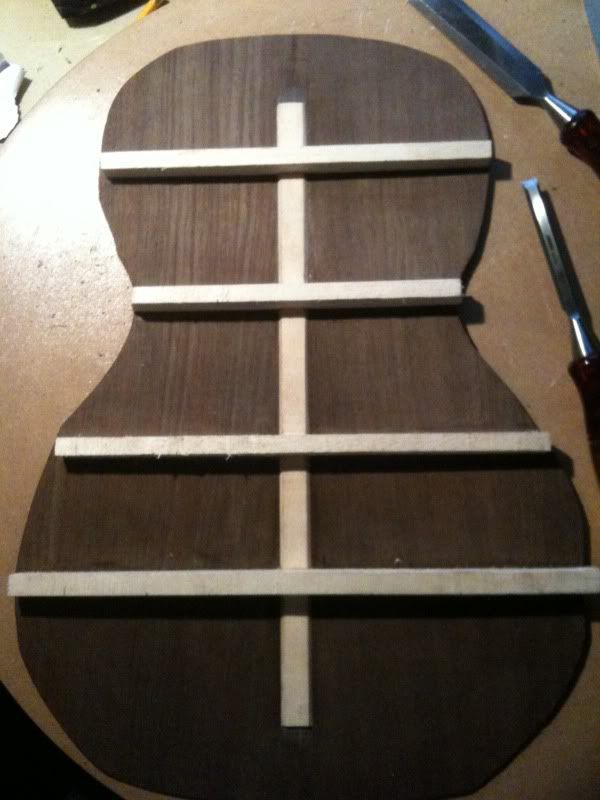 Night. Last edited by Coke_zero; 03-18-2010 at 01:02 PM.
|
|
#70
03-11-2010, 09:35 PM
|
|||
|
|||
|
Pete, looking good there dude! And what a story. I remember reading about the fire back before Christmas but forgot about your build till now.
You are doing just fine, especially for having limited tools and space to work. You should be proud of your effort to date and know that it will work out fine as long as you keep asking questions and following your plan. Keep it up, you'll get there 
__________________
Rod True, aspiring luthier My current project A guitar I built for my Father in Law The Celtic Beauty - The Epic Journey True SJ - #9
|
|
#71
03-18-2010, 12:59 PM
|
|||
|
|||
|
Thanks R. True.
Update: I have been neglecting this thread for a while now. Work has really been busy and I've had a few things going on which put guitar building at the bottom of my to do list, but I'm back with an update. I spent a few hours last week putting in my end wedge. It was a very simple design of flamed maple with ebony purfling. I cut out the section & glued in all the pieces. Brilliant I thought. I hung it up in my workshop and it fell off the hook, resulting in nasty scuffs and one big dent in the back which under advice I was better cutting out rather than patching it. Damage! 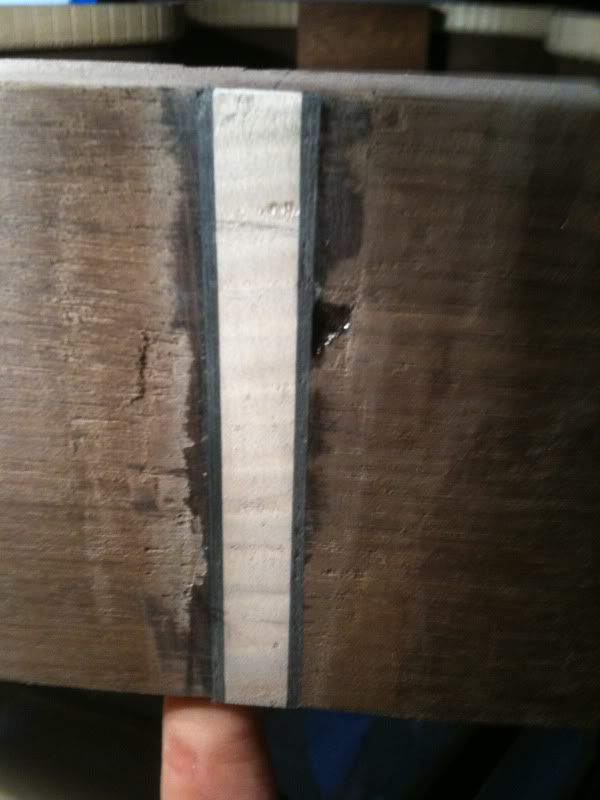 I chiseled it out and started thinking about what to do from there. The damage was a lot more than it appears in the picture. The chip missing actually carried on another 2-3mm from where you can see so the whole section had to be cut, obviously the same amount from each side of the wedge had to go to keep things symmetrical. I remembered I had a few walnut offcuts and started to fashion a wedge shape which I bound with black purfling again. I don't have any "finished" images of the wedge as I had a lot of catching up to do, but I did take a picture of the wedge when gluing up the back so you can see what I did it save it. Which will be at the end of this post. So, now it was time to finally start bring pieces together. I test fitted the back, all was fine so it was time to glue the back on. I got all my spool clamps lined up, spread glue over kerfing and mahogany blocks and away I went. Back glued up: 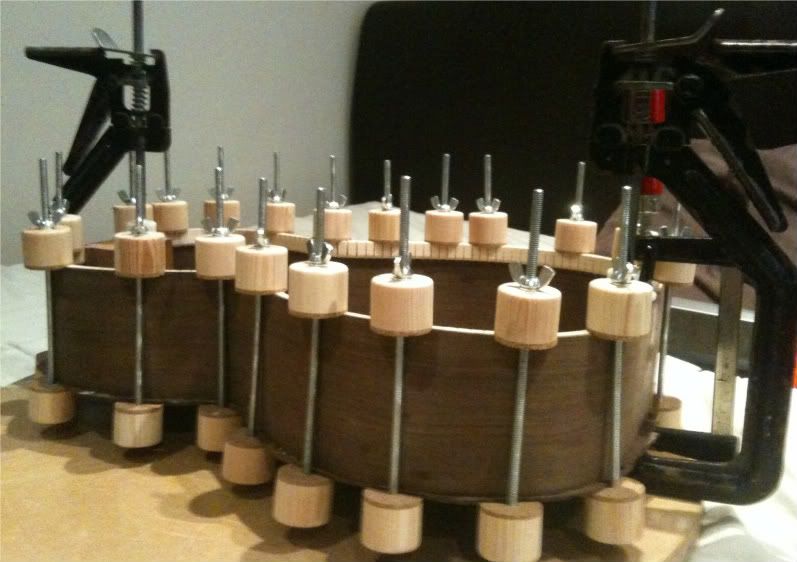 End wedge: 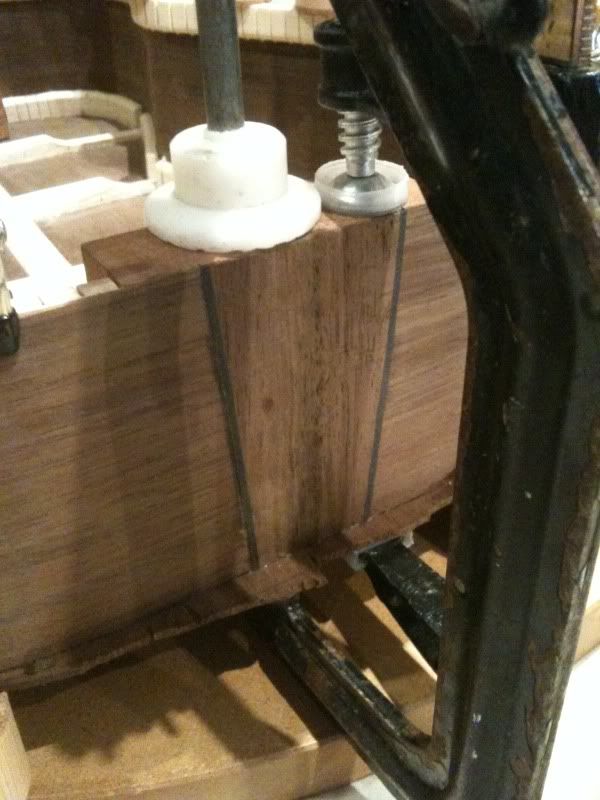 I actually much prefer the new end piece. If I could have made it smaller I would have, but it's a shame there was more damage than I first thought. I haven't braced the top yet as I haven't had the time to make sure I don't rush it. I hope to glue the braces on tomorrow morning and maybe start carving by the evening. That all depends on if everything falls apart when I remove the clamps from the guitar tomorrow!
|
|
#73
03-20-2010, 11:19 AM
|
|||
|
|||
|
It worked out okay in the end. I have ditched the idea to bind the guitar with maple now as I feel it will be too much of a contrast. The plan is to save the maple for build #2 which I already have plans in my head for. I now plan to bind it with a darker wood, I have some Ziricote binding somewhere so I will see how that looks.
When the clamps came off it was a solid glue joint with no obvious weaknesses at all. The back kept its radii well and Things are all ready for the top, which I braced & shaped over Thursday & Friday. Not many pictures as I was just too preoccupied but here's what I have, I used a few other pictures as reference but I would rather a slightly over-braced guitar for my first one than a totally under-braced one. 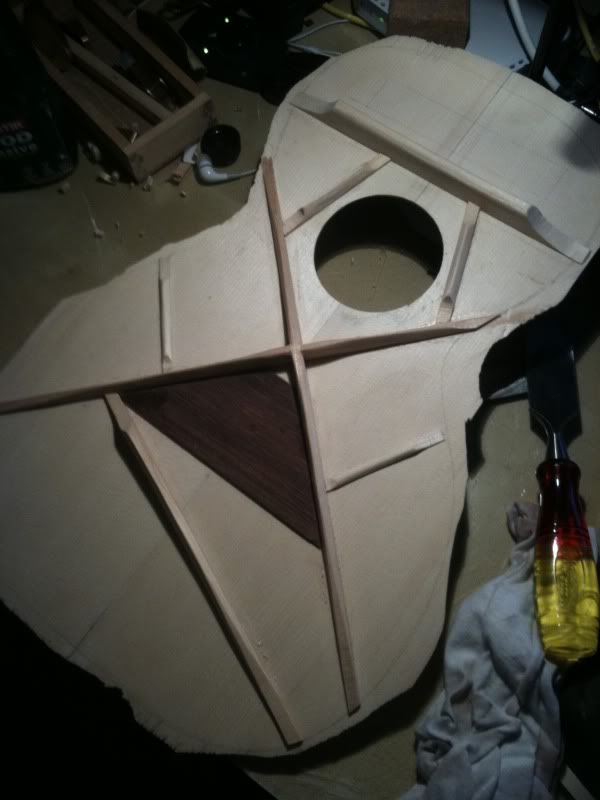 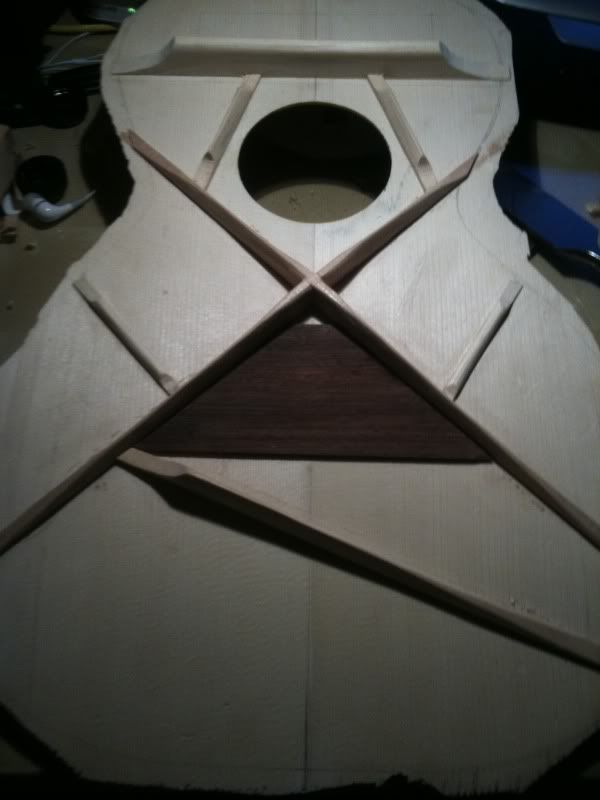 Neither picture is the finished top as I had a bit more work to do. By no means perfect but I was quite happy with my efforts. I have just finished gluing the top to the sides, so effectively closing the box. More to follow later today hopefully.
|
|
#74
03-26-2010, 03:11 PM
|
|||
|
|||
|
So how do you just up and start on something like this? I have no garage, and no power tools...can I still build my own guitar? I found some nice cocobolo and cedar on ebay (dream guitar = cedar top, cocobolo back and sides)...can I make one with no workspace like at my computer desk or do you need a lot of space? Could I just use a handsaw? I could soak the wood in the bathtub, so it is bendable, then bend it over my leg, right?
Don't laugh at me please, lol. I have never made one, but want to BAD!!
|
|
#75
03-26-2010, 03:53 PM
|
|||
|
|||
|
CokeZero, the job is looking great..........good fix on the end wedge. Can't wait to see how it comes along.
Crobs, I built most of mine in our computer room. All the sanding and power cutting I did outside. The only time I used a power saw was for cutting spools out of stock for a spool clamp. It would have been better if I'd bought them, but, that's what I did. Some kits come with the sides bent, and everything thicknessed for you. Bob
|


