
|
|
#1
 07-10-2020, 10:12 AM
|
|||
|
|||
|
Spend time today cleaning and prepping shop(garage). Do some final sanding and scraping of plates. I bought new and better quality cabinet scrapers with a proper burnisher. I am scraping now just because it is enjoyable. LOL
A. Wishing me luck is appreciated. B. What have you gentleman forgotten in closing the box on your first couple of builds? Hoping to avoid same. Meaning, you close the box and forgot the hole in a transverse brce to access the truss rod or forgot to place side braces or (what I nearly did) forgot ALL about the bridge plate. C. Aside from a go-bar deck, what was your preferred method of glue up? I believe I will go with wooden screw clamps on the head and tail block areas with various clamps at the edges. I also have homemade radius bars that I can clamp over the plate being glued as a caul. D. Cut the mortise in the block before or after? OR really doesnt matter. 
|
|
#2
07-10-2020, 11:02 AM
|
|||
|
|||
|
Good luck! I tried wrapping (a la Cumpiano) the first time, and have used clamps the rest of the times. A good fit requires less clamping force (tape works, careful not to peel the top grain) than you'd think.
If you cut the mortise before you put the back on, then you can go all the way through and then cover it when you put the back on. If you're doing it with a router it's not as big of a deal but doing it by hand makes it easier. I mortise my neck block before it's even on the sides.
|
|
#3
07-10-2020, 12:59 PM
|
|||
|
|||
|
I use spool clamps around the outside. Made myself a pile of them.
A good thing to do before you close the box is make yourself a bridge gluing caul for the inside. Easier to make while you can still check the fit against the braces.
|
|
#4
07-10-2020, 01:15 PM
|
|||
|
|||
|
Quote:
|
|
#5
07-10-2020, 03:36 PM
|
|||
|
|||
|
Good luck. Next up: lots and lots of scraping and sanding. Binding is on the horizon.
__________________
(2006) Larrivee OM-03R, (2009) Martin D-16GT, (1998) Fender Am Std Ash Stratocaster, (2013) McKnight McUke, (1989) Kramer Striker ST600, a couple of DIY builds (2013, 2023)
|
|
#6
07-13-2020, 09:16 AM
|
|||
|
|||
|
Well the weekend wasnt it. More problems.
A. How many of your first builds were hideous? B. More important. How many are playable to this day?
|
|
#7
07-13-2020, 09:43 AM
|
|||
|
|||
|
Quote:
Quote:
Keep your chin up.
|
|
#8
07-13-2020, 12:04 PM
|
|||
|
|||
|
I built my first acoustic guitar in 1992 and I still play it today. It doesn't look great, it's had the neck reset once, but it actually sounds pretty good and I like it just becasue it's my first.
This is how I have always closed the top by gluing on the back: 
|
|
#9
07-14-2020, 06:34 AM
|
|||
|
|||
|
Quote:
The photos posted in the custom shop threads really are another level, the close ups of miters on bindings are honestly just gloating at this point  My guitar is still playable. The action is a little high, because neck geometry is very difficult to get right, but it plays nicely, and sound improves with age. To make you feel better, here's a closeup of the soundport on number 1 - this tear out is something I have pointed out to tens of people, and very few of them can see it despite me pointing right at it. To me, it's glaringly obvious. http://https://photos.app.goo.gl/49cKE9QBb4HVd1SL6 You always remember your first.
|
|
#10
07-14-2020, 07:17 AM
|
|||
|
|||
|
Quote:
A: I had lots of help and had access to better tools for my first. The only thing really hideous about it is the tenon on the neck. I tried using barrel boots like Cumpiano but it compromised the durability of the tenon so its now a semi-butt joint. For my second Im trying to do a lot more on my own - and it shows! The neck joint is much better though because it learned from my mistake and did threaded inserts and sealed them in with epoxy. B: my first build is 6 years old. Its too soon to tell but could use a setup. Im not entirely happy with the neck profile but am glad that the neck is stable. The neck joint is a bolt on and I intentionally chose not to glue down the fretboard extension because I didnt want to have to resort to steam when doing the reset.
__________________
(2006) Larrivee OM-03R, (2009) Martin D-16GT, (1998) Fender Am Std Ash Stratocaster, (2013) McKnight McUke, (1989) Kramer Striker ST600, a couple of DIY builds (2013, 2023)
|
|
#11
07-14-2020, 08:18 AM
|
|||
|
|||
|
It's a learning process. Every builder, including C. F. Martin, Bob Taylor, Ren Ferguson, Olson, Lester DeVoe, etc. has been where you are now.
Quote:
Clamping:   I have forgotten the brace between the block and the top transverse brace (this little flat brace helps delay neck reset):  Quote:

|
|
#12
08-02-2020, 06:59 PM
|
|||
|
|||
|
Bump.
Because the box is closed. I think it went pretty well. Need to refine my clamping process. Maybe if I can find a way to make cheap spool clamps. My errors with the back plate are still there and are still errors. The rim expanded/slipped while being bent and glued. It left it an inch longer than the back plate that I foolishly cut already. I need ideas for thick back purfling to cover the error. Plan is to model a Martin 000-28. So the back should be simple white binding. This will not be thick enough to cover my boo-boo. I am here for ideas. I don't know that I like herringbone on the back, so I want to shelve that idea. Unless you guys can point me in the direction of some examples where I am wrong?
|
|
#13
08-02-2020, 07:18 PM
|
|||
|
|||
|
Quote:
If it were mine, I'd remove the back, clean it up and re-glue. I suggest employing some means of ensuring that the side assembly remains the size of your templates - the intended shape. There are numerous methods of doing that.
|
|
#14
08-02-2020, 09:47 PM
|
|||
|
|||
|
Quote:
__________________
(2006) Larrivee OM-03R, (2009) Martin D-16GT, (1998) Fender Am Std Ash Stratocaster, (2013) McKnight McUke, (1989) Kramer Striker ST600, a couple of DIY builds (2013, 2023)
|
|
#15
08-02-2020, 10:36 PM
|
|||
|
|||
|
Quote:
Although this isn't my work board, it is very similar to the one I use, though mine has provision for the neck to allow building Spanish style, face down. The back and bindings can be clamped in conjunction with the board using rubber bands through the slots. I also use outside molds. 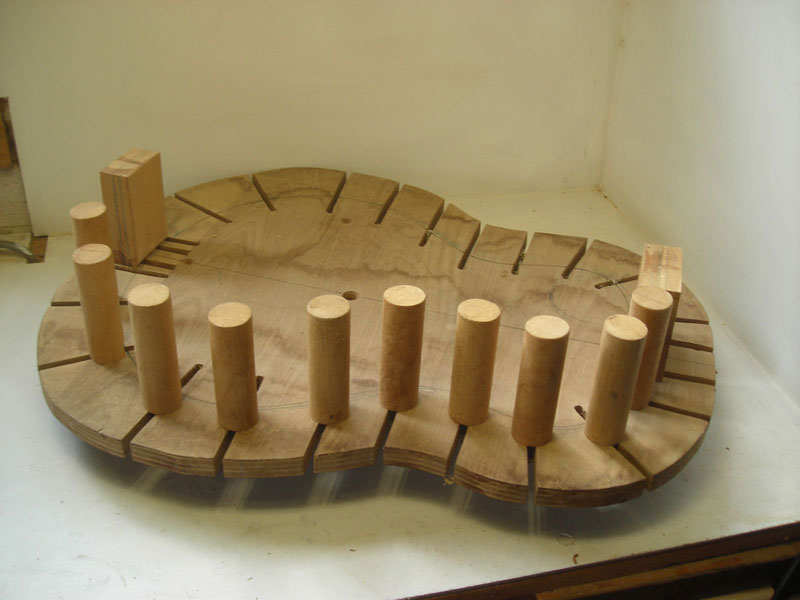 Quote:
|


