|
|
#31
 03-22-2020, 11:02 AM
|
|||
|
|||
|
Quote:
I'm really looking forward to seeing this endgraft design. Mike sent me some sketches of his thoughts and I think he's got a great idea that will continue our theme but provide a really great variant on it. I won't spoil the surprise (and how it actually turns out is going to be a surprise to me as I gave Mike latitude to improvise), but I think it's going to be cool. Can't wait to see this box all closed up and bound! I hope everyone is staying healthy, safe, and sane. I'm enjoying the opportunity to listen to records and play music and, fortunately, I think I can happily keep doing that for months. We'll get through this and those of us who pass the time playing guitar will hopefully come out of it with some new songs and skills. 
|
|
#32
04-28-2020, 08:54 AM
|
||||
|
||||
|
After a little over a month of zero shop time, we just got the go-ahead to start working again on a limited basis -- two at a time, always with the same person, sanitizing at the end of the shift, etc. It was really nice to get back in there, however limited, and actually progress on this build again!
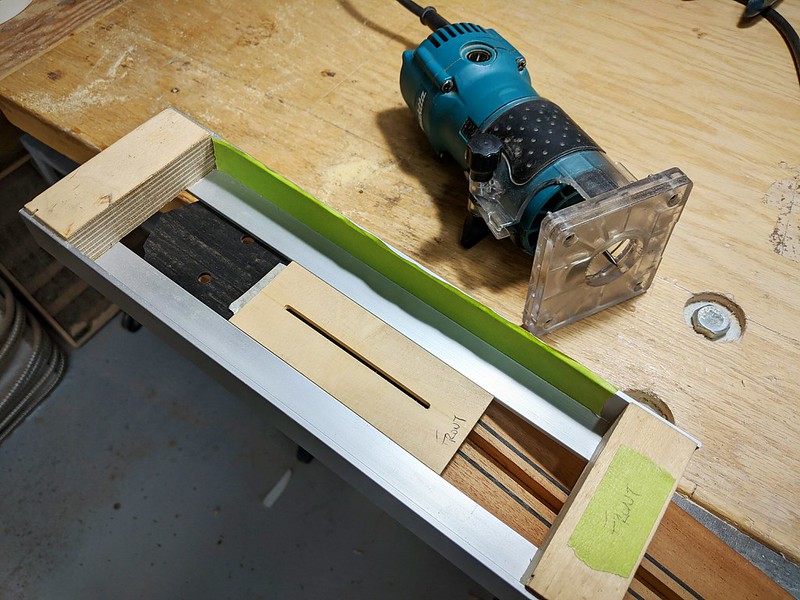
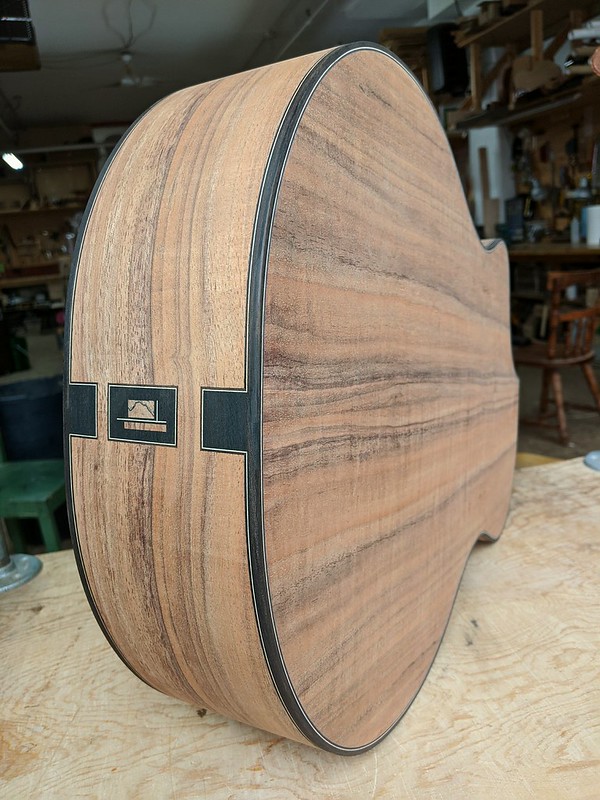
Picking up where I left off it was time to make the end-graft and get on with binding. After lots and lots of pondering, I came up with a design I'm pretty happy with and incorporated some ideas I've never done before. First up is routing and chiseling out the koa to receive the various bits of the end-graft...  Next up is framing the different sections. There are lots of ways to approach this type of inlay but my general strategy is to try and minimize the affect any inaccuracies will have. For example, I could make the end-graft separately and install it all at once directly into the koa. If I did it that way and I was off by .2 mm in my fit (which would still be pretty darn tight), that .2mm "gap" would be right next to a .8mm strip making that strip look 25% thicker. However, if I glue the strips in first so there's zero gap and then install the center sections I can move that potential .2mm error next to a 25mm area which will be much much harder to see. Hopefully that makes sense! 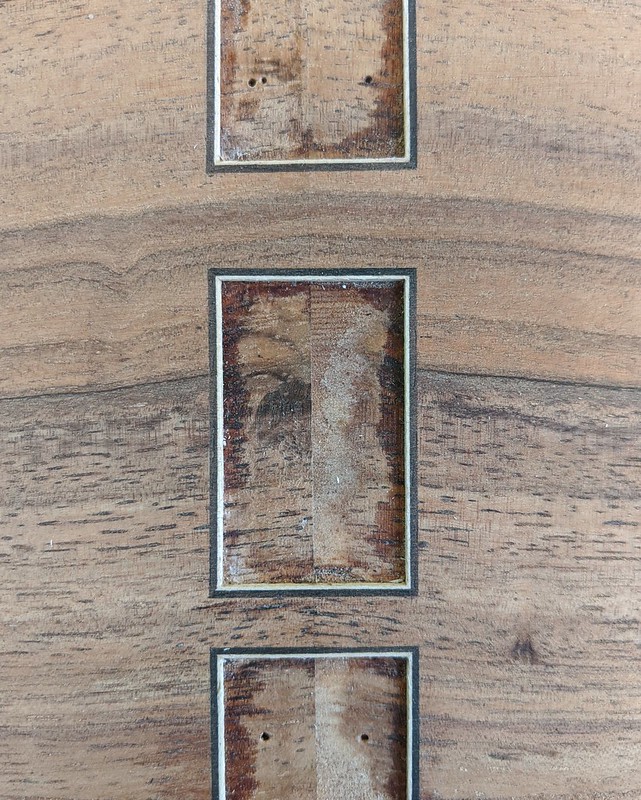 With the center sections installed and a bit of naphtha... 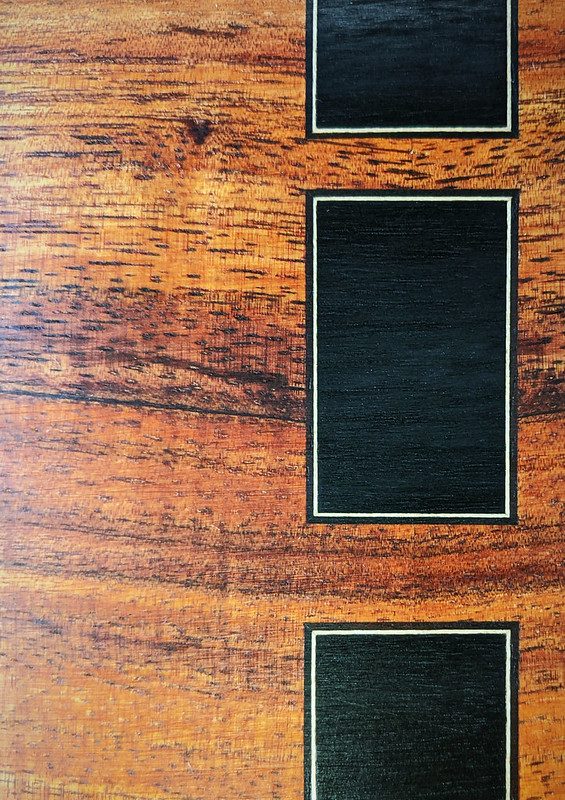 Getting closer... 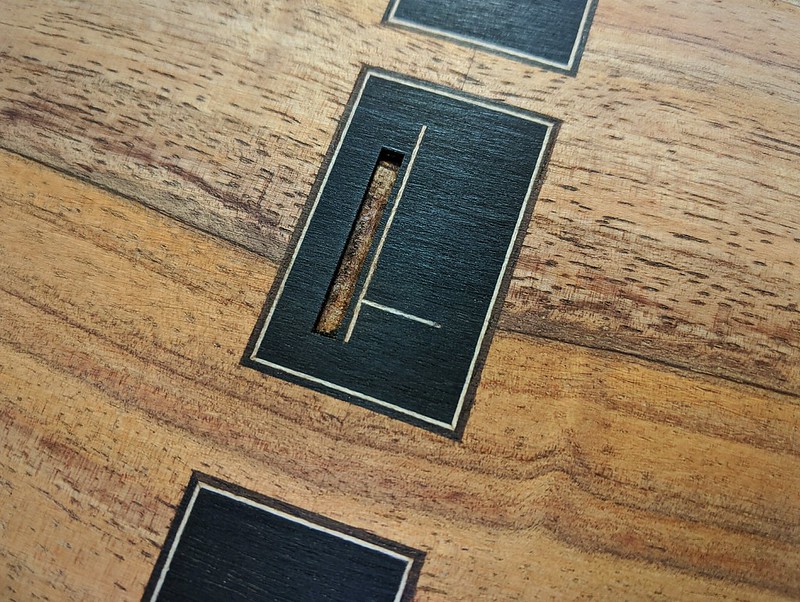 And fully installed!  I'm quite excited to see this once it's connected to the binding. Hopefully with my pared down shop time I'll be able to get that done over the next week and have some more to share with you all before too long!
|
|
#33
04-28-2020, 10:38 AM
|
|||
|
|||
|
Mike - the graft looks amazing! Happy to hear that you're back in the shop!
|
|
#34
04-29-2020, 09:48 AM
|
|||
|
|||
|
Hey Mike, your methodology makes a lot of sense. Nothing is ever perfect, but there are ways to make things look like they are. I always love seeing these detailed, close-up shots. Your craftsmanship and attention to detail is outstanding. This is what makes these custom builds so interesting for me 😎
__________________
Ian K. 2018 Michaud OO-R 2012 Webber Dreadnaught *SOLD* 2010 Eastman E20OM 1994 Guild D30 1979 Yamaha FG375S (retired) 1974 Norman B30 (retired)
|
|
#35
04-30-2020, 08:44 AM
|
||||
|
||||
|
Quote:
Quote:
|
|
#36
05-03-2020, 11:52 AM
|
||||
|
||||
|
Just a quick update this weekend as I'm slowly inching forward on this build as I'm able to get little bits of shop time. There's always lots and lots of prep work required for binding and throwing a cutaway into the mix ramps it up even more. One of the biggest challenges is that with the side twisting to meet the heel, all of the channels (binding and purfling) in the upper bout of the cutaway side have to be cut by hand. With the channels cut and the ebony binding successfully bent around the horn it's time to use an official wackload of tape to make sure everything is squeezed in nice and tight...
 I was able to get all of the strips glued before my shift was up yesterday but now I have to wait two days before heading back in -- I'm super excited to pull off the rest of the tape, clean this up and get a good look!  That's it for now and hope you all are having a great weekend!
|
|
#37
05-06-2020, 05:12 PM
|
||||
|
||||
|
All cleaned up and I'm super happy with how it's looking!
  And as is typical in lutherie, once I had everything cleaned up and looking pretty it's time to rout a big hole in it...  The woodwork on the body is just about done and hopefully the neck will be carved by next week and fully on to finishing!
|
|
#38
05-06-2020, 05:17 PM
|
|||
|
|||
|
Really looks fantastic, Mike!
__________________
2013 Stehr Auditorium (Carpathian/Myrtle) 2015 Stehr Auditorium (Adi/BRW) 2020 Baranik Meridian (Blue Spruce/Manchinga) 2020 Wilborn Arum (Tunnel 14/Coco) 2021 Kinnaird Graybeard (BC Cedar/Bog Oak) 2022 Kinnaird CS Student Build (Adi/Padauk) 2023 Kinnaird FS (Italian/Koa)
|
|
#40
05-24-2020, 08:34 AM
|
||||
|
||||
|
Quote:
Quote:
I'm slowly creeping forward with this one as I'm still only able to go in part time but grateful for whatever shop time I can get! If nothing else the past few months have helped reinforce how much I enjoy not only the work but the environment and community that the shop provides. Hopefully we'll be back up to full hours before too long! Here's a shot of the back cleaned up after binding when you can finally see the true shape of the cutaway and hopefully some nice clean lines...  I got the neck squared away over the past few weeks with a new first for myself. First up is the obligatory fingerboard glue-up shot... 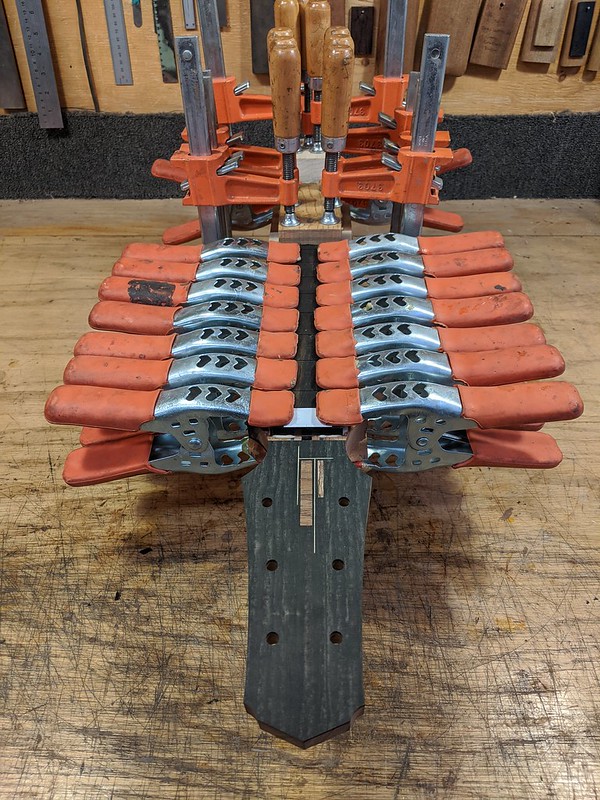 I'd say about 75% of carving a neck is prep work and that last 25% is where all the action, and bulk of time, happens. My typical routine is to carve the neck, feel like it's done, and then come back the next day with fresh eyes and hands and tweak all the little bits I missed the day before. Here's a neck right before I dive into that final 25%...  Once the neck is essentially done, it's time to flush it up with the cutaway. Feeling this joint for the first time after all the prep work and planning is like fireworks in my brain! Very very satisfying!  Heel cap on...  And now with a black neck! (first time I've done one)  Typically I will add a sound port after french polishing (it's easier to polish over an uninterrupted surface) but in this case the sound port will be bound. I've always cut out my sound ports by hand but with binding in mind, I want to make sure the sides are perpendicular and parallel with each other. So, after 12 or 13 years it was finally time to make a jig to help with the job! 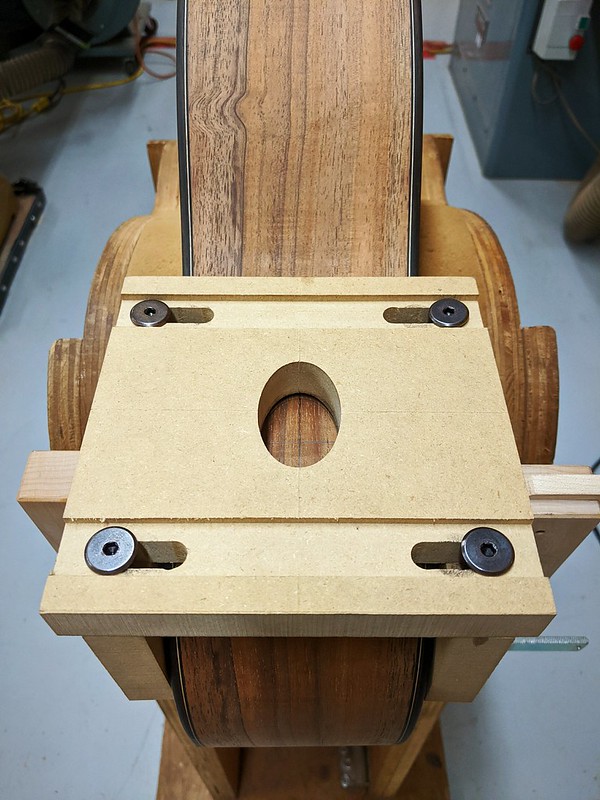 That just about finishes up the woodwork and it's on to filling and polishing over the next few weeks!
|
|
#41
05-26-2020, 09:37 AM
|
|||
|
|||
|
When Mike posted the photo of the neck leading down to the body with the beautiful curvature on the side and heel, I thought it couldn't get any better. I was wrong. When I saw the photo of the black neck, I flipped -- this is going to be such a handsome guitar, I'm quite excited. It's only going to get better when we see that Koa dressed up with French polish.
Fantastic work, Mike!!!
|
|
#43
06-18-2020, 11:43 AM
|
|||
|
|||
|
Quote:
|
|
#44
06-21-2020, 08:34 AM
|
||||
|
||||
|
Sorry for the delay in updating -- I am indeed fully immersed in french polish mode. Thankfully we've been able to be back in the shop full-time the past couple of weeks which makes it much easier to get into the rhythm of french polishing. I find it hard to get interesting photos in the early stages of finishing but luckily I'm closing in on official shiny-ness!
Jumping back in to the last couple of steps of woodwork, after cutting the soundport it was time to bind it...  More or less cleaned up...  Now fully cleaned up, pores filled, sealed, and relaxing in some (indirect) sunshine...  Years ago when it was just Jeremy and myself in the shop we built a UV tent to help speed up the cure time of french polish. I think that first setup was built with a coat rack, mic stand, broom handle, and an emergency blanket. Twelve years later Jeremy decided to go all in and built his time machine -- full digital humidity control, lights on timers, and a disco ball motor to spin the guitars... 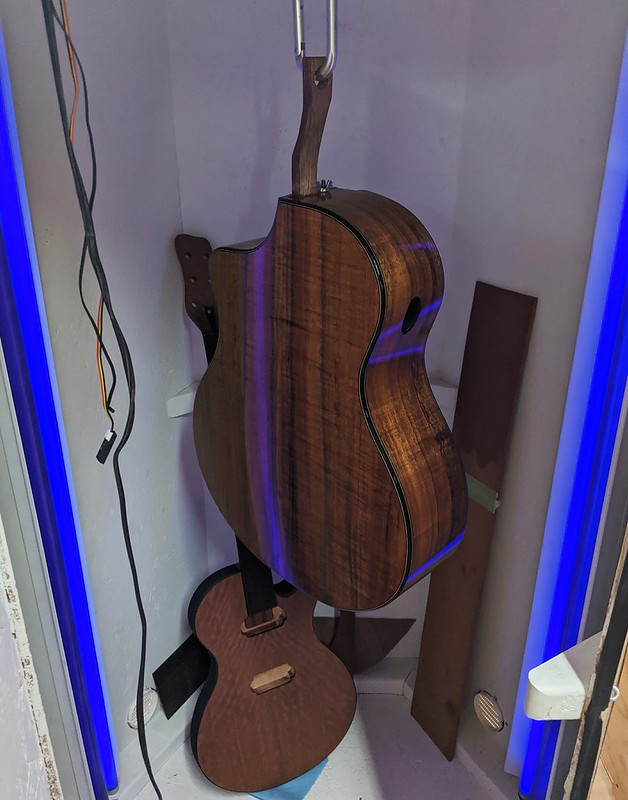 I really love the way the grain, color, and figure shift and move on this one...  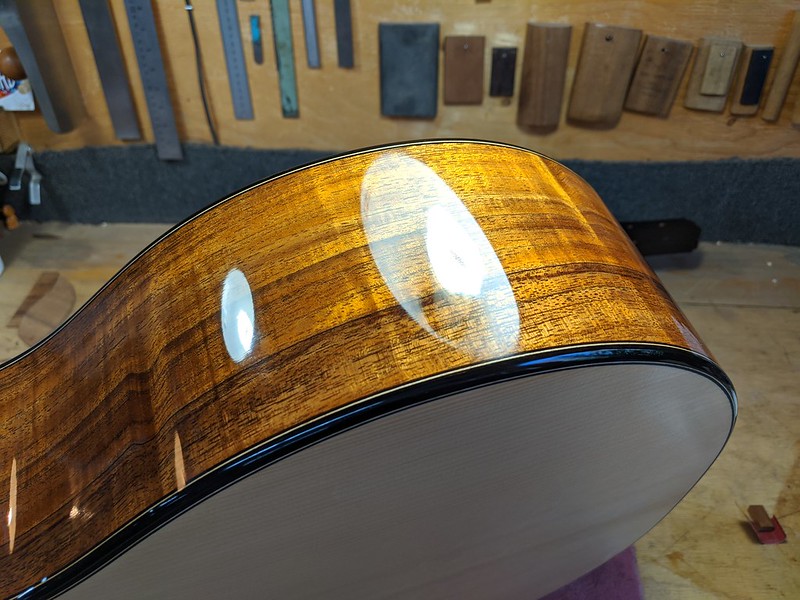 When we were finalizing some of the details for this build, Bill had the idea to go with a black neck if we used koa. I was very much on board and his initial idea lead to many of the subsequent designs and overall feel of the guitar. I can't wait to see (and hear) it fully assembled but what a great idea from the get-go! 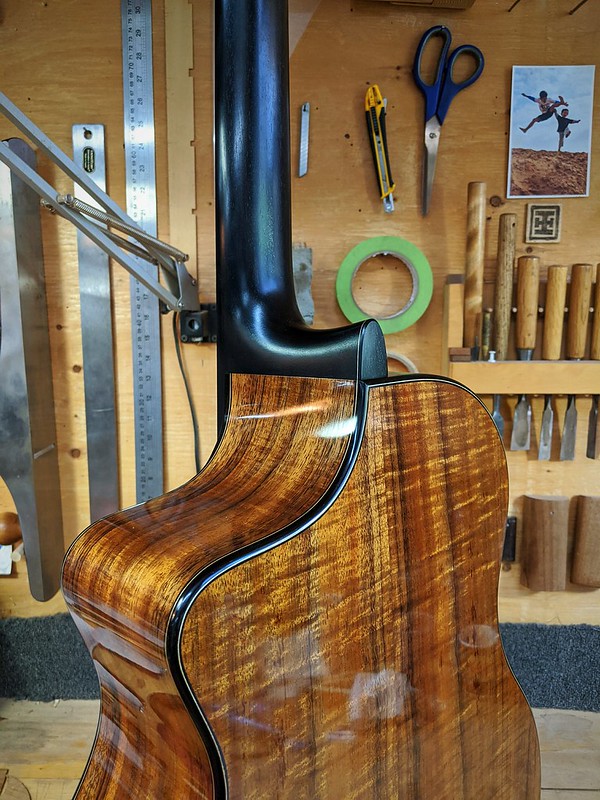 Still a bit more french polishing to do but hopefully I'll be satisfied enough in the coming week to call it shiny!
|