
|
|
#1
 04-10-2019, 12:39 PM
|
|||
|
|||
|
Ordered a bone saddle for a recently aquired D16 GT. It was preshaped but the bottom needed sanding which wasn't a problem but the sides needed to be trimmed down a little too. I used the same method with the sand paper taped to a flat surface and worked with my hands. The bottom was easy because there was more to grip but the sides of the saddle were a pain. Any tips to make it easier?
Thanks 
|
|
#2
04-10-2019, 12:43 PM
|
|||
|
|||
|
It's hard to get a grip on those things, isn't it? Try putting a piece of double stick tape on it. Better yet, tape it to a flat block and push that around.
A trick I learned from an old machinist was to move things in a figure eight pattern when you're trying to lap or sand them flat. Pushing back and forth tends to remove more material from the leading and trailing edge, leaving the center high. A figure eight pattern takes two strokes off the middle for every one on a corner, and helps keep the corners from getting low.
|
|
#3
04-10-2019, 01:14 PM
|
|||
|
|||
|
Thank you Alan. Didn't enjoy the blister I got from sanding the side. Wanted to make sure I didn't have the same problem next time.
|
|
#4
04-10-2019, 01:32 PM
|
|||
|
|||
|
Quote:
Very Nice Tip!
__________________
Taylor V-Class 814ce, 717e BE WHB, 520ce, 454ce, 420 Cedar\Maple, T5z Classic Martin D18E Retro Cordoba C10 Crossover Emerald X20 Rainsong H-OM1000N2 Voyage-Air VAD-04 Custom Les Paul Hot Rod Deville 410, Fishman Loudbox Performer
|
|
#5
04-10-2019, 03:48 PM
|
|||
|
|||
|
Quote:
__________________
Tom
|
|
#6
04-11-2019, 03:47 AM
|
|||
|
|||
|
You can buy rolls of sandpaper that has sticky back. Alternatively you can just use spray adhesive on the back of the sheet and then stick it to something like a workbench. I stick mine to a metal box.
|
|
#7
04-11-2019, 11:50 AM
|
||||
|
||||
|
Can't attach photos here, but I've got a 2"x2" sanding block that's about 8" long. I turn it upside down with sandpaper side up (80 grit) and hold the saddle on the ends and sand them that way. The saddle is longer than the width of the sanding block, but you can get a good grip on the ends that way. move it side to side and check with a caliper to make sure you're sanding it evenly.
__________________
Bryan 
|
|
#8
04-11-2019, 11:52 AM
|
|||
|
|||
|
+1 on the figure 8 pattern and I would add to that a bit, count the number of figure 8's you do, say 10, then rotate the work 180 degrees and count ten more. I usually get one side nice and flat and polished and then only thin on the other side. Once you start getting close switch to finer papers. You don't want to go too thin and you need room to polish out.
Another tip is to take a piece of masking tape and wrap it around your finger(s) sort of like a bandaid on backwards so the sticky side is facing out. That will help you grab the saddle.
|
|
#9
04-11-2019, 11:59 AM
|
|||
|
|||
|
Thank you for the wonderful tips.
|
|
#11
04-11-2019, 02:13 PM
|
|||
|
|||
|
I don't remember where I saw this, so I can't give credit to who thought this up--it wasn't me. What I did was take a piece of 1" by 2" by 6" long pine[although anything should work fine], and I took a 1/2" router bit and routered a "slot" in the wood about .060-.070" deep about 3-1/2" long. I then put some self stick sand paper on the top of my table saw--you could also fasten a sheet of sand paper to the table with a few rare earth magnets to hold it in place as well. Put the saddle blank on the paper and then use the 1x2 to thin it to width. The "slot" holds the saddle captive so you don't have to stick it to anything making it very easy to measure your progress as you go. Using the figure 8 pattern is a great idea to help keep the width uniform.
|
|
#12
04-11-2019, 03:07 PM
|
|||
|
|||
|
I only build 1-2 a year so don't do elaborate jigs in most cases. Here is a piece of 1X3 with a recess the length of the saddle and about 1/2 the thickness. Works great used by hand too with a piece of sandpaper held with your other hand on the table saw table:
https://www.flickr.com/photos/ruby16...7688488198220/ Ed
|
|
#13
04-11-2019, 06:14 PM
|
|||
|
|||
|
__________________
Cheers, Frank Ford
|
|
#15
05-10-2019, 01:56 AM
|
|||
|
|||
|
Some ingenious solutions on this thread.
I like this tool, which will thickness not only saddles but bindings and even guitar sides as well. 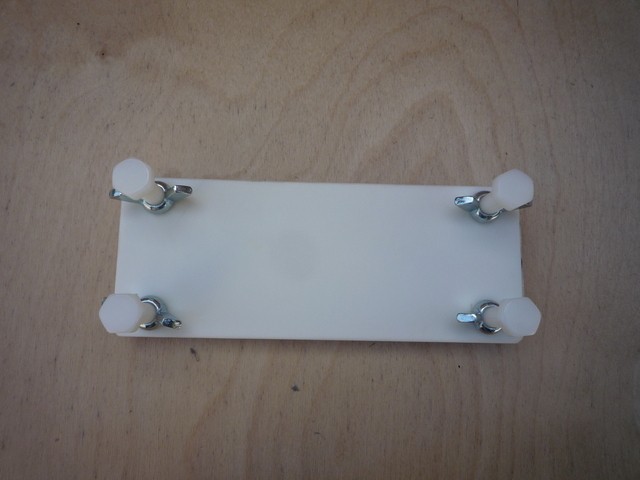
|


