
|
|
#1
 12-27-2022, 06:49 AM
|
|||
|
|||
|
I mean the actual joint at the neck and headstock. Ive looked at all the pictures I can find of this. Ive practiced several joints on scrap. Ive nearly got it figured out.
It seems I can cut this quickly and accurately with just a tennon saw. The difficult part for me is not the dart or the tennon, its the Vee in the headstock part. Its not that hard to mark off, but its hard to hold it and clean it out. I can cut the slopes on the sides of the tennon with the saw, but its hard to get the flat on the bottom of the tennon cleaned out because it goes to a point at the back. You cant really chisel it out from the end of the headstock because you are climbing into the grain when pushing the chisel. Any advice on this? 
|
|
#2
12-27-2022, 01:28 PM
|
|||
|
|||
|
Are you taking about the original through V-joint, as used in many Classical guitars, or Martin's modified bridle joint? The Martin-style joint can actually be cut with jigs on a table saw, with only a bit of fitting needed at the end. The through V-joint is harder to do, although it might be possible to set up a shaper table for it using custom cutters. Doing it by hand is simply a matter of taking your time fitting, and keeping your tools really sharp. I usually stop a few times to touch up my chisel, especially when doing that climb cut into the point of the mortice. I think my record for cutting one of these is 45 minutes; usually it takes longer.
|
|
#4
12-28-2022, 10:10 AM
|
|||
|
|||
|
I would not try to string up a guitar with a V-joined head unless it was glued on, but, that said, it is loaded in (mostly) compression and shear, which are the 'good' ways to stress a glue line. The bridle joint could hold under string pressure with no glue if it was fitted right.
|
|
#5
01-15-2023, 11:08 PM
|
|||
|
|||
|
John Grevin shared an article in an issue of the Guild of American Luthiers on the building of this joint. Excellent article with step by step instructions and photos for each step. The issue is titled Flattop Guitars: An American Lutherie Anthology.
https://luth.org/books/american-luth...rie-anthology/ Steve
|
|
#7
01-28-2023, 07:31 AM
|
|||
|
|||
|
Quote:
Cole Clark in OZ has an interesting method which in kind of like what I described, but no volute at the bottom. I think that allows them to use a clamp on top and bottom of the headstock for glue-up. Would you mind showing some pictures on how you do it? Or a video link? Last edited by M Pete; 01-28-2023 at 10:32 AM.
|
|
#8
01-28-2023, 10:01 AM
|
|||
|
|||
   Here are pictures of a CAD I did for how I think Cole does it. You can route out the motrise on the headstock piece flat and then use a tenon jig on a table saw to put the headstock angle on the neck stock and rout out the tenon. You could also use a CNC for all of it, which is what I think Cole does. In that case I'd put a small fillet on the edges of the tenon where it meets the body so that your bit can clean all of that out, replicate on the mortise side as well. Of course then if you want to have a volute then you leave the stuff on the bottom as below. Either way I think it would be much easier to work the headstock angle into the neck tenon than the headstock mortise if you are not using a CNC or want to build an angled platform for a router. 
Last edited by M Pete; 01-28-2023 at 10:51 AM.
|
|
#9
01-29-2023, 07:23 AM
|
|||
|
|||
|
Quote:
When you say how Cole does it, do you mean Cole Clark? I’d love to learn more from your research. Last edited by Quickstep192; 01-29-2023 at 07:28 AM.
|
|
#10
01-29-2023, 08:06 AM
|
|||
|
|||
|
Quote:
https://www.youtube.com/watch?v=qFlA1X-EZ7w
|
|
#11
01-29-2023, 08:18 PM
|
|||
|
|||
|
Quote:
BTW, heres a picture that shows the joint with contrasting woods that shows the joinery. Cool look too 
|
|
#12
01-29-2023, 09:58 PM
|
|||
|
|||
|
Quote:
|
|
#13
01-30-2023, 07:46 AM
|
|||
|
|||
|
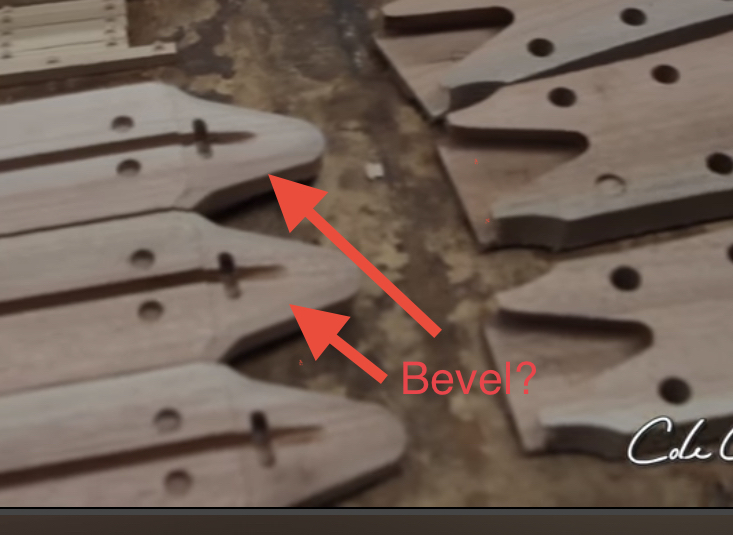
When I took a close look at the tenon (neck part), it looks like there’s a bevel on the face side. Assuming there’s a similar bevel on the peghead part, that would help lock the joint kind of like a dovetail.
Sorry if I’m being a pest, but I’m still not clear on how you’d make the tenon at the top of the neck part. Assuming the template would be attached to the part that remains after the cut, there’s not a lot to attach the template to given that the widest part (nut area) is only 1-3/4” or so. BTW, it would be really cool the make the cuts using a dovetail bit.
|
|
#14
01-30-2023, 02:47 PM
|
|||
|
|||
|
Quote:
Quote:
|
|
#15
01-30-2023, 09:52 PM
|
|||
|
|||
|
Heres a picture showing what looks like a bevel to me. What do you think?
|


