
|
|
#1
 02-02-2020, 11:16 AM
|
|||
|
|||
|
Hi, I recently sanded my headstock to make the ''racoon eyes'' go away before replacing my tuners. It went well untill some ''waves'' marks started to appear a little everywhere. Can someone tell me what are those marks and how can I make them go away? The finish is smooth to touch... I don't know if it is because there's no more finish at certain place or is it humidity in the wood or I don't know? I'm kind of new to this...
Thank you for your help guys! 
|
|
#3
02-02-2020, 01:00 PM
|
|||
|
|||
|
did you sand using a fairly hard block? Always hard to tell from photos, but it looks to me like the surface it not flat yet. The shiny areas (which started a tiny amount lower) have not dulled from the sanding yet.
This can happen when using a very flat sanding block on an almost-flat surface. It's easy to test - just take the last grit you used and sand a shiny part with your finger or soft-back very quickly/lightly, then see if the surface is consistent. If I'm correct, your choices are to sand up through the finer grades using a much softer and smaller sanding block, ensuruing you hit the highs and lows, and buff. This will appear flawless if there's only a microscopic un-flat-ness. Riskier move is to ensure the surface is as flat as you desire it to be. The obvious issue with any more sanding is that you might sand through the finish, which is a completely different repair project.
|
|
#4
02-02-2020, 01:01 PM
|
|||
|
|||
|
Sorry I linked 3 pictures but I don't know if it works? Here's links again
https://ibb.co/C2tVs3P https://ibb.co/RCzcx8X There's like wavy lines all over de headstock that look more glossy
|
|
#5
02-02-2020, 01:08 PM
|
|||
|
|||
|
Thank you for your answer.
I sanded using wet sandpaper without a block and the shinier line where not there at first, the finish was coming off pretty evenly without marks but I continued sanding to make the old washer's mark go away even more and at one point the shiny marks started to appear... They appeared as round around the pegholes first, then I continued to try to make them disapear but it kind of went on and started appear a little everywhere and they started ''touching each other''... I don't know if it is because I sanded through the finish?
|
|
#6
02-02-2020, 03:34 PM
|
|||
|
|||
|
ALWAYS use a sanding block. If you don't the surface will not stay/be flat.
When wet sanding, sanding through the finish is usually obvious, after wiping the surface dry, by the difference in color between the finish and the bare wood. From the photos, I can't tell what is what. The fact that sanding scratches run through the shiny areas suggests that you have sanded through the finish in all parts except the shiny ones. In other words, it appears you've removed the finish from the head, but for the shiny parts. Difficult for me to tell just from the photos. Out of curiosity what grit sandpaper did you use? Last edited by charles Tauber; 02-02-2020 at 03:39 PM.
|
|
#7
02-02-2020, 03:49 PM
|
|||
|
|||
|
Quote:
|
|
#8
02-02-2020, 05:07 PM
|
|||
|
|||
|
yep gone through the finish, need to sand and restain to even the colour out.
To me it looks like a vulcan fibre headplate Steve
__________________
Cole Clark Fat Lady Gretsch Electromatic Martin CEO7 Maton Messiah Taylor 814CE Last edited by mirwa; 02-02-2020 at 05:47 PM.
|
|
#9
02-02-2020, 05:47 PM
|
|||
|
|||
|
Witness lines are characteristic of some catalyzed finishes. They can appear where you have sanded through a layer of finish. Very often, a polyester finish will have a sealer coat that is dull and won't polish to a high gloss. If that is the case here, your best bet is to spray a few coats of clear lacquer and then polish it. A wipe with naphtha will tell you if the lines will disappear when lacquered. If not, then you need to use black stain (aniline dye) or black lacquer to even out the color.
I would be very hesitant to sand much more, since the pearl logo may not actually be inlaid. 'Raccoon eyes' is a slang term for the circles made by tuner washers. They can be finish impressions or off-color from the lack of UV exposure.
|
|
#10
02-14-2020, 10:38 PM
|
|||
|
|||
|
Quote:
Here are 4 photos, Start point 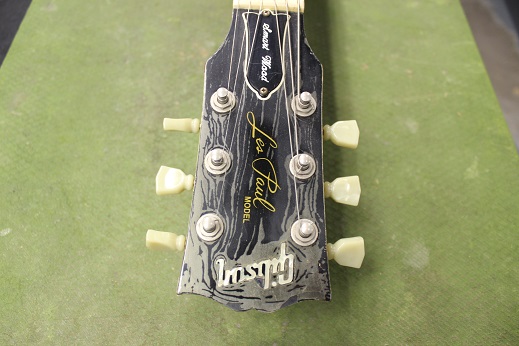 1 sanded through the finish and uneven colour, notice colour variance now around gibson logo 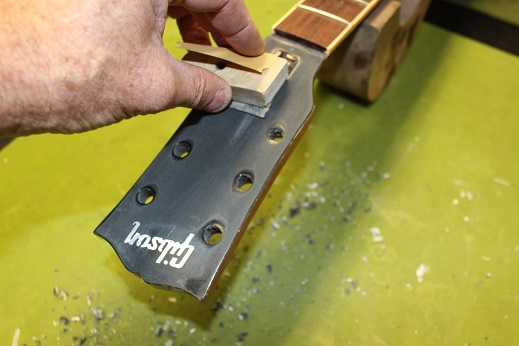 2 remove all finish and restain 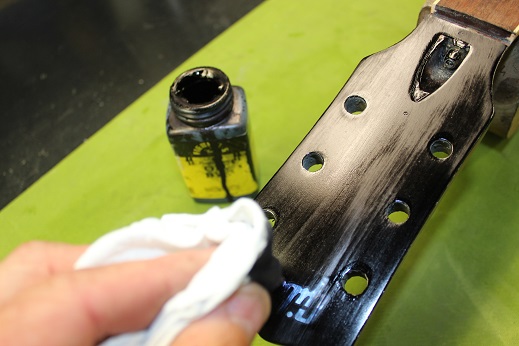 Smooth sand and refinish with clear coats, note I also fitted a new waterslide decal 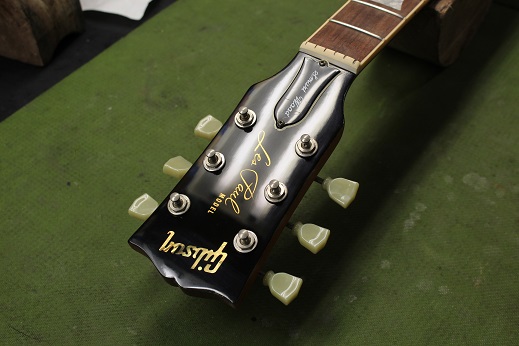
__________________
Cole Clark Fat Lady Gretsch Electromatic Martin CEO7 Maton Messiah Taylor 814CE
|
 |
|
| Tags |
| finish, headstock, sanding |
|
|


