
|
|
#1
 06-05-2020, 06:15 AM
|
|||
|
|||
|
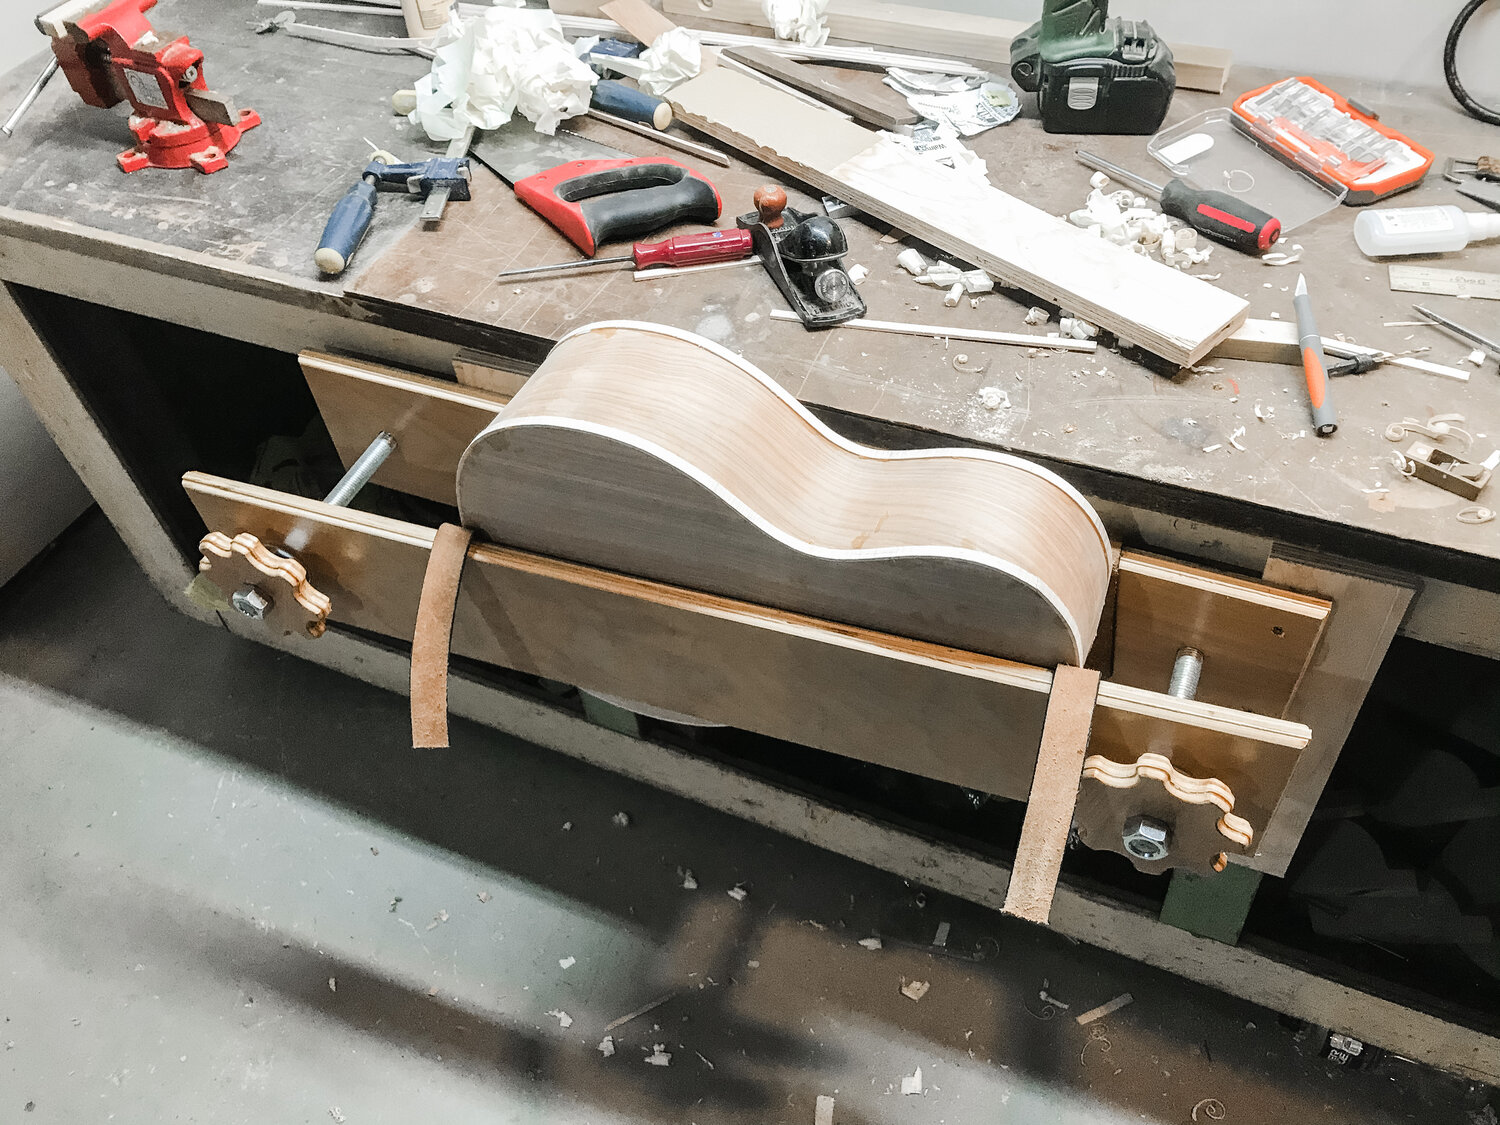
Hey everyone! I recently built myself a rim vice, I made a video of the process. Hope you enjoy!
For anyone who doesn’t know, a rim vice is for clamping an acoustic in its side, by clamping only the outside of the guitar. https://youtu.be/9_BQktLDBiY d’Entremont Custom Guitars Daniel d’Entremont Luthier & YouTuber dentremontguitars.com YouTube: TheRealDanielJ Facebook: d’Entremont Guitars Instagram: @danieldentremont Last edited by dEntremont Custom Guitars; 06-06-2020 at 11:29 AM. Reason: Embedded video. 
|
|
#2
06-05-2020, 07:27 AM
|
|||
|
|||
|
Daniel, nice job on the vice. I especially liked your process in building the hand cranks. Very clever. I think looping your leather straps below the guitar body would be good insurance against dropping the body through to the floor.
__________________
BradHall _____________________
|
|
#3
06-05-2020, 07:33 AM
|
|||
|
|||
|
Thanks brad! I plan to add an adjustable bottom to it. Something that goes up and down below the guitar.
The handles work decently well, but a crank with an off cantered handle would be better I think, they are slow to use. I might modify them. d’Entremont Custom Guitars Daniel d’Entremont Luthier & YouTuber dentremontguitars.com YouTube: TheRealDanielJ Facebook: d’Entremont Guitars Instagram: @danieldentremont Last edited by Kerbie; 06-06-2020 at 07:34 AM.
|
|
#4
06-06-2020, 11:30 AM
|
|||
|
|||
|
Here is an image of it in use for anyone who doesn't want to watch the video.
__________________
dEntremont Custom Guitars Daniel dEntremont Luthier & YouTuber dentremontguitars.com YouTube: TheRealDanielJ Facebook: dEntremont Guitars Instagram: @danieldentremont
|
|
#5
06-08-2020, 08:58 AM
|
|||
|
|||
|
A piece of pipe insulation on each of the threaded rods would reduce the pucker factor a little when you put a instrument in it. Also - that looks like pretty thick plywood to not put pressure on the high spots of the top and back. Ingenious
Ed
|
|
#6
06-08-2020, 09:01 AM
|
|||
|
|||
|
Quote:
__________________
dEntremont Custom Guitars Daniel dEntremont Luthier & YouTuber dentremontguitars.com YouTube: TheRealDanielJ Facebook: dEntremont Guitars Instagram: @danieldentremont
|
|
#7
06-08-2020, 07:21 PM
|
|||
|
|||
|
I have pipe clamps going through the bench, I make a rough adjustment with the sliding back claw clamps and then fine adjust with the clamp screws. If need be I can still pull the clamps and use them on projects not near the bench.
 Excuse the mess. My overflow bench. Notice you can still work on the last two inches.
__________________
Fred
|
|
#8
06-09-2020, 02:50 AM
|
|||
|
|||
|
Quote:
__________________
dEntremont Custom Guitars Daniel dEntremont Luthier & YouTuber dentremontguitars.com YouTube: TheRealDanielJ Facebook: dEntremont Guitars Instagram: @danieldentremont
|
|
#9
06-09-2020, 10:52 AM
|
|||
|
|||
|
Good solutions. I made up a similar one myself. If anyone wants the particulars you can find my "Makeshift Moxon Vise" on the Highland Woodworking website.
https://www.highlandwoodworking.com/...rking-tip.html 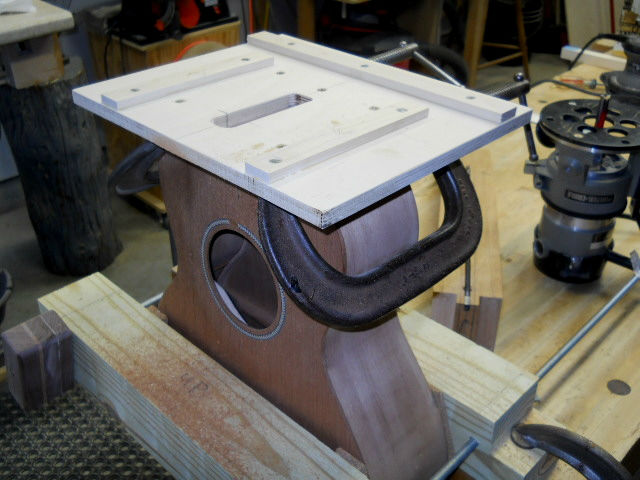
Last edited by Rudy4; 06-09-2020 at 10:58 AM.
|
|
#10
06-09-2020, 12:13 PM
|
|||
|
|||
|
Those look like good solutions.
One of the solutions that I use is based on the Larrivee-style "Troji" : https://www.canadianluthiersupply.com/products/troji There are plans for one here: https://app.box.com/s/1h0r6vzsvm This isn't the one I made - it was made by "Ben-had" here on the forum - but mine is very similar to this, also placed on a WorkMate, using its "jaws" to clamp the guitar. 
Last edited by charles Tauber; 06-09-2020 at 12:20 PM.
|
|
#11
06-09-2020, 01:33 PM
|
|||
|
|||
|
Quote:
__________________
dEntremont Custom Guitars Daniel dEntremont Luthier & YouTuber dentremontguitars.com YouTube: TheRealDanielJ Facebook: dEntremont Guitars Instagram: @danieldentremont
|
|
#12
06-09-2020, 01:34 PM
|
|||
|
|||
|
Quote:
__________________
dEntremont Custom Guitars Daniel dEntremont Luthier & YouTuber dentremontguitars.com YouTube: TheRealDanielJ Facebook: dEntremont Guitars Instagram: @danieldentremont
|


