
|
|
#17
 12-21-2018, 08:44 AM
|
|||
|
|||
|
<<Question regarding that one little tone bar on the treble side not contacting the top?
Here Tom, I fixed it  : : I like to butt the neck block into the upper transverse brace and glue the two, so I fit that brace to the rims prior to gluing it to the top:     I don't know how much rim reinforcements really help. I don't think they hurt, so I usually add them. They may add a small bit of stiffness, though I'm not convinced they will stop a crack if one starts. I glue them in with hide glue so a repair can be made more easily later. I start by cutting a strip of the left over spruce from the top. Then using a small thumb plane, I put a chamfer along each outer edge:   For areas like the waist, I sand a concave into the brace so it fits tight against the rim:   The neck block section that goes under the fingerboard extension needs a hole so the truss rod can be accessed. I drill this using a small jig:   Thanks for following along! 
|
|
#18
12-22-2018, 06:47 PM
|
|||
|
|||
|
Took a few photos while bracing the back this afternoon. The braces were made before I started the guitar, sandwiching ebony between mahogany.
First down is a cedar reinforcement strip, glued with hot hide glue:  I mark where the brace crosses the cedar strip:  I saw through the cedar strip just proud of the line I had marked:  I then pop out the piece and clean up with a chisel:   The process is pretty straight forward. Patience and a good chisel gets good results. When done, the brace has a nice tight fight and is ready to be glued in:  All the braces are glued down and clamped:  Time to start carving some bracing Thanks for checking in! Ken
|
|
#19
12-23-2018, 11:19 PM
|
||||
|
||||
|
Does the Mahogany affect tone vs spruce? And I assume the center laminate adds considerable rigidity?
They look neat, too... Carry on and have a wonderful Christmas Paul
__________________
4 John Kinnaird SS 12c CUSTOMS: Big Maple/WRC Dread(ish) Jumbo Spanish Cedar/WRC Jumbo OLD Brazilian RW/WRC Big Tunnel 14 RW/Bubinga Dread(ish) R.T 2 12c sinker RW/Claro 96 422ce bought new! 96 LKSM 12 552ce 12x12 J. Stepick Bari Weissy WRC/Walnut More
|
|
#20
12-24-2018, 02:05 PM
|
|||
|
|||
|
<<Does the Mahogany affect tone vs spruce? And I assume the center laminate adds considerable rigidity?
Now that is a good question, Paul! I started using mahogany years ago as I had so much left over from necks. Back braces seemed like a good use for it. I have been using mahogany exclusively ever since. Does it sound different than spruce? Well, I suppose it does. Mahogany is heavier than the red spruce I use on the top. All else being equal, that would dampen the back a bit. But my backs are thinner than the typical commercial guitar, and I lighten the bracing by shaving quite a bit from the top edges of the braces. I also scallop the braces at the ends and let the thinned ends through the linings and sides. The wood, the shape, the thickness of the braces, and whether the braces are let through the sides and how much all tend to tighten or loosen the back. A tighter, stiffer back should be more reflective and project more, while a looser, lighter back would engage more with the top and provide a wider sound. Which is right? I guess that depends on what the player is looking for. But I have tried to be somewhere in the middle. I am shooting for a good amount of sustain while giving the guitar some projection. Truthfully, I haven't built enough guitars nor experimented enough with all the variables to really provide a definitive answer. Regarding the ebony lamination, that adds even more weight and stiffness to the braces. I have never used laminated back braces with heavy, dense backs. But I have had good success in using them on less dense woods like mahogany and koa. I think it adds a touch more focus but I could be hallucinating But you are right, they look cool!Ken Last edited by Kenneth Casper; 12-24-2018 at 03:43 PM.
|
|
#21
12-24-2018, 02:59 PM
|
|||
|
|||
|
I started carving the top bracing yesterday and finished up the top and back carving today. The Italian spruce top is sounding really nice and should sound wonderful paired with the mahogany back. Even though I pre-shape the braces on my CNC, I still need to remove a lot of wood with a hand chisel to voice the top.
Here is the top prior to carving the braces:  I use a handmade Japanese chisel to carve the braces:  The tone bars are largely carved, but will be tweaked a bit more as I fine tune the top:  This is my simple but effective deflection measuring device. My hand planes weigh a combined 5 pounds, and I measure how much the top deflects under that weight. I do tap the tops as I carve, but I also measure deflection periodically. I have a targeted range I shoot for that depends on the body size: 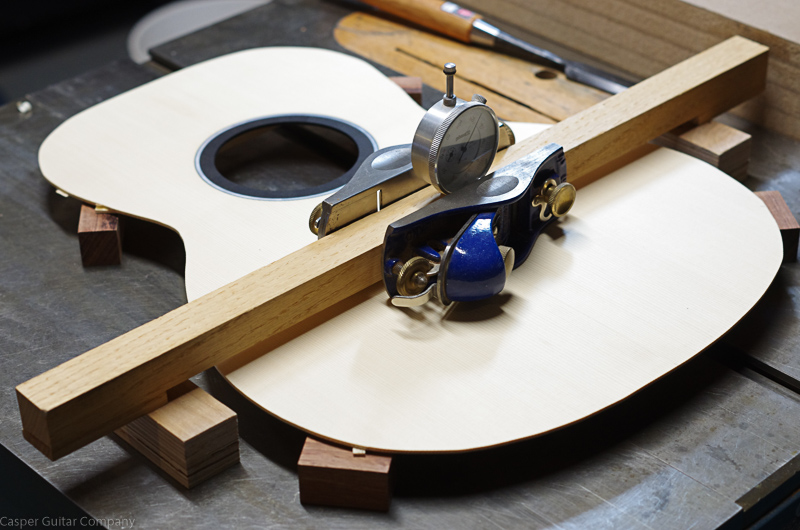 The top has been voiced, and I am done carving the braces:   Some sanding, and the top is ready to go:  The back braces are much easier, and I shape them using a small thumb plane:  Back ready for the rims:  Thanks for looking. Merry Christmas everyone! Ken
|
|
#22
12-30-2018, 04:53 PM
|
|||
|
|||
|
Progress was a bit slow this week, but I did manage to get back in the shop later in the week. The box is now closed up on this one:
My process for putting on the back is similar to what others have posted. I mark and notch the rims where the back braces pass through. I use a small razor file to cut the edges of the relief area then clean up with my laminate trimmer. I fine tune the fit with a file:  One last look at the back before it goes on:  I keep the body in my mold and the whole thing goes onto my go bar deck. I put a clamping pad on the back to protect it from the bars:  After about a half hour, I remove the bars and clean up any squeeze out from the inside of the body:  After the glue has fully cured, I use my laminate trimmer to cut off the excess, flip the body over, and repeat the routine for the top. As I had previously cut the relief areas for the upper transverse brace, I only need to cut the relief areas for the X braces:  Then off to the go bar deck: 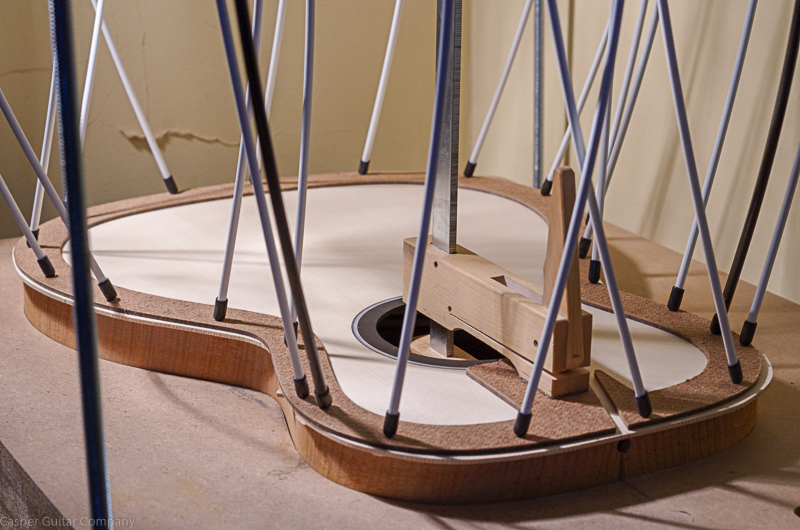 One St Clair ready for binding:   Thanks for checking in. Have a great new year! ken
|
|
#23
01-06-2019, 02:41 PM
|
|||
|
|||
|
Time for another update. With the holiday, I didn't get too much shop time, but back at it now. This week I started binding the guitar. First up was to bend the binding. I taped four strips of ebony together. The purflings I would be using could be bent while installing them, so I didn't need to put them in the bending with the bindings. A little spritz of water and a steel slat sandwich, and they were off to the bender:
   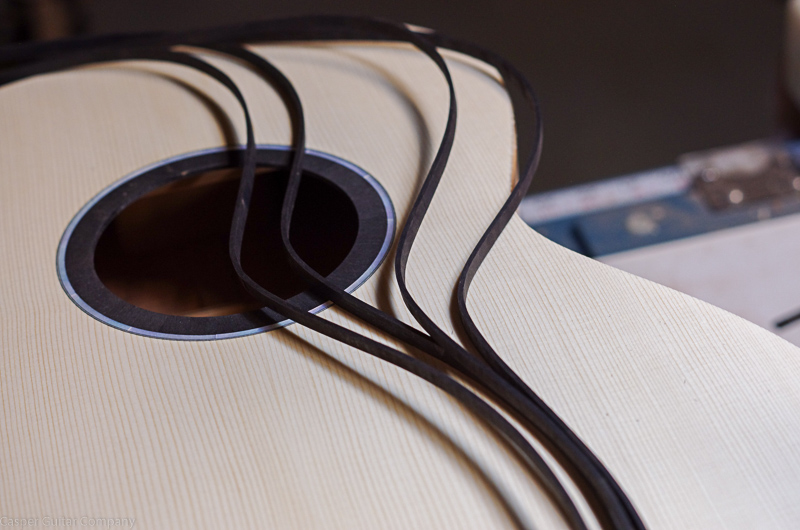 To get the sides ready for cutting the binding channel, I level them with a sanding bar to remove any high spots:  I use a fixed place router and move the body past the cutter. To make sure the channels are an even thickness all the way around the guitar, I have a carrier for the body, and I orient the body to get all sides as close as possible to parallel to the cutter:  I route the top first:   Then the back:  Once the channels are cut, I double check the fit and clean out the inside corners with my scraper. Once I am happy with the channels, I move on to the tail graft. First step is to lay it out on the rims:  I use a home made jig to cut the wedge using a laminate trimmer with a guide bushing:    I made a graft from ebony and banded it with fine black/white/black purfling. The purfling was mitered to pair up with the purflings that I will run around the rims: 
|
|
#24
01-06-2019, 02:43 PM
|
|||
|
|||
|
With the tail graft in, I could run the bindings and purflings around the top. We are using two runs of purfling around the top. Those pieces, the binding, and the side purfling added up to four pieces that I needed to glue and tape at the same time. I make sure the top pieces and binding ends are at the center of the tail graft and the side purfling miter is mated well with the tail graft, and I tape those ends in place. I then glue and tape about 4 to 5 inches at a time as I work my way around the top. Once one half is done, I repeat with the 2nd half. I then wrap the body tight in twill tape to pull the binding and purfling tight against the body. As I had already cut the channels for the back, I taped in some temporary maple binding along the back so the twill tape didn't dent the soft mahogany:
  Again, thanks for following along. Hopefully some of you find this build interesting. Ken ___________________ www.casperguitar.com Last edited by Kenneth Casper; 01-06-2019 at 03:23 PM.
|
|
#27
01-06-2019, 11:10 PM
|
||||
|
||||
|
Mighty fine stuff!
This sure is cute... I am enjoying it a lot!!! Not as much as the owner will, though. Haha Woohoo Paul
__________________
4 John Kinnaird SS 12c CUSTOMS: Big Maple/WRC Dread(ish) Jumbo Spanish Cedar/WRC Jumbo OLD Brazilian RW/WRC Big Tunnel 14 RW/Bubinga Dread(ish) R.T 2 12c sinker RW/Claro 96 422ce bought new! 96 LKSM 12 552ce 12x12 J. Stepick Bari Weissy WRC/Walnut More
|
|
#29
01-07-2019, 08:55 AM
|
|||
|
|||
|
Another gorgeous instrument, Ken! Your bindings are always such a precise and beautiful addition to each guitar. Is this one having a bound fingerboard? I love looking at the contrast between the gorgeous mahogany neck and cocobolo binding when I'm playing my Casper.
beth p.s. I love your new website!! Seems like a familiar guitar on that home page
|
|
#30
01-07-2019, 09:42 AM
|
|||
|
|||
|
<<Super clean work and some amazing Mahogany!!!
Thanks Todd. I need to find a few more sets of this mahogany. Beautiful wood. <<Loving the precision of this build. Your skills are amazing! Thanks Ron. Lots of very good luthiers here. Just trying to keep pace  <<This sure is cute...I am enjoying it a lot!!! Appreciate it Paul. I wasn't thinking cute, but I guess it sort of is. Glad you are enjoying the thread. <Love that mahogany! Thanks for following along, Colins. Yeah, that mahogany keeps the posts interesting even if the verbiage isn't! <Is this one having a bound fingerboard? I love your new website!! Seems like a familiar guitar on that home page Beth, no bound fingerboard. We are using ebony to bind the body, and with an ebony fingerboard, no need. We will do a faux binding, which is when I hold the fret slots short of the edges to hide the fret tangs. We will bind the headstock with ebony, though. We are also working on something interesting for inlays/side position markers. Still not dialed in yet, but will be by the time I get to that point. I just refreshed the website and launched it a few days ago. I hadn't done anything to it for years, and it desperately needed a major update. The hardest part was choosing what pictures to use where. Lots of guitars and images, and I wanted to use pictures from many as opposed to few guitars. But yes, you got the home page Thanks for the kind words and following along! Glad that Indonesian RW Huron is getting some playing time.Ken
__________________
www.casperguitar.com
|


