
|
|
#1
 01-09-2020, 03:29 PM
|
|||
|
|||
|
I got my Taylor 214 out to practice with, and slung it over my shoulder. Stupid me, I forgot that I still had my pocket knife in my pocket ... with the clip on the outside of the pocket. Needless to say, it scratched the back of my guitar. Anybody know how to get a scratch off? Or at least hide it? I believe the back of my guitar is a satin finish...

|
|
#2
01-09-2020, 03:37 PM
|
|||
|
|||
|
Consider chalking it up normal wear. Taylor uses a finish that is cured by some kind of light (UV) - https://www.taylorguitars.com/guitar...eatures/finish , so it'll be difficult to hide it if it's more than a scratch. If you must have it fixed to perfection, then the best choice is to send it to Taylor and wait 6-8 weeks for the fix.
|
|
#3
01-09-2020, 03:40 PM
|
||||
|
||||
|
Taylor guitars use a UV cured polyester resin.
Finish work is the hardest part of a quality guitar build and the easiest to totally mess up. So, as I see it, you have four repair choices: 1) send it to Taylor for a perfect repair 2) send it to someone skilled and equipped with UV gear 3) send it to someone to hide the scratch an alternate way 4) do it yourself an alternate way #3 and #4 will show and there will be some refraction where the alternative finish fill material meets the polyester but it can be minimized. I've done this myself and only I can find the spot but it can never be invisible. Depends a lot on how deep and bad the scratch is (is it through the wood, through the finish or just he surface etc.
__________________
Fazool "The wand chooses the wizard, Mr. Potter" Taylor GC7, GA3-12, SB2-C, SB2-Cp...... Ibanez AVC-11MHx , AC-240
|
|
#4
01-09-2020, 03:43 PM
|
|||
|
|||
|
Quote:
|
|
#5
01-09-2020, 03:44 PM
|
|||
|
|||
|
I was hoping to be able to fix it, it is a 2012 model and up till now has been in pristine condition... I didn't know about the UV light thing though ... I guess now it is just part of my guitars character lol
|
|
#6
01-09-2020, 03:45 PM
|
|||
|
|||
|
My experience is that while a grossly finish can be repaired and then buffer back out, satin and Matt finishes are almost impossible to spot-fix. Gloss is gloss and is achieved by polishing, which lends itself better to filling above what is needed to fill the scratch and then cutting back to level and buffing the whole area to match it. Satin and Matt covers a whole range of unglossiness and are an unbuffed finish which means any fill can't be cut back to the right level without affecting the texture of finish you've just laid.
Your best bet it to chalk it up to experience and forget about it. Think of it as being personalised. The first scratch is the most painful. When you inevitably bang it on the corner or a table and put a dent in the front you'll forget all about the scratch on the back 
__________________
Gibson Customshop Hummingbird (Review) Last edited by RalphH; 01-09-2020 at 03:52 PM.
|
|
#7
01-09-2020, 03:55 PM
|
|||
|
|||
|
Quote:
Were it mine, I'd use a drop of superglue or UV-glue to fill in the dent and cover the little spot of exposed wood - and leave it be.
|
|
#8
01-09-2020, 06:10 PM
|
|||
|
|||
|
You may be able to carefully raise the dent with a wet rag and a wood burning tool or soldering iron. Place the wet rag on the dented area and use the wood burning tool to carefully turn the water to steam where the dent is. Practice on scrap wood first so you will know how your particular set up behaves.
Mohawk makes spray can nitro lacquer in sheens from gloss to semi gloss to satin to matt to "dead flat". For repairing a finish you are usually better off to go "flatter" than what is on there, so you might want to go with Matt or Dead flat. It will be hard to make a perfect repair, but it should be possible to make it less noticable.
|
|
#9
01-09-2020, 06:52 PM
|
|||
|
|||
|
Quote:
|
|
#10
01-09-2020, 07:25 PM
|
|||
|
|||
|
Uv finished guitars (This Taylor for example) can be drip filled with superglue with good results.
Things to note, if damage is into the wood surface, superglue will stain light coloured woods somewhat, it will look like a bruise after being finished, superglue repair will be typically visible afterwards but not in your face Steve Here is one I did earlier, this is a taylor as well, I have a step by step process on my website showing this repair being done that I can privatley link you too 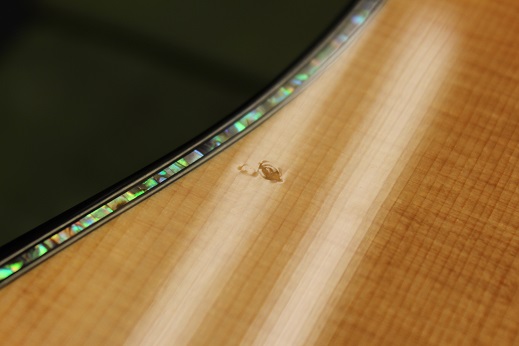 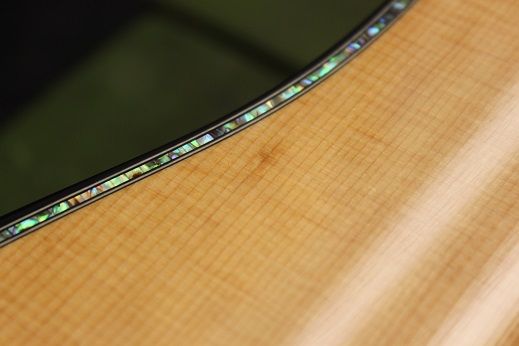
__________________
Cole Clark Fat Lady Gretsch Electromatic Martin CEO7 Maton Messiah Taylor 814CE
|
|
#11
01-09-2020, 08:40 PM
|
|||
|
|||
|
Quote:
|
|
#13
01-10-2020, 07:58 AM
|
|||
|
|||
|
If OP chooses to try to fill the ding after steaming the damage, please don't forget the masking tape, confine the materials to the smallest exposure possible. No use expanding the problem.
|
|
#14
01-10-2020, 09:48 AM
|
|||
|
|||
|
If you are considering a CA/superglue repair to a ding in your guitar, you should really also consider using a UV-cured glue instead.
Something like this: https://www.amazon.com/Adhesive-Liqu...NsaWNrPXRydWU= There are many brands, but essentially it's the stuff dentists use for fillings and gluing crowns onto your teeth. It stays liquid and workable until you hit it with the UV light for a few seconds. WAY more convenient for most things than CA in my opinion. Especially an aesthetic repair you want to come out right. With the CA, once you've dripped it, you're committed. With the UV glue your not committed until you turn on the light.
|
|
#15
01-10-2020, 09:51 AM
|
|||
|
|||
|
Quote:
|


