|
|
#1
 08-09-2013, 04:06 AM
|
|||
|
|||
|
A quick bit of a intro and some background info about me. I am a professional woodworker and have worked in building, cabinetry, joinery and theatre set construction. I built my first guitar 20 years ago using the Cumpiano/Natelson book. I am now on my 9th acoustic and have built 4 electric, 3 ukuleles and 2 mandolins as well as drums, rumba boxes, marimbas and kalimbas.
Now Rose Cliche, my second parlour sized guitar, I have given it a deep body (I don't think I like the look of it) to try to get the air resonance as low as I can (doubt I will make one this deep again). Back and sides and neck, New Guinea Rosewood (Narra) Top, Sitka Trim, Figured Blackwood (Black Acacia) 1 and 7/8 inch at the nut 25.5 inch scale 14 fret to body I was not going to add any decoration to the set of guitars I am making at the moment but decided to add simple inlays cause I love making them. 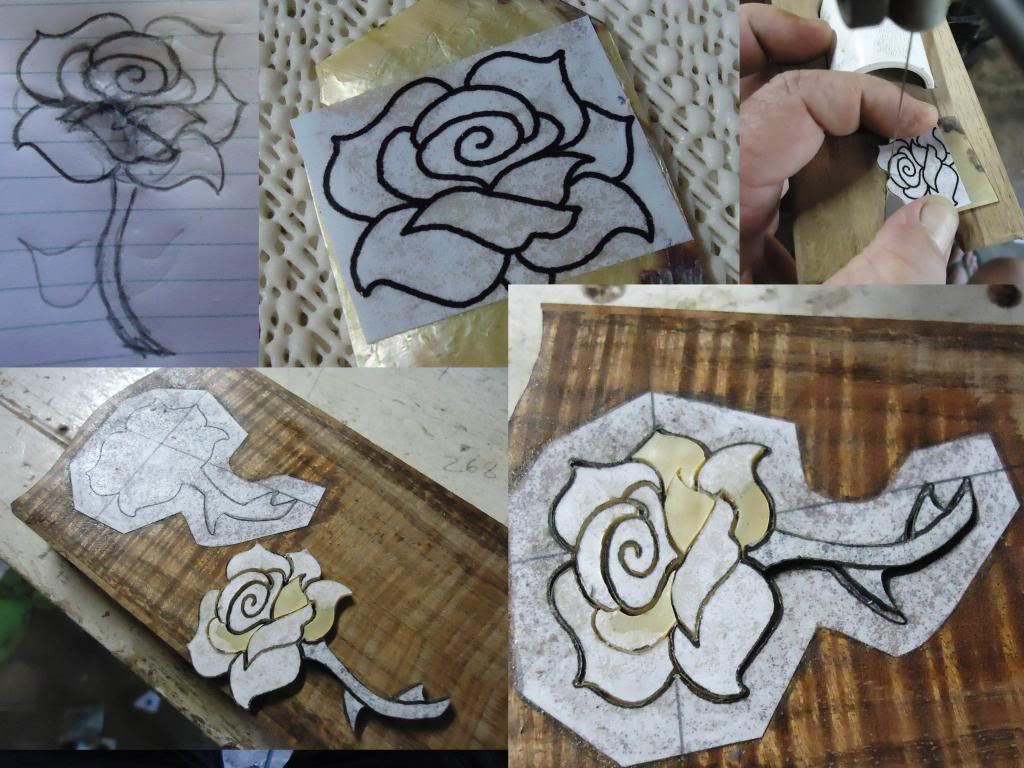 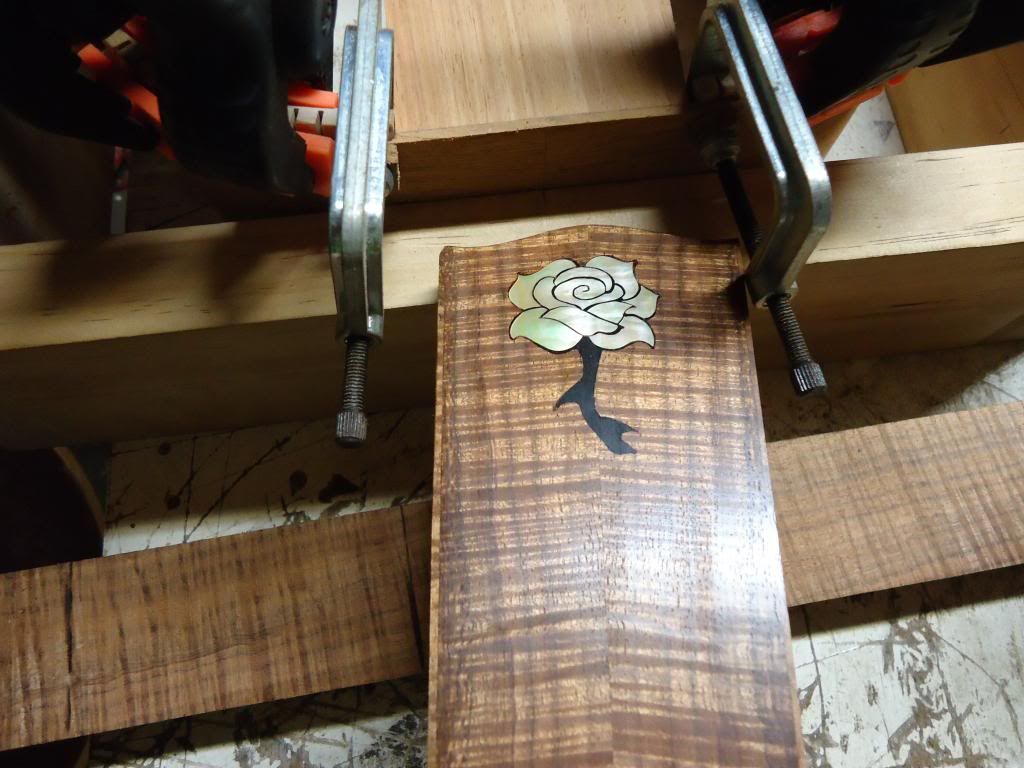 Jim 
|
|
#2
08-09-2013, 09:07 AM
|
|||
|
|||
|
Looks good. I know nothing about engraving except that every time I try it's the most frustrating thing ever
 I guess you could always pop the back off and trim the sides down if you don't like the depth. You can get a good bass response on small guitars by thinning the top too.
|
|
#3
08-09-2013, 06:59 PM
|
|||
|
|||
|
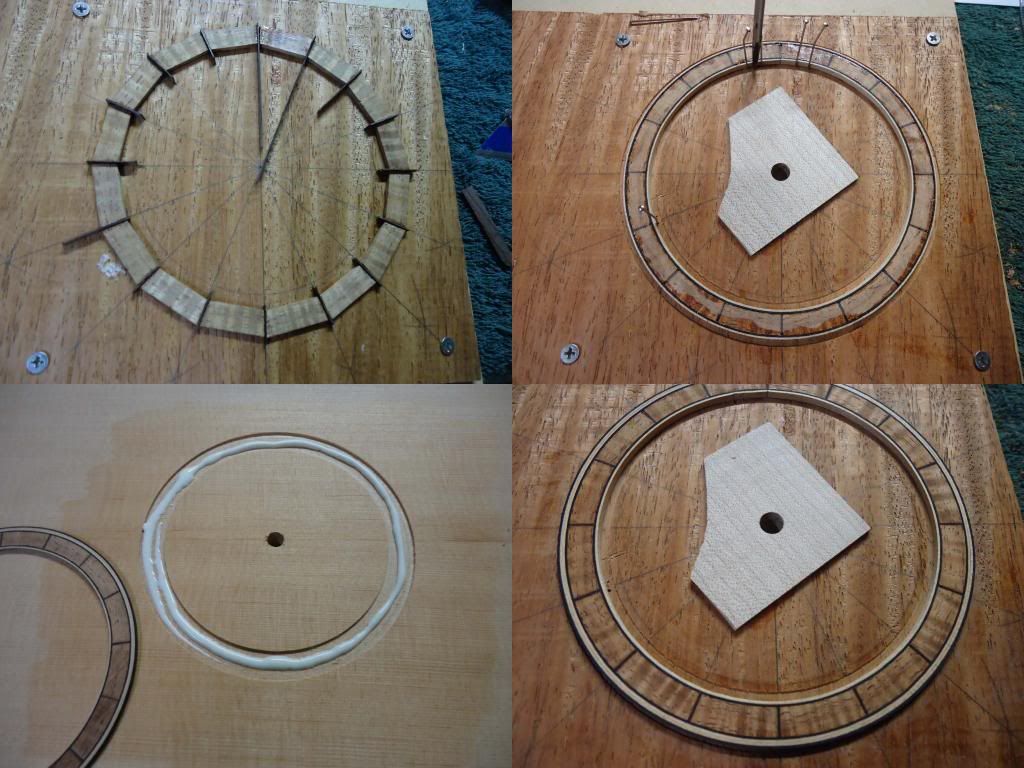
Thanks Redir. The rose is not engraved, I just cut all the bits, spaced them out a little and fill with Stewy Mac black CA glue.
I will leave this one deep and see what it looks like finished then decide from there about the next one. Yep the top is thin, it came down to 2.4mm (0.095 inch) and then I further thinned the perimeter down to 2mm (0.08 inch) tapering from about 50mm (2 inch) away from the edge down to the 2mm at the edge. Will add some pics of that process later. From top left running clockwise; Side bending, Gluing in the head and tail block, Gluing in solid linings and reducing the tail block to the same glue line width as the linings. 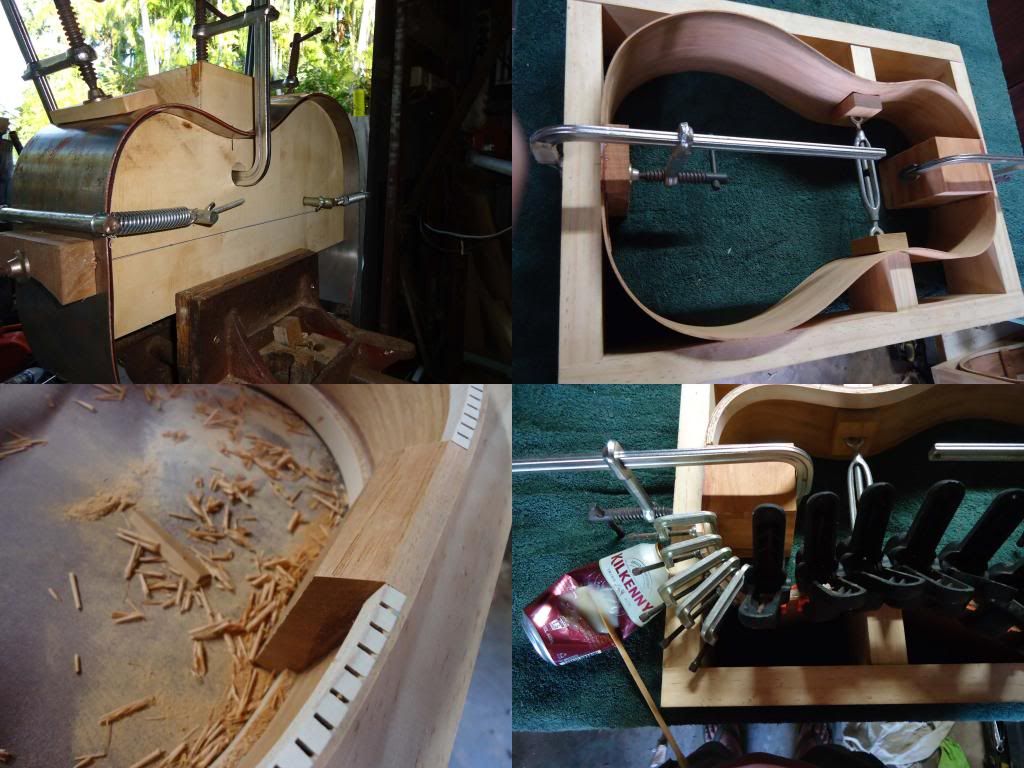 Sides almost ready except for brace rebates. 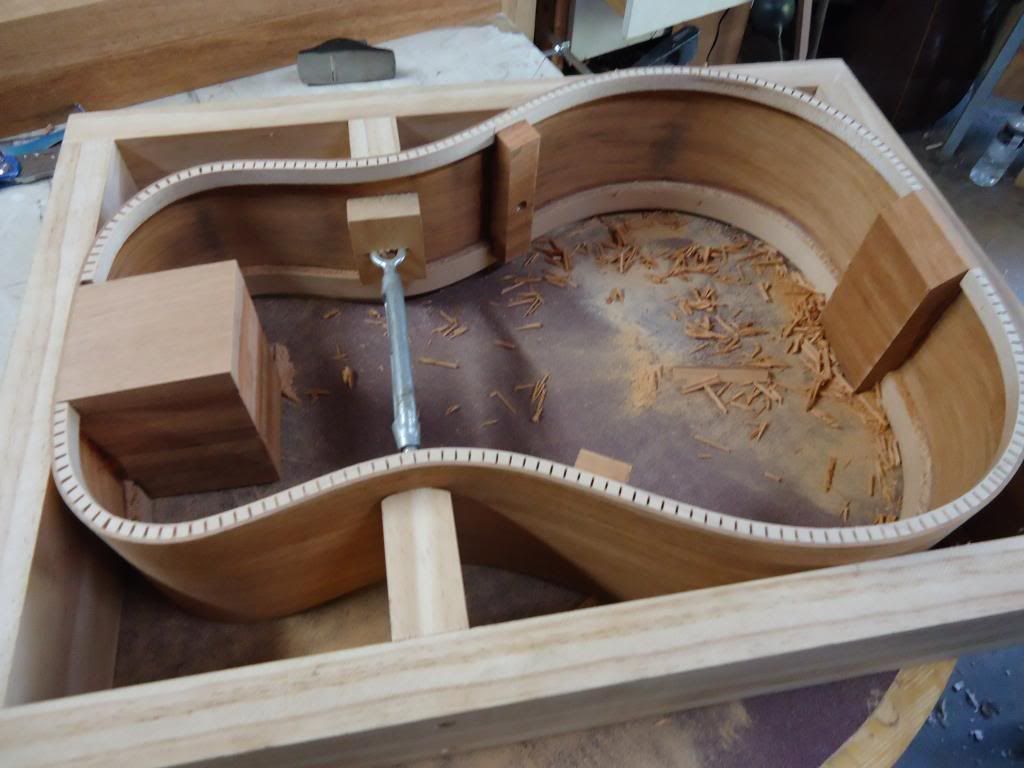 Jim Life is good when you are amongst the wood
|
|
#4
08-10-2013, 06:59 PM
|
|||
|
|||
|
Making the live back.
I pre-shape the back braces to close to finished so there is less work to do once the braces are glued on. All I have to do after glue is trim the brace ends that go into the linings down to 2mm (0.08") and the ones that don't go under the linings (those 4 little ones) get shaved down to nothing where the ends meet the back (this reduces the risk of them coming off due to impact) Getting ready to glue 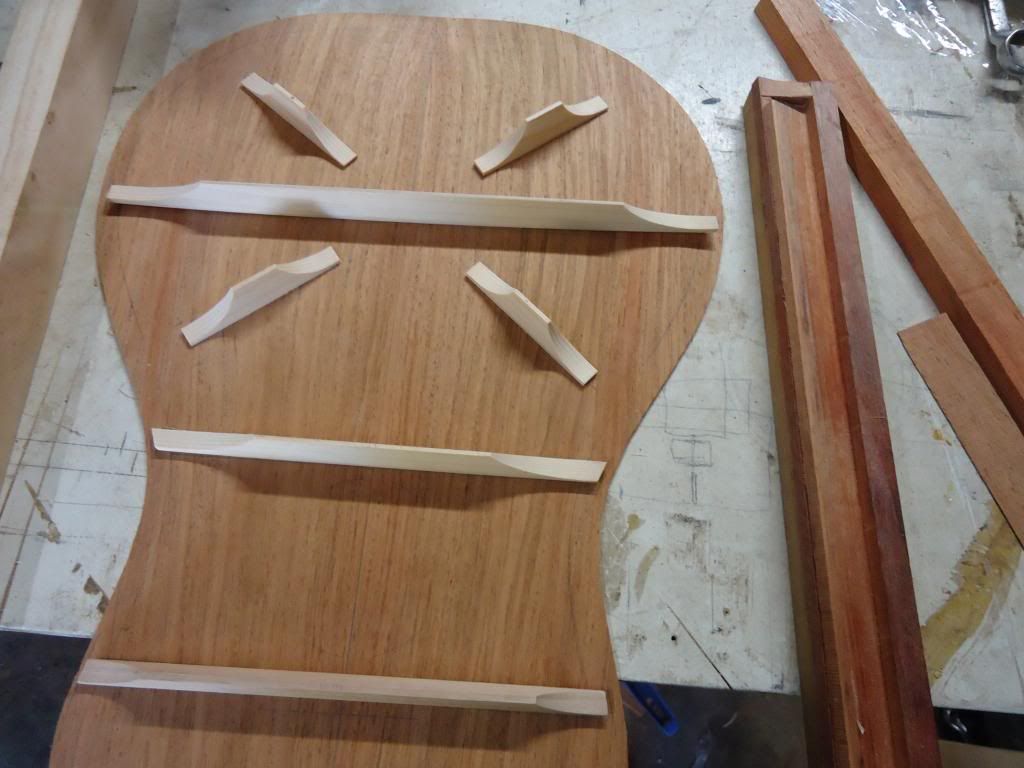 Top left then clockwise. 1- Back in the go bar deck. 2-Marking out the main brace for scooping then making a cut in the middle down to finished height. 3-Scooping towards the centre. 4-Scooping done. 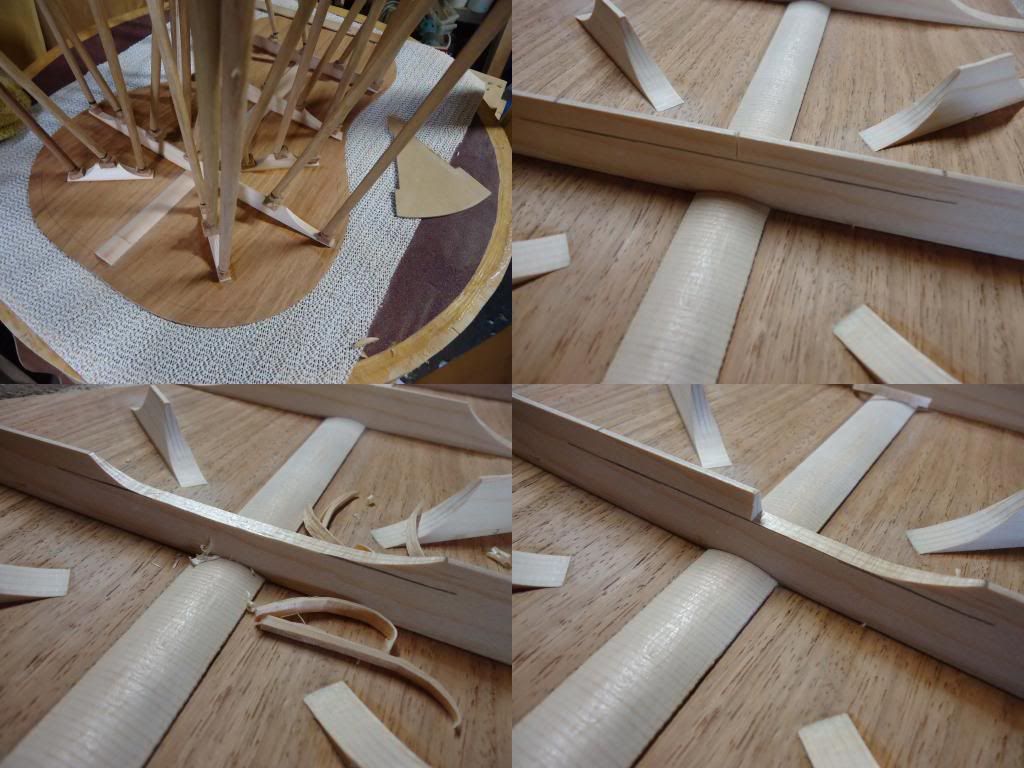 The back finished, that scoop in the main brace will be thinned out a little move when the guitar is finished to get the back frequency right where I want it. 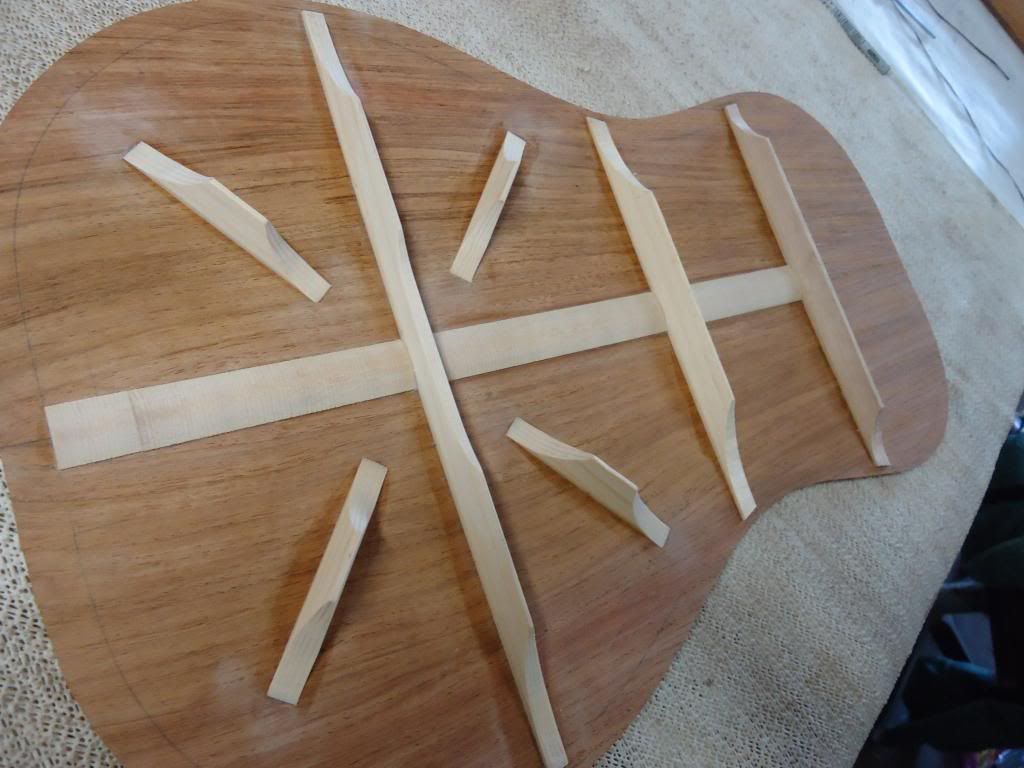 Jim
|
|
#6
08-12-2013, 03:42 AM
|
|||
|
|||
|
Jim is the large neck block anything to do with your bolt on method and are you planning on a flying buttress.
__________________
The standard you walk past is the standard you accept.
|
|
#7
08-12-2013, 06:37 AM
|
|||
|
|||
|
"Large neck block", more like a tree stump. No flying buttress Jeff but I am using a 20mm (0.8") x 10mm (0.4") UTB tapering to 5mm (0.2") at the linings with two strands of 6k CF tow over it.
That tree stump is about the neck join and is a work in progress, I have pulled a bit of weight out of the block (see pic) but the neck join has about 6 screws and a few lumps of steel in it as well so I need purchase for them. I wanted the adjustment on the inside the box to hide it but think I might eventually go for a more simple adjustment at the 19th fret (simpler to make and with less weight).  Jim
|
|
#8
08-12-2013, 06:49 PM
|
|||
|
|||
|
Making the lid.
This is my second of this bracing style and I have reduced the brace height for this one. Once the first was built (being cautious) I measured the bridge rotation under string tension and got 1.3 degrees which is a little low but good cause it gave me a indication of where to go next. Which meant I could go lower and lighter to aim at 2 Degrees of bridge rotation. I cheated a bit with the pics cause I forgot to take ones of the second brace process but it is the same except that I lowered braces. The final pic is the top I am working on now. From top left then clockwise. 1-checking the braces against the bridge plate template and lining up the soundhole patch. 2- Checking the bridge plate to fit the secondaries. 3- Gluing the soundhole patch only. 4- Rebating the main braces to fit over the bridge plate. 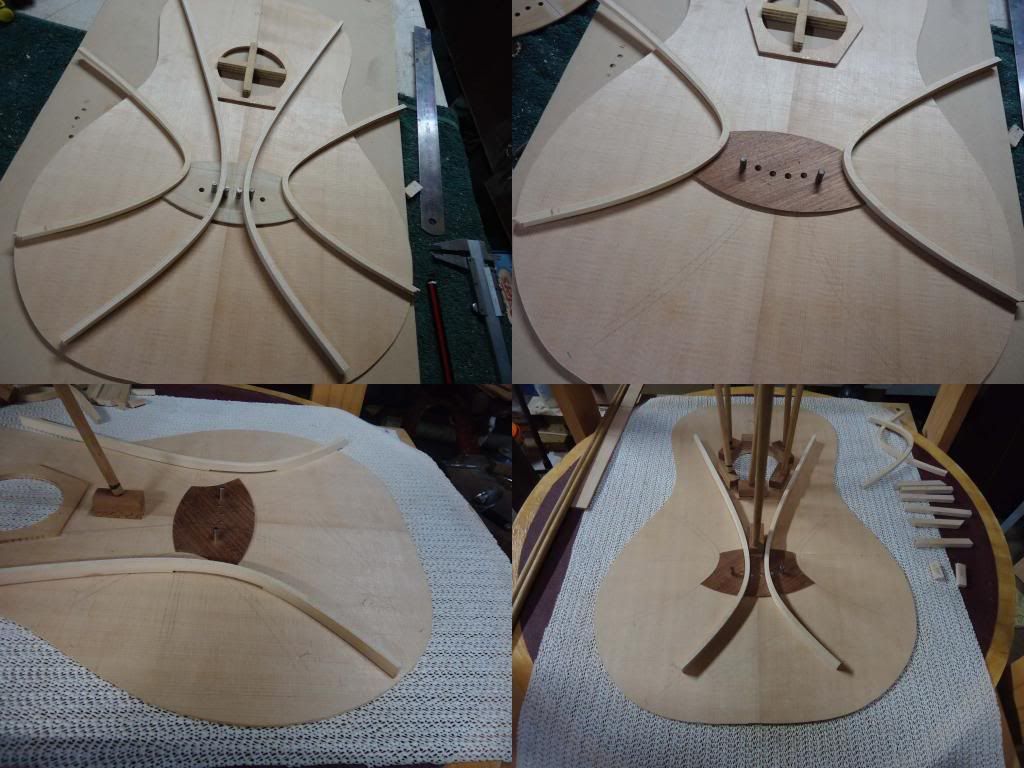 Same direction. 1- Go barring the braces. 2 and 3- Shaping the braces. 4-All braces shaped and ready for CF overlay. 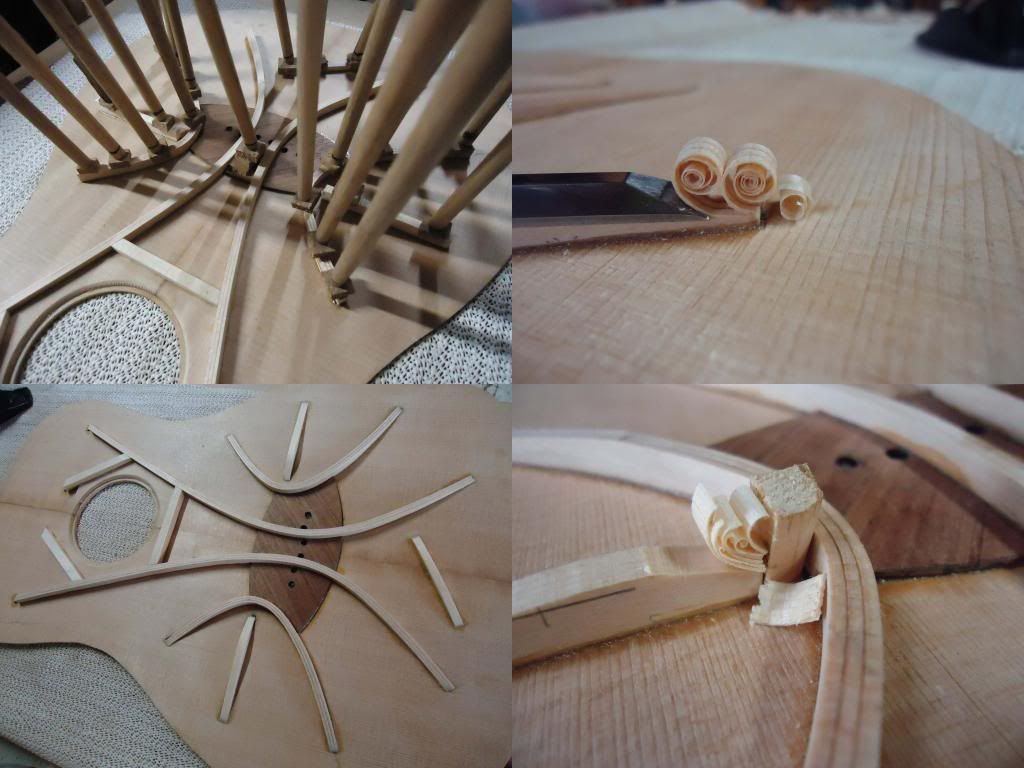 The last pic is the finished soundboard. 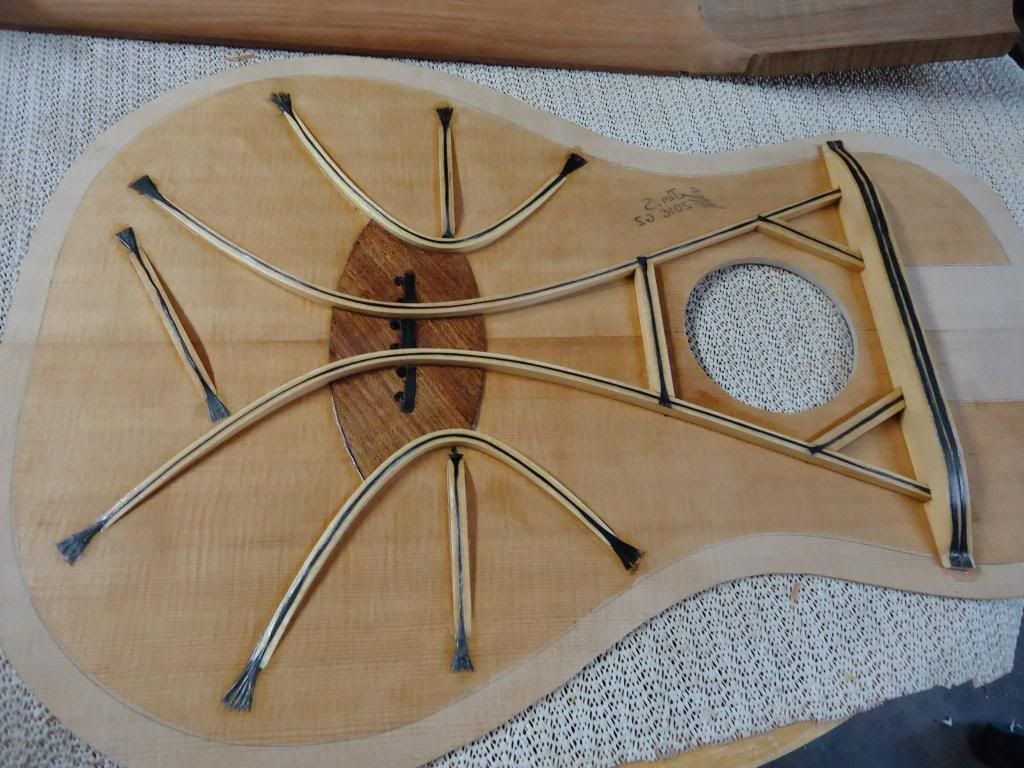 Jim
|
|
#10
08-13-2013, 05:29 PM
|
|||
|
|||
|
Cheers Stuw. The black stuff is 3K carbon fibre tow (6K on the UTB), basically it is to stop wood creep over time, that is to stop bellying over time. Those strands of CF tow are on both sides of all the top braces as well as having uni-directional CF mat or tape under the 1.5mm thick bridge patch.
It is fancy set of bracing and just looks great to me but it is also very clever. Developed by Trevor Gore. Jim
|
|
#11
08-14-2013, 06:54 PM
|
|||
|
|||
|
Leo Fender and Frankenstein's Monster share a cup of tea and come up with a heelless adjustable neck.
Top left then clockwise. 1- Setting up the router jig. 2- Hogging out a bit to ease the routers job. 3- The first few cuts, I go about 5mm at a time. 4-Pocket cut to finished depth. 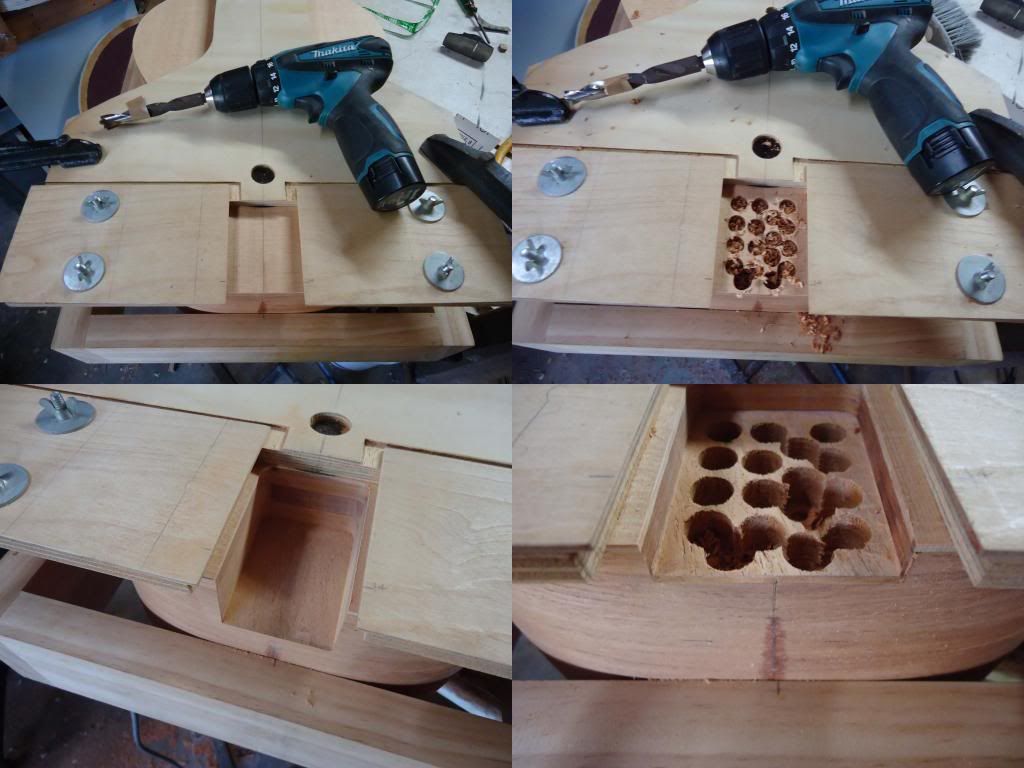 Same again. 1-Making a hole. 2-Rebating the hinge/hook and the lower adjuster plate. 3-Checking the fit. 4-Neck hook keep and upper adjuster plate rebated in. 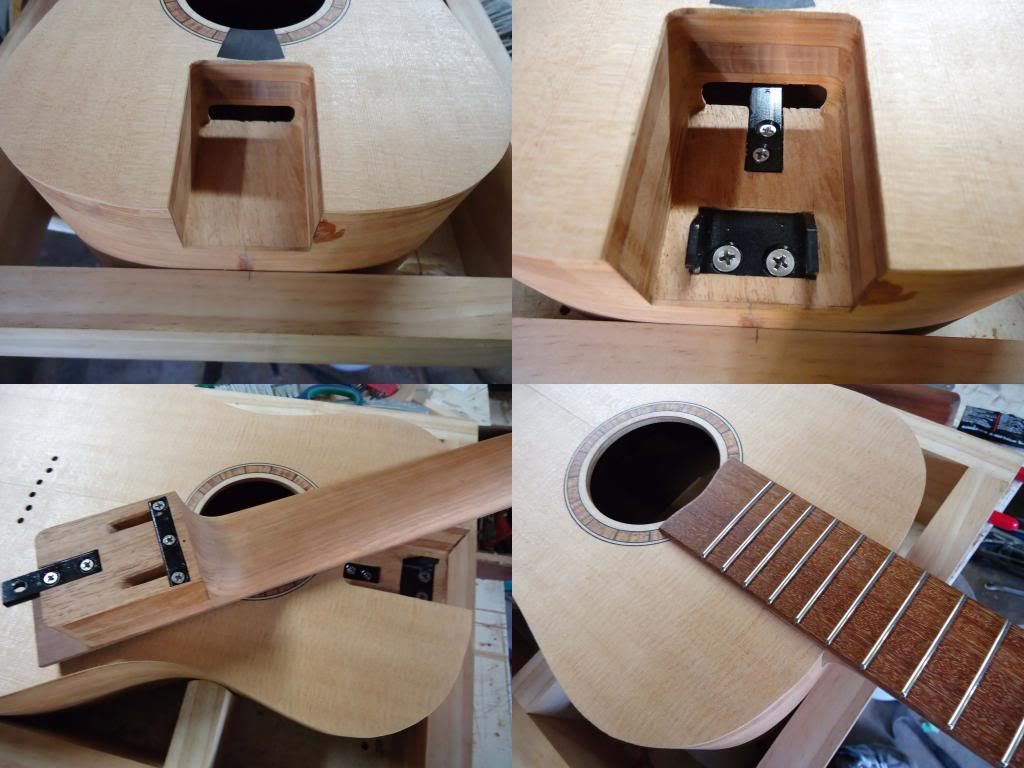 Jim
|
|
#14
08-15-2013, 06:54 PM
|
|||
|
|||
|
Cheers again Stuw, If you look at the upper plate on the neck it has at its end a hole. The hole is on a angle and is threaded to take a bolt (socket head cap screw), the bolt pushes against the lower plate to adjust. So you just put a Allen key between the strings and adjust from the outside. It differs from Fenders in that you can't see all that hardware on the outside. I will probably change it on the next one to have the same convenience but will try to drop a bit of weight out of the head block.
Thanks, is it Rick (Rykwon). It is exciting as well as frustrating at times but always a challenge and that makes it fun. I have never really been happy with what manufactures offer us. Jim
|
|
#15
08-17-2013, 07:32 AM
|
|||
|
|||
|
More pics, Boxing up.
Gluing the back on, I do most stuff in the go bar deck. 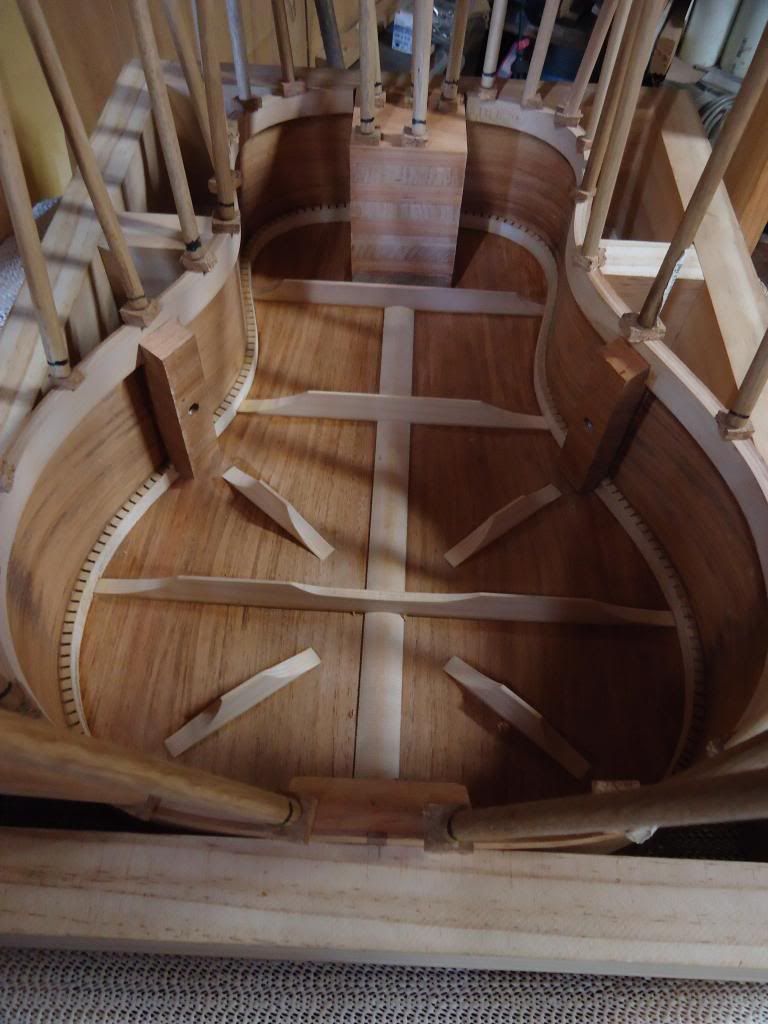 1-Because the bridge position is already fixed, the top has to go on in the right spot so I glue little tabs on so everything goes easy when I have glue all over the place. 2-Back on then I brush a coat of low sheen PU on the inside. 3-top in the go bar deck 4-A line scribed parallel to the edge 50mm in then I plane the top down to 2mm at the edge sloping up to the line. 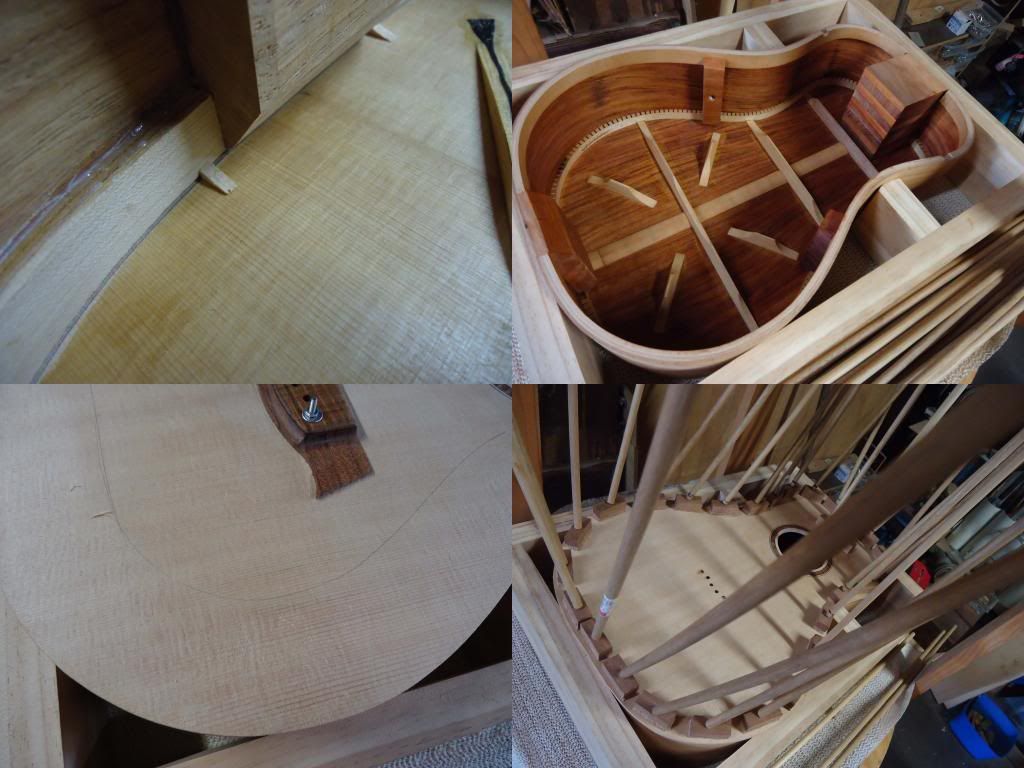 1- As the edge gets thinned I have the bridge bolted on cause I tap test as I thin. 2-Random orbit sand the two facets till they blend. 3-Not sure if you can see it but the pores on the b&s are canyon like. 4-Back filled with a water based filler then a few wipes with a 1lb cut of blonde shellac. 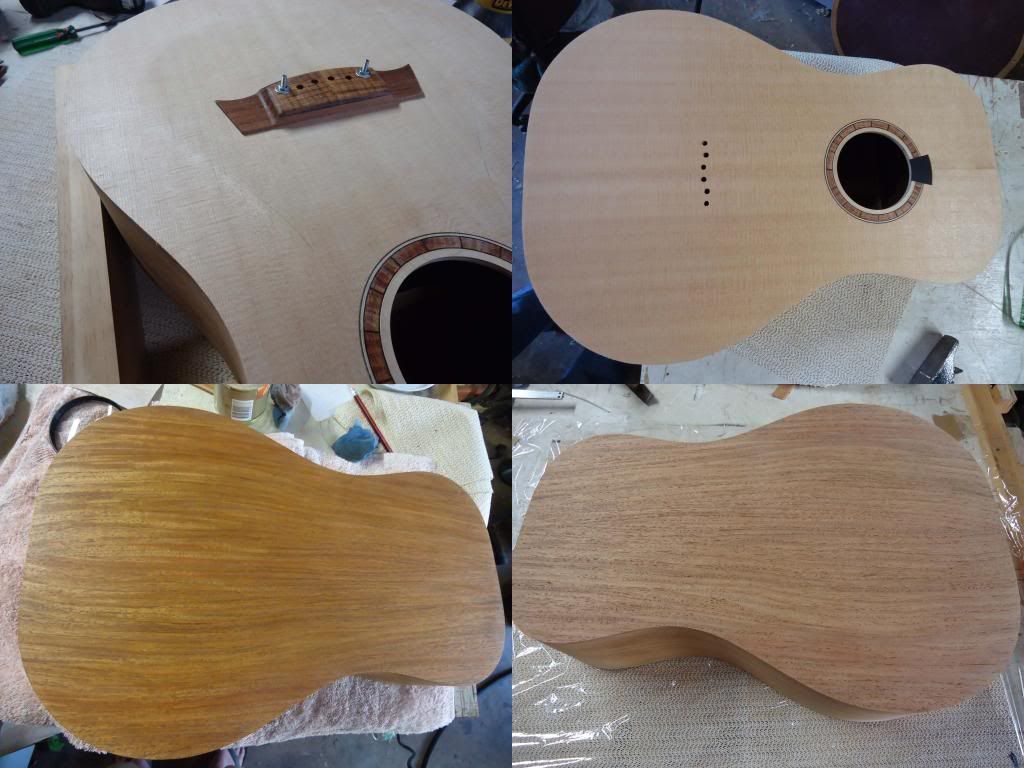 Jim
|