
|
|
#1
 06-21-2023, 07:10 PM
|
|||
|
|||
|
Does anyone know of a source of plans for building acoustic guitars with an elevated fingerboard?
__________________
WANT TO BUY: Luthier Tools, including side-bending iron 
|
|
#3
06-22-2023, 08:09 AM
|
|||
|
|||
|
https://www.stewmac.com/luthier-tool...n-guitar-plan/
http://https://genone-luthier-supply...-guitar-plan-2
|
|
#4
06-22-2023, 10:02 AM
|
||||
|
||||
|
Quote:
|
|
#5
06-22-2023, 11:26 AM
|
|||
|
|||
|
Quote:
a) How to construct an elevated fretboard; and b) The changes you need to make to the geometry of a traditional build. Sean
__________________
WANT TO BUY: Luthier Tools, including side-bending iron
|
|
#6
06-22-2023, 05:08 PM
|
|||
|
|||
|
I would just build the body the same as any other but rather than having the top "flat" and reducing the heel area depth as compared to the butt of the guitar I would make the back the "flat" edge and bring up the neck end as high as normal. Rather than the string length being roughly in parallel to an ordinary top the distance from the saddle to the heel edge of the box will be a little less. You could use trig to calculate how much or just draw a line that is perpendicular to the back from the saddle and measure how long the neck has to be for the desired scale length. Then when making the neck add a wedge under the fretboard area over the top. Might be a good idea to make a rough test neck out of a 2x4 or other scrap wood.
__________________
Fred
|
|
#7
06-24-2023, 09:37 AM
|
||||
|
||||
|
Here's a quick rundown of how I make the elevation...
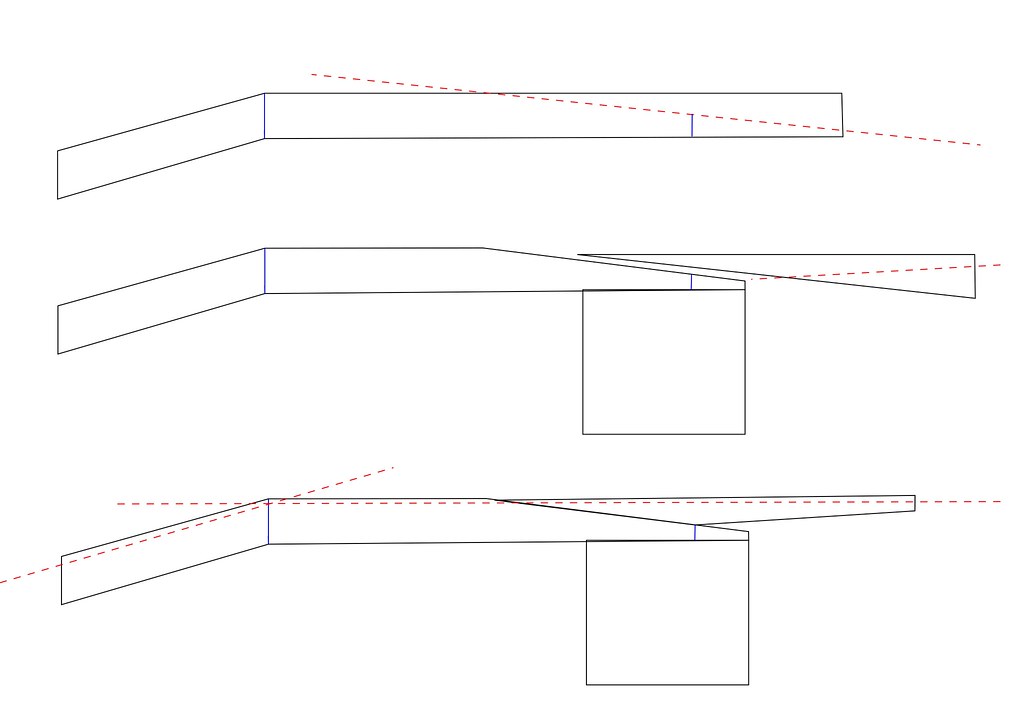 Starting with a neck blank, measure out the length of your headstock and mark the edge of your nut/head veneer (left blue line) and the body joint (right blue line). Cut a shallow triangle off of the neck blank (dotted red line). The angle of this triangle will depend on what fret you're joining at, the desired height of the elevation, the length from the body joint to the end of the fingerboard, and the size of your neck blank. Glue a heel block onto the neck blank making sure you have enough room for your tenon. Roughly set the neck angle and rout the tenon. Measure the length of fingerboard that sits over the body of the guitar (the end of the fingerboard to body joint). Use this measurement to position the triangle you cut off from the neck blank. Basically you need to have the extension stick out that length beyond the body joint. Cut the extension/triangle to roughly match the curve/angle of your top. Glue the extension on (I think hide glue is by far the best glue for this job). Put the neck on the body and mark the height of the extension at the body joint (I usually go 10mm). Using that elevation height as a fixed point, draw a line connecting that point and a point at the nut that will give you your desired neck angle. Plane the surface of the neck to connect those two points -- this is where you set the precise neck angle. Finally, plane the headstock so the nut is in the correct spot and voila! My biggest suggestion would be to first take some posterboard and cut out a mock neck blank and slice it up like I described before cutting wood. And the long scarf joint usually goes from about the 7th fret to the body joint and should be nearly invisible. It may seem complicated, but once you go through the process a couple of times it's really quite simple and in a lot of ways easier than a standard neck (since you can just plane the neck angle in and it's simple to make it a fully bolt on neck). Hope that helps some! Last edited by IndianHillMike; 06-24-2023 at 09:43 AM.
|
|
#8
06-24-2023, 04:38 PM
|
|||
|
|||
|
Thank you Michael - that is the clearest explanation that I have seen yet!
__________________
WANT TO BUY: Luthier Tools, including side-bending iron
|
|
#9
06-25-2023, 08:50 PM
|
|||
|
|||
|
Quote:
__________________
WANT TO BUY: Luthier Tools, including side-bending iron
|
|
#10
06-26-2023, 07:35 AM
|
||||
|
||||
|
Like printer2 mentioned earlier in the thread, I also have the back "perpendicular" to the sides and put the body taper in the top. For an elevated neck, I do a little bit more severe of a taper than on a standard guitar. Typically my heel blocks are ~92mm tall but on an elevated neck they're ~86mm. So, the heel block height combined with body length, end block height, and the arch on the top (I go with 25') will determine the angle between the top and the sides.
To find the neck angle/projection for an elevation, I use the same approach as on a standard guitar. One of the last jobs I do on a guitar, once the bridge and neck are attached, is radiusing the fingerboard. When radiusing, I place a straight edge on the bass side of the fingerboard and want that straight edge to hit .7mm below the top of the bridge. This should give me my desired action with a 3-4mm saddle projection and ~12mm string height off the top. Ideally I also have an even fingerboard thickness along the length when done (~6.5mm). Keeping all that in mind, when I'm done radiusing I want that straight edge to sit on the fingerboard 6.5mm above the mahogany at the nut, 6.5mm above the mahogany/top at the body joint, and 7.8mm above the top at the bridge. Using those numbers, I can make an "angle-ometer" to set the neck angle without having to actually measure any angles. Take a straight edge (or jointed piece of stable wood) and glue three nubs (6.5mm, 6.5mm, 7.8mm) placed at those three key points (nut, body joint, bridge). I can use this angle-ometer to set my neck angle before gluing on the fingerboard -- when all three nubs make contact with the top and/or mahogany, I know I've got the correct angle. In the case of an elevated fingerboard, if I want a 10mm elevation, that middle nub now has to be 16.5mm instead of 6.5mm. So, once you've got your tenon cut and extension glued to the neck blank, you can put the neck on the body, mark 10mm above the body joint and use the angle-ometer to mark where the nut sits. Connect those two points with a straight line, plane away the excess, and everything should work out! Just a warning that the specific measurements work for me, but depending on your bridge height, type/size of top arch, etc., your numbers might be slightly different. Hope that all makes sense!
|
|
#11
07-02-2023, 08:52 PM
|
|||
|
|||
|
Thank you Michael. Let me read this a few times and digest it. I really appreciate your sharing this kind of detail.
__________________
WANT TO BUY: Luthier Tools, including side-bending iron
|
 |
|
| Tags |
| acoustic, cantilevered fingerboard, design plans, plans |
|
|


