|
|
#1
 06-09-2014, 11:41 AM
|
|||
|
|||
|
I see lots of photos of guitar sides bent and put in an outside mold, and then spreaders put in with turnbuckles or similar. Sometimes 1 spreader, sometimes 3. Here's my question. Are these spreaders usually left in place until the top and back are glued on and then removed through the soundhole? Thanks, Danny Gray

|
|
#2
06-09-2014, 12:10 PM
|
|||
|
|||
|
Quote:
If the sides are bent well, these "spreaders" are in fact only "clamps" to hold the sides in position as the bindings, top, back, etc are glued in position. If the sides aren't bent well, then the "clamps" may indeed function as "spreaders".
__________________
---- Ned Milburn NSDCC Master Artisan Dartmouth, Nova Scotia
|
|
#3
06-09-2014, 02:52 PM
|
|||
|
|||
|
Quote:
a lot of effort can be spared if the sides are bend true and flat and the blocks are set exactly right. imo it pays big dividends down the road (at least for me) because i make my blocks to final size except for the faces that will meet the top and bottom plates. Last edited by arie; 06-09-2014 at 03:13 PM.
|
|
#4
06-10-2014, 07:55 AM
|
|||
|
|||
|
Quote:
|
|
#5
06-10-2014, 09:26 AM
|
|||
|
|||
|
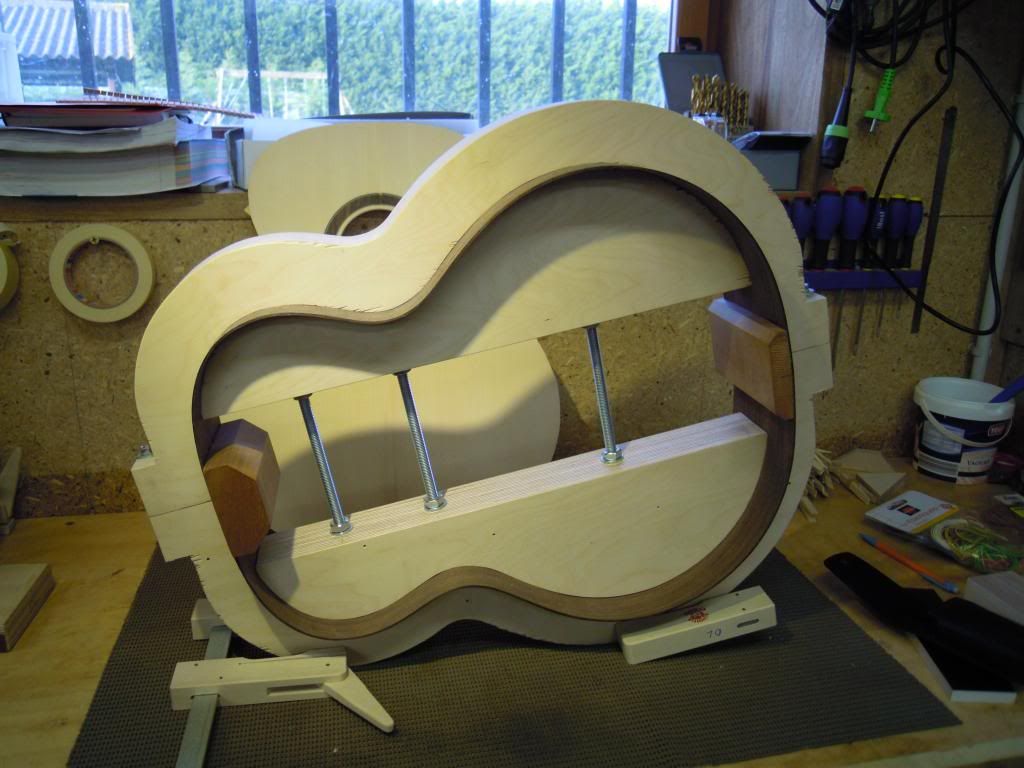
no, sorry i don't have any pictures. haven't seen one on the internet before, but it's such a super easy thing to make i'm sure it's been done already:
-trace body template onto a piece of wood, 3/4~1" thick, etc.. -cut contour out about 1/4" smaller then the template outline. -then cut in half. -cut an extra inch off the inside edge of each half. -cut out clearance notches for both blocks in each half. -on the inside edge, drill clearance holes for two pieces of threaded rod about 2" or so from each end. rod size of about 1/4-20" ~ 5/16"-18, etc.. about 2 inches deep in each half. -get some adhesive window insulation -that black rubbery/foamy/tape stuff and apply to the outer edge of each half. 1/4" thick will work, as wide as you like. -cut 2 pieces of threaded rod to length. long enough to spread each half outward in the mold without falling out of the holes. -install 2 flat washers and 2 wing nuts per each piece of threaded rod. -you're done! the foam "conforms" to the inside of the rim and with the threaded rod adjusters, pushes the rim into the mold securing into place. if you're making a cutaway guitar then you'll have to make some mods. Last edited by arie; 06-10-2014 at 09:43 AM.
|
|
#6
06-11-2014, 02:36 AM
|
|||
|
|||
|
Something like this?
 Mine are cut 2.5mm inside the outside mould contour, but without the foam lining, so with sides less than 2.5mm I do have some "play". I like the idea of leaving more clearance and using foam. I usually glue the back first, then replace the full-size spacer with a small turnbuckle spacer at the waist before gluing the top.  Its then removed via the soundhole. Always remember to remove the big spacer before gluing linings for the top though! Regards, Drew Last edited by dlowry; 06-11-2014 at 03:13 AM. Reason: Added photo with waist spreader
|
|
#9
06-11-2014, 10:13 AM
|
|||
|
|||
|
How did you cut the mold-I guess with a bandsaw?
It´s very nice and accurate.
__________________
Thanks!  Martin D28 (1973) 12-string cutaway ...finished ;-) Hoyer 12-string (1965) Yamaha FG-340 (1970) Yamaha FG-512 (ca. 1980) D.Maurer 8-string baritone (2013-2014) and 4 electric axes
|
|
#10
06-11-2014, 11:51 AM
|
|||
|
|||
|
Quote:
Drew
|
|
#11
06-11-2014, 12:27 PM
|
|||
|
|||
|
Drew, thanks for sharing your experience!
As I am nearly finished with my very first guitar with a brown to amber burst -an 8-string baritone like Taylor´s  When it´s finished I´ll share photos. I have the impression that all the preparing and surrounding work almost needs as much effort as building the guitar itself. I had to get a lot of information about the heap of different solutions like bending the sides, how to route the moulds for the inlays, what tools for making the neck, what finish et all. Now that I know -thanks to all the friendly help of this forum(!)- and have the necessary tools I´m thinking about building a second one with a cutaway... I guess I´m on the hook... PS.: My wife doesn´t know yet... ")
__________________
Thanks! Martin D28 (1973) 12-string cutaway ...finished ;-) Hoyer 12-string (1965) Yamaha FG-340 (1970) Yamaha FG-512 (ca. 1980) D.Maurer 8-string baritone (2013-2014) and 4 electric axes
|