
|
|
#1
 03-21-2020, 10:43 AM
|
|||
|
|||
|
Chances are my L-03 Larrivee will be getting a fret leveling in the near future. Since I`m a finishing carpenter and have enough interest and knowledge to be dangerous I`m thinking about truing up my 24" spirit level as a sanding beam for the job. The table saw top isn't long enough to sand/lap the beam but I do have a piece of quartz countertop that about 4" x 27". No idea how flat it is or what the acceptable tolerances are for this level of precision. Think I go sand it on the quartz anyway just to see how that goes but will hold off on calling it true enough to level my fretboard,
Watched a YT video outlining exactly what I described above and the guy used his table saw top and 220 grit paper. Don't recall if he used double side tape or the CCA glue and masking tape trick but he got apparently good results. I`m not a luthier and not trying to become one but I believe in understanding how things work and I ought to with diligence be able to do this. Any helpful advice would be appreciated. 
|
|
#2
03-21-2020, 12:05 PM
|
|||
|
|||
|
It's tempting to overthink. I've used this "sanding beam" for fretboards and frets since 1968:
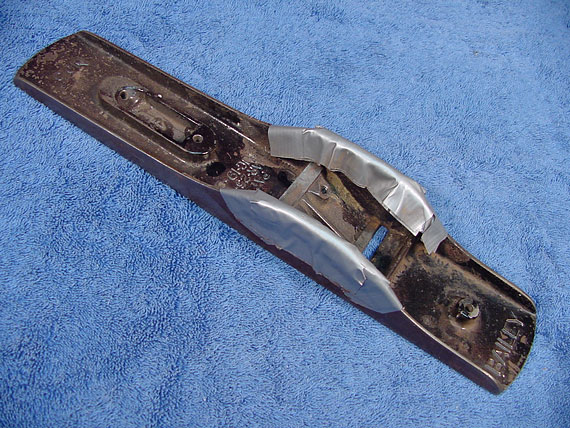 It's an older Stanley #5 jack plane body, and it's flat enough to provide the reliable leveling I've needed for every fret job. I've "interviewed" any number of these and have found them all to be satisfactory flatness-wise. No sticky sandpaper for me, I just crease the paper and hold it in place as I woerk: 
__________________
Cheers, Frank Ford
|
|
#3
03-21-2020, 01:57 PM
|
|||
|
|||
|
Truing a fretboard is more a matter of technique than of having a perfectly flat (or perfectly cylindrical) tool for the job. I've never felt or seen the need for the "radius beams" that suppliers sell.
A few things to keep in mind: Bringing a perfectly flat milling tool to the object that is to be flattened will create a convex surface rather than a flat one; you in any case must be checking as you work with a good straightedge and adjusting your technique and your surface accordingly; last, you don't play the fretboard--you play the frets.
__________________
"Still a man hears what he wants to hear, and disregards the rest." --Paul Simon
|
|
#4
03-21-2020, 03:19 PM
|
|||
|
|||
|
Well shucks two really good responses right off the bat thanks guys. Frank..can't thank you enough.Your website has been a huge help to me in learning about how guitars are built and maintained.
Funny I had a 16" or so Stanley jack plane up until a couple of years ago that I very rarely used..darn. Howard following your input I just checked my freshly "flattened" 24" Stanley Fat Max aluminum spirit level and yup sure enough the center is high from end to end so that the edges are roughly .0015" below the centreline along it's entire length, drat Oh but along it's length it's really quite flat. I used a few new Olfa blades to measure against sighting along the beam aimed out the window looking for daylight...basically ziltch. So it's really the cross section convexity that gives me pause. I don't want to over thinkit but of course I don't what to butcher it either. OK it's not perfect but does it matter if you can make up for it with cautious technique? With a finishing carpenters eye ans feel for evenly removing and checking material removal is this a "proceed with caution or "no go" situation. There seem to be two camps regarding leveling beams. Camp A goes spendy on high dollar close tolerance luthery grade beams and... Camp B gets the job done with experience, touch and less than perfect tools. Trouble is this is new to me and I don't really know my arse from my shirttail but hey you gotta try right.
|
|
#5
03-21-2020, 07:04 PM
|
|||
|
|||
|
Its not a case of camp A or camp B, its more you make your job easier with the best tools for the job.
The best tool for the job is a relatively straight flat beam about an inch wide, you can buy one, make one, think outside the box for one, not using the correct tool can also give a good to great result but typically relies heavily on the experience and skill set of the operator. Why make your job harder, if you have no experience. Levelling the frets its only a very minor step in a fret level and setup Steve
__________________
Cole Clark Fat Lady Gretsch Electromatic Martin CEO7 Maton Messiah Taylor 814CE
|
|
#6
03-22-2020, 06:34 AM
|
|||
|
|||
|
Right...so if'n it ain't flat don't use it..right...message received and understood.
Woke with an idea,,funny how the brain works while we rest...anyway since sanding my makeshift beam on a flat surface resulted in a convex beam surface I`m gonna try layering up the sanding surface with a few strips of masking tape each layer narrower the layer beneath it until there's a convex surface that hopefully matches the profile of the first attempt at sanding the spirit level. That's taking the long way around the barn to describe mimicking the convexity so as to get a flat result. Wishing I hadn't got rid of that jack plane... Also woke up thinking about using a piece of safety glass or tempered glass 3/8" thick or so. Wonder how flat that stuff is? Just want to get this done and move on to all the other steps that I`ve done before. Also might see how effective my diamond blade tile saw is at cutting 1" thick quartz counter top...I`m guessing not so good.
|
|
#7
03-22-2020, 08:38 AM
|
|||
|
|||
|
Quote:
Geometric accuracy - things like flatness and straightness - can be a rabbit hole. it isn’t possible in the real world to make something perfectly flat or perfectly straight. Then just how flat is flat enough, how straight is straight enough? Both Frank and Howard have used “relatively flat” tools to get the job done. Wood changes geometry with seasonal changes, aluminum, such as many levels are made from, changes geometry with temperature. Even if either of these were “perfectly flat” when the job was done, they won’t stay that way: there will be small changes. For the past several decades, I’ve used the same standard mill file to level frets. I know the file isn’t flat: it is slightly convex on the side I use. It doesn’t really matter since it is largely about technique and observing your progress, as Howard said. I use the same slightly-convex file to level the ends of the frets with the fretboard/neck: the convexity allows me to control where is being filed. As an aside, I surface fingerboards - not frets - first with a hand plane and then with an off the shelf aluminum level with sandpaper on it. I have no idea how flat/straight the level is. The level, with sandpaper, naturally produces a slight back bow to the fingerboard of a few thousandths of an inch. This is just the right amount, I’ve found, to bend flat under string tension. By contrast, when setting up my jointer, which wasn't working as well as it needs to, I purchased an expensive straight edge guaranteed to be straight and flat to high tolerance. For jointer setup, a reference that is that flat and straight was necessary. For fret levelling, it isn't. That leads us to the Plek machine for fret levelling... Last edited by charles Tauber; 03-22-2020 at 08:54 AM.
|
|
#8
03-22-2020, 10:44 AM
|
|||
|
|||
|
Well the three strips of masking tape 1 1/2", 1" & 1/2"centered under the sandpaper worked out pretty good. Now sighting the surface reveals gaps a lot less thick than before...good enough.
By comparison a well season spruce 2" x 4" x 24" ripped on my table saw was quite flat in some spots but varied a fair bit along it's length...again it probably doesn't matter. I`ll elect to go with my now pretty flat spirit level. My thanks to Howard for making me aware of flat against flat truing not making for flat results. Based on my level which is about 1 3/16" wide if I had to do it over I 'd go with masking tape strips 1 1/2", 1", 1/2" and 1/4" centered on each other. I used double sided tape on top of this pile o'tape to attach the 220 grit paper. A clamped piece of wood acting as a sanding guide kept the level centered on the sandpaper and the results were centered. Not rocket science and about a half hours work.
|
|
#9
03-22-2020, 12:05 PM
|
|||
|
|||
|
In the old tyme machinery world, apprentice machinists made their own true flat plates as part of their training. You start with three identical cast iron plates designed for the task, you machine them flat, you scrape them flat, then you get out the rouge and other fine abrasives and you polish them flat, using each one to polish the other, rotating evenly between all three plates. Each one takes out the imperfections of the other, and at the end of the day you end up with flat plates that you make wooden cases for and never use again for fear of marring them. Edit: looked it up, it's called the Whitworth Three Plates method.
I never particularly worry about getting fretboards flat, I think more in terms of equalizing fret heights between adjacent groups of frets. To me, coming from a precision machining background, the idea of a long stick of wood with bits of wire laid on being "flat" is kind of an oxymoron.
__________________
Brian Evans Around 15 archtops, electrics, resonators, a lap steel, a uke, a mandolin, some I made, some I bought, some kinda showed up and wouldn't leave. Tatamagouche Nova Scotia.
|
|
#10
03-22-2020, 12:52 PM
|
|||
|
|||
|
A portion of my job before I retired was repairing machines in the machine shop so I had a "in" in the shop.
I had a machinist grind a couple of pieces of cold rolled steel to less that +/-0.0005 inch on all 4 sides for alignment of my jointer. Also had a longer single piece ground to check fingerboards. I only use it to check flatness. I flatten with the longest, widest, finest flat file I could find I cut off the tang. These are really calibration tools and are not used as "tools". For a flat sanding block I run a piece of basswood over the jointer. Any size and length I need. I had a old Stanley plane that was not flat worn from years of use. Also had it ground flat' One of the few things I really miss about the job, the machine shop.
__________________
"My opinion is worth every penny you paid for it." "If you try to play like someone else, Who will play like you". Quote from Johnny Gimble The only musician I have to impress today is the musician I was yesterday. No tubes, No capos, No Problems.
|
|
#11
03-22-2020, 03:07 PM
|
|||
|
|||
|
Quote:
I was talking about one tool doing the cutting on the surface to be made flat, and more particularly, about trying to use a longer cutting tool to flatten a shorter surface. In the high precision case (working to accuracy within a hundred thousandth of an inch), flat surfaces are polishing each other rather than one doing all the cutting. And even here, if the surface to be flattened is significantly smaller than the one that is in motion, the process will tend to make the smaller surface convex. It is also critical in this kind of work that the only thing pushing the plates together is gravity, so the pressure is perfectly even. So that video is not at all an illustration of how to work on a guitar neck. I just find it interesting that maximal accuracy in a reference surface is obtained by hand work. Most people seem to think that machines are far more accurate than human hands. Nope. The opposite. Machines rough out reference surfaces, which are then made more accurate by hand work. I see that a lot of people level or flatten a fretboard or the fret tops with a tool like a level that is longer than the fretboard. That will inevitably make the fretboard slightly convex over its length (we are not talking at all about radiusing the width here, which is a different topic) rather than straight. Which is okay if, like Charles, you are making use of that as a way of compensating for string pull. I personally do not do that; I use a block that is a lot shorter than the fretboard (and later I mill the frets with a 10" file). And of course, I am supplying downward pressure with my hands. But this way I can avoiding making the board convex, and I can direct the pressure to the areas that my straightedge tells me need the work. I also am not trying to make the board perfectly straight. The best playing fretboards and frets do not follow a straight line from nut to last fret (also another topic). And last, we are orders of accuracy away from what good metal machining requires, and we don't need that kind of accuracy. So I was not trying to tell you how to make your spirit level closer to really straight by making the sandpaper surface convex. I was saying that once your leveling tool is reasonably good, you can make it do a great job by how you use it. There isn't any tool for this that will make the need for technique go away. Have at it. You will learn a lot just by doing. And get a good 12" straightedge
__________________
"Still a man hears what he wants to hear, and disregards the rest." --Paul Simon Last edited by Howard Klepper; 03-22-2020 at 03:15 PM.
|
|
#12
03-22-2020, 05:05 PM
|
|||
|
|||
|
Well Howard whatever I took away from your information it led me to experiment with layers of masking tape which resulted in a fairly flat level for which I remain thankful.
Now as for technique...there are a heap of YT vids showing folks going over the frets with long beams or whatever and one thing that keeps jumping out at me is that not all the frets are in contact all the time. To my thinking this will result in uneven material removal. In choosing to use 22.5" of aluminum sprit level that leaves me enough room to maintain constant contact through the back and forth movement of the beam. In my innocence I presumed that would contribute to keeping things nice and flat and not contribute to going out of true. Wouldn't each fret getting the same duration of contact yield better results? Ok release the hounds 
|
|
#13
03-23-2020, 11:25 AM
|
|||
|
|||
|
I cannot advise you about how to level frets with a long beam and sandpaper, since I do not do it that way.
__________________
"Still a man hears what he wants to hear, and disregards the rest." --Paul Simon
|
|
#14
03-23-2020, 12:18 PM
|
|||
|
|||
|
I used to use radius blocks to surface the fretbaords and it certainly was satisfactory but ever since I got a leveling bean, the one that Stew Mac sells, my fret work dramatically improved. In fact I'd put it up against any Pleck done fret job
 I just run the beam along the board in the direction of the strings and it creates a conical compound fretboard. I guess technically to dress the frets with the beam you would position it on the fretboard and scratch the tops of the frets by sliding the beam left and right in the direction of the frets rather then the long way in string direction. But in practice I find it works super well going in string direction, just don't run the beam off the end of the board. Take small strokes. For fretboard leveling if you scratch a pencil line on the FB between each frets you can watch your work as you approach perfection.
|
|
#15
03-23-2020, 12:35 PM
|
|||
|
|||
|
Quote:
Quote:
First, that the desired end result is a single flat plane. On many guitars, the higher frets are purposely on a different plane than the first fret to the neck joint fret. Some build this "fall-away" into the upper frets. I don't do that, but many do. Having two distinct fret planes negates having all of the frets in contact with the abrasive at the same time. Second, it assumes that the desired result is having the tops of the frets lie in a flat plane. They don't if one has any relief in the neck. Instead, what matters is the "next fret clearance", to borrow Bryan Kimsey's term: http://www.bryankimsey.com/setup/neck_relief_1.htm. In essence, you want sufficient clearance over the fret above the one being fretted that the vibrating string does not touch the next fret. (That is the "logic" behind fall-away in the upper frets.) Some people insist that fret levelling should be done while the instrument is at full tension, strings on. That way, so they argue, the shape of the neck is what it is going to be when actually played so that levelling of frets will be done in that playing condition. Opinions vary. Third, it assumes that simply rubbing something flat across something that isn't will make that something flat. It generally doesn't: it will generally make it convex. So even if there is consistent abrasive-time, it won't guarantee flatness. The point is that the operator does the work, not the tool. That involves technique and observation that "informs" the progress of the work. Here is a simple example. ONE way of approaching fret levelling is to use a black magic marker and color the tops of each fret black. Start levelling, using whatever tool you want. Observe which frets have the black marker removed and observe the width of the non-black flat that is produced. Chances are good that some frets will retain their black tops while others revel non-black flats. That tells you that those with black tops are lower than those with shiny flats: it might also indicate that the frets don't form a single plane, though a straight edge or sighting the length of the fingerboard would tell you the same thing. That "informs" you of what needs to be done and where. One of the things one learns from that is that beyond a certain point, the length of the levelling tool doesn't really matter much. It also teaches you that one stroke with the arm with a very short tool - say 6" long - potentially does a lot less effective work than a longer tool. That is, sometimes a longer tool gets the work done with less effort. Occasionally, the question comes up of how to prepare the joint in the centre of a guitar top or back. During that discussion, often, someone asks whether or not it is easier to obtain a perfect joint using a longer (jointer) plane. The usual answer is no, not really. Simply running a longer plane - one which keeps more of the sole of the plane in contact with the plane of the wood joint being prepared - back and forth over the joint won't produce a perfect, straight joint any better or faster than a shorter (smoothing) plane. Again, it is largely technique and observation/feedback. I'm in the midst of guiding a friend of mine through the making of his first guitar, a classical. At the onset, I suggested to him that one of the most difficult parts of most of the individual steps in guitar making is identifying what needs to be done and doing only and exactly that. That's true whether preparing to join two pieces of wood together or levelling and crowing frets. Last edited by charles Tauber; 03-23-2020 at 12:41 PM.
|


