The Acoustic Guitar Forum

Go Back   The Acoustic Guitar Forum > General Acoustic Guitar and Amplification Discussion > Build and Repair

Reply
 
Thread Tools
  #136  
Old 02-24-2014, 09:42 PM
charles Tauber charles Tauber is offline
Registered User
 
Join Date: Feb 2011
Posts: 8,381
Default

Quote:
Originally Posted by Viking View Post
Hmmm. Do you mean the entirety of the upper jaw, or the clamping surface itself on the upper jaw?
When applying a cam clamp, you squeeze together the ends of the jaws closest to the bar. If you have nothing in the jaws, you don't want the ends nearest the bar to touch each other prior to the padded working portion of the jaws coming together. Put another way, with nothing between the padded jaws, when you squeeze the bar-ends of the jaws together, the pads on the jaws should touch and be parallel to each other giving pressure the full area of the pads, even before throwing the cam. If the ends of the jaws closest to the bar touch before the pads touch, you'll get little pressure or engagement of the pads when clamping thin stock. If the ends touch before the pads touch, when clamping material, throwing the cam will cause the angle change you mention and will apply lateral forces, in addition to vertical forces, that will cause the glued pieces to slide, one over the other. If the lower, fixed jaw is accurately at 90 degrees to the bar, the only way the bar-ends of the jaws can touch is if the upper jaw isn't at an ideal angle to the bar. This can be a result of too much play between bar and upper jaw, or the angle at which the jaw is attached/restrained.

If the bar-ends of the clamp are squeezed together and the padded jaws in full contact and parallel, throwing the cam doesn't involve a large displacement of the tongue of the upper jaw and little change in angle of the jaws.

Last edited by charles Tauber; 02-24-2014 at 10:37 PM.
Reply With Quote
  #137  
Old 02-24-2014, 11:25 PM
LouieAtienza LouieAtienza is offline
Registered User
 
Join Date: Feb 2013
Posts: 4,617
Default

Quote:
I tend to think the species of wood doesn't have much to do with the sound. Perhaps it does in an 80/20 rule kind of way. 80% of the sound will be directly attributed to the builder... the construction, the bracing, the thickness, stiffness and mass of the top, the care taken in striking the right balance for the target guitar and how it was built, etc.. Then the final 20 might represent the coloring of the sound due to the species.
Having played instruments ranging from $100 to $20,000 I can attest that there definitely is a difference. in terms of woods. Each species does have certain characteristics which leads to certain tonal properties, though yes, I think the better the builder, the more these properties shine through.

Or maybe "tone" is not the right word. Aspects such as note attack, swell, sustain, decay, overtones, low, mids, highs I believe can be attributed to the woods used. Maybe one could say that the back and sides can be built so ridgid that they cannot vibrate and contribute to the sound. But I believe that the certain properties of back and side woods, regardless of how they're used, affects the way the top vibrates. So I think this happens irregardless of how one perceives a guitar to "sound" at least to his or her ear.

Another thing to consider is the guitar you played may have not had the chance to "open up;" it may have not been played much, it could be the setting or room... I've heard rosewood guitars that sound like 12 strings with reverb though there are only 6, then I've heard rosewood guitars that sound rather dark. it would be tough to make a judgment based on playing one guitar, or better yet, listening to someone else play the same guitar. I've played guitars that sound crappy but somehow sound great recorded, and vice versa.

Quote:
I would also need a radiused work dish, which I have been planning on building without. I'd need a more robust router and the proper routing bit, plus the jig to cut the dish. Then I would build the go-bar deck. Doing what I am doing now may take a little more time, but it will take less money. I may chose to build with a go-bar deck in the future, but for now, I think this is where I'm going to stay. I can also use the cam clamps for gluing the back and top to the sides.
I think it's an order of magnitude cheaper and easier to build a go bar deck; you could do it with a few pieces of threaded rod and some nuts and washers (or even 2x4s and screws), and a couple pieces of scrap plywood. I make go-bars out of scrap wood; ipe decking makes great go-bars. Even without a radius dish you can do many tasks wit a go-bar deck - gluing center stripes, rosettes, soundboard braces, even glue tops and backs to the sides. You can also glue every brace together; this is all but impossible with cam clamps.

Last edited by LouieAtienza; 02-24-2014 at 11:37 PM.
Reply With Quote
  #138  
Old 02-25-2014, 01:31 AM
Viking Viking is offline
Registered User
 
Join Date: Mar 2013
Location: Colorado Springs, CO
Posts: 234
Default

Quote:
Originally Posted by LouieAtienza View Post
I think it's an order of magnitude cheaper and easier to build a go bar deck; you could do it with a few pieces of threaded rod and some nuts and washers (or even 2x4s and screws), and a couple pieces of scrap plywood. I make go-bars out of scrap wood; ipe decking makes great go-bars. Even without a radius dish you can do many tasks wit a go-bar deck - gluing center stripes, rosettes, soundboard braces, even glue tops and backs to the sides. You can also glue every brace together; this is all but impossible with cam clamps.
Okay, you're going to have to explain that statement. How is it impossible to glue the braces with cam clamps? Even if the clamping surface doesn't reach the surface of the brace because of another brace being in the way, can't you just use a caul? I see folks using those with go-bar decks anyway. Or are you saying the the range of possibilities is impossible with cam clamps?
__________________
-- Nick
Reply With Quote
  #139  
Old 02-25-2014, 07:06 AM
LouieAtienza LouieAtienza is offline
Registered User
 
Join Date: Feb 2013
Posts: 4,617
Default

Quote:
Originally Posted by Viking View Post
Okay, you're going to have to explain that statement. How is it impossible to glue the braces with cam clamps? Even if the clamping surface doesn't reach the surface of the brace because of another brace being in the way, can't you just use a caul? I see folks using those with go-bar decks anyway. Or are you saying the the range of possibilities is impossible with cam clamps?
I'm not saying it's impossible. But it becomes needlessly difficult. And believe me, I did it in a fashion similar to the way you describe, and it just blows. The clamps get in the way of glue clean-up. I can never really trust the down pressure using a caul to "bridge" a clamping gap; some areas get more pressure than others. What I said was impossible is trying to glue the x-brace, tone bars, side braces, transverse brace, and soundhole brace together, using just cam clamps. And that doesn't include trying to get under every clamp and caul to remove glue before it sets. Sure you can glue the tone bars separately, then the transverse brace separately, then the soundhole braces separately... but why?

While cauls are used in go-bar decks (and I use thin cauls for things like backstrips and rosettes) they are of a more flexible variety, and you can use a higher density of go-bars which makes for a better glue-up. So in effect you can have more evenly distributed clamping force. The other reason to use cauls in a go-bar deck is to prevent marring of the wood surface.

Of course I'm not stopping you from doing so! And I had the same attitude about this, but I speak from my limited experience; when I built my first go-bar deck I had to smack my head repeatedly, wondering why I never built one in the first place!
Reply With Quote
  #140  
Old 02-25-2014, 09:18 PM
Viking Viking is offline
Registered User
 
Join Date: Mar 2013
Location: Colorado Springs, CO
Posts: 234
Default

Quote:
Originally Posted by LouieAtienza View Post
What I said was impossible is trying to glue the x-brace, tone bars, side braces, transverse brace, and soundhole brace together, using just cam clamps.
Yes, that I can see would be impossible, doing it all at the same time.

You've made me think Louie. Never a bad thing, but... decisions, decisions. Don't know which way to go.

But, for grins a giggles at the least, I finished my first cam clamp. Well, they still need some cork or leather on the jaws, but it works great. They don't produce the world's largest amount of clamping pressure, but then that's not their purpose.

Now, if I decide to go the cam clamp rout, I just need like 10-15 more of them.
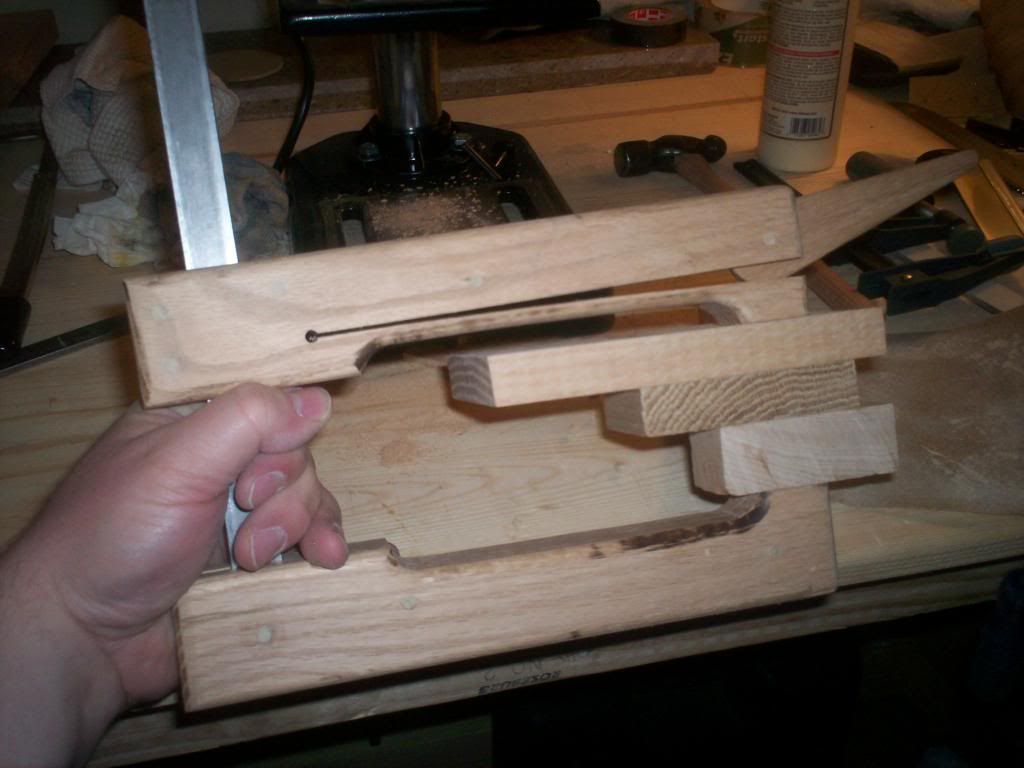
__________________
-- Nick
Reply With Quote
  #141  
Old 02-25-2014, 10:01 PM
LouieAtienza LouieAtienza is offline
Registered User
 
Join Date: Feb 2013
Posts: 4,617
Default

Well not totally impossible, but almost ridiculous!

You can make both, as both are beneficial to have! You NEVER have enough clamps. Afer making one cam clamp, I ended up purchasing bar clamps. I did have a few as I used to have a cabinet shop, but most of them are too long for guitar work.

I still have a box of long carriage bolts and wing nuts to make those spool clamps I've been putting off for the last 5 years....
Reply With Quote
  #142  
Old 02-26-2014, 12:05 PM
gpj1136 gpj1136 is offline
Registered User
 
Join Date: Nov 2012
Posts: 93
Default

[QUOTE=Viking;3837292]I would also need a radiused work dish, which I have been planning on building without. I'd need a more robust router and the proper routing bit, plus the jig to cut the dish. Then I would build the go-bar deck. Doing what I am doing now may take a little more time, but it will take less money. I may chose to build with a go-bar deck in the future, but for now, I think this is where I'm going to stay. I can also use the cam clamps for gluing the back and top to the sides.
on that.


I use shims on a flat board I see no need for a radius dish. Go bar decks are a vary old tool. Radius dishes are new. Prewar guitars that every one loves so much, to the best of my knowledge were glued on a flat surface. My go bar deck is one of my least expensive tools. I precarve the radius into the brace and when the top comes out of the deck it has the radius.

Having cam clamps would be real nice for gluing the bridge, although I built a little jig that uses no clamps at all for doing that made out of long small diameter bolts and nuts that fit through the string holes and wood. There's a web site that sells them but it costs about a dollar to build it yourself.

Save your money for a good chisel you'll need it when you carve those braces. If you use a cheap one you will have to extremely causious to not damage the top. Or your fingers !

Last edited by gpj1136; 02-26-2014 at 12:34 PM.
Reply With Quote
  #143  
Old 02-26-2014, 12:20 PM
charles Tauber charles Tauber is offline
Registered User
 
Join Date: Feb 2011
Posts: 8,381
Default

Go bar deck: run slats of wood between the top of your bench and the ceiling. If need be reinforce the ceiling with a piece of plywood screwed to it or the joists.

When finished, the go bar deck disappears, taking no space but to store the slats (go bars).
Reply With Quote
  #144  
Old 02-26-2014, 09:03 PM
Viking Viking is offline
Registered User
 
Join Date: Mar 2013
Location: Colorado Springs, CO
Posts: 234
Default

Quote:
Originally Posted by gpj1136 View Post
Save your money for a good chisel you'll need it when you carve those braces. If you use a cheap one you will have to extremely causious to not damage the top. Or your fingers !
I do already have a very nice chisel. A hock blade, 7 inches long, half inch wide, and with a nice gentle curve to it. Perfect for carving braces. I'll also be using a finger plane.


Quote:
Originally Posted by charles Tauber View Post
Go bar deck: run slats of wood between the top of your bench and the ceiling. If need be reinforce the ceiling with a piece of plywood screwed to it or the joists.

When finished, the go bar deck disappears, taking no space but to store the slats (go bars).
Yeah, if I stop posting at some point, it may be because I nailed a piece of plywood to the ceiling for my home made go-bar deck and my wife killed me for it. Yeah, I don't see that happening.
__________________
-- Nick
Reply With Quote
  #145  
Old 02-26-2014, 09:08 PM
LouieAtienza LouieAtienza is offline
Registered User
 
Join Date: Feb 2013
Posts: 4,617
Default

Quote:
Yeah, if I stop posting at some point, it may be because I nailed a piece of plywood to the ceiling for my home made go-bar deck and my wife killed me for it. Yeah, I don't see that happening.
For my first one, I used two doubled-up pieces of plywood about 2 feet square, and four 2x4s about three feet long, each notched for the plywood to fit tightly. I used all scrap, and when you done you can knock it down and put it away.

I made a newer, more permanent one using leftover aluminum extrusions and two circular bases. One side is dished and one side is flat. When I have company at my shop it doubles as a beer table!
Reply With Quote
  #146  
Old 02-26-2014, 09:23 PM
LouieAtienza LouieAtienza is offline
Registered User
 
Join Date: Feb 2013
Posts: 4,617
Default

Quote:
Originally Posted by gpj1136 View Post
Quote:
Originally Posted by Viking View Post
I would also need a radiused work dish, which I have been planning on building without. I'd need a more robust router and the proper routing bit, plus the jig to cut the dish. Then I would build the go-bar deck. Doing what I am doing now may take a little more time, but it will take less money. I may chose to build with a go-bar deck in the future, but for now, I think this is where I'm going to stay. I can also use the cam clamps for gluing the back and top to the sides.

I use shims on a flat board I see no need for a radius dish. Go bar decks are a vary old tool. Radius dishes are new. Prewar guitars that every one loves so much, to the best of my knowledge were glued on a flat surface. My go bar deck is one of my least expensive tools. I precarve the radius into the brace and when the top comes out of the deck it has the radius.

Having cam clamps would be real nice for gluing the bridge, although I built a little jig that uses no clamps at all for doing that made out of long small diameter bolts and nuts that fit through the string holes and wood. There's a web site that sells them but it costs about a dollar to build it yourself.

Save your money for a good chisel you'll need it when you carve those braces. If you use a cheap one you will have to extremely causious to not damage the top. Or your fingers !
The backs too? I can see this done for the top, but the back , with less compliant hardwood, might not yield a satisfactory dome, and it would be a struggle to glue it to the rim.

I know of someone who made a "radius" dish by taking a circular piece of plywood, added a raised rim out of 1/2" plywood, and a circular piece of 1/4" hardboard or masonite that was screwed at the center toward the first layer of plywood. While not a true spherical section, the difference is so small he didn't notice it, and it was simple to make. I probably would glue down a circle in the center about 4-5" in diameter so it has more of a parabolic shape instead of a hyperbolic shape.
Reply With Quote
  #147  
Old 02-27-2014, 01:41 AM
Viking Viking is offline
Registered User
 
Join Date: Mar 2013
Location: Colorado Springs, CO
Posts: 234
Default

Quote:
Originally Posted by LouieAtienza View Post
For my first one, I used two doubled-up pieces of plywood about 2 feet square, and four 2x4s about three feet long, each notched for the plywood to fit tightly. I used all scrap, and when you done you can knock it down and put it away.

I made a newer, more permanent one using leftover aluminum extrusions and two circular bases. One side is dished and one side is flat. When I have company at my shop it doubles as a beer table!
So there was a little less than 36 inches from the top piece of plywood to the work piece... and how long were your bars?
__________________
-- Nick
Reply With Quote
  #148  
Old 02-27-2014, 07:15 AM
LouieAtienza LouieAtienza is offline
Registered User
 
Join Date: Feb 2013
Posts: 4,617
Default

Quote:
Originally Posted by Viking View Post
So there was a little less than 36 inches from the top piece of plywood to the work piece... and how long were your bars?
I had a few different lengths. If I remember correctly I had about 2-1/2" from the ends of the 2x4s to the notches, which left me about 28" or so between the two doubled-up plates. The lengths depend on what you're doing. I have shorter go-bars for glueing tops and backs in, longer ones for braces, even longer ones for backstrips.... You have to experiemnt a little with the strips of wood you cut beforehand to determine how long you need them. They don't need to overly bend either to provide good pressure; I make them about 1/8" or so longer than the actual distance.

On my current one, I have 24" between decks. I did this purposely because I am pretty cheap by nature(!) and this allows me to get full use out of regular stock and dropoffs.
Reply With Quote
  #149  
Old 02-28-2014, 12:00 AM
Neil K Walk Neil K Walk is offline
Registered User
 
Join Date: Aug 2006
Location: Pittsburgh suburbs
Posts: 8,318
Default

I made one out of two sets of two 3/4" x 24" x 24" pieces of MDF glued together and used steel pipe with steel collars for the supports. Since my workbench is pretty cluttered it doubles as a short work table and storage unit. For gobars I chose to use hardwood trimmed to varying lengths. I can't recall offhand how tall the whole thing actually is but even sitting on a small mover's dolly it fits beneath my main workbench with a good 6" to spare.


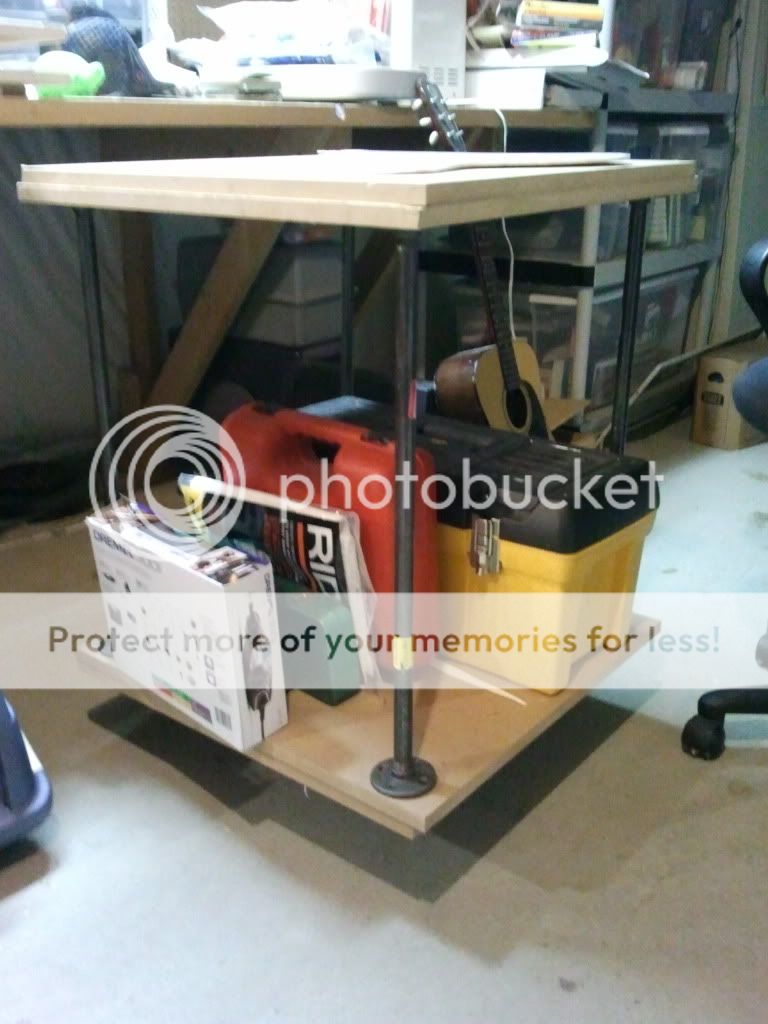
All told I think it cost less than half of what LMI sells theirs for. I don't have radius dishes though and I was advised not to radius the upper transverse brace on my soundboard either.
__________________
(2006) Larrivee OM-03R, (2009) Martin D-16GT, (1998) Fender Am Std Ash Stratocaster, (2013) McKnight McUke, (1989) Kramer Striker ST600, a couple of DIY builds (2013, 2023)
Reply With Quote
  #150  
Old 02-28-2014, 10:32 AM
Viking Viking is offline
Registered User
 
Join Date: Mar 2013
Location: Colorado Springs, CO
Posts: 234
Default

Quote:
Originally Posted by kwakatak View Post
I don't have radius dishes though and I was advised not to radius the upper transverse brace on my soundboard either.
Interesting. Who advised you not to radius the transverse brace?
__________________
-- Nick
Reply With Quote
Reply

  The Acoustic Guitar Forum > General Acoustic Guitar and Amplification Discussion > Build and Repair


All times are GMT -6. The time now is 03:52 PM.


Powered by vBulletin® Version 3.8.11
Copyright ©2000 - 2024, vBulletin Solutions Inc.
Copyright ©2000 - 2022, The Acoustic Guitar Forum
vB Ad Management by =RedTyger=