
|
|
#16
 02-07-2012, 05:52 PM
|
|||
|
|||
|
Here's a photo of the side bender in action on a cutaway. Last year I completely redesigned my bender and spent a lot of time tweaking it so that the sides including cutaway come out ready to glue with very little or no touch-up on the iron.
 Here I am gluing the tail block and head block to the sides. Actually I am only gluing the headblock to the cutaway side. The cam clamp is only holding things in place. I will glue the headblock to the non-cutaway side separately. I could do it all at once, but I'm in no hurry and I prefer to do it this way. Note that I use an adjustable workboard, or solera, and not an outside mode. This gives me a lot of flexibility in making different guitar models. It also work well with the way I build as will be seen later on. 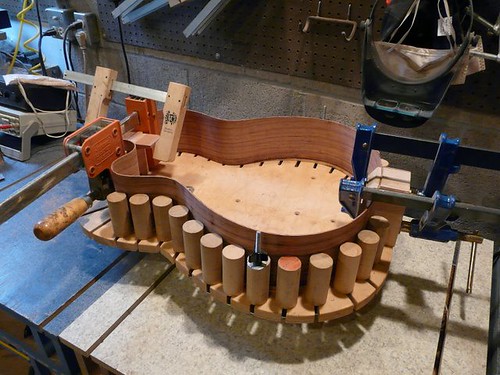 I just made some new linings out of the Northern White Cedar I got. They smell so good. 
__________________
Randy Last edited by Randy Muth; 02-07-2012 at 06:05 PM. 
|
|
#17
02-07-2012, 06:10 PM
|
||||
|
||||
|
Quote:
|
|
#18
02-07-2012, 06:50 PM
|
|||
|
|||
|
Thanks Bruce but I love the number five. My wedges are pretty long, it's just that that piece of WRC was extremely wide, wide enough to do a 20" lower bout. Next time I will trim some of the excess off the outside edges. Doesn't matter though, everything is still held very flat with this fool proof technique. If you look at the photo where I'm joining the Honduran Rosewood, you will see a more typical situation.
__________________
Randy
|
|
#19
02-08-2012, 06:53 AM
|
|||
|
|||
|
Couple of gauchos talkin'
 Randy - Can you talk a little more about the flexible mold....Do you use it for all your models, how do you set it up for exact dimensions....?
__________________
Martin OM-42SB MJ Franks 000-12 Brazilian/Carpathian J Kinnaird 000-12 Birdseye/Sitka Flammang SEL SCGC 00-12 EIR/Sitka SCGC OM Mahogany/Moon
|
|
#20
02-08-2012, 03:37 PM
|
|||
|
|||
|
Hi Robert. Yes, I do use it for all my models, although not for the ukulele I built for my daughter. The dowels have a threaded rod in the bottom that passes through the slots on the board. They are attached to the board underneath with a fender washer and a wing nut. I just lay down a body template on the board and move the dowels and end blocks into place and tighten them up. The end blocks have two threaded rods so that they don't pivot.
__________________
Randy
|
|
#21
02-09-2012, 12:07 PM
|
||||
|
||||
|
That bender is pretttty impressive. Nice stuff, Randy.
Steve
|
|
#22
02-09-2012, 04:46 PM
|
|||
|
|||
|
Thanks Steve. What I really like about it is its simplicity. The mold is the same for the cutaway and the non-cutaway with just an insert. I use 4 boards for the mold with 3/4" spacers in between. They are just held together with 3/8" threaded rods that pass through the spacers as well, no screws or glue. The threaded rods are strategically place on each mold so that the press clamps with the cauls are in the correct position for each mold. Also rods are in the wood blocks that the springs are attached to so that you can just drill holes anywhere on the pivot arm that you need to. Not sure if you are familiar with the Doolin setup, but I designed this to address pretty much all of the issues I had with it.
For the cutaway there is a piece of wood screwed across the front of the base that stops the arm in the horizontal position. Everything comes apart easily for storage. If you want I can post more detailed pictures. More build photos tomorrow!
__________________
Randy
|
|
#23
02-10-2012, 03:36 PM
|
|||
|
|||
|
Here's a couple of pics.
In the first one I am gluing the linings on. I like these clamps because the head on them pivots so that they don't mar the linings. Besides they are colorful too! However, they don't have enough spring tension by themselves. This is easily fixed by putting bands made from the appropriate size rubber tubing on them. If you look closely you can see the bands. Now they are perfect! In the second one I am sanding the correct angle on the upper bout so that the neck extension will lay flat on the top. I had already radiused (sic) the rim before doing this. Hey Robert, I'm now using (sic) when I use a made up word. I also installed bias cotton strips soaked in fish glue on the sides. The purpose of side reinforcement is not to prevent cracks in the side, but to prevent the propagation of the cracks around the sides. This is a particular problem with well quartered sawn straight grain sides. The strips soaked in glue do an amazing job at this. It is important that the glue be a hard crystalline glue such as fish glue or hide glue. They will be coated with a couple of coats of shellac before I close the box. More flexible glues such as Titebond are not as effective. Since I profile the sides to receive the back after bending and gluing the strips, I get to test how well they work on every guitar. You should be wondering what happened to the soundboard by now. Normally it would be all braced up and ready to go. However, I made a last minute decision to change out the rosette. Segmented rosettes are cool and I enjoyed doing it, but I just like the organic look of a non-segmented rosette. I will have some photos of the top after the weekend. 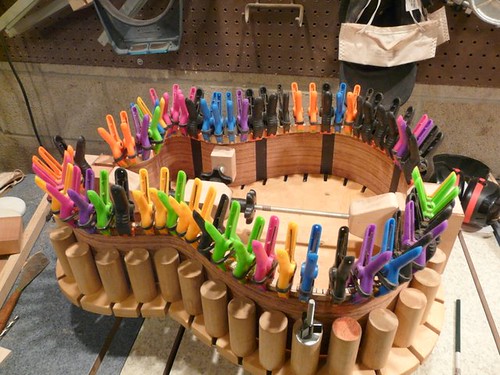  
__________________
Randy
|
|
#24
02-12-2012, 04:53 PM
|
|||
|
|||
|
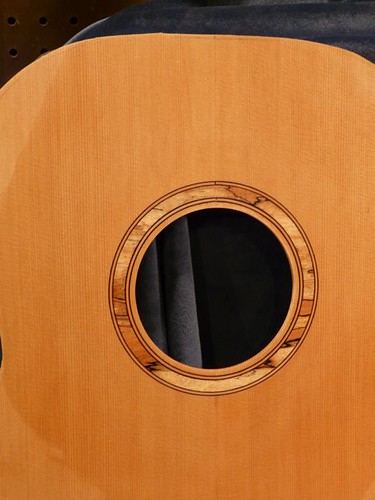
Here's a shot of the new rosette. The center purfling line is Swiss pear and is actually 1/16" wide. Something I saw online somewhere and I thought it looked interesting.
 Here I am gluing a 1/16" ebony backplate onto the headstock.  I use a carbon fiber laminated brace for the upper transverse brace. I do this not only for the added stiffness, but more importantly for the stability it imparts. Carbon fiber won't relax and deform over time. Here I am scalloping the brace end on a small oscillating belt sander. This borg tool is actually quite handy for this as well as shaping nuts and saddles. Capping the brace with carbon fiber would also work and I'm thinking of going in this direction since I wouldn't have to work the carbon fiber as much. 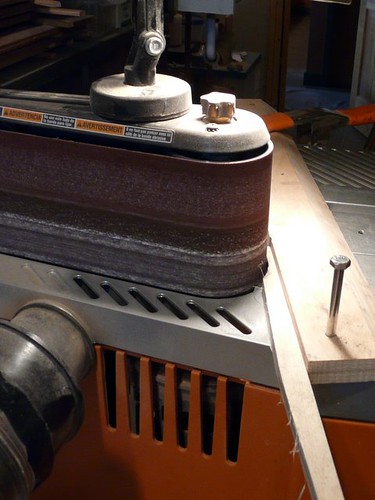 Here the first set of braces are being glued onto the top. I like to think of this as a system. I use a half lap joint for the A-frame braces as they pass through the carbon fiber laminated upper transverse brace (UTB). The ends will be let into the headblock and as they pass through the UTB they will be profiled and serve as soundhole braces. Actually on this guitar only one A-frame brace passes though the UTB towards the headblock because it is a cutaway. The side of the cutaway serves to support the headblock on that side. These braces in the upper bout are glued flat and are not radiused. I use hot hide glue to glue my braces on. 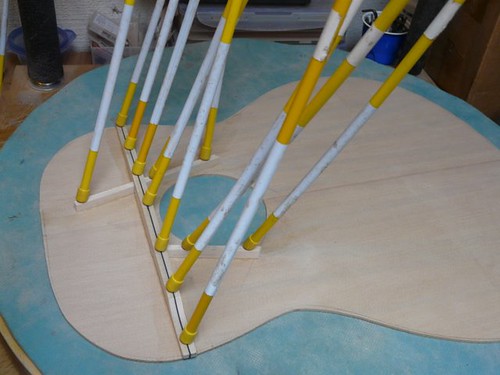
__________________
Randy Last edited by Randy Muth; 02-12-2012 at 06:25 PM.
|
|
#25
02-13-2012, 04:45 PM
|
|||
|
|||
|
I've carved the soundhole braces and now I'm ready to glue on the X-brace. In the first pic I am putting a radius on the bottom of the braces using a jig and the router table.
 I scallop the ends of the braces that are going to be let into the linings using the oscillating belt sander before gluing them on. I do this so that the ends of the braces will have a nice consistent height for when I rout the cavities in the linings. All other profiling, scalloping and tuning of the braces is done after they are glued on.  Tools of the trade. Here I have started profiling the braces. Tuning will occur after all the braces and bridgeplate are glued on. 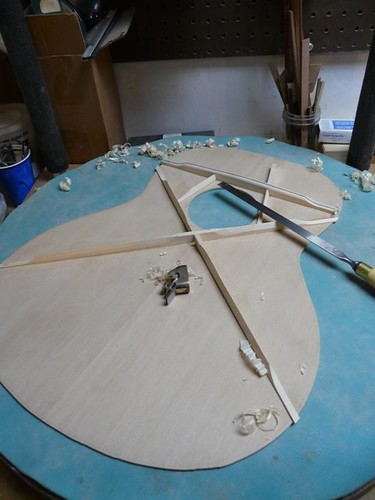
__________________
Randy
|
|
#26
02-15-2012, 09:48 PM
|
|||
|
|||
|
Here are some more bracing pictures. I suppose these might get some comments/questions. This is my exclusive XTF (X-Tunnel-Fan) bracing system that I have been developing over the past several years. In this picture the braces are just rough carved and the fan brace and carbon fiber plate have yet to be added. I use a spruce bridge plate that will have a smaller carbon fiber plate added to receive the ball ends of the strings. The tunnel braces emanating from behind the bridge plate and extending forward towards the edge of the guitar really help to prevent rotation about the bridge. In fact the height of the X-brace can be lower than typical. There is also a tapered spruce center graft that is thinned down to nothing at the tail of the guitar. A center fan brace that extends over the bridge plate and partially down the graft will be glued on next.
As a result of this system the whole top pumps more efficiency. The top resonates freely with very light tapping or scratching all over the plate including along the edges outside of the soundhole.  Here I am gluing on the carbon fiber bridge plate and the fan brace. Very small braces may be added to the open areas of the lower bout as tuning dictates. On small body guitar and/or 12-fret guitars, I often don't need them. The final bracing pictures will hopefully make things clearer. My two primary objectives in developing this system was to have a bracing scheme that was highly tunable after gluing on the braces and to enhance the contribution of the tripole vibration mode in an X-braced steel string guitar. I believe I was successful in achieving these goals and more. The tripole mode is a very efficient vibration mode that enhances the trebles and higher harmonics resulting in full, lush trebles.  Here is the neck blank and the headplate with an ebony veneer as the backplate. I use a Spanish-V joint to attach the heaplate. Tomorrow will be pics of this process. 
__________________
Randy
|
|
#27
02-17-2012, 05:53 PM
|
|||
|
|||
|
Well it's been an eventful couple of days. Power outage yesterday and I had a tooth pulled today. Man, my face hurts!
Here's how I make the V-joint. This tablesaw is nothing to brag about, but it is very well set-up and maintained and does the job quite well. It gets me about 80% of the way there and then the last 20% is hand finishing the cuts and final fitting. Of course like everything in life, the 80:20 rule applies. That is, it takes 20% of the effort to get 80% of the way there and 80% of the effort to get the last 20%. Here I am cutting the tenon on the neck blank at the correct angle. In order for this method to work the neck blank and headplate have to be perfectly square and true. Also the angle on the saw blade is not changed in between making the cuts for the tenon and mortise, insuring a very good fit. In fact I have it laid out so that the height of the blade doesnt have to be changed either.  I am now cutting the compound angle for the mortise in the headplate. The headplate is placed on a sloped block with a 15o angle when passed through the saw. Actually in this pic I am making the second cut which comes from the backside of the headplate. Thus the block is flipped over.  In this pic, I am finishing the tenon. Now I can change my blade angle back to 0o.  Here I am cutting the 15o back angle on the headplate. At this point it is left long until I finish the cuts by hand and do final fitting. Then I carefully nibble the bottom of the headplate until I get a perfect fit.  All done. Here the headplate is just resting on the neck blank for the photo opportunity. It will only be glued on after a whole lot more is done to the neck blank.  Here are a couple of final pics of the soundboard bracing. It has been tapped, scratched, flexed, deflected and sonicated (sic) and is ready to glue to the rims. I spend a lot of time on this since the soundboard has the largest impact at this point on the sound of the guitar. I glue the top on first so that I can do any final tuning that may be needed before the back is glued on. 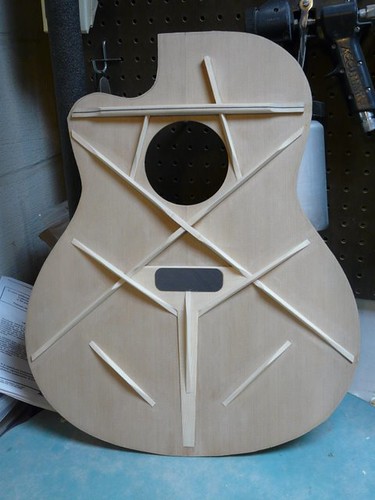 Any questions? 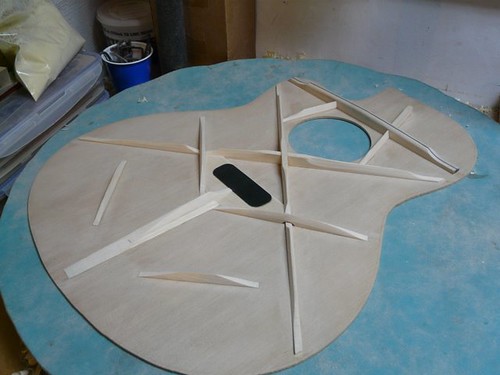
__________________
Randy
|
|
#28
02-17-2012, 06:22 PM
|
|||
|
|||
|
Very nice to see your work up close Randy! Clean and clever methods, and interesting top bracing.
__________________
Laurent Brondel "Faiseur d'instruments"
|
|
#29
02-17-2012, 07:13 PM
|
|||
|
|||
|
Randy - Those 2 small independent braces in the lower bout....What are looking to achieve?
__________________
Martin OM-42SB MJ Franks 000-12 Brazilian/Carpathian J Kinnaird 000-12 Birdseye/Sitka Flammang SEL SCGC 00-12 EIR/Sitka SCGC OM Mahogany/Moon
|
|
#30
02-17-2012, 09:14 PM
|
||||
|
||||
|
Quote:
|


