
|
|
#1
 12-20-2010, 02:28 PM
|
||||
|
||||
|
Pyramid bridges come in all shapes and sizes and you can buy them online from StewMac and other retailers already made up. For what I do, there is no "one bridge fits all" out there so I make them one at a time to fit the project at hand(sample pics below). I taught myself how to make a pyramid bridge using a few simple tools, a ration of patience and a dose of good luck. I don't always like what comes out the first try but it's not that complicated and can be mastered with just a fair amount of practice.
I don't mind sharing and always believe in stealing a good idea, with permission. If there's interest out there(and my feelings won't be hurt if there's not), I'd be happy to post a step-by-step tutorial on how to make a poor man's pyramid bridge. What say you?  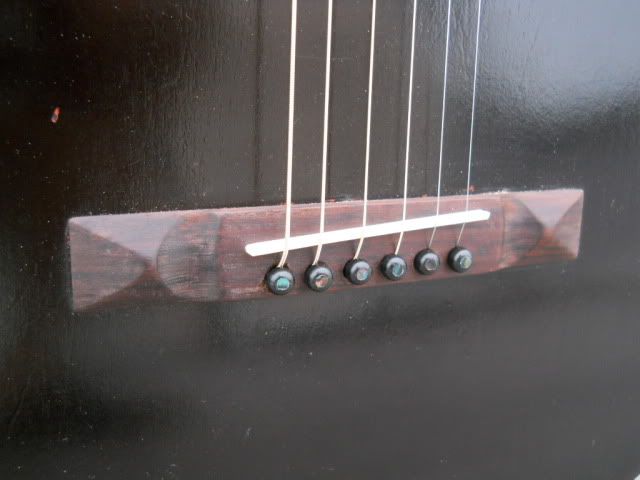 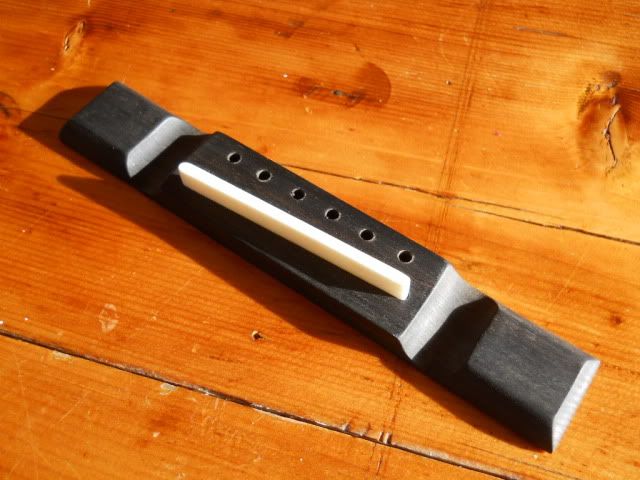
__________________
VintageParlorGuitars.com Fresh inventory just added, click link at left to view Last edited by vintageparlors; 12-20-2010 at 03:39 PM. 
|
|
#2
12-20-2010, 02:58 PM
|
|||
|
|||
|
As a budding wannabe amateur luthier who's on his second build and has done some simple repiars, I would think this would be the coolest! I've thought about buying one of the "project guitars" from ebay and restoring it. I would looooovvvvve to see a step by step on making a pyramid bridge.
|
|
#3
12-20-2010, 03:12 PM
|
|||
|
|||
|
i say it looks like fine work and a very generous offer! i'd enjoy following that...
i am also interested to know the thickness of these bridges (the rosewood portion) ... i ask because i have a very old supply of small pieces of brazilian rosewood ... they are generally about 5/16 x 1 5/16 x 18 ... i hope to put them in the hands of someone who can make good use of them ... would they work for these bridges or are they too thin? p.s. i have three nice old parlors that are in need of tlc ... i hope to bring them to you some time when i am up in vermont (traveling from connecticut) one of these days ... many thanks for any thoughts you may have. -tony Last edited by apalazzolo; 12-20-2010 at 03:23 PM.
|
|
#4
12-20-2010, 07:11 PM
|
||||
|
||||
|
Do it Do it. I'd like to see your process for remaining even all around... thanks
|
|
#5
12-21-2010, 09:41 AM
|
||||
|
||||
|
Quote:
The dimensions you posted for the pieces of braz. rosewood would work for many applications. Hang on to them as they might work perfectly in the future on one of your old parlors.
__________________
VintageParlorGuitars.com Fresh inventory just added, click link at left to view
|
|
#6
12-21-2010, 10:37 AM
|
||||
|
||||
|
Rockler has/had? real straight grained Indian Rosewood blanks that fall .01 short of being thick enough ( Height) for a standard Martin Bridge. Perfect for bridges and practice. .99 cents each.
|
|
#7
01-01-2011, 10:01 AM
|
||||
|
||||
|
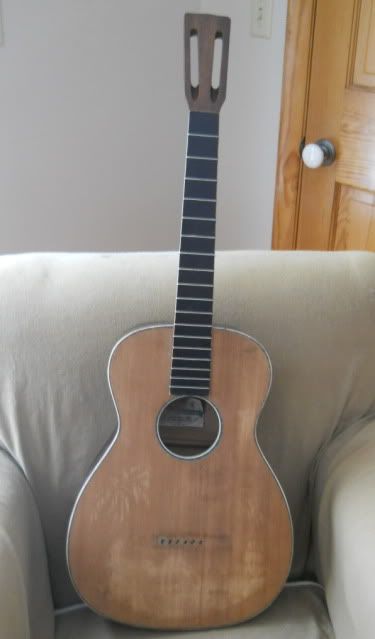
Let's get this show on the road. We'll make a pyramid bridge for this 1938 Harmony 0-. She has a solid spruce top with birch sides and back. She's just had a neckset and is ready for a new bridge.
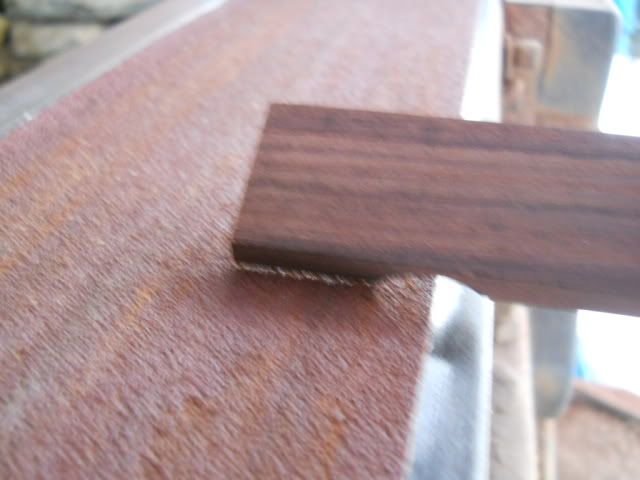
 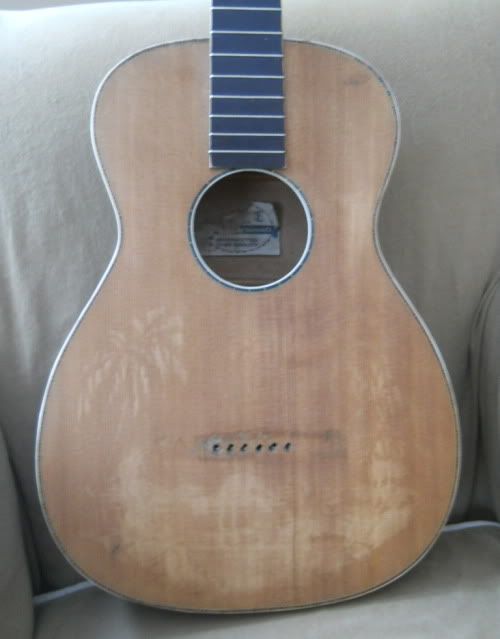 Please keep in mind that what I'm about to present is my way of making a pyramid bridge using simple tools and needing only basic skills. This may not be the best way and is certainly not the only way. There are some out there who may cringe at the sight of this technique. Let me say in advance that if you anticipate something might be upsetting to you, just cover your eyes. First step is to determine the bridge blank dimension, specific to each guitar. This one will start at just over 1" X 6". Final sanding will get it down to finish size. To determine the rough bridge height, I locate the front edge of the future bridge location, mark it with painters mask and set a straight edge along the fretboard to extend over the bridge. I want the rough height to be just a hair under the bottom of the straight edge. 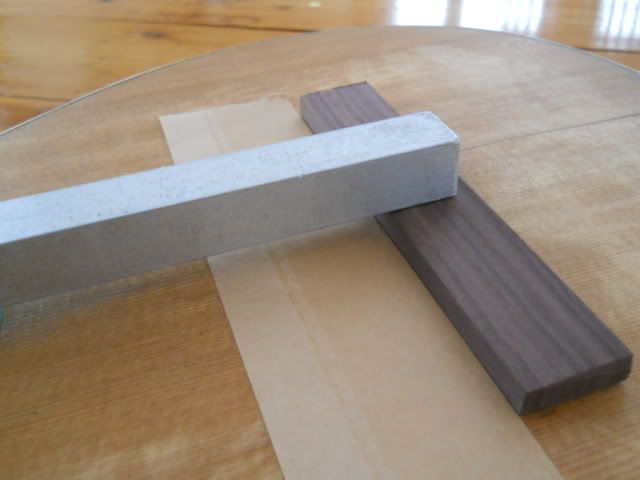 Using the masking tape as a ledger, I set the straight edge along each side of the fretboard and mark what is the outer edges of the fretboard as if it extended all the way to the bridge. Within these pencil marks will be the future string spacing measurement. I place the bridge blank at the edge of the mask and determine that I want the "valley" of each pyramid to be 1 1/2" from the outer edge of the bridge. From this point forward, all the work will be from this mark outward. 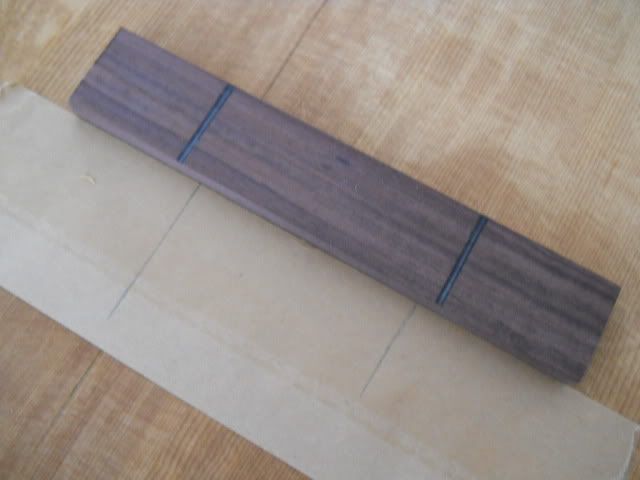 In comes the first of only two power tools I use to make the pyramid bridge. This is a standard drill with a 1/2" cylinder drum sanding bit attached. We use this to "cut" the valleys. I use 100 grit to make the initial rough cut and then change to 150 grit to make final adjustments later on. 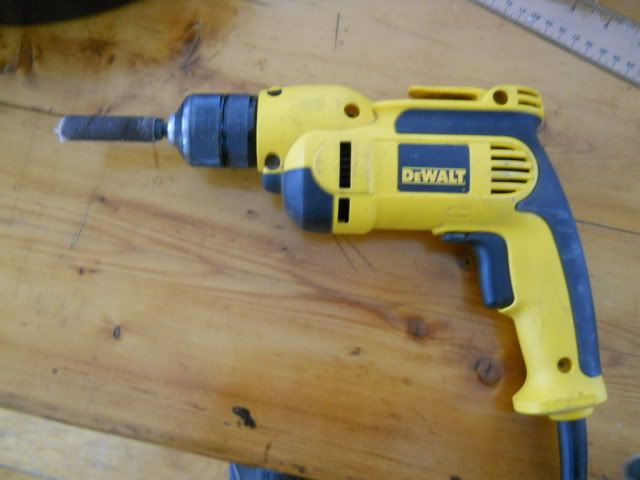 Securing the bridge blank in the vice, I'm sighting one of the two marks I made to delineate the innermost edge of the pyramid valley. Make sure that blank is real tight in the vice as any movement while your bearing down with the drum will be bad. 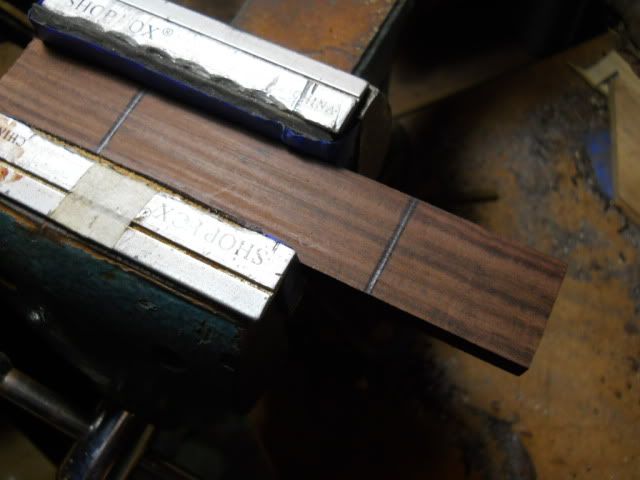 I pull the trigger on a test run. I don't want to be over the line but I also don't want to be too far off the line. This takes practice but comes easier with time. 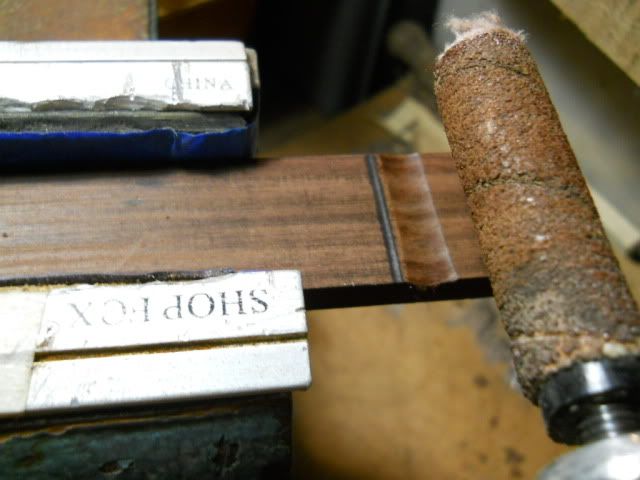 Once you're comfortable with the starting point, you'll slowly work the drum back and forth until you've got about a 1/16" reveal on the edge of the bridge. My drill has a variable speed feature which is very helpful to gauging the depth and alignment of the valley. Just move slowly back and forth until you have a nice even valley edge and depth on both sides of the bridge. 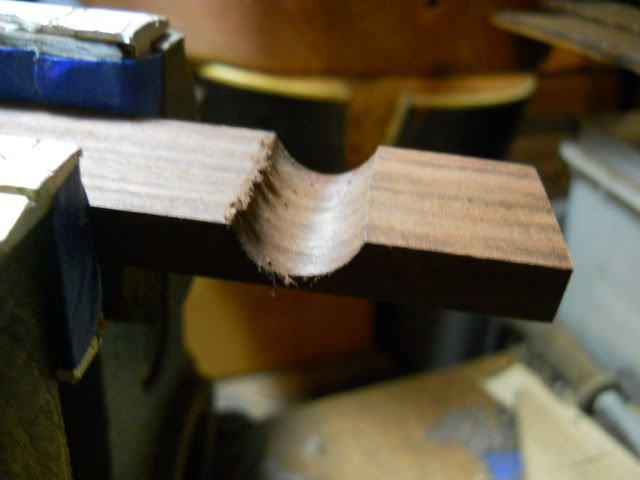 When you've finished the valley on one side, turn the blank around and create the valley on the opposite side. When you're finished with this step, your blank should look like this. 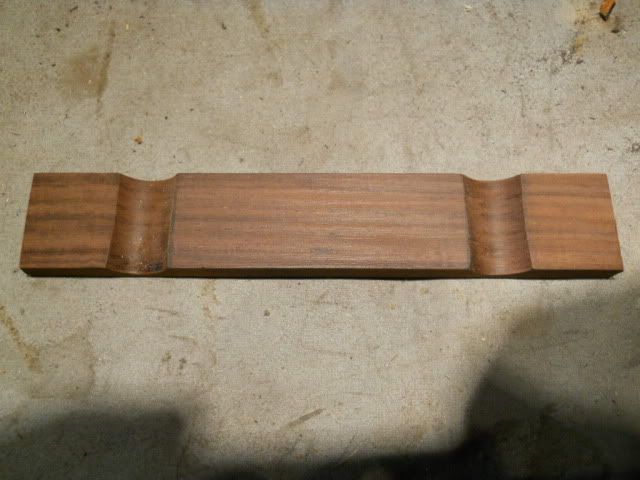 Now we're going to rough out the three sides of the pyramid. For this I use the 4" belt sander, the only other power tool in the mix. Before I start, I locate the center of the future pyramid on both sides and mark it in pencil. The belt sander starts with 120 grit and then finishes with a very worn down 220 grit. More on that later. 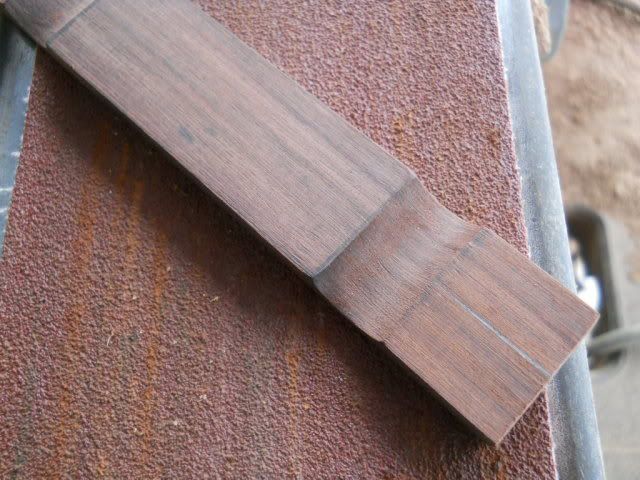
__________________
VintageParlorGuitars.com Fresh inventory just added, click link at left to view Last edited by vintageparlors; 01-01-2011 at 07:02 PM.
|
|
#8
01-01-2011, 10:06 AM
|
||||
|
||||
|
Turning the bridge on its side and working perpendicular to and at the very edge of the sander, I want to angle the bridge so that only one side of the pyramid is sanded off. Working slow and lots of practice will ensure that you don't lose too much wood and in the wrong places.
 When you're finished with the first side, it should look like this. 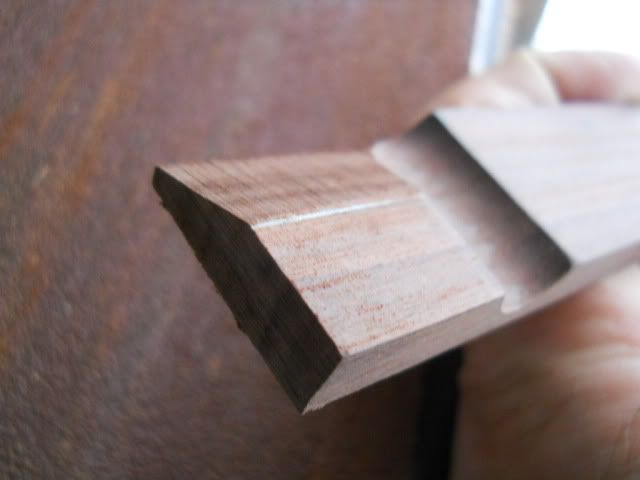 Now reverse the bridge to create the opposite side of the pyramid. Now you have two of the three sides roughed out. 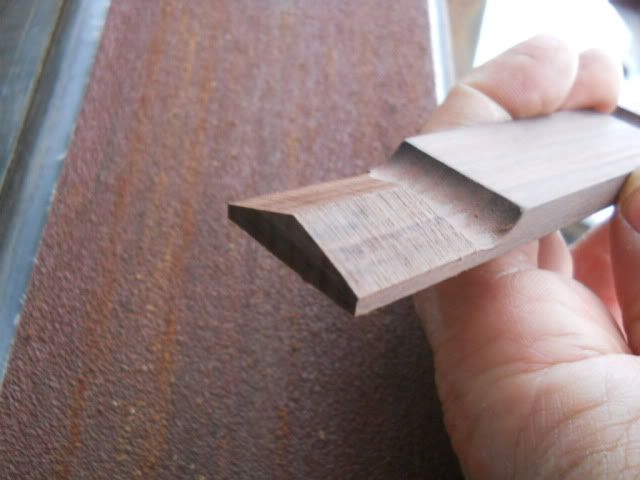 Now position the bridge parallel to the sanding belt and sight the bridge in such a way that your final pyramid side is ready for sanding. 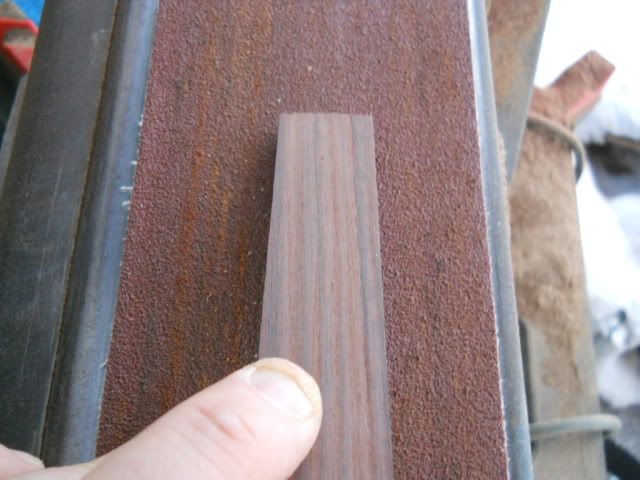 You've actually got to bend down with your face at the edge of the sanding drum to ensure you're as centered as you can be before turning the machine on. You are wearing your safety goggles, right? 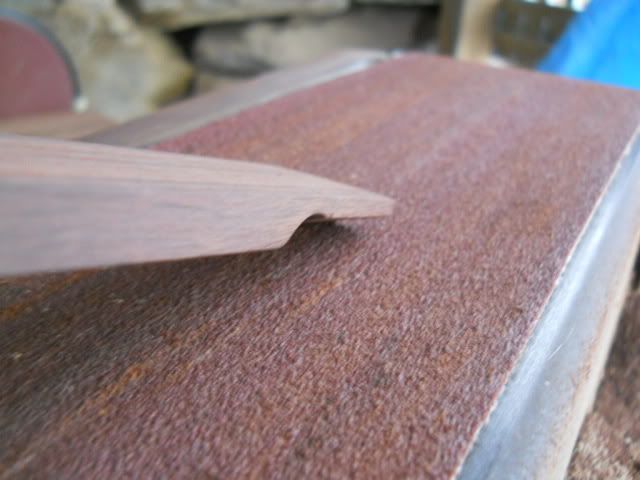 This part of the process takes the most time to master. I've create lots of lopsided pyramids before I found my groove. Here's the finished rough 3-sided pyramid. 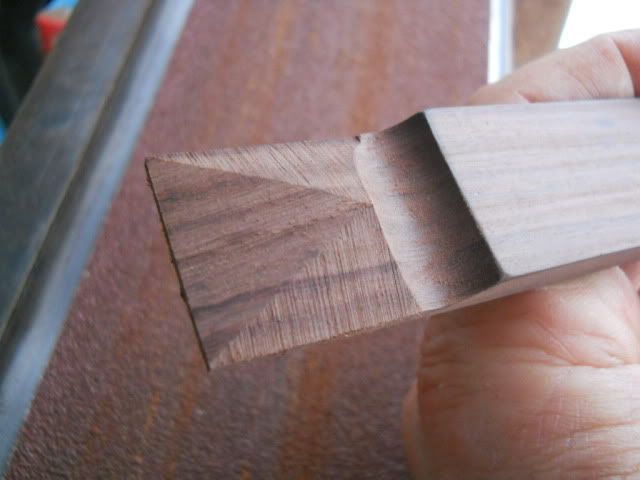 You'll note that the two parallel sides show sanding grooves that need to be addressed. Once I've got both pyramids roughed out, I change the sanding belt from 120 grit to 220 grit and repeat the process. This 220 grit belt that I use at this stage is so worn down that it's almost embossing the wood as opposed to sanding it. It takes 90% of the rough sanding groove off with little effort. 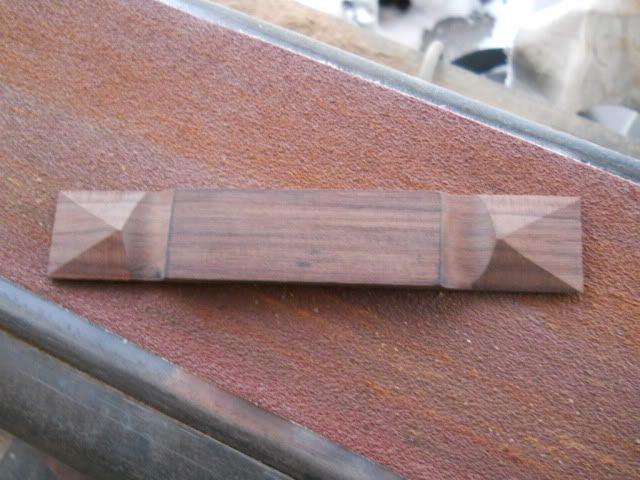 At this point, I bring the roughed pyramid bridge back down to the vice and work a 150 grit cylinder sanding drum back and forth through the valley to "clean" them out and even them up. There will be a few sanding grooves on the sides to address and then a final all-over sanding by hand to shape the edges and season to taste. 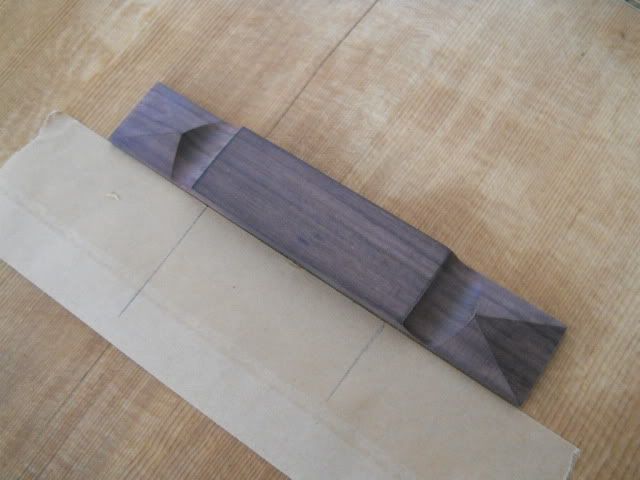 I'm using these pyramid bridges on vintage guitars so I do my best to make them look the part. From start to finish, it takes me about 20 minutes to rough out a pyramid bridge from a blank. I'll spend another 20 minutes of hand sanding before its ready for the guitar. This one still needs hand sanding but you get the idea. 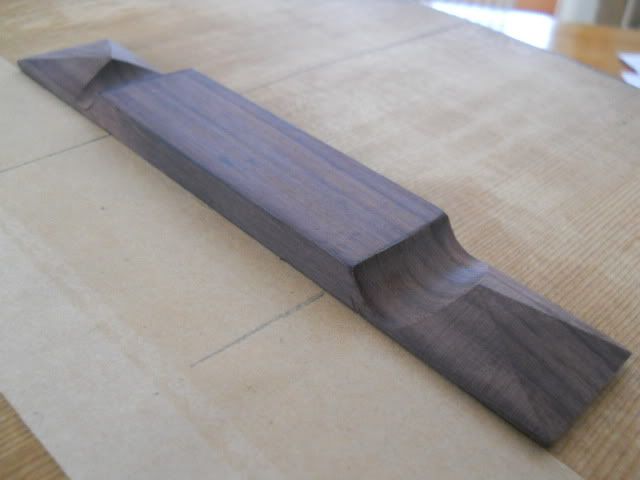 Like I said at the start, this technique may not work for everybody but it works just fine for me. Please borrow what you can, in whole or in part, if you can make it work for you. Don't forget to keep us posted on how you do and please update us on any good refinements or tricks that you've developed in making your own pyramid bridge from scratch.
__________________
VintageParlorGuitars.com Fresh inventory just added, click link at left to view Last edited by vintageparlors; 01-01-2011 at 07:05 PM.
|
|
#10
01-02-2011, 04:12 AM
|
|||
|
|||
|
nothing wrong with that technique!!
I LOVE my belt sander...... a thought.... the pyramids.... now they LOOK nice, and add the traditional vibe and all that, but isn't the pyramid just extra weight? wouldn't sanding the pyramid off altogether leave a lighter bridge, therefore a lighter top, so more bass? only a tiny anount, true, but on a parlour sized instrument, any bass you can get, right?
__________________
Quote:
|
|
#11
01-03-2011, 08:17 AM
|
|||
|
|||
|
Thanks for the edumacasion Steve! Someone should puts threads like this in the Library of Congress so people know how things like this were done back in the day. Imagine if Antonio Stradivarius had done this ...
|
|
#12
01-04-2011, 02:38 PM
|
|||
|
|||
|
Nice work, Steve, and full marks for ingenuity.
I will be completing my first ever acoustic build this year, and I determined a long time ago that I wanted a pyramid bridge, so I will post progress on this forum. I am fortunate enough to have an oscillating spindle (bobbin) sander in the shop, so I will probably set up jigs to automate the process. One thing for sure, I will be practising and experimenting on a multitude of softwood offcuts before I subject any rosewood (or more likely ebony) to the process !
|
|
#13
01-05-2011, 07:43 AM
|
||||
|
||||
|
Thanks lad. The spindle sander is a wonderful thing. If I go into the pyramid bridge making business full time, it's a definite buy.
Here's the finished product and it's new home, one of the woodiest sounding vintage spruce top, 0-body's I've had the pleasure of restoring. She's shy a few decals but not character or tone. 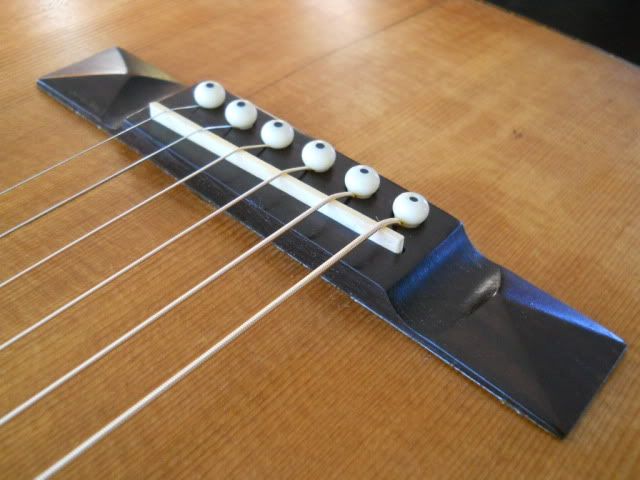 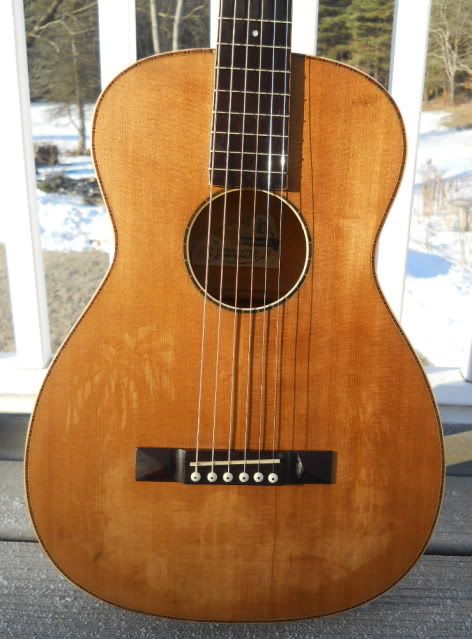
__________________
VintageParlorGuitars.com Fresh inventory just added, click link at left to view
|
|
#14
01-05-2011, 07:51 AM
|
||||
|
||||
|
For an Oscillating sander you want to check out the Ridgid OSS. Oscillating belt sander and spindle all in one for $200
|


