
|
|
#1
 07-11-2017, 02:35 PM
|
|||
|
|||
|
I just finished going through all my Micro Mesh grits. I have Medium, Fine and Swirl Remover polishing compounds from Stew Mac. I'm pretty sure the Medium is too course but should I start with the Fine or go straight to the Swirl Remover. I am doing this by hand. No power tools.

|
|
#2
07-11-2017, 07:12 PM
|
|||
|
|||
|
You didn't say what grit Micromesh is the finest you are using, but probably "fine" polishing compound.
|
|
#3
07-11-2017, 08:09 PM
|
|||
|
|||
|
Quote:
|
|
#4
07-12-2017, 04:54 AM
|
|||
|
|||
|
I've used Meguiars Show Car Glaze after Micro-Mesh with good results. Because it's not a very aggressive cut, it may take multiple applications to remove all the scratches, but I see that as a good thing.
|
|
#5
07-12-2017, 05:03 AM
|
|||
|
|||
|
|
|
#6
07-12-2017, 06:20 AM
|
|||
|
|||
|
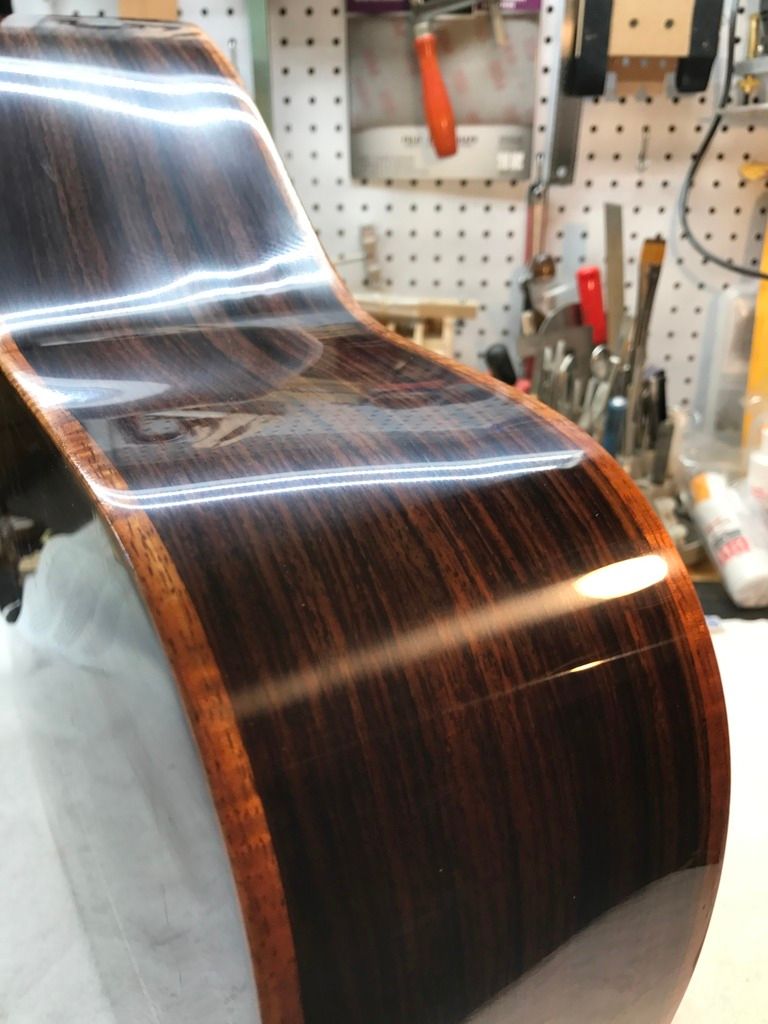
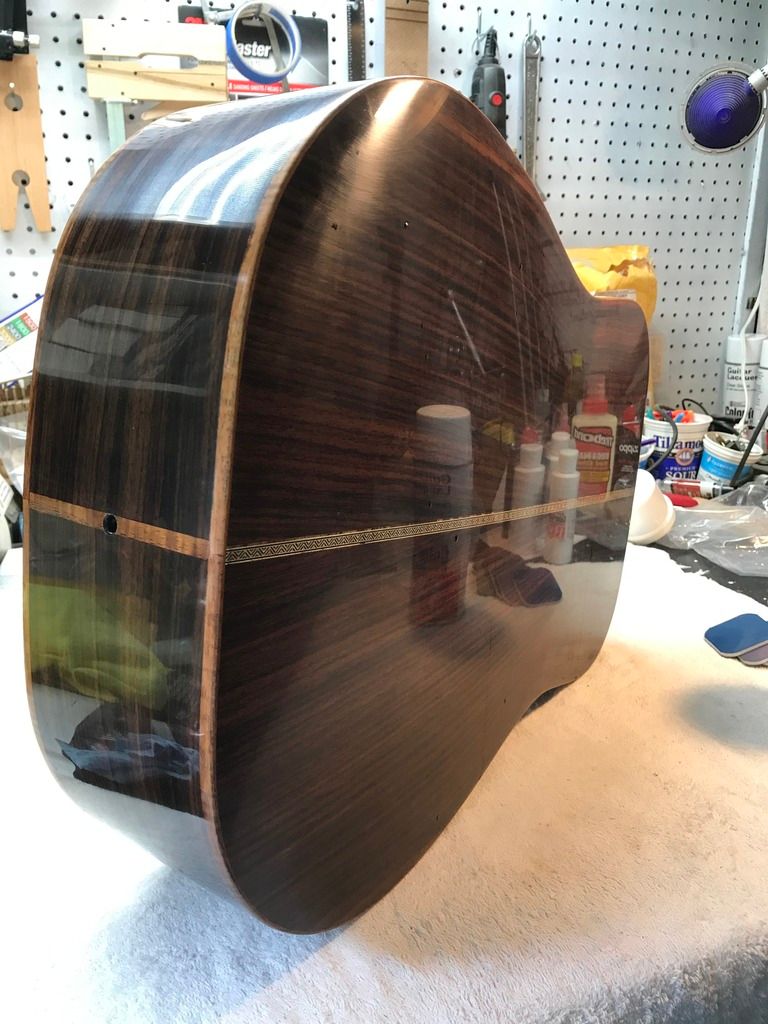
This has really piqued my interest, so I conducted an experiment on a test piece I've been spraying. I had already sanded it with micro mesh and had been polishing it with Show Car Glaze. I was reasonably happy with it, but still had some scratches. I rubbed (by hand) with Fine Cut Cleaner and it looked pretty good after that. Then I went on to swirl remover and man, what a difference. The depth it brings out is amazing. I don't want you to take a chance in what is already an excellent job, but these extra steps really take it to the next level and I think if you're doing it by hand the chances for disaster are greatly reduced. Hopefully, people with more expertise will weigh in.
|
|
#8
07-12-2017, 08:55 AM
|
|||
|
|||
|
Quote:
It is difficult to hand sand a finish and fully remove all of the scratches left by the previous grit abrasive. The result is a shiny surface with scratches that can be seen in certain light. The scratches left during the sanding can be seen in your last photo in the reflection of the light on the lower bout of the back. A very fine polishing compound, such as a Swirl Remover, won't take those out. Hence my suggestion for the use of the "fine". Depending, the fine might not fully remove them either. While hand sanding and polishing is inexpensive and requires less "technique", my experience has been that nearly ANY type of machine buffing - and I've tried a variety of them - will produce a more scratch free result than hand sanding/polishing for a lacquer-type finish. The reason being that the action of the machine occurs many more times than the action of one's arm. One's arm - and patience - run out long before the best result is achieved. Even an inexpensive foam buffing pad in a hand drill produces a better result. Some technique needs to be developed to achieve the best result. All that said, for a first guitar, you've done a very nice job on the finish.
|
|
#9
07-12-2017, 09:57 AM
|
||||
|
||||
|
While it is theoretically possible to achieve professional results with hand sanding techniques such as using MicroMesh, despite years of trying I have never personally achieved it, nor have I seen others pull it off. That said, your work has come quite close at this point, judging by the photos.
It is hard if not impossible to beat the sanding results generated by good old wet and dry paper used wet and backed by a firm yet flexible block. I use flip-flop sandals for this purpose. If you don't use anything coarser that 2000 grit on your final coat, 2 hrs of sanding followed by 10 minutes at the pedestal buffer will get you unbeatable results.
|
|
#10
07-12-2017, 11:12 AM
|
|||
|
|||
|
+1 on that, I've never been able to get even close to a perfect finish hand sanding. I use, for lack of a better word, an auto polishing buffer machine. Basically a random orbital hand held machine. Not only has it saved my elbow but has dramatically improved the finish results.
|
|
#11
07-12-2017, 12:34 PM
|
|||
|
|||
|
Thank you all for the guidance. I went at it a little with fine polish and swirl remover and it's a bit better. I have had 2 sand through in the process and I guess I'm just afraid to use a machine or go much further by hand. I have to say I'm pretty thrilled with it the way it is and have learned a lot. I'm also going to pick up some good wax. That should help give it more shine. I didn't realize how much figure my top has until it was polished up a bit.
|
|
#12
07-12-2017, 01:00 PM
|
|||
|
|||
|
[QUOTE=Albert D;5405357] I have to say I'm pretty thrilled with it the way it is/QUOTE]
You should be, it looks great. I can actually read the labels on the bottle of Titebond, the can of Zippo lighter fluid and the Rattle Can of Guitar Lacquer in the reflection off of the back.
|
|
#13
07-12-2017, 01:32 PM
|
|||
|
|||
|
Quote:
1. achieving an evenly shiny surface 2. achieving a perfectly smooth surface with no ripples, orange peel or other texture 3. fully filled pores - no pits (at least within a few weeks of polishing  ) )4. scratch free In the pursuit of these things, many try a wide variety of different tools, techniques and materials. Different spray methods, different sequences of application, different sanding/buffing materials ... Eventually, many find what combination of these things produce the best results for the least amount of time and effort. Finishing is an art unto itself, apart from the building process. Finishing can take as long as the building process, the woodworking.
|
|
#14
07-12-2017, 02:23 PM
|
|||
|
|||
|
Quote:
And some never do  I swear if I had the reputation to sell $10k dollar guitars I'd farm the finishing out. I hate it!
|
|
#15
07-12-2017, 06:13 PM
|
|||
|
|||
|
Quote:
|


