
|
|
#106
 09-23-2016, 09:09 AM
|
|||
|
|||
|
Quote:
I can understand that he might want to have a greater distance between the edge of the e string and the edge of the board than between the edge of the E string and the edge of the board, and that tilting it away from the treble strings would accomplish that , but if that is what he does, ie so that the center line of the fretboard is no longer perfectly in line with the center line of the body, it strikes me as a sloppy bit of fudging, and that the same result could be obtained much more elegantly. I am probably misunderstanding what he does, however, and would be most grateful for enlightenment. 
|
|
#107
09-23-2016, 09:52 AM
|
|||
|
|||
|
Quote:
That's provided the pins hold. I wouldn't drill any holes through the tenon until you have the neck angle set though. It will weaken the tenon and make any future adjustments much more difficult. Trust me on this: my first build employed barrel bolts and I played too much with the neck angle, causing the lower tenon part of the tenon - AND the bottom of the heel - to actually break off. As Charles said though, there are still ways to fix even that type of catastrophe. I glued it back together and was fortunate that luthier Tim McKnight is a good friend who lives within reasonable driving distance. He ended up epoxying threaded inserts into the heel along the line of the length of the neck and set the neck for me the right way. I'd recommend giving that approach a try once you have the neck angle set.
__________________
(2006) Larrivee OM-03R, (2009) Martin D-16GT, (1998) Fender Am Std Ash Stratocaster, (2013) McKnight McUke, (1989) Kramer Striker ST600, a couple of DIY builds (2013, 2023)
|
|
#108
09-23-2016, 12:55 PM
|
||||||
|
||||||
|
Wow. Seems this latest issue with the neck angle has struck a chord with you all. Loads of help here, its all totally massively really appreciated!!! If it all went how it was supposed to go and I didn't make any mistakes, I wouldn't need so much help and this thread would be a lot shorter but significantly more boring!
Quote:
Quote:
Quote:
Quote:
Thanks guys, you're all making the same point which is handy! (that was probably my only option anyway if i wanted to try get this neck straight) so i'll be going in this direction at least to start with. I almost wish I didn't have the "backup" neck as its distracting me a bit and having to go through all the neck angle calculations for both vertical and horizontal angles is not hard, its just plain annoying. Quote:
Quote:
Thanks again Dave
|
|
#109
09-27-2016, 07:48 AM
|
|||
|
|||
|
Quote:
|
|
#110
09-28-2016, 02:31 PM
|
|||
|
|||
|
It took 3 hours of messing around with a japanese handsaw, a chisel, a rasp, sandpaper and some other bits and pieces, but I managed to get the neck to about 98% of the fit it needs to be. The tenon is a little loose but fits pretty straight on its own (leaning slightly to the treble side), and then when held in place with pressure its as close to straight as I can make it (but very very very slightly to the bass side). I just hope when I eventually come to glue it, any of the slop in the joint can be eliminated with shims, glue, the dowels etc and the neck will end up straight down the middle.
I still have to adjust the tenon length slightly so the top of the neck fits perfectly to the guitar top and make make the actual edges of the neck joint as close to "straight" as i can get them so the fit against the sides of the guitar is better they are a little wavy right now. The gap in the side view pictures are less than they look, its hard to keep the neck joint in place and take a picture when the joint isn't particularly tight. Also very annoyed about the chip out, I may carve the sides in slightly to hide it or i may fill it, it depends on how i feel later, it will probably depend on how i decide i want the back view of the neck joint to look, my current thought is that if it stays "wider" the angled joint looks a little more deliberate. There is a downside to this angle correction, the neck joint really isn't square and you can see when you look at the back of the neck and it does look kinda odd. (see pictures below) 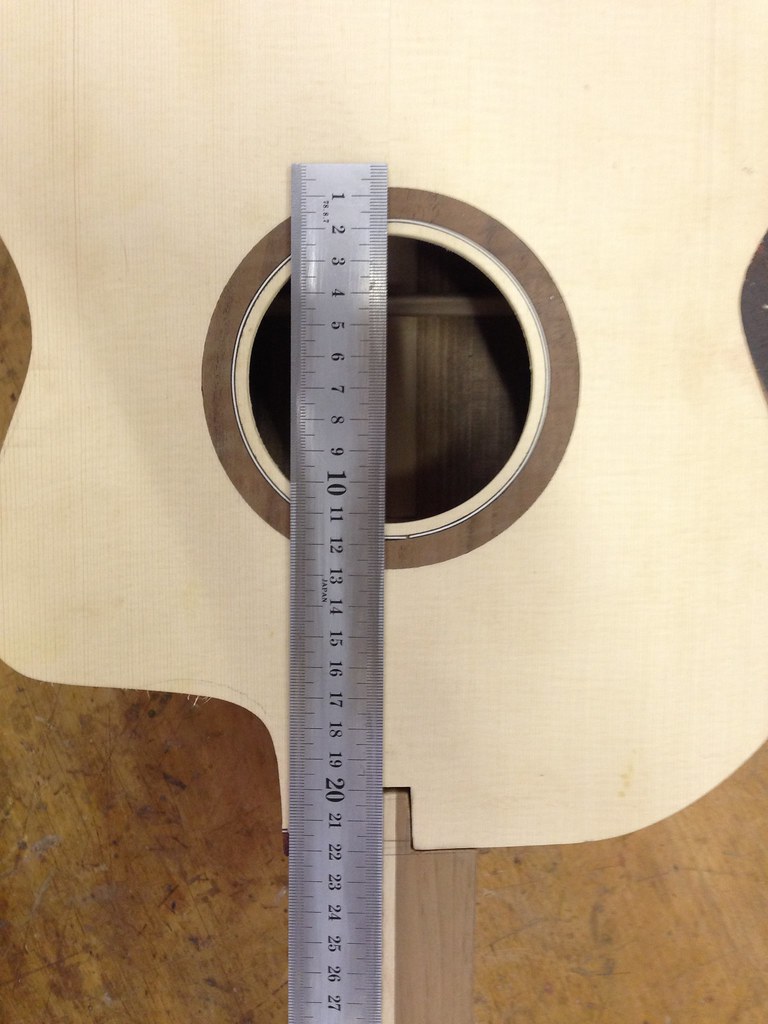 Untitled by David Emm, on Flickr Untitled by David Emm, on Flickrside view of the neck joint 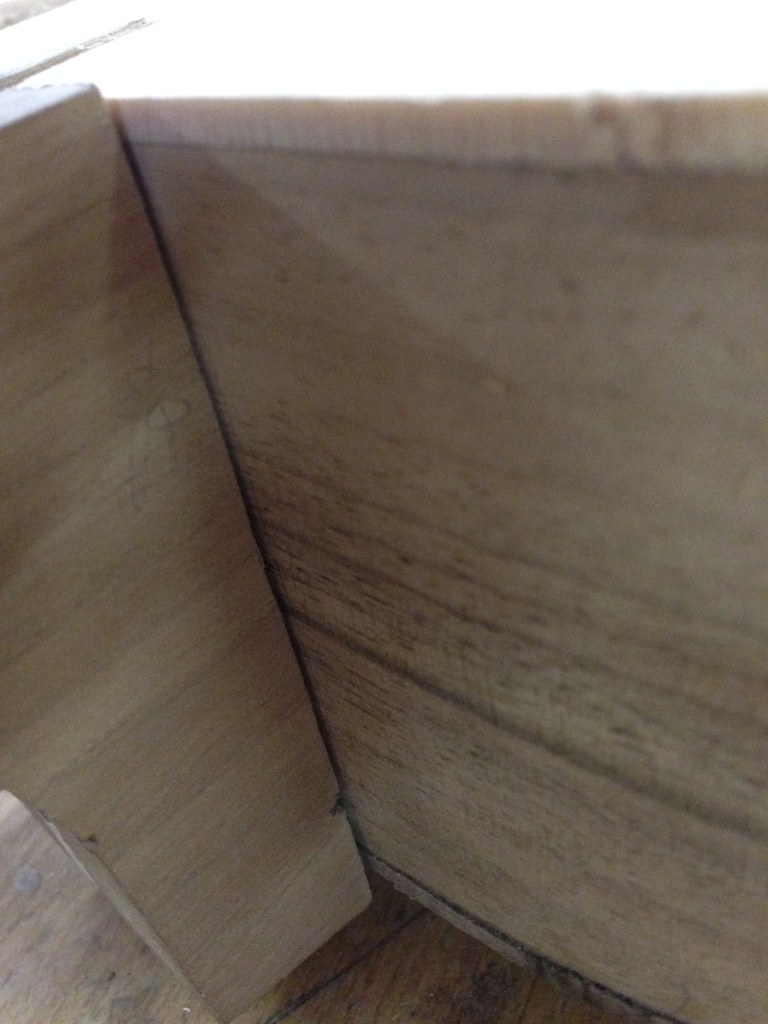 Untitled by David Emm, on Flickr Untitled by David Emm, on Flickropposite side view of the neck joint 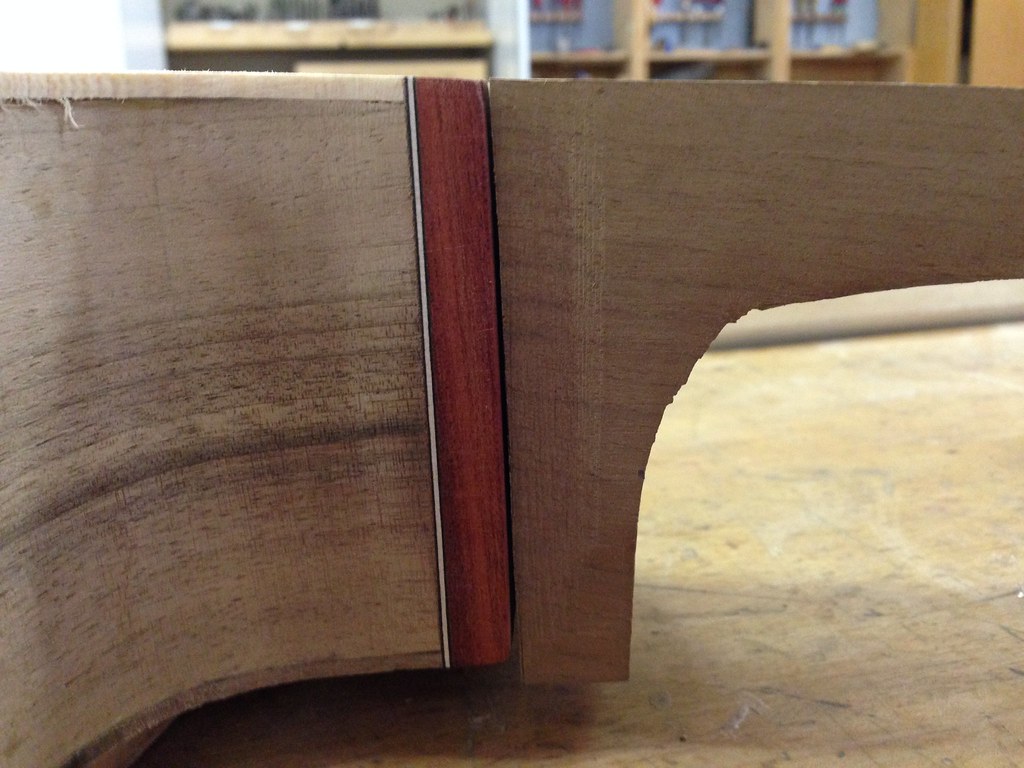 Untitled by David Emm, on Flickr Untitled by David Emm, on FlickrRear view of neck joint  Untitled by David Emm, on Flickr Untitled by David Emm, on Flickr
|
|
#111
09-28-2016, 04:05 PM
|
|||
|
|||
|
Embrace the asymmetry. Go with it and create something deliberately unique. There are guitars that deliberately have odd angles and aren't symmetric.
As for the chip-out, traditional heel shapes narrow towards the back of the guitar, removing the chipped area. You could easily go that route.
|
|
#112
09-29-2016, 05:34 AM
|
|||
|
|||
|
Looking good so far. Don't expect to get the fit perfect with the heel unfinished like that. How are you going to carve your heel? Are you going to make it as wide as it is now or are you going to taper it to a Martin-style with a small end cap? Once the heel in its final shape - and you've added the binding and scraped/sanded the sides level too BTW - then you can begin to really worry about setting the neck and getting that joint tight.
__________________
(2006) Larrivee OM-03R, (2009) Martin D-16GT, (1998) Fender Am Std Ash Stratocaster, (2013) McKnight McUke, (1989) Kramer Striker ST600, a couple of DIY builds (2013, 2023)
|
|
#113
09-29-2016, 02:11 PM
|
|||
|
|||
|
Thanks guys,
No i haven't decided on how i'm going to carve the heel yet, and it may yet end up asymmetrical in all directions! initially it was going to be a wider/squarer heel shape and because of the way i finished the corner of the cutaway and neck end and because I had this thought in mind, there is a nice "gap" in the side pieces between the neck tenon slot and the corner and this "gap" (which i planned to be covered) is much closer to the corner of the neck block end/cutaway than I would like, this leaves me with little room to carve the heel away before that would start to show. This is also one of the reasons why I put a much wider and chunkier bloodwood corner piece in, in case I did need to carve some of the heel away. And yes I won't do much more fitting of the neck until the bindings are fitted, i'm still (kinda) patiently waiting for the replacements for the ones I cracked to arrive in the post....
|
|
#114
09-29-2016, 02:36 PM
|
|||
|
|||
|
I purposely carve the heel asymmetrically to give better access to the upper frets.
Nobody has noticed it, the difference is slight.
__________________
Rodger Knox, PE 1917 Martin 0-28 1956 Gibson J-50 et al
|
|
#115
09-29-2016, 04:01 PM
|
|||
|
|||
|
Quote:
If i could actually carve it to get a slight difference that nobody noticed i'd be amazed. I might even make it so crazily asymmetrical that it may not have a specific shape, i'll see what happens when I get round to it, hopefully next week
|
|
#116
09-30-2016, 08:04 PM
|
|||
|
|||
|
Here are some seriously asymmetrical heels to provide inspiration.
https://yamamotoguitar.com/models/gallerytest/
|
|
#117
10-03-2016, 01:47 PM
|
|||
|
|||
|
Quote:
|
|
#118
10-03-2016, 02:17 PM
|
|||
|
|||
|
I'm getting bored waiting for my replacement bindings, so I was considering fretting my fretboard and starting the neck carving.
I started remembering reading about fretting from when i did my bass guitar that you are not "supposed" to fret the board before gluing it to the neck as the insertion of the frets will cause the fretboard to bow and obviously a bowed fretboard is not the best for straightness, how well the board will stay glued down and for playability. In my bass guitar I glued the fretboard first and then fretted it. I was doing the fretting with a hammer. It didn't go that well and I had to spend time and money to do the fretting in a repair shop (they let me do it in their shop but I paid the same as if they had done the job) This time i have a caul clamping system for use with an arbor press or as i'm not sure if i have access to one of those, possibly a drill press. I get the feeling that doing the fretting with the clamping will give me less back bow and twist issues if i fret the board first vs hammering and I'm guessing I could probably see any bowing as it appears and could find a way to correct it. I'm hoping that i'll be able go and cut the headstock shape and glue on the walnut headstock veneer tomorrow morning and after that, depending on time may start the neck carve.
|
|
#119
10-03-2016, 03:22 PM
|
|||
|
|||
|
I always fret the board before gluing it to the neck, and it usually backbows quite a bit (1/8" to 3/8"). I put the fretboard on a flat surface with 1/4" thick blocks under each end, and clamp it in the middle, so that it's got 1/4" forward bow. Leave it clamped a day or two, and it comes out flat.
__________________
Rodger Knox, PE 1917 Martin 0-28 1956 Gibson J-50 et al
|
|
#120
10-03-2016, 03:48 PM
|
|||
|
|||
|
I've tried both pressing frets and hammering frets. Both will work.
I've tried installing the frets before gluing the fingerboard to the neck and after gluing the fingerboard to the neck. Both will work. Mostly, it depends upon personal preference which to use. When I first started making guitars, I had a lot of difficulty installing frets. In those days, CA glue didn't exist, nor did a variety of the now commercially available fretting tools - or the modern super-hard fret wire. I went and visited one of the well-known guitar makers in the area and he told me the "secret" that all of the Larrivee apprentices-gone-on-their-own used for fretting - at least in the late '70's. They all used the same German fret wire that they collectively purchased in bulk. It was a relatively soft fret wire that had no "memory": it goes and stays where you hammer/press it. It was a dream to work with and very easy to install provided one had the right slot width in which to install it. I still use the same fret wire on classical guitars, where wear is not an issue. Starting with a soft fret wire allowed me to learn some aspects of fret installation while obtaining excellent results. As I gained skill with those aspects of it, I began installing harder fret wire. The harder the wire, the more it has a mind of its own: that's where pre-bending to the desired fingerboard radius and CA glue can enter into it. In the '70's David Russell Young used epoxy to glue frets into over-wide slots. Then there is old style bar frets. One classical maker used to slot the fingerboard after it was glue on the neck. Lots of variations: use what works for you. For the methods I use, I don't recommend shaping the neck with hand tools prior to gluing the fingerboard.
|


