
|
|
#1
 01-25-2018, 01:24 PM
|
||||
|
||||
|
Hey guys, I got in this 000-15M that someone dropped a pipe wrench onto the player side. It had about 5 lateral cracks in a fairly small area with thankfully no wood missing. As is the case always, cost was a premium to the owner as far as whether to repair or not. I quoted $80 to fix the sides with the caveat that the damaged area would always be noticeable from close up. It seemed a fair balance of time and quality.
However, before I ship it back, I thought it might be a teachable moment for me. After securing the sides and getting everything flush. (Sorry I didnt take a before picture of the snaggletooth hole, but believe me it didnt look good.) Insides are reinforced. However, leveling the sides got under the colored, flat finish Martin sprays. I was able to work a decent amount of color back to the sides with Trans-Tint dyes, and to try and match the flat sides I rubbed some wax and softened the overall glossiness of it. I can sleep at night as is (Im not making money on the job, and I feel good about the repair), but, does anyone have tips on how to cheaply and quickly match the flatness of Martins lacquer. Too much finish work makes my price go up more than many want to pay. Is there a better fix than what I have done?   Thanks for any insight. 
|
|
#2
01-25-2018, 06:09 PM
|
|||
|
|||
|
Looks to me like the original finish has a reddish tint to it or the wood stained before clearcoat was applied. The finish looks quite muted compared to most.
If you did something to to darken the pores where the repair is it looks like they might be a little dark to start with. I would lean towards getting some of the black out of the pores. If you have access to a rattle can mahogany toner, go slow and light with the application. Always easy to go dark but not so easy to lighten it if too much is applied. Cut a hole in a piece of poster board the basic shape and size of the repair. Hold it a few inches away from the repair and spray through the hole lightly holding the can about 8-10 inches away. This will help eliminate overspray and keep it to a minimum. Move it away after each coat and check to see if more is needed. Final passes can be light without the poster cutout. A little dull clear and rub out with steel wool. Another method is to brush it on but not as easy to hide without leaving light and dark spots using toners. Good luck. Mike
|
|
#3
01-25-2018, 09:20 PM
|
|||
|
|||
|
The tints you have used have actually stained the base wood, you can see that in the existing finish, that the tint is in the lacquer, so they have sealed the surface and then built up from there, yours has a brown stain in the wood, really needs a bit more red anyway, but that brown stain has exaggerated the grain lines and made them even more distinctive than before, I think the finish can be far better with less effort if you make a stain board.
Take your time and mix yourself up a test sample board like this one. This top had a hole punched into it, you can see some small remnants of that in the sanded area, this is just to show how I do it with the finish, finish took maybe 20 minutes of work. Look in the after photo for the defect you can clearly see in the before photo    Steve
__________________
Cole Clark Fat Lady Gretsch Electromatic Martin CEO7 Maton Messiah Taylor 814CE Last edited by mirwa; 01-25-2018 at 09:34 PM.
|
|
#4
01-26-2018, 07:09 AM
|
||||
|
||||
|
Quote:
__________________
Kevin Krell, Executive Director, International Traditional Music Society, Inc. A non-profit 501c3 charity/educational public benefit corporation Wooden Flute Obsession CDs https://www.acousticguitarforum.com/...d.php?t=572579
|
|
#5
01-26-2018, 07:44 AM
|
|||
|
|||
|
Steve is an expert at this sort of thing and makes it look easy. I can never match as good as that. It's a difficult thing to get right and if you can then you deserve to charge a lot for it. The real trick is getting everything aligned right before you clamp it shut. Then you have minimal finish sanding and won't go through the finish. But alas sometimes you do. For me personally I tend to just leave fixed cracks as is or if necessary fill the area with nitro or shellac before leveling. Obviously sometimes you cannot do that. Good luck.
|
|
#6
01-26-2018, 07:51 AM
|
||||
|
||||
|
I did a very very similar repair to a 000-15 a couple years ago.
It's characteristic of this wood and those repairs. I was doing it for myself so I ended up stripping back and totally refinishing the body. To satin-ize a finish, I use 3000 grit 3M Trizact paper.
__________________
Fazool "The wand chooses the wizard, Mr. Potter" Taylor GC7, GA3-12, SB2-C, SB2-Cp...... Ibanez AVC-11MHx , AC-240
|
|
#7
01-26-2018, 08:08 AM
|
||||
|
||||
|
Thanks guys for all the responses. Steve, your idea about a stain board is a nice one that I might try to work up. As has been said, when fixing cracks lining up the two sides well keeps finish work at bay. I do a lot of crack repair like that. However, this particular wound was too dramatic and the colored flat lacquer hard to replicate at the price. Good ideas all. Of course the photo accentuates the difference that the eye notices much less in person.
Thanks for all the help.
|
|
#8
01-26-2018, 09:09 PM
|
|||
|
|||
|
A stain board will save you so much time, yes they are a pain to mix up and establish, but worth every minute spent when doing your colour matching.
Here are two for next week, once I rebuild them, I doubt the finishing on either will take longer than 30 minutes. 
__________________
Cole Clark Fat Lady Gretsch Electromatic Martin CEO7 Maton Messiah Taylor 814CE
|
|
#9
01-27-2018, 01:53 PM
|
|||
|
|||
|
Nothing harder than matching grain, color, and finish.
I would say that you used too dark a pore fill--it looks black, and the original is a mahogany brown. Also the pore fill got into the grain a little--did you seal before pore filling? And your dyes got the wood color a little off. It would have worked better to seal the wood and dye the finish on this guitar; and of course, you can redo a mistake that way without sanding wood off. Re the gloss/matte thing: The only way I've foudn to get a good match to a matte finish is to spray a matte finish--one that has the flatting agent mixed in. No grade of abrasive ever gives the same look. I loved the no longer made MacFaddens matte instrument lacquer for this. It had a beautiful satin look and flowed out really well so the top coat didn't show any spray overlaps.
__________________
"Still a man hears what he wants to hear, and disregards the rest." --Paul Simon
|
|
#10
01-29-2018, 02:22 PM
|
||||
|
||||
|
Thanks Steve and Howard for the advice. Steve, how much do you charge for a repair like the second job you show? Ultimately the guy liked the job for the price. Typically if Im spraying lacquer, its adding $150+ to the price. Is anyone providing crack repair plus finish under $100? Here in East Texas, especially on low dollar instruments, a repair over $150 rarely happens. Just curious to know.
I do finish repairs like yall have mentioned in the $300 range, but I guess Im wondering if work goes through like this for much cheaper.
|
|
#11
01-29-2018, 05:44 PM
|
|||
|
|||
|
Pic 1, quoted 210 repaired and finished, pic 2 quoted 145 repaired and finished.
I cannot re-iterate how much time a stain board will save you. Steve
__________________
Cole Clark Fat Lady Gretsch Electromatic Martin CEO7 Maton Messiah Taylor 814CE Last edited by mirwa; 01-29-2018 at 06:41 PM.
|
|
#12
01-29-2018, 06:38 PM
|
|||
|
|||
|
Those are more then reasonable prices for that quality work. I'd love to see some before and after pics of them. This is something I've been struggling to get good at for a very long time. I swear that you either 'get' it, or ya don't.
|
|
#13
01-29-2018, 07:09 PM
|
||||
|
||||
|
Thanks Steve. Good prices. Ill have to work up a stain board I guess. Historically I havent done that much stain with finish work, but I guess its something I can try to get better at. Thanks for the advice.
|
|
#14
02-14-2018, 01:40 AM
|
|||
|
|||
|
Quote:
Steve
__________________
Cole Clark Fat Lady Gretsch Electromatic Martin CEO7 Maton Messiah Taylor 814CE Last edited by mirwa; 02-16-2018 at 07:57 PM.
|
|
#15
02-16-2018, 07:55 PM
|
|||
|
|||
|
Do not under estimate the time savings gained from a stain board.
Quoted the customer 210, ended up being 175 with taxes, the paint work was even quicker than I had hoped for. Maybe 20 minutes of paint work. Finished, customer collected it this morning. Steve 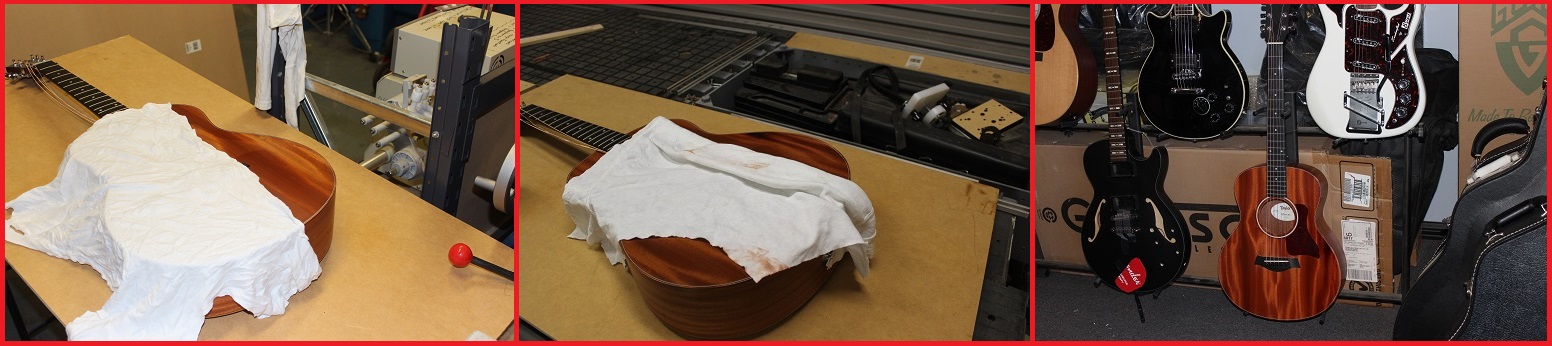
__________________
Cole Clark Fat Lady Gretsch Electromatic Martin CEO7 Maton Messiah Taylor 814CE
|


