
|
|
#106
 11-02-2017, 02:03 PM
|
|||
|
|||
|
There are certainly folks here that are much wiser than I, but I think doing a burst would be far easier than trying to add a purfling.
Man, I wish there were a way to "unsoak" unwanted stain from grain. I've had it happen a few times and the only solution I found was to put the affected in the fireplace. At least it generates heat that way 

|
|
#107
11-02-2017, 02:08 PM
|
|||
|
|||
|
Throw that thing away. It's not something you ever want to use. Life is too short to subject oneself to that level of misery.
A dark finish is what appears to be the best all-around solution.
|
|
#108
11-02-2017, 02:12 PM
|
|||
|
|||
|
Quote:
How about a 4mm (enough to cover error) gloss enamel painted band over the mistake? You could simply mask off the top and purfling, spray or paint. Choose a colour that will compliment other design features or just go black. It's not ideal but may be a solution. Good luck
|
|
#109
11-14-2017, 04:37 PM
|
|||
|
|||
|
Well I haven't updated for a while.
I have decided to go with a black stain for the top, I haven't actually done this bit yet as the stain hasn't arrived. In the meantime I installed the new fretboard, with a cool new inlay idea at the 12th fret, i installed the frets, realised the fretwork was shocking, removed all the frets, sanded the fretboard level again, damaged the inlay, refretted again, then decided i wasn't going to fill the chip in the inlay and instead to repair or redo the inlay, in the end I went for the repair option and that was definitely the right option as you basically almost can't tell. i'm hoping that my stain will arrive this week, if thats the case theres a good chance i'll be able to lacquer the guitar mid next week, but that fact that i've mentioned that should ruin any semblance of schedule Now the pictures to explain the tale. the new inlay shape. I had a rectangle in fretboard no.1, nothing wrong with that, but it wasn't particularly interesting. This is much better 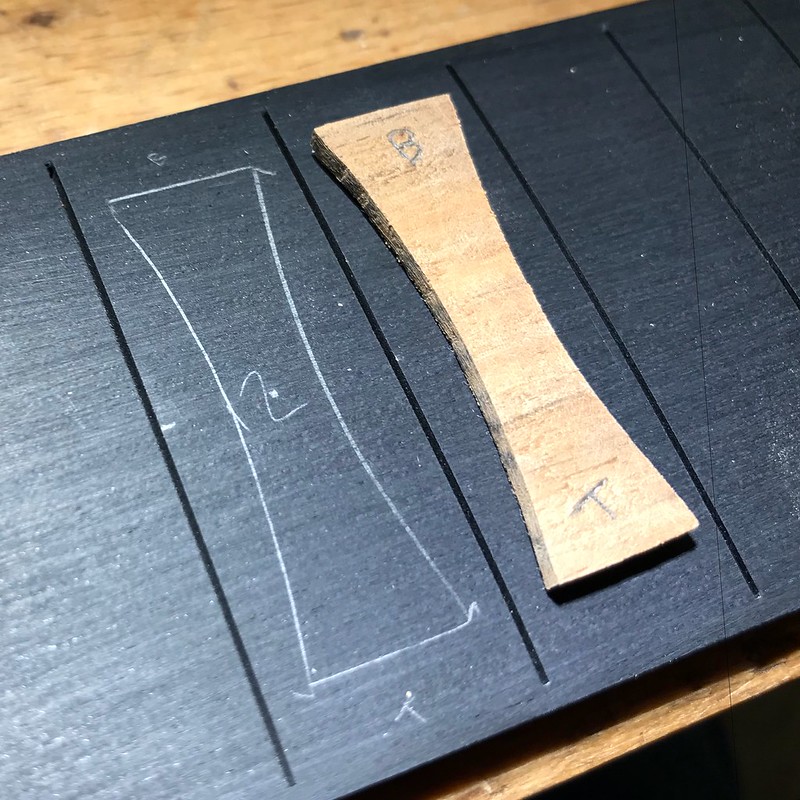 Untitled by David Emm, on Flickr Untitled by David Emm, on Flickrinlay installed 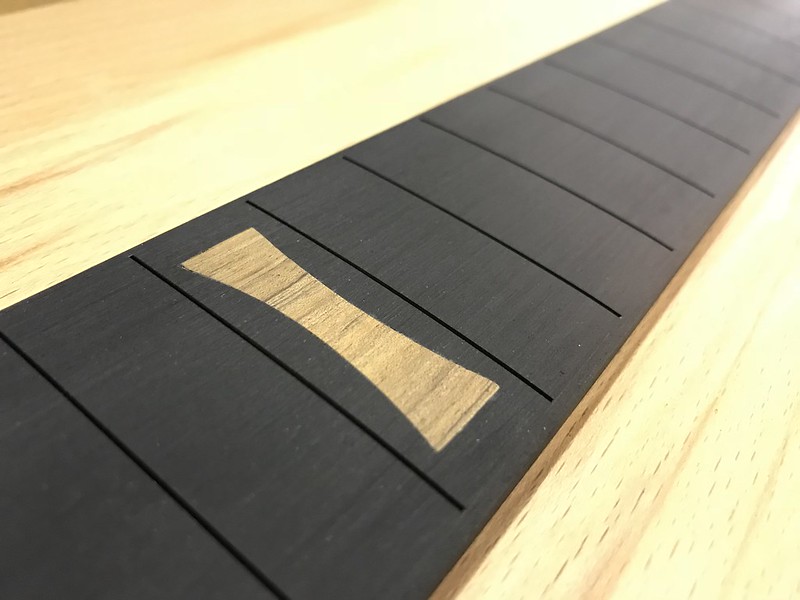 Untitled by David Emm, on Flickr Untitled by David Emm, on Flickrfretboard with inlay on the guitar 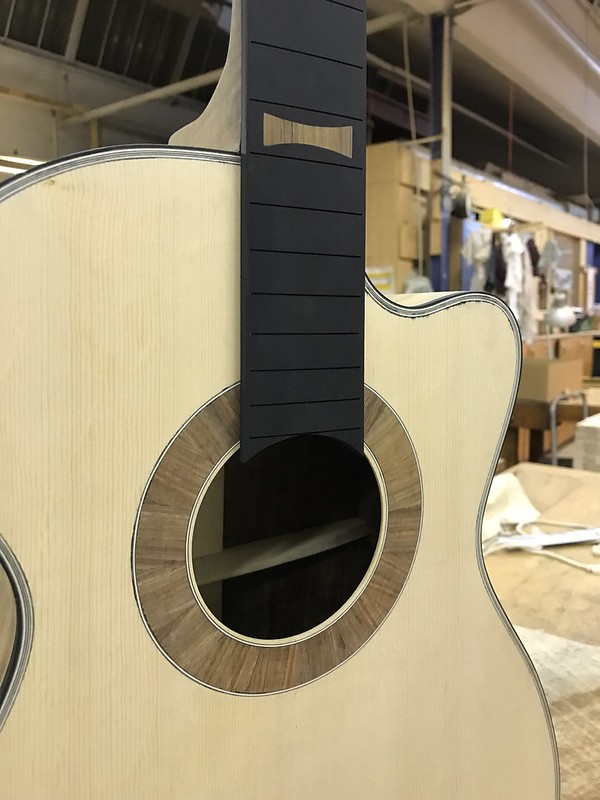 Untitled by David Emm, on Flickr Untitled by David Emm, on Flickrfrets were ripped out, fretboard sanded to fix all the fretslot mess from where the frets had come out and this sanding is where the inlay got damaged. frets were then reinstalled as I hadn't yet decided what i was going to do to the inlay, at this point i was leaning towards just filling the hole with black 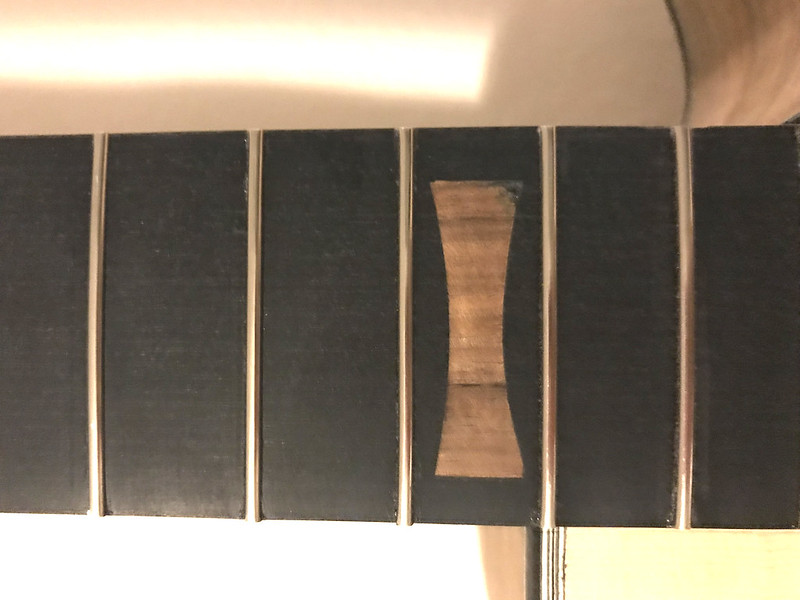 Untitled by David Emm, on Flickr Untitled by David Emm, on Flickrdecided filling the hole with black was a stupid idea so decided on the repair option, and if that failed, to replace the whole inlay. there was/is a small black streak in the wood so i used that as a split point to hide the cut. because I still had the same piece of tasmanian blackwood, i matched up the same black streak and cut a new section and carved the damaged end of the inlay out 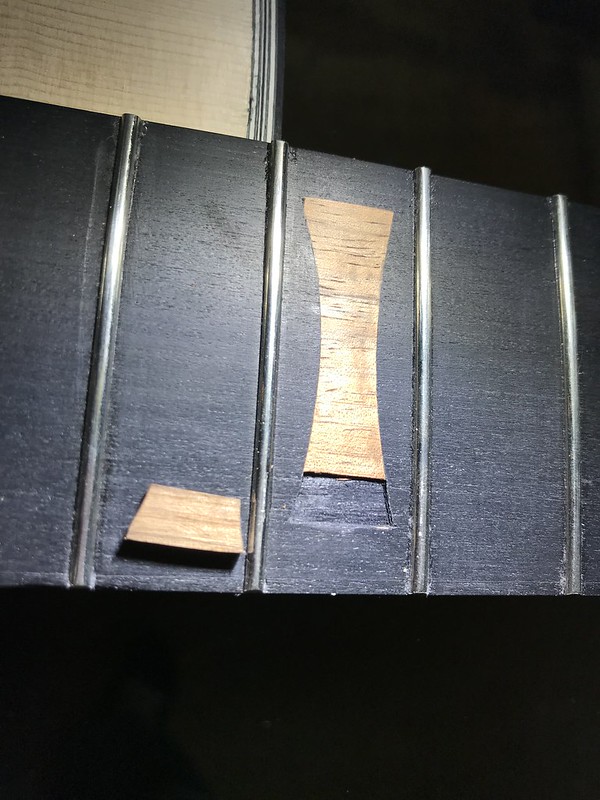 Untitled by David Emm, on Flickr Untitled by David Emm, on Flickrglued the new block in place 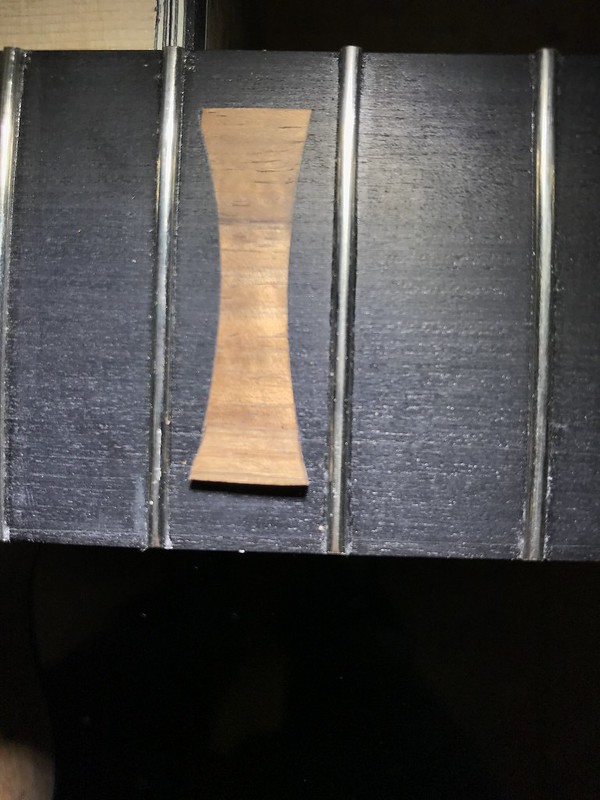 Untitled by David Emm, on Flickr Untitled by David Emm, on Flickrand sanded it flat 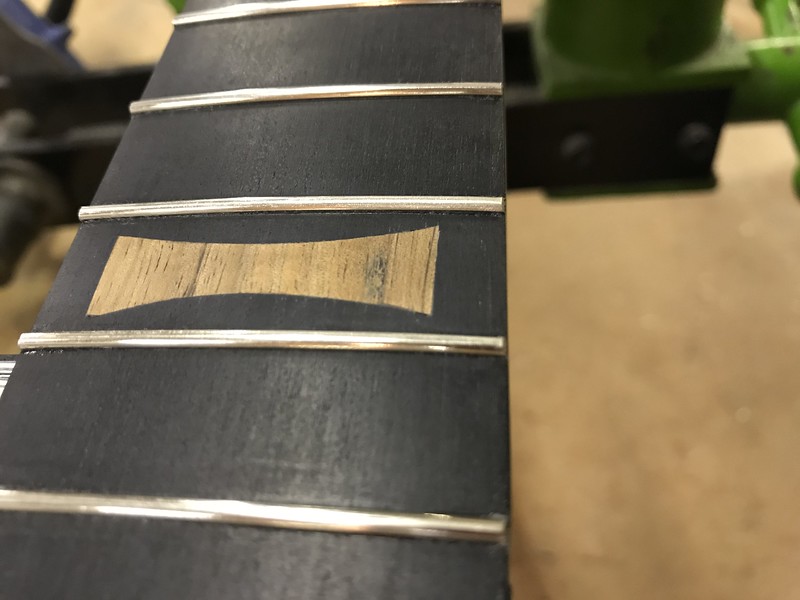 Untitled by David Emm, on Flickr Untitled by David Emm, on Flickr
|
|
#110
11-14-2017, 05:23 PM
|
|||
|
|||
|
Quote:
|
|
#111
11-15-2017, 03:57 AM
|
|||
|
|||
|
Quote:
Testing that tool didn't take very long as the tool didn't even work, mostly because the 'follower' post bit wasn't even square to the cutting block so even trying to cut a vertical channel was tricky, let alone getting a consistent distance from the edge, i could probably have done better by hand with a scalpel so i didn't even try it on the real guitar. I also measured the minimum amount of extra internal purfling required to cover the mess would be more than 2mm, 1-1.5mm would cover most of the problematic areas in lower bout area, but in the cutaway it needed to go to 2mm and in some areas more. As this is a thin top (1.9mm before sanding) there isn't much depth to rout into before i'm through the top and with already having quite thick purfling there isn't a huge amount of lining left that the top is sitting on. Perhaps had this not been a 'replaced top' and where the top went all the way to the outside edge of the guitar this might have been a possibility but as the top is only sitting on the linings on the inside of the purfling line anyway, any option of making this area thinner/weaker was too risky for my liking especially with the new purfling having to be wider than i originally thought. Also the black bindings are Rocklite, as are the fretboard and bridge on this guitar.
|
|
#112
11-15-2017, 08:51 AM
|
|||
|
|||
|
You should be able to go half way down the top, providing you didn't get carried away with your sanding... Then scrape the new binding/purfling flush to the top, don't sand it. Save the sanding for last.
Really, I know you invested a lot of time and cash replacing the top and saving the binding and purfling, and if this was your personal guitar, then sure... For a commission i don't know; when you get to the third layer of repair that's when the issues and compromises creep in. If it were me, I'd remove the binding, heat the top off, glue thicker kerfing or at least pad the existing. Or better yet bite the bullet and make another top and save this top for a smaller instrument. Really, you're making the burst out more difficult than it is. You can cut cardboard and do a few practice runs. They make aerosol kits for bursting. But I wouldn't do any kind of transparent burst at the edges as those defects will still show through - then it will really look like a cover-up.
|
|
#113
11-15-2017, 10:06 AM
|
|||
|
|||
|
Quote:
Given that it is your second guitar, you are still learning the basics. Learn from your mistakes and move on. There comes a point where throwing more effort at something isn't going to substantially improve the end result. At that point, it is time to complete it and move on. It's an important part of the learning process to recognize that point.
|
|
#114
11-15-2017, 10:25 AM
|
|||
|
|||
|
Quote:
This is why i'm going this route. Its close enough to being finished I can actually finish it and either keep it for myself, give it to my dad, or FINALLY smash it into the million pieces it deserves to be and actually build another one from zero thats closer to what this guitar should be. That would have been quicker/as quick as this repair anyway. By finishing it at least i'll know how it will sound anyway. This thought is about the only thing thats kept it in one piece lately. I agree about the burst, and especially the transparent burst, thats why i'm going for the black stain for the entire top minus the rosette and purflings. Quote:
Also for the burst finish I was quoted well over the equivalent of $1000, so i said words to the effect of 'thanks, but no thanks' and speedily left, hence why i'm back to the black stain option and the finish being done by my cabinet maker friend.
|
|
#115
11-15-2017, 11:24 AM
|
|||
|
|||
|
Quote:
|
|
#116
11-15-2017, 11:57 AM
|
|||
|
|||
|
Quote:
This is what I'd advise as well. From what I'm seeing, you're spending a lot of time learning and testing techniques that you may never use again (since your build quality should improve over time), instead of improving your overall technique and understanding of more important concepts like sound generation. In the spirit of your internal decision-making process: Quote:
a) no, there is no way an all-black top will look good or intentional, and if you do an excellent job the result will definitely look cheap. b) no, move away from sunburst - you have neither the skill nor equipment. Why introduce yet another master-level skill into the mix? c) no, your routing will not be perfect and you'll end up with similar issues at best. At worst, you trash the top. d) hard no. e) no, as you said, this adds nothing. f) no, unless your goal in all this is to become a master re-topper process (a rare and seldom-desirable repair technique). -- There is no chemical leeching process, you have dyed the "inside of the hollow straws" of the wood. Sanding will result as you expect - you'll likely sand right through before you remove it all. -- Do not learn to use that tool. Put it aside for now. If you ever desire to learn gramil technique, use a modern one (that looks like a vintage one for violin construction, maybe?). -- One more constructive idea, I believe suggested earlier, is to find a very dark shellac finish for the top. This will significantly change the color of the top, to the point where folks might think it's cedar, but honestly, this is probably the route I'd go. I'd say the shellac should be reversible if you really hate it, but that's not ACTUALLY correct since you have some open areas along your glue lines and purfling, which the shellac will seep into. That said, I'd fill gaps and do this myself, knowing it won't solve the problem but rather reduce the contrast significantly. If done well, I'd bet 95% of folks won't even notice when you point it out to them. To wrap it up: You have ruined the end-grain of the wood. Your takeaway lesson is that this is an irreversible process with visible results. I'm not sure if this complicates things, but I'd personally add to this lesson one note: CA glue, even clear, can change the color of any wood if it gets into end-grain. I see this in many amateur luthiers' works, and I recognize it because I've made the mistake myself. If you attend a guitar show, take a look at your problem areas, and around the rosettes, and move the instruments around in the light. Chances are, you'll spot under-finish irregularities or color-bleeds if the builder seals their edges with CA (or I've heard the same for Behlen's instrument laquer). Even worse, I had this happen with 24-hour epoxy as well. Just one more case where "think of the end grain like a bundle of straws" is a helpful mental model!
|
|
#117
11-15-2017, 12:15 PM
|
|||
|
|||
|
Quote:
Quote:
The key to all good finishing work is having a "perfect" surface to finish: filling gaps is essential, rather than expecting the finish, itself, will do it for you. For filling gaps, wood glue and sawdust can work well in some circumstances while colored 5-minute epoxy is good in others. Quote:
|
|
#118
11-15-2017, 02:07 PM
|
|||
|
|||
|
Quote:
Yep, I agree, theres a lot i'm doing here that i'm hoping to never have to do ever ever ever again. The next point is that I'm pretty sure my guitar build quality is going backwards. As i mentioned in the previous post, that tool is long gone back to its previous owner. It wasn't going to do what I wanted anyway. I had finally come to the conclusion that i only had 3 remaining options. A) leave it as it is 2) stain the top black d) kill it dead. Now i have another option. I had not thought of using a dark shellac because I have zero experience with shellac, I did not know shellac was available in these darker colours, and most importantly I have been warned by several people against using shellac / doing a french polish type finish unless I know what i'm doing. As I still don't know what i'm doing I was leaning towards the black stain option. I don't even know if i can lacquer over the shellac. The guy who will be doing the spraying, and who did my last one uses DD Acrylic lacquer and i have no idea if thats compatible with shellac. I've changed my mind thrice today already, and again while writing this reply. i'm currently biased towards the kill it dead option. Quote:
|
|
#119
11-15-2017, 08:09 PM
|
|||
|
|||
|
Quote:
You're not moving backwards. You're learning. Unfortunately it's from the school of "hard knocks" and the tuition is pretty steep! To put a rational mindset to the situation - you've come this far, and you don't want to make another top. Let's remove "kill it dead" as an option. Looking at the rest of the options you, me, and others suggest: 1. Leave It Alone What's good about this is that you can do a test finish to see if it will pass. Some have suggested a dark shellac. It may look fine. It is possible the alcohol in the shellac may reactivate the black dye in the filler and pull it further into the grain. This may not be bad overall - may give it an "antique" look. 2. Stain It Black This may be OK, if not for the fact that your rosette is dark, and I don't know if the purflings around would separate ithe black enough from the rosette. Michael Greenfield has made a few guitars that have a painted top (color-shifting paint) which I think looks cool but probably not the look you're after. 3. Sunburst I really don't understand the hesitation with this. It's far easier than the re-top you just did. There's a company called Reranch that sells an acoustic sunburst kit, they have a forum, and there's a bunch of YouTube videos available. http://reranchstore.stores.yahoo.net/acsun.html Like I mentioned earlier, you can practice on a cardboard cutout, and the burst would make those black stains all but disappear. If you want, coat the top thin with shellac, then do the burst - it would make a nice base color, and if the burst wasn't satisfactory you could remove it easier without taking wood with it. 4. Redo The Binding/Purfling I know, you went through the trouble of saving the binding. But really, compared to all the other work you were able to accomplish, that's one of the easier tasks. You only need to make the purfling channel 1mm deep or a little less, and as you mentioned only 2mm wider than it is now, maybe a couple extra purfling lines. If you also do the binding 1mm deep, once you glue that down and round the edge you'll never know it was there. I can't tell you how many times I've redone bindings on a guitar because I wasn't satisfied. Not that my stuff's perfect, yet it's what I strive for. But, save for changing the top, this is the only way I know that would make the top look "perfect" in the way I believe you envisioned it - nice white spruce, with the purfling tight and clean against it. To add to the "for next time" list... Remove the bindings and purflings when putting a new top on. I can see them being saved on certain instruments. But because you're building a new instrument, the time you think you save by not redoing them is offset buy the time and trouble jigging up for the new top and the subsequent problems that can occur after. Really, to do that, I would have put a couple layers of tape around the rim for the pilot of the bit to run against. It's easier to remove wood then add on. But I prefer to route the bindings on a secondary ledge, and with the inlay method of top replacement, it's not possible, unless you can accurately remove the purfling, and rabbet the edge of the new top to accept them. But, binding and purfling are relatively cheap especially if you make them yourself - which is very easy, so I just suck it up and redo it. Think of it - even if you did successfully fill those gaps with black, you'd have a purfling line that would constantly vary in thickness, and I can't see how that would look better than just getting colored wood fill (to match the top), for example. Seal end grain before using CA/staining/filling A great advice to heed. As others mentioned shellac works well for this. Not a lot, a quick wipe of brush is all that's needed. I'll quickly run some 180 grit over the area before I start gluing. Protecting the top I used to use cardboard a la Somogyi's book. I find it a LOT easier to just hit the top with a light coat of spray or wiped on shellac. In fact I coat the entire box with it. Then when I route the bonding and purfling ledges I wipe or bush a little on there too if I CA the binding/purfling on, then swipe it with sandpaper. The benefits? One, when you're gluing binding on, it's easier to wipe excess glue without smudging it into the raw wood. Two, you can tape directly onto it, with no fear of pulling wood fibers out. Three, when you scrape the bindings flush, you have a gauge as to whether you've gone too far - you'll scrape into bare wood. Four, it acts as a gauge for sanding. Five, it acts as a help in pore-filling if you're using finer grain woods, and seals the wood from staining with more porous woods. Another thing I have used successfully for protecting the top is transfer tape, used by vinyl sign installers. Stick it on, cut away a little at the edges and soundhole. Wipe naptha on it and it releases easily. My tops are close to final dimension BEFORE I glue them on the rim, so I take care to not touch them with sandpaper until absolutely necessary, which is finish sanding. Soldier on We all make boo-boos. Of course the more we build, the less we should make. Sometimes you have to take a couple steps backwards to go a mile forward. Learning is not linear, there are many ups and downs. You have to accept the downs as a learning lesson. You see, I once had my own cabinet shop, and then my own home improvement business (thrice!), and was a foreman for a builder. On-the-job training when you're the boss paying for it is not fun, but since a lot of what I did was either structural, or for some high-end clients, there was no "leave it as it is." It had to be right. It has nothing to do with "learning and testing techniques" - those were techniques you were learning to cover up an issue, and when you get to the third layer it all snowballs. If everything else on the build is good except for that one pesky thing, fix the one pesky thing, then you can move on. Otherwise you're just lowering the bar for yourself. Yes we all have to accept what skills we have now, and if it was a build for yourself, then the "mistakes" just become a record of the skill level you were at the time. But I think you sell yourself short, and are quite capable, but it take trying and trying and trying again. I know this is very long, but I hope to encourage you to, whatever you do, do what you feel is "right" and what would give you a good feeling when you present this guitar to your client!
|
|
#120
11-16-2017, 09:11 AM
|
|||
|
|||
|
Quote:
If you decide you want to do your own finishing, you have to start somewhere: you have to do something to gain experience at that thing. Shellac is inexpensive, generally reversible and does not require expensive equipment to apply as it can be applied with a brush or pad. (It can be sprayed and that does require more expensive equipment.) A good quality brush is required, if you brush it. It can be used as the entire finish, eliminating the need for you to hire someone to spray a finish. Before jumping in with both feet, do on-line research about shellac - or staining conifers, if you go that route, or any other finish you intend to apply - and its application. There are many sources of information. People have successfully used a very wide range of finishes, some brushed, some padded, some sprayed. Do tests of your finishing process on wood that is not your instrument. Good quality finishing takes practice and knowledge. Expect that your first attempts will not be perfect. But, you have to start somewhere, if you decide to do your own finishing.
|


