|
|
#1
 07-04-2011, 12:11 PM
|
|||
|
|||
|
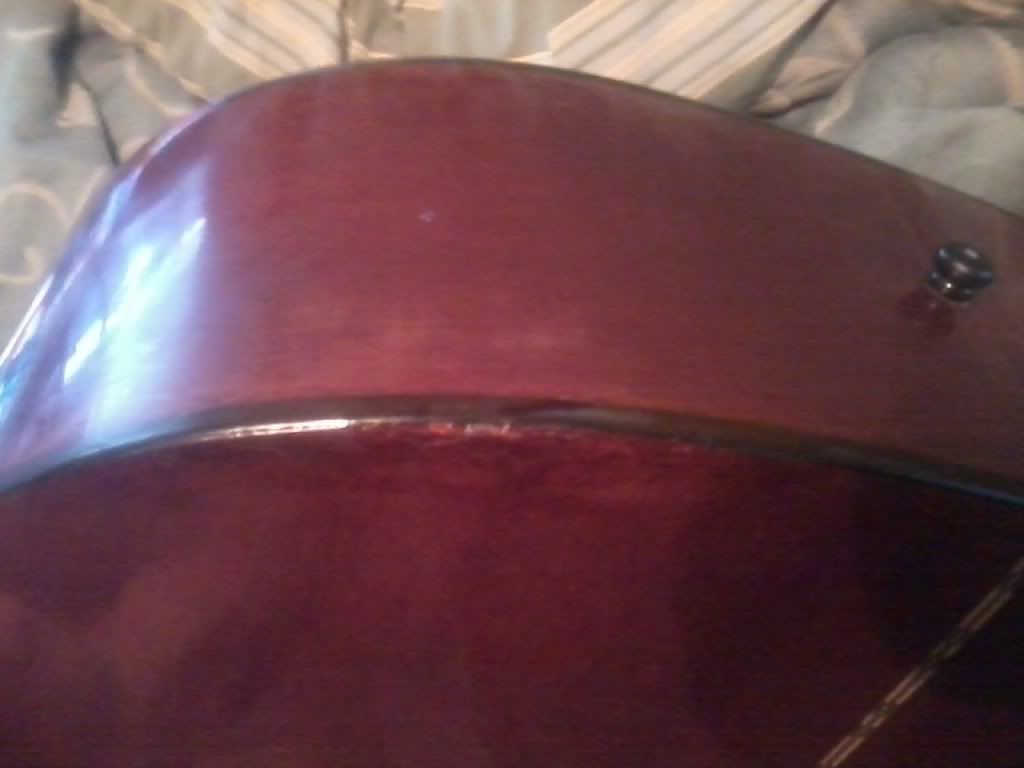
See pic below. This acoustic was dropped and as you can see part of the side and back of the guitar was shattered and if you look to the left of the crack, you can see the back is starting to separate from the side.. I'm trying see if there's anything I can do to repair this myself (the guitar probably isn't worth enough to warrant taking it to a repairman). I'm really hoping I can fix the shatter and definitely keep the back from separating from the side.
Note: I'm willing to do whatever it takes as far as sanding, refinishing, etc.. Might be a fun little project for me.  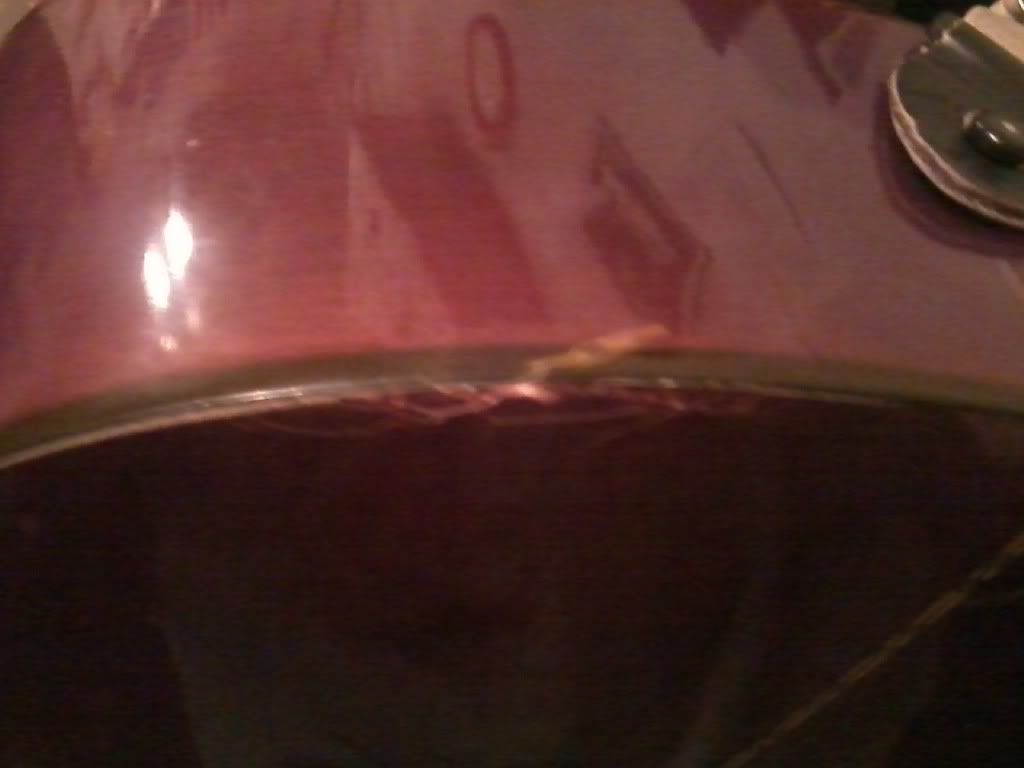
Last edited by jennison; 07-04-2011 at 12:21 PM. 
|
|
#2
07-04-2011, 02:25 PM
|
||||
|
||||
|
Removing finish will be nasty. Not knowing what its made out of and more importantly finished with it can be tough to clean up the look.
For the separation and wood repairs I would use super glue. That way you can be the clamp to hold it till it sets. For the crunch in the finish you might try Superglue in the cracks. It may melt into the finish a bit. I would try one small spot first. Then a series of sanding pads till polished. Don't glue yourself to the guitar.
|
|
#5
07-06-2011, 02:40 PM
|
|||
|
|||
|
So the super glue did a pretty good job of sealing up the cracks.. And after sanding with a fine sandpad, the cracks are hardly noticeable...
Only problem now, the sanding pad took off the gloss finish around the cracks (and also on a place on the side where I put a little too much superglue). It also lightened the stain some.. Any advice on restoring the gloss finish?
|
|
#6
07-06-2011, 06:07 PM
|
||||
|
||||
|
http://www.microfiber-products-online.com/quscresy.html
Megiuars scratch removal system. Then they have different grades of high gloss polishes Meguiars polishes are many builders final buffing compound
|
|
#7
07-06-2011, 07:06 PM
|
|||
|
|||
|
So the scratch remover actually adds the glossiness back to the finish? And then I assume the polish would be more of a cleaner?
Thanks again Kitchen. If I can ever get this thing looking halfway normal again, I'll make sure and post a pic of the finished product.
|
|
#8
07-06-2011, 07:44 PM
|
|||
|
|||
|
An irregular surface reflects light in all directions creating a dull, diffuse appearance. The more regular a surface, the more light is reflected in an "orderly" fashion, creating a more shiny, mirror-like appearance.
For finish work, one uses progressively finer abrasives to make the irregularities in the surface progressively smaller. Doing so makes the surface appear to have more shine, more "gloss". It has nothing to do with "cleaner". (However, removing "dirt" on a surface can reduce the irregularity of the surface caused by the dirt.) A thin coating of wax also makes the surface more regular, hence, more shiny. Some of the finest abrasives may also contain some wax to help create the high-gloss "wet" look. The higher the gloss desired, the more thoroughly one needs to remove the scratches/irregularities at each level of abrasive, and the more progressive stages of scratch/irregularity removal required. Hence, one starts with a relatively course abrasive compound and progresses through several progressively finer compounds. I've used Maguire's with good results as well as other brands. (Note: "satin" and "low gloss" finishes have particles suspended in them to purposely make the surface more irregular, hence, lower gloss. Beyond a certain point of progressive abrasion, they simply won't get appreciably shinier.)
|
|
#9
07-07-2011, 07:17 AM
|
|||
|
|||
|
Thanks for the reply. I'll give the scratch removal and polish a shot. As far as the stain/dye fading, I'm probably just going to have to live with that. From what I have read, staining/dyeing can be a very involved process (unless anyone has any quick tips in that area).
|
|
#10
07-07-2011, 08:24 AM
|
|||
|
|||
|
Getting an exact match can be tricky and is a requirement for a professional job (i.e. one for which you are paying someone to do). However, you can get pretty close, probably, without too much trouble. Options include:
As well as other options, though those are, perhaps, the most accessible/simple. The reddish/cherry color in your photos is a pretty common one for furniture and there should be a variety from which to choose, some pretty close to the color of your guitar.
|