
|
|
#1
 09-08-2015, 11:07 AM
|
|||
|
|||
|
I was having my first attempt at laminating plastic binding. I was attempting to laminate strips of black and white side purfling to the edge of a piece of white-black-white binding that I had already laminated. It was difficult to keep the narrow strips of black-white aligned with the edge of the binding because the binding was curved after the previous laminating operation. To make sure everything stayed aligned, I only did about an inch at a time. I brushed the acetone on the strips, pulled them into the Stew Mac Binding Laminator tool, made sure everything was aligned, then moved on to the next inch and so on. The only thing is, I ended up with globs of grey goo on the outside of the binding, you know, the part that will show. I'm planning/hoping this will scrape off when I clean it up, but it's such a mess, I wonder if I was doing something wrong. Any advice?

|
|
#2
09-08-2015, 01:36 PM
|
|||
|
|||
|
Typically, only the edge purflings are glued to the binding prior to installation. The face purfling is usually installed at the same time the binding is installed. A primary advantage of using plastic binding is that it does not need to pre-bent and will not break when bent around an instrument during installation.
|
|
#3
09-08-2015, 01:49 PM
|
|||
|
|||
|
Quote:
I'm talking about the "prior to installation" phase. I'm just laminating the strips. Haven't put them on anything yet.
|
|
#4
09-08-2015, 02:36 PM
|
|||
|
|||
|
Quote:
Let's clarify terminology. Binding is a thick, tall strip that is inlayed into the perimeter of a guitar's body to form its exterior edges. Purling are thinner, shorter decorative strips that are optionally placed between the binding and the top or back and/or between the binding and the sides. Usually, bindings are a single strip of material - wood or plastic. Plastic bindings are flexible and are easily bent around the perimeter of the guitar when they are installed. (They are flat and then bent as they are glued/clamped in place.) Purfling is usually thin and doesn't like to bend on-edge. That is, it doesn't easily bend in the direction of its depth, but easily bends in the direction of its thickness. This is the situation for purfling that goes between the bindings and the sides. For that reason, it is not easily bent when installed - clamped and glued. Instead, side purfling is usually glued to the binding prior to installation. Then, the single unit of binding and the side purfling is installed as a single, inseparable strip. The purfling between the binding and the top or back is installed separately, but, usually, though not always, at the same time as the binding. It is not glued to the binding prior to installation. It is thin in the direction of bending and bends easily in that direction. Quote:
If you are making a binding by laminating purfling, that is an uncommon practice.
|
|
#5
09-08-2015, 06:18 PM
|
|||
|
|||
|
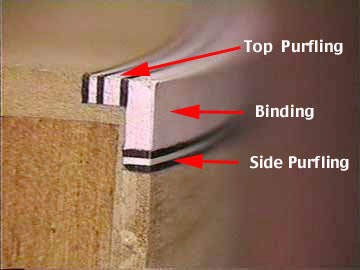
In my case, the bindings will be made of multiple strips of materials as my goal is to also have a black-white strip on the side of the binding. In the attached illustration, it's referred to as side purlfling. I'm not trying to attach the top purling to the binding, I'm trying to attach the extra strips to the binding as shown in the drawing.
|
|
#6
09-08-2015, 06:39 PM
|
|||
|
|||
|
I'm sorry, I'm not able to follow what you are doing.
In your initial post you state the difficulty is due to laminating the side purfling to an already laminated binding. Why is the binding already laminated, or to what is it already laminated? Stewmac's instructions for the laminator illustrate using the laminator between two lengths of tubing to support the lamination and keep the lamination straight. http://www.stewmac.com/How-To/Online...tructions.html
|
|
#7
09-08-2015, 07:05 PM
|
|||
|
|||
|
I laminated a piece of .020x.25 white, .020x.25 black and .040x.25 white together - so that it shows white/black/white on the top. To that, I wanted to add black and white stripes on the edge of that binding. Each .020x.08 (skinny stuff)
Here's a maybe better description form StewMac. I'm trying to build the combination of B and C for my binding except my ""B" section is three laminations; white-black-white.  I got them together, but it made a mess of the outside of the binding, so I'm looking for ways to improve my technique so I don't create so much clean up work for myself.
|
|
#8
09-08-2015, 07:07 PM
|
|||
|
|||
|
Thanks for that link to StewMac.
The combination in the lower drawing is just the one I'm trying to make. 
|
|
#9
09-08-2015, 07:26 PM
|
|||
|
|||
|
Here's a picture of the actual binding I made. I cleaned up the end so you can see the laminations, but it sure seems like I made a mess and there must be a better way.
 
|
|
#10
09-08-2015, 07:43 PM
|
|||
|
|||
|
Quote:
Part of successful implementation is planning the sequence of how it will be assembled. That includes preparing/maintaining the gluing surfaces.
|
|
#11
09-09-2015, 07:28 AM
|
|||
|
|||
|
Charles has you covered exactly.
Laminating binding BEFORE installation will make it more difficult to bend, and if the side bindings are laminated as they are glued on the guitar, they will have greater stability and likely greater strength since they will be glued/laminated onto the shape of the guitar. Another thought... If you are going to the trouble of making this sort of binding/purfling pattern, why wouldn't you do it with wood?? I personally do not understand why people would choose plastic binding for a hand-made guitar.
__________________
---- Ned Milburn NSDCC Master Artisan Dartmouth, Nova Scotia
|
|
#12
09-09-2015, 11:14 AM
|
|||
|
|||
|
"Another thought... If you are going to the trouble of making this sort of binding/purfling pattern, why wouldn't you do it with wood?? I personally do not understand why people would choose plastic binding for a hand-made guitar."
I can only claim a brief bout of insanity. (or perhaps an elongated bout  It's actually for a banjo and I'm matching neck binding that someone else did. I asked myself why I didn't have the neck bound in wood, but I didn't get any good answers. To your earlier point (and Charles'), I can easily imagine laminating wood binding onto the guitar, but I can't imagine getting all those plastic binding strips to stay in place while the glue set. On another note, this is for a banjo resonator. As a general rule, banjo resonators don't have top purfling, so everything is done in the binding.
|
|
#13
09-09-2015, 11:29 AM
|
|||
|
|||
|
Quote:
With plastic binding, CA can be used, which makes the process less tape-intensive than using a slow drying glue. If you are just doing the neck, do you mean the fingerboard, or headstock as well? If just the fingerboard, it simplifies things substantially and opens up other options as good choices.
__________________
---- Ned Milburn NSDCC Master Artisan Dartmouth, Nova Scotia
|
|
#14
09-09-2015, 01:11 PM
|
|||
|
|||
|
Quote:
|
|
#15
09-09-2015, 06:07 PM
|
|||
|
|||
|
Quote:
Example - hit the edge of your guitar and likely the wood will remain dented for the rest of its existence. Plastic on the other hand springs back 90 percent of the time
__________________
Cole Clark Fat Lady Gretsch Electromatic Martin CEO7 Maton Messiah Taylor 814CE
|


