
|
|
#1
 02-05-2010, 02:39 PM
|
|||
|
|||
|
I've had my build showing at another site, but thought I'd put it on here for other "unprofessional" builders. I'm toward the end of this build, but I documented a lot of it, and the mistakes I made could be helpful for those who are starting their first.
My kit came from Stewmac, with a sitka spruce top: sound hole and rosette pattern were cut. The back and sides are mahogany, no center strip on this one. Bindings were plastic, and fiber purfling. Top bracing parts were radiused and there's a full length layout in the kit for locating them, same with the back bracing. Kerfing provided as well as popsicle type sticks for side reinforcement. The neck is mahogany and pretty well profiled. Not sure I'll do anything other than sand it down and put the rosewood laminate on top of the headstock. The holes for tuners are predrilled, but will take modification for whichever type tuners I buy (they aren't included on this kit). The fretboard is ebony and is slotted for frets and radiused. It has to be sized to the neck. Bone nut and saddle. Rosewood bridge. Plastic tail wedge and heel cap. If I missed anything, let me know. Here are pics of the kit as it came, before anything was done. By the way, I had to let the kit set up in my "office" which is a bedroom we use for the computer and now guitar building, for a week or so. Plus my wife wouldn't officially give it to me until Xmas day, which is when I started working on it. The top  Back  Sides  Other pieces:       I'm going to be getting my next kit from Kenneth Michael Guitars, and then probably one from John Hall at Blues Creek Guitars. Those will go to my kids. The 4th build will be for me, using some wood with waterfalls, pommelle, some cool features. Not sure where that will come from. I'll start this build on my next post. Going to make sure these pictures are working. Bob Last edited by naccoachbob; 02-05-2010 at 03:58 PM. 
|
|
#2
02-05-2010, 03:11 PM
|
|||
|
|||
|
The first thing I did was install the rosette in the precut channels. It's just a herringbone pattern and 3 rings. Scraped and sanded it down flush after gluing in with just plain wood glue.
 Here's the mold I built with the sides in it and the neck and heel block clamped in for gluing. I took 1/2 of the pattern for the guitar, which is a Dreadnought, and traced it onto poster board. Then cut that out and traced on a piece of plywood. Cut it all out with a jigsaw and cleaned it up with sandpaper. I never really got it totally smooth, but the sides fit in it well. I used this as a "master" and cut out 5 more pieces of plywood and used a flush cutting router bit to match them with the master. It was reasonable, but I've already bought a mold to use for subsequent builds. This is a foundational part of the build, and I've decided that a good mold is a necessity.   Here is the bracing for the top. 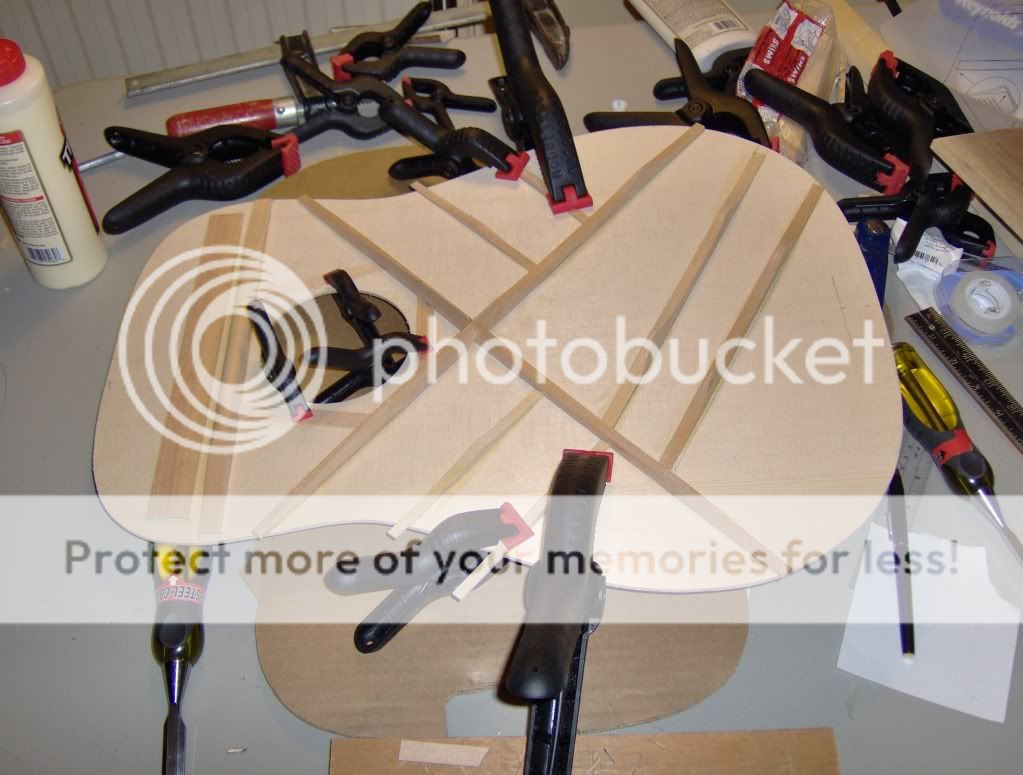 The bridge plate gave me a problem because I didn't have any clamps that would each it. So I came up with this "East Texas go bar clamp".  Here is the kerfing being attached to the sides. I think I used about 100 clothes pins for the top, and same for the bottom.  You can see the kerfing here.  The top has to be placed in position over the sides to allow marking the sides where the cross braces intersect. The kerfing has to be relieved to match the depth of the bracing. I forgot to take pics of that. Or of the top being glued on. To glue the top, I bought a bunch of little metal hooks that I screwed into the mold. I then attached rubber bands across the top in various configurations to hold it down. At some point, I checked the length of the guitar and it was about 1/4" too long. So I wedged a couple of shims at the tail end. Later on it turned out my sides are not perpendicular to the top/back all the way across. Another reason to have a good, accurate mold. Putting the back on presented a challenge. The sides/front would not stay stable in the mold when I tried using rubber bands again. So I built some spool clamps of 1" oak doweling, some felt pads, some 1/4" rod cut to 8" lengths. A better size is 1 1/2" doweling to give more surface for them to clamp on. Notice the band clamp in the following picture. Luckily I did not disrupt the angle of the neck block or heel block. Had I done that, my soundhole might never have had strings go across it!!  Here is the box before trimming the top or back.  I'll stop here and pick up in a few more minutes. Bob
|
|
#3
02-05-2010, 03:51 PM
|
|||
|
|||
|
I used a flush cutting bit on a Bosch Colt laminate router to clean up the top and back. First mistake was leaving too much of the bit exposed. I'm afraid it aided in my sides not being completely straight. The bit did get a little bit into the sides, and there ended up a ring of fuzz almost completely around the sides about 3/4" down from the top, and also some about the same distance from the back. After sanding and sanding and almost wearing thru the sides in one spot, I stopped and got advice from another kit builder who said to use a razor on that part. It worked pretty well.
Now the 2nd mistake. I had cut out the top and the sides where the neck bolts onto the body before I had trimmed the top and back. I wanted to see what the guitar would look like - especially how the neck was aligned. Remember the band clamp? Well, that part turned out ok. I was maybe 1/16" from my reference if that much. But................. as I routed around, when I got to the neck, the flush trim bearing had nothing to register against, and slipped into the back of the guitar. Here's that pic.  But, I went ahead and squared up that hole, and cut a piece of mahogany that was in the kit, and glued it to the back. It's going to be ok. If it shows just a little, it'll be a reminder for future builds. Here's the fix:  I failed to take pictures of cutting the binding/purfling channels. Sorry. But the one thing I bought was a router attachment from Kenneth Michaels Guitars, that made cutting them pretty easy. With that attachment (I'll take a picture tonite and edit this post), the router registers with the sides all the way around - make sure your sides are smooth with no bumps. It's almost impossible to dig in too deep. My channels came out pretty good. The binding is plastic in this kit, so I used Weld-On 16 to glue it. Also used a lot of blue painter's tape. I hate gluing with that stuff. I think my future builds will be with wood bindings so I can use regular wood glue. Once thru with that, it was sanding and scraping and razoring until the sides were good. I will probably use 220 grit this weekend to prep the body for finishing. As for the neck and fretboard, had a friend try cutting my f/b down to size first with a table saw, but that chipped out too badly. So he did the other side with a band saw, which works very well. Later I had to set up a shooting board - just a straightedge with 80 grit sandpaper stuck to it - to trim the f/b further to size. Then, I fretted, leaving the 2nd and 13th frets undone for reasons I'll explain below. It was only after doing this, that I realized the fret dots needed to be installed and sanded before all that. I did do those freehand with a drill, making sure to not go very deep at all. Only problem was then I had to sand sideways on the f/b instead of down the length. Once they were flush, I went back and sanded up and down. Only added a little bit of time. I then cut the f/b to near the length that I want. May adjust the length or shape later. Placed the f/b on the neck, clamped securely, and put one hole at the 2nd fret, and 2 at the 13th. Using a 1/16" bit. Then cut the heads off 3 brads and stuck them in the neck. Glued the neck, and set the f/b on it using the brads to secure it in position. Wrapped a very long rubber band around the neck, and then put clamps all over it. Below is a picture of the wrapping before I put on the clamps.  At about the same time, I traced out the rosewood veneer for the head stock and glued it in place. Maybe 8 clamps on it. The frets need to be dressed, using little diamond files and probably some other gadgets to polish and round them out. I'm at that point now. Once it's done, and a light sanding to the body, it'll be ready for the finish. Here's how it stands as of today.  Bill Cory who's written a couple of books on kit building told me in the other forum that "this is an ego-free zone". I'm taking that to heart and spilling the beans on myself for the mistakes I made. If I can save you the errors I made, maybe your errors won't be enough to worry about. -Happy Building! Will post more as I get into the finishing. Bob
|
|
#4
02-05-2010, 04:30 PM
|
||||
|
||||
|
Wow, Bob, you make that look almost doable!
 Thanks for sharing your experience with us, mistakes, next times and all. Bill Cory sent me a copy of the calendar they did over on the kit guitar forum, and I must say that I was very impressed with the care and craftsmanship that went into some of those guitars pictured. They were not at all what I had envisioned. Oh, I'm sure some of our seasoned pro builders might grin at the way you're putting your guitar together, but then I bet they well remember how they got started, too. I can imagine the extra pride you'll have when you finally get to play this guitar! I look forward to your next steps along the way, and to hearing your finished product. cotten
|
|
#5
02-05-2010, 04:56 PM
|
|||
|
|||
|
Cotten, thanks.
My kit should end up similar to the Feb guitar on the left side, if all goes well. I got a chance to visit Stephen Kinnaird, who's had 30 years of work as a luthier. He lives here in Nacogdoches. Look for a post something like "Stephen Kinnaird Owners" in the custom section I think. Anyway, he and Ryan treated me almost as an equal even though I'd only been doing this a month at that time. They even commented positively about my mistake with the hole in the back. Steve said to turn a mistake into a feature. Great advice. They are allowed to snicker. As a matter of fact, I've laughed at my own mistakes as they were the result of impatience and not reading about a process just before tackling it. I've learned to go back and re-read about things, or watch the DVD about it before I do anything now. Kit building is doable. When I put that router in my hand in close proximity to my $450 investment, I was terrified. But I got thru it, just like many others before me. And yes, some of those kits, and some of the work beyond kits, that Bill has on that calender are very nice. It's a great community.
|
|
#6
02-05-2010, 06:43 PM
|
|||
|
|||
|
Man, I ain't too far from you. Once you get it stung up I'd love to come see it. I've been rolling around in my head doing a kit, but don't have anyone around here to ask for advice. I mean, yeah there's forums and stuff, but when you have someone standing right there with you saying "whoa hey, I did that once and it didn't turn out too good" you get to think twice.
But it's looking good man, how'd the fretwork turn out?
__________________
77 Takamine F-360S Seagull S6 Coastline Q1 Sekova OM G&L ASAT Classic Fender Am Std Telecaster Marlboro spruce/eirw dread Wrongbox Cigar Box Lap Steel
|
|
#7
02-05-2010, 07:00 PM
|
|||
|
|||
|
Sordid, still "dressing" the frets. It's an involved process. I'm using a diamond file on the edges, getting them rounded and flush with the side of the board. That's taken an hour so far and I'm over half done. Then there comes leveling and polishing with various grits of sandpaper.
The forums, especially kit guitar forum, have been a huge help. It actually feels like someone's over your shoulder. And I did run things by Steve when I visited him. Asking about what I'd done, and what I was thinking. Where are you located? I'd be glad to have someone play it who's better than I am, and to show it off. I'll be proud even if it isn't immaculate - just hope it sounds good. I mostly strum, but since I've taken this leap, will start to learn to finger pick.
|
|
#8
02-05-2010, 07:04 PM
|
|||
|
|||
|
I'm in SFA's rival town, Huntsville. My best friend actually lives in Nac and I'm up there quite frequently (about 2-3 times a month). I've done my fair share of fretting, but I'm always interested in watching other's techniques. Hammering, pressing, clamping, gluing...always cool to see.
BTW, I really like how you picked back up after taking out that bit in the heel area.
__________________
77 Takamine F-360S Seagull S6 Coastline Q1 Sekova OM G&L ASAT Classic Fender Am Std Telecaster Marlboro spruce/eirw dread Wrongbox Cigar Box Lap Steel
|
|
#9
02-05-2010, 07:13 PM
|
|||
|
|||
|
Well, my nephew had the misfortune to attend "Sam", so all can be forgiven. Man, if you get up here in the next week or so, let me know. I know nothing about fretting except what I'm reading. LOL this holds true about the whole kit experience.
|
|
#10
02-05-2010, 09:16 PM
|
|||
|
|||
|
I'll see what I can do. Send me a PM and we can work out the details.
__________________
77 Takamine F-360S Seagull S6 Coastline Q1 Sekova OM G&L ASAT Classic Fender Am Std Telecaster Marlboro spruce/eirw dread Wrongbox Cigar Box Lap Steel
|
|
#11
02-08-2010, 07:52 PM
|
|||
|
|||
|
Brushed on two coats of HSF 5100 filler with silica today. The first batch I was afraid got too thick, so I thinned it a bit. On the 2nd I used almost a 1:1 ratio, probably 1:3/4 HSF:silica. Can't sand the 2nd coat because it's raining outside and I'm sick anyways. My wife and daughter presented the male side of the family with whatever they've had the past week.
I cleaned the whole box with denatured alcohol after I'd sanded to 320. And boy, when that hit the grain on the sides, my eyes almost popped out. This wood is gonna look fantastic to me. There are nuances that you just can't see until the finish is on, I guess, but if this is any indication, HOT DANG! I love how the wood has turned more golden/amber.  The neck, barely visible, got the same treatment. I doubt I'll go to work tomorrow, so I'll finish the pore filling then if I can. I hand sanded between coats with 400 grit with a block, per what I read in another finishing forum on Emtech 6000. Tomorrow, I will probably use the RO sander to get down a bit deeper in the wood just to see how well it's filled. Last edited by naccoachbob; 02-08-2010 at 08:12 PM.
|
|
#12
02-08-2010, 11:32 PM
|
|||
|
|||
|
I'd say here in a few days you'll have it ready for me to head up there man. I touched base with them good ol' boys there in Nac, and I was invited to stop in anytime. We might have to make a trip.
__________________
77 Takamine F-360S Seagull S6 Coastline Q1 Sekova OM G&L ASAT Classic Fender Am Std Telecaster Marlboro spruce/eirw dread Wrongbox Cigar Box Lap Steel
|
|
#13
02-11-2010, 07:10 PM
|
|||
|
|||
|
Began the finishing tonite. It's pretty cold and damp outside, so I found an old vice in the shop, clamped it down to my table in the office, and rigged up a device to hold the guitar where I could brush on the finish. It ain't elegant, but it works. One more coat tonite, then 2-3 a day for the next 4 days.
Here's the rig: 
|
|
#14
02-12-2010, 04:56 AM
|
|||
|
|||
|
Quote:
LOVE the bridge plate clamp work around, and I've made the same blooper trimming into the neck pocket. as to the wood coming alive with the finish? OH yes!! it always makes me smile when the first coat goes on! watch out for any glue spill out though. it may be sanded smooth and be invisible BEFORE the finish, but some glue/finish combinations will show them up. oil finishes are real culprits here, I find Stewmac's waterbased colortone is a lot more forgiving. GREAT job, and you'll LOVE the completed article..... but be warned..... as the creator of this fine instrument, YOU will see the few flaws 10 times bigger than anyone else. Other folks will be amazed and delighted and most wont believe that you made it yourself because its so GOOD. you will be champing at the bit to start another one to do a better job!! don't forget to make a label for the inside with your name & the date on it as that extra little bit of evidence!!
__________________
Quote:
|
|
#15
02-12-2010, 02:17 PM
|
|||
|
|||
|
Thanks for the encouragement Martin. I've already looked back and smiled, laughed, chuckled at the mistakes I've made so far. And I'm not offended if others do it too. Considering I've only been at this less than 2 months, I'm pretty happy.
As far as the addiction. I'm hooked. Already have plans for 3 more. 2 for the kids, and hopefully a much better one for me. It's a great ride. Some of the steps are down right intimidating, but I remember a golfer talking about his daughter saying about a roller coaster ride: It ain't fun if it ain't scary! I'm evidently having a lotta fun. Bob
|


