|
|
#16
 08-03-2023, 04:03 PM
|
|||
|
|||
|
Man I suck at wood work...I'm a nuts and bolts guy but I would love to build that, I have thought about building Dual Showman Reverb circuit and put it in a 1-12 cabinet, Of course to make it a little easier It would only be one channel and 50 watts.. more like a Pro Reverb I guess.
I love that Dual Showman Reverb circuit...beautiful tone 
|
|
#17
08-03-2023, 04:41 PM
|
||||
|
||||
|
Quote:
But seriously, we learn through our errors. When I talk with luthiers, they will mention that it took ten or twenty guitars before they felt competent. You should build that amp! Remember, you’ll be dead a long time. Rick
__________________
Lorem ipsum dolor sit amet Last edited by srick; 08-03-2023 at 04:48 PM.
|
|
#18
08-07-2023, 07:32 AM
|
||||
|
||||
|
The Stewmac kit strikes a nice balance between easy and overwhelming. It is well-documented, and supplementing the written instructions with their supplied video (and many other independent YouTube videos (shoutout to John Hall!)), makes this project achievable.
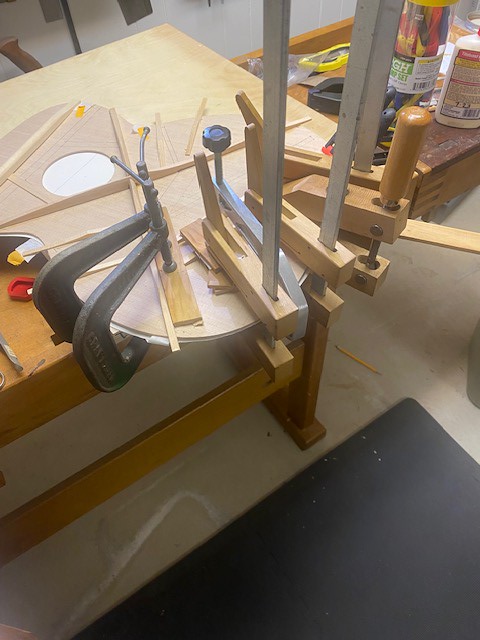
First step: Attach the neck and tail block to the sides. A straightforward task, but nonetheless, one that needs to be done just right. The tail block was a home run - I knew what I was doing! 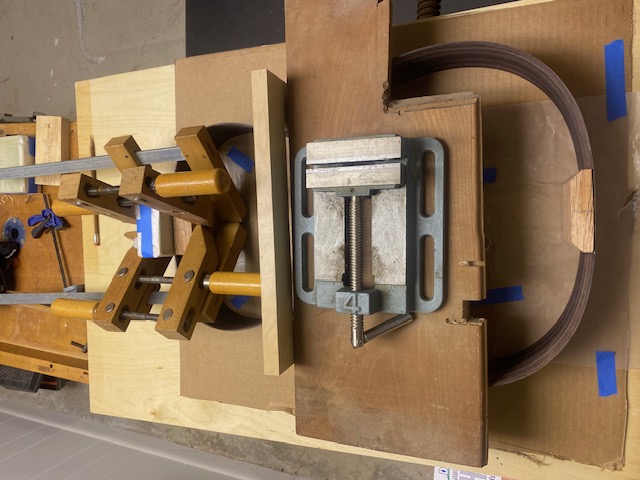 Nicely clamped right? I had this one down When I removed the clamps, it looked great from the bottom... 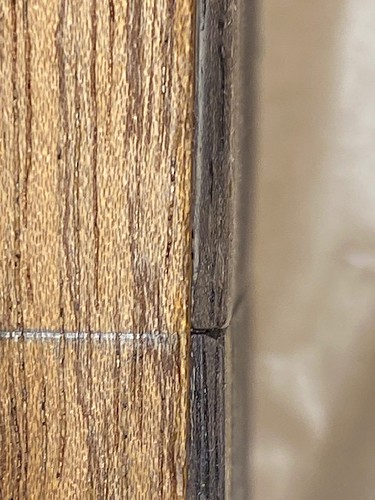 (7.24.2023 continues...)
__________________
Lorem ipsum dolor sit amet
|
|
#19
08-07-2023, 07:33 AM
|
||||
|
||||
|
7.24.2023 continued
and here's the top part of the joint (You're looking at the neck block at one side of the dovetail)...whoa... what's this? ] 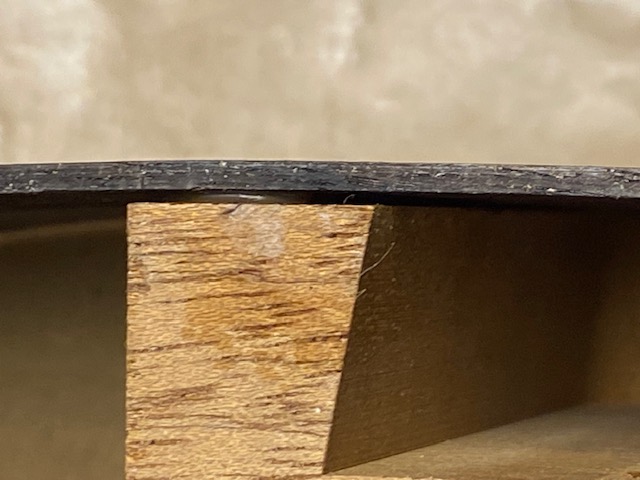 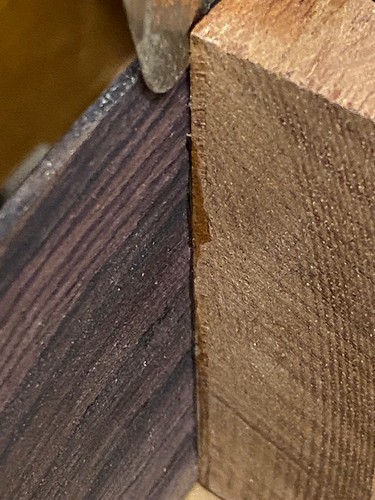 One side of the neck block was glued well. But on this side, there was a separation large enough to fit a palette knife into. There's solid glue throughout the joint, but a thick glue joint is not a strong glue joint. Glue is strong in a thin section. In this case, the glue is Titebond. I could almost get away with this since this is in the dovetail area, but... Coming up next: A trip to Home Depot to get a new heat gun! What a great a chance to learn! ;-)
__________________
Lorem ipsum dolor sit amet
|
|
#20
08-07-2023, 07:35 AM
|
||||
|
||||
|
The Heat gun has arrived - the credit card balance just kicked up a notch...
Wisely, I opted for the higher end Wagner heat gun that has a temperature sensor incorporated into it. And we'll find out how that works in about an hour. If I can get this joint heated to about 160-180, I might even be able to close it with a couple of clamps. I'm early enough in the build where I can take a chance. I may also take the path of heating the palette knife with the heat gun. One hour update… the ability to increment heat in ten degree steps is very handy. 350 degrees (coming through the nozzle I presume) melted the glue just enough to close the joint. It’s clamped right now. Today, looking at the joint, it was not as bad as I had feared- mainly just the one side of the dovetail needed to be reglued. So we’ll see if the Titebond will re-form just a skoche. Definitely worth the try as opposed to removing the entire neck block. Two hour update… it worked!  After photo In medicine, they call this 'revision surgery' - they never call it an 'oopsie.' Rick PS - When Kathy presented me with the kit, I knew that I would be buying a lot of tools and jigs, I may have to take the heat gun and destroy my credit card within a few weeks.
__________________
Lorem ipsum dolor sit amet
|
|
#23
08-07-2023, 08:40 AM
|
|||
|
|||
|
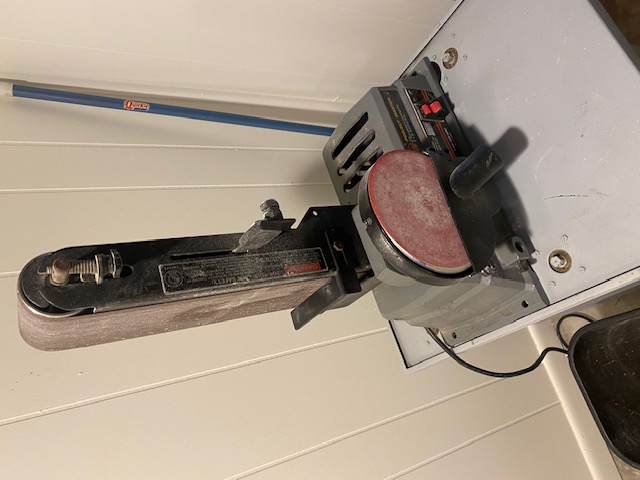
Your photo clearly shows the sides at the neck block follow a radius and the block is squarely cut. You need to radius the block at the edges. Easily done on a disk or belt sander, but not difficult with a file or a sanding block. Just forcing the rims to conform is a recipe for failure. For brace clamping a go bar system is cheap and easy to make yourself. I even have some extra bars I would give you should you decide to build one.
__________________
BradHall _____________________ Last edited by BradHall; 08-07-2023 at 08:49 AM. Reason: Spelling
|
|
#24
08-07-2023, 12:45 PM
|
||||
|
||||
|
Thank you Brad. I’ve come to the conclusion that this build is not about building a guitar, but it’s about “learning how to build a guitar.” And the perennial question keeps dogging me: “Is this good enough?”
Even though I have studied the process for years, until I got into the weeds, I didn’t really know the whole story. If I don’t purchase\build a go bar deck to complete this guitar, I’ll definitely have one for the next guitar. And I will likely spend a bit to get a decent binding jig. Also, the Stew Mac kit relies on an internal mold and a waist clamp… it works, but, I wouldn’t do it that way again. And radius dishes, did I mention the radius dishes? Good thing I have a healthy credit card. If I were to guess, the end result will be OK. But it’s not about the result, it’s all about the process. And with luck, it will sound good too. Rick
__________________
Lorem ipsum dolor sit amet Last edited by srick; 08-07-2023 at 12:53 PM.
|
|
#25
08-07-2023, 02:05 PM
|
|||
|
|||
|
Be careful purchasing all these shiny objects for lutherie. An awful lot of guitars have been built without them. I try to build them myself before purchasing because I'd rather spend on materials for the next guitars. That said, I bought a dish and I made dish. They both work great. If you have low ceilings in your shop like I do then you don't need a go bar deck, just sticks that reach the ceiling. I put plywood on the floor joist in my basement for the top portion. Just think of all the fancy back and side wood you can buy with the savings!!

|
|
#26
08-07-2023, 06:14 PM
|
|||
|
|||
|
Quote:
You can build a binding jig, scrap plywood and a drawer slide or two. A low powered router works fine. https://www.flickr.com/photos/194462...7720299310279/ A lot of the expensive things like radius dishes are nice to have and may speed things up but are not essential.
|
|
#27
08-19-2023, 07:07 AM
|
||||
|
||||
 I was as ready for this step as I would ever be. Over the past day, the humidity in the shop changed and my nicely set-up box started changing. You may be aware that the internal cardboard form of the StewMac guitar kit is adjusted by driving wedge between the tail block and the end block. Well. complicating matters, one of the wedges fell out of place (and into the black hole between the forms). It took a few hours with some new wedges to get things back in line and then time for gluing. I was about quarter way through the gluing and clamping when my wife called down: "Bennett (a close friend who decided to drop in at the critical moment) is here." "Send him down" I was multitasking fairly well for about two minutes when I suddenly said, "oh crud.... the top's not seated" And you know the fire drill. Whip off all of the clamps, get some fresh glue on all of the surfaces, rinse and repeat! As far as I can tell, it's a happy ending. I'll know more tomorrow. [UPDATE: looks good] Bennett got to witness a good show. And fortunately, I always have a plan B. And a plan C. and D. The next guitar will be built in a mold with index tabs. And you know there's a YouTube video of a guy in Mexico who builds a guitar only using a machete, right?
__________________
Lorem ipsum dolor sit amet
|
|
#28
08-19-2023, 07:13 AM
|
||||
|
||||
|
As a dentist, you have to:
Sound familiar? Fortunately, the guitar doesn't bleed, has no sense of pain (well, that's debatable, isn't it) and a new piece of wood can be fabricated. Plus when you get frustrated, you can always walk away for awhile (Warning: if you are a dentist, I don't recommend that you do this too often)
__________________
Lorem ipsum dolor sit amet
|
|
#29
08-19-2023, 07:40 AM
|
|||
|
|||
|
Quote:
I keep a 3 tpi skip tooth blade on it and use the same blade for all cutting, including 3/8" aluminum and brass stock. I did add a stout 3" extension to the column so I can re-saw wood up to 9" wide for book matching top and back plates. 
|
|
#30
08-19-2023, 12:27 PM
|
|||
|
|||
|
Quote:
|