|
|
#1
 09-24-2014, 06:58 PM
|
|||
|
|||
|
I fear I have ruined what once was the beginning of a beautiful finish. I had posted awhile back that I wanted to put down a durable coating over my shellac surface so as to protect it from my clumsiness. I started by mixing a one pound cut of quality dewaxed amber flake and everclear. I then put down a good wash coat, followed by four bodying sessions. This produced such spectacular results that I almost decided to leave it as is. I now feel that I should have. I let it dry for about a week and went out and bought a can of arm-r-seal. I started wiping it on as per instructions, but could not get a streak free finish, no matter what I did. It seems to tack up way to fast during application. I used 0000 steel wool to cut it back between coats, but it still drys the same every time. Question is, can I end this nightmare by sanding it down to the shellac layers and continue to french polish to completion, or am I committed to this process?
This is the guitar after shellac and before arm-r-seal: 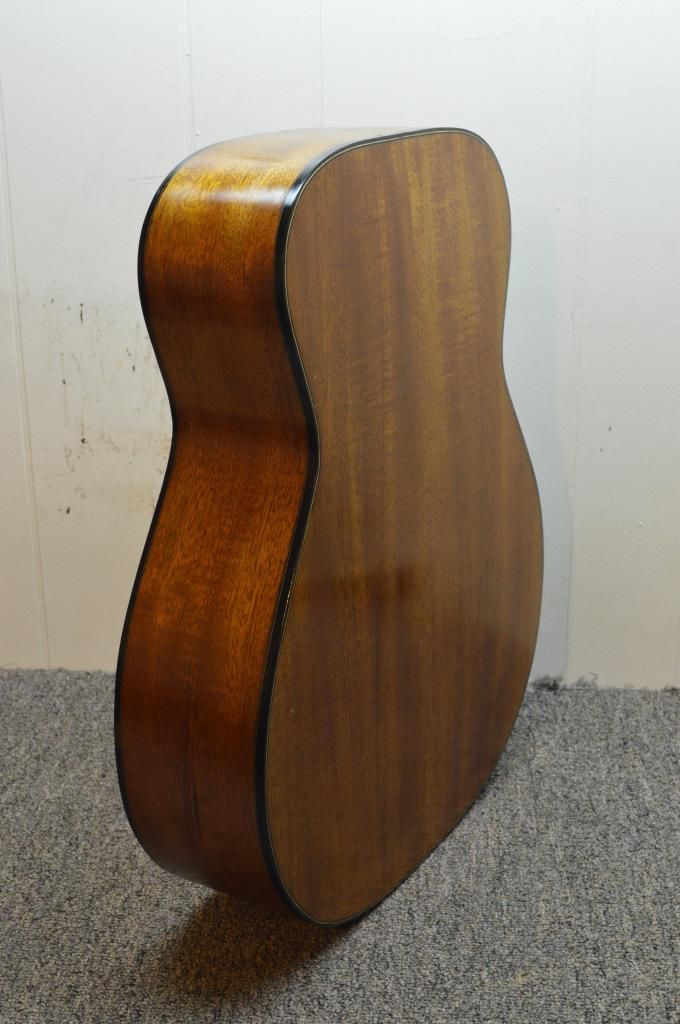
Last edited by WallyM; 09-24-2014 at 08:40 PM. Reason: Image added 
|
|
#2
09-24-2014, 08:42 PM
|
|||
|
|||
|
Have you tried level sanding it to take the streaks out? Use a firm block (artgum erasers work well) and 320 or 400 grit wet/dry paper. I'd use water to help lubricate and prevent clogging the paper, but dry sanding does provide a better view of your progress. Then run up through the grits of micromesh, or use a power buffer (the arm-r-seal web site says to give 2 weeks cure time for that).
However, there's also this on the web site: "Can I use shellac under Arm-R-Seal? Yes If using shellac apply only one light coat, dewaxed, 1# cut, and sand before applying Arm R Seal for adherence." So it may not be adhering well to your thicker, glossy FP layer anyway. Probably better to sand back and redo the FP, and leave it at that. Although I'm not especially fond of the uber-gloss FP, because it is very delicate. It looks gorgeous when fresh, but scratches easily, and then the effect is ruined :-/ My favorite finish is ultra-thin, lower gloss FP. Stopping when it still looks like a polished wood surface, rather than a film on top of the wood. Then scratches just make it look well loved 
|
|
#3
09-24-2014, 08:50 PM
|
|||
|
|||
|
I wet sanded with 400 grit. Dry sanding clogged the paper way too quickly. By wet sanding I was able to clean off the surface of the guitar as well as the sand paper (on a rubber block) as it gunked up. I used 0000 wool to prep the surface just after the image was taken. I was tempted to thin the varnish but the can states specifically not to do so. I figured it might flow easier and maybe not tack up so quickly, but I wasn't sure if that would be a good idea.
|
|
#4
09-25-2014, 12:31 AM
|
|||
|
|||
|
Side note, I personally wouldn't use steel wool for prep under another finish. It leaves that ugly, dark dust that's too risky, IMO. Would much rather use a paper. I'm sure some do fine with steel wool but this is just an opinion to consider.
About your varnish having too much tack, were your layers thin and did they get proper curing time?
|
|
#5
09-25-2014, 01:24 AM
|
|||
|
|||
|
First I tried a medium wet layer, not too heavy, along the grain from the upper bout to the lower. I applied enough to do about a two inch swath from top to bottom. In the time it took to recharge my cloth and begin to do another two inch swath, the edge of the first would already be tacking up. Any attempt at further blending would leave drag marks that would not self level when dry. I then tried a different approach. Thinner layers working even quicker. This was worse as the thin layers dried even faster. I don't know what else to do other than thinning the product and trying again. Unless someone has a better idea.
|
|
#6
09-25-2014, 06:55 AM
|
|||
|
|||
|
Sand back and either continue the FP or go with whatever the other product is. Part of your problem was likely due to the fact that the shellac should have been sanded before the new finish applied. Finish materials will not adhere well to glossy surfaces. They need an anchor, some surface tooth to grab onto.
|
|
#7
09-25-2014, 08:16 AM
|
||||
|
||||
|
What Brian said! The other thing is that Shellac will stick to anything, so you can always level things out and re-polish, even over the stuff you put on there. However, if it clouded stuff up, you'll want to get it off first.
__________________
Waddy
|
|
#8
09-25-2014, 05:11 PM
|
|||
|
|||
|
Thanks everyone. Like I said, I cut back the shellac with 0000 steel wool before applying the varnish. It seems to be adhering well, it's just grabbing and streaking. So this morning I tried once more to get this right. I wet sanded everything down with 400 grit. I then diluted the product by 25% with mineral spirits and tried again. This seems to have been the issue all along. Using a clean, folded piece of old white t-shirt I applied the product as before. Left to right, upper bout to lower bout. This time I was able to get all the way across the surface without dragging, and when I was done, everything had leveled out quite nicely. I will report back with the results once it has had a good 24 hours to dry.
|
|
#9
09-28-2014, 05:49 PM
|
|||
|
|||
|
So here's the verdict. Even though I was able to thin the product out enough to where it wasn't dragging, it still dried with a multitude of streaks. It did not level out, regardless of how thick or thin I put it down. I started with a surface that was perfectly flat, with pores well filled. I ended up with a surface that looks as though I painted it with a giant brush. So, after all of that, I decided to sand all that plastic **** off and go back to french polishing. After the first few sessions I noticed something interesting. The light hitting the shellacked surface has a much nicer look than the urethane, aside from just the obvious warmer tone. It glows and sparkles off the grain as you move it around under the light. The glossy urethane surface seemed to reflect light as though you were looking at a wooden table with a pane of glass over it. I guess I will just have to try and be more careful with this one than I am with my other guitars. At least it will be a lot easier to fix if I have to.
|
|
#10
09-28-2014, 08:06 PM
|
|||
|
|||
|
The great thing about FP is you can always go over it again at any time later.
Shining should not pose too much difficulty. Another few shine coats sounds all you need. You can err on the excess side with the oil, but use the shellac very sparingly (thinned out a touch compared to your bodying sessions) - one drop or even only half a drop should be enough to shine a 4 to 5 square inch area. Rub a few coats like this and you may be able to leave it without any further polishing. The pad should be slightly warm, and can warm up from the friction in the process. (I use a firm pressure for these last few coats.) Good luck!
__________________
---- Ned Milburn NSDCC Master Artisan Dartmouth, Nova Scotia
|
|
#11
09-29-2014, 06:40 AM
|
|||
|
|||
|
Quote:
|
|
#12
09-29-2014, 06:55 PM
|
|||
|
|||
|
I am one of those people. I haven't repaired a damaged fp finish before, but this guitar is going to be used mainly indoors and only by me. I don't have to fear having to repair a customer's guitar. If I do anything to damage it I have no problem sanding it back and doing it again.
|