|
|
#16
 12-02-2016, 07:56 PM
|
|||
|
|||
|
Quote:
A third option is to plane the fingerboard, but I usually reserve that for guitars that have excessive relief and no adjustable truss rod. Too much planing to eliminate drop-off will make the fingerboard too thin at the neck-body joint. In addition, planing will make the fingerboard thicker at the end, which will look similar to shimming, only thinner overall. 
|
|
#17
12-02-2016, 07:57 PM
|
|||
|
|||
|
John posted a minute before i did.
 People can do what people want to do, we all repair differently. This is the reason I shim fretboard extensions on neck resets. I find not doing so renders 16th fret upwards uncomfortable if not unplayable, if the fretboard is not shimmed, then the only way IMO is to defret level the board and refret. I have taken the time to draw a standard Martin scale length neck and the effect an angle change has on it. Typically I find neck resets range in the .6 to 1 degree changes, .5 is the neck visually shooting into middle of the bridge reference my example underneath, that is a 2mm or 80 thou for imperial minded fall away, That IMO is unplayable, that is not the real number either, that is referencing the pull away to the saddle position not the 21st fret position which is where the tongue would be clamped down against the body, this would make it more like 2.3mm The fretboard drawn is 5mm for reference, the scale length is to size 
__________________
Cole Clark Fat Lady Gretsch Electromatic Martin CEO7 Maton Messiah Taylor 814CE Last edited by mirwa; 12-02-2016 at 09:36 PM.
|
|
#18
12-04-2016, 09:23 PM
|
|||
|
|||
|
A lot to think about here... Since posting this thread, I've had an opportunity to get this guitar out of storage and put it on the bench. Overall, it's not a bad looking guitar, but it's had some bad repairs that need to be undone, as well as some damage caused by the effects of time and neglect. (Photobucket won't let me turn it 90 degrees, but whatever...)
[IMG]  [/IMG] [/IMG]Quote:
I'd love to know more about the guitar in the pic. Please post a link if I've missed something that's already on the internet. Given the state of the inside of the guitar, I'm fairly certain removing the back is the right thing to do. I wonder if anyone can shed some light on what the center brace looked like before it was broken. Was there originally more to the bridgeplate assembly? Is there a blueprint available?  Here's another repair that will be made much easier with the back off:  If it's possible, I'd like to avoid taking apart that intricate neck assembly, so I'll proceed as if slipping the neck block is the plan. Regarding Howard's concern about the sides flaring - that makes sense. I don't want to induce a huge amount of stress by forcing it into submission, so if that proves to be a problem, I'l re-evaluate my options at that time. Regarding adding a wedged shim in the course of changing neck angle, I've done it both ways, but usually I prefer not to. My philosophy has always been to leave no trace of my presence on the guitar whenever possible. However, a telltale fingerboard drop off is also evidence of my work, so it all depends on how you look at it. Quote:
Quote:
However, on a similar guitar, Frank managed to reconstruct the arch of the back by removing all the braces and using a curved form that matched the original back radius as a gluing caul: http://www.frets.com/FretsPages/Blog...rtin126_1.html Either with the original UTB, or a with new one if necessary, the same technique could presumably help me return the arch to the top of this guitar:  Unfortunately the top is also sunken somewhat in front of the bridge. I'm open to any suggestions as to how to remedy this [IMG]  [/IMG] [/IMG]I suspect this guitar will be the subject of more threads as I get into the job. At the moment, I'm just trying to gather as much information as I can before I dive in. Maybe John Hall would be willing to share the pictures of the one he had apart. Wouldn't hurt to ask. In the meantime, if anyone else has any info that could point me in the right direction, I'm all ears. Thanks!
__________________
https://www.reverbnation.com/bootheelers Last edited by Hot Vibrato; 12-04-2016 at 09:37 PM.
|
|
#20
12-04-2016, 10:00 PM
|
|||
|
|||
|
Quote:
 When I get the back off, I'm sure it'll make more sense.
__________________
https://www.reverbnation.com/bootheelers Last edited by Hot Vibrato; 12-04-2016 at 10:44 PM.
|
|
#21
12-04-2016, 10:55 PM
|
|||
|
|||
|
Quote:
Frank pointed out that these fretboards are thin and the slots go most of the way through them, but with heat and a little patience, I don't think that should be an obstacle to removing the fretboard cleanly.
__________________
"Still a man hears what he wants to hear, and disregards the rest." --Paul Simon Last edited by Howard Klepper; 12-05-2016 at 02:36 PM.
|
|
#22
12-04-2016, 11:53 PM
|
|||
|
|||
|
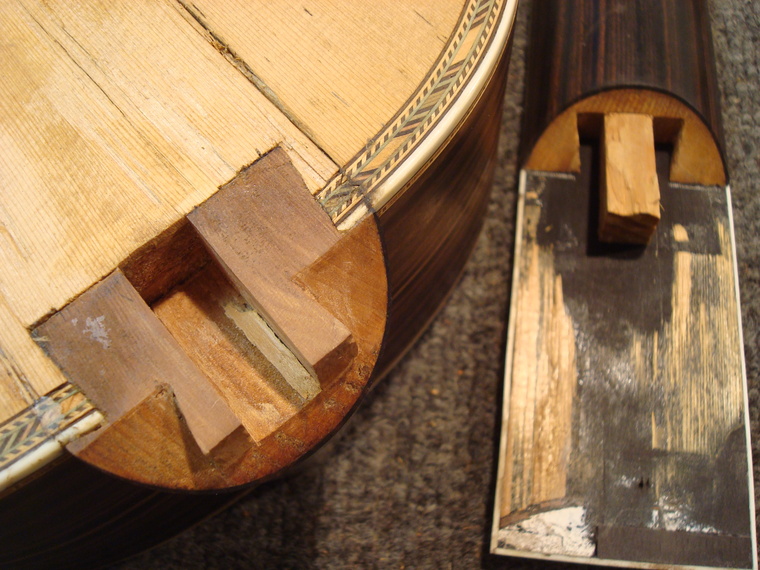
Many ways to do achieve the same as a neck reset,
- Pull the back and reset the sides and neck block, - Press the neck out and shave the heel, - Shim the whole neck under the fretboard, - Pull the board steam the neck and insert carbon fibre rods, lots of ways - Pull the board and fit thicker fretboard, taper shape to bridge As per Howards description above. However on this one I used mahogany to shim the fretboard as the customer did not want a wedge shaped fretboard. The neck and body were both mahogany, so its just cosmetic colouring required. 
__________________
Cole Clark Fat Lady Gretsch Electromatic Martin CEO7 Maton Messiah Taylor 814CE Last edited by mirwa; 12-05-2016 at 01:22 AM.
|