|
|
#76
 12-13-2014, 10:32 PM
|
|||
|
|||
|
Quote:
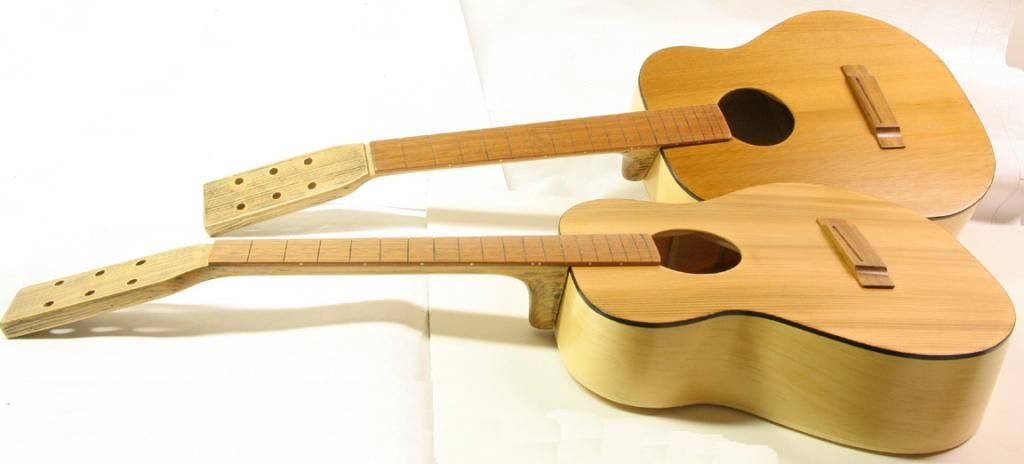
I have a couple of real cedar tops, might have to use one with the walnut. The first one I am going to do is with some Lutz. But first things first, got to get these done before Christmas. I did the back wedge, I used cherry for the head plate and heel cap so it is only fitting to do the wedge with it. 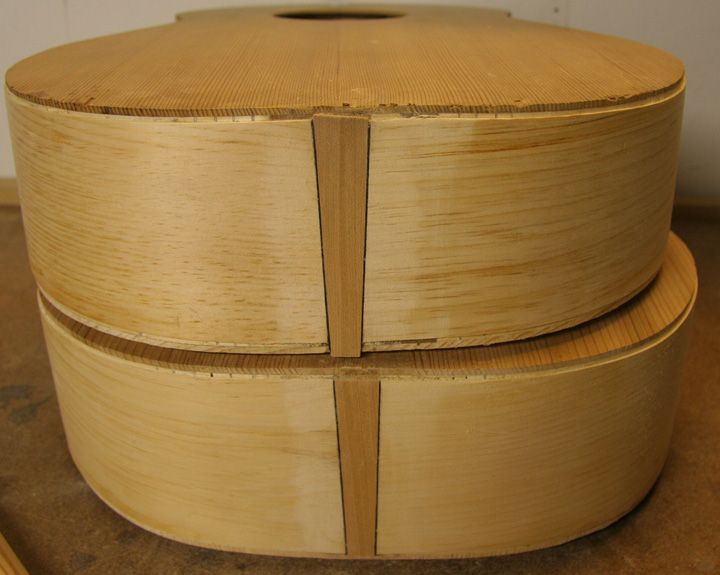 Slotting the bridge on my first guitar was a kind of tossed together affair. 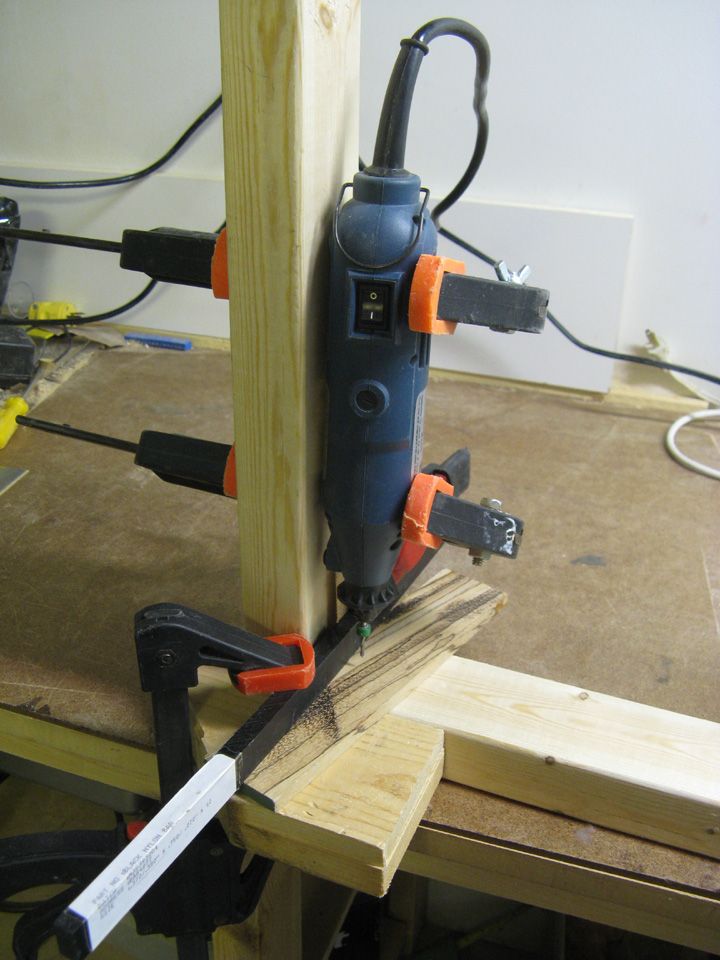 At least this version does not have me concerned with something slipping. 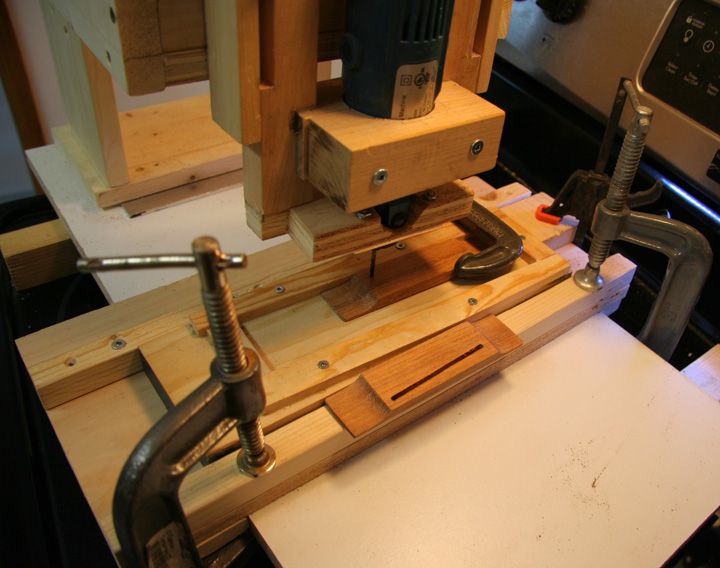 I had a less than pleasant experience routing the binding on my first acoustic. I decided to make a jig to hold the router and a carriage to hold the body while cutting the binding. Then I decide to give the first jig another chance and modified it. Sometimes I think I just like making work for myself. I found my old cutting board and routered it down . 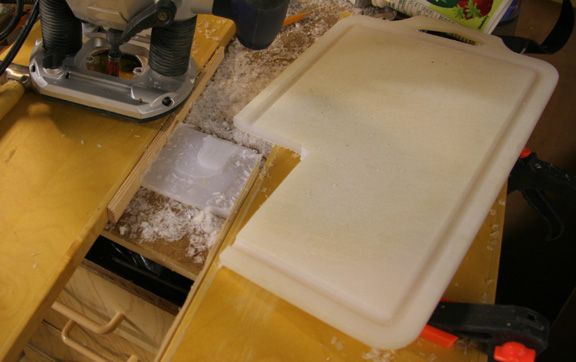 It is a good thing I still had it as these are not easy to get anymore, all I could find is bamboo cutting boards. I drilled it out and bolted it up. 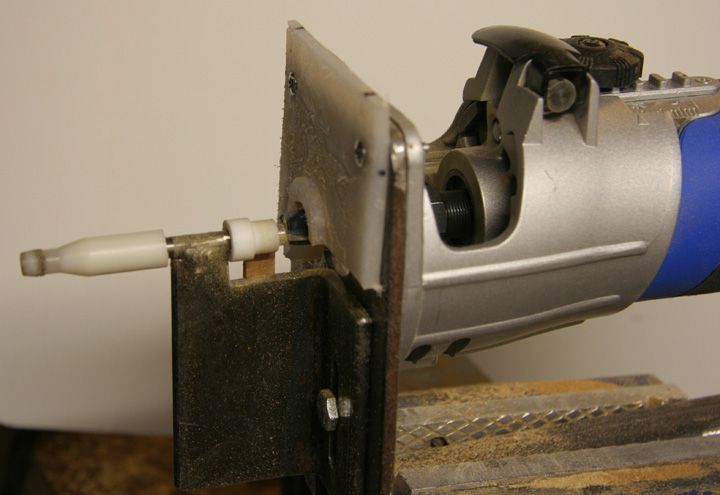 And things went fairly well. 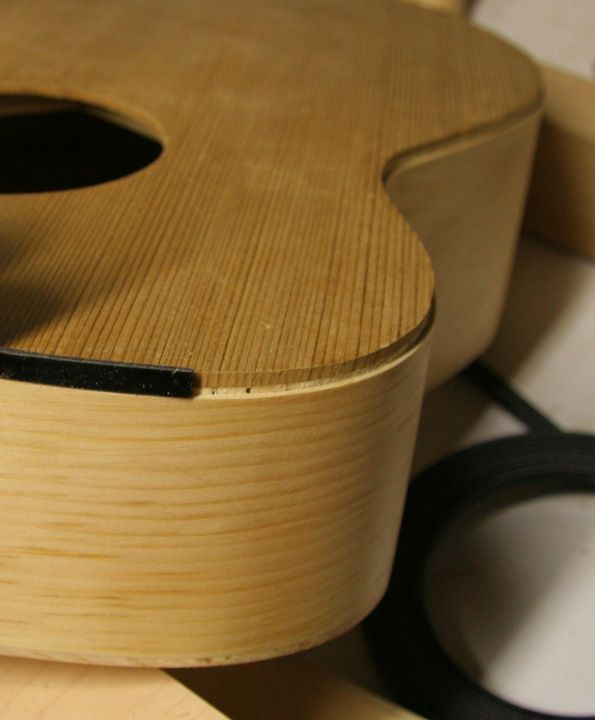

|
|
#77
12-14-2014, 09:15 AM
|
|||
|
|||
|
Quote:
__________________
Martin OM-18 Authentic 1933 VTS (2016)
|
|
#78
12-16-2014, 08:51 PM
|
|||
|
|||
|
Quote:
I sort of aim my content here in between the other two forums as it is easy for someone to pick up how guitars are made by all the good present and past builds. My build is more of the journey I take in learning how to build these instruments more than anything else. Part of the reason I veer off every once in a while is interest or opportunity pulls me in a direction or learn something new that changes the direction I travel in. Mostly it is just that I get distracted by shiny objects very easily. Just cleaning up dings and chips to the tops and sides. When I was trimming the cedar top after it was glued to the sides I did not always have the top flush against the bandsaw table, not normally a problem when I was using the 16 tpi metal blades but when you use a 4 tpi blade you probably should be a little more careful. 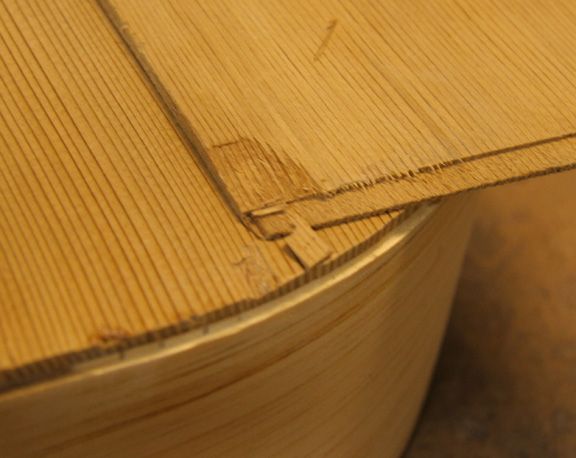 Had a scrap piece of top left over, not an exact match but these are not intended to be works of art but something you throw in the back of the car and not worry about too much. Good thing I saved some scraps. 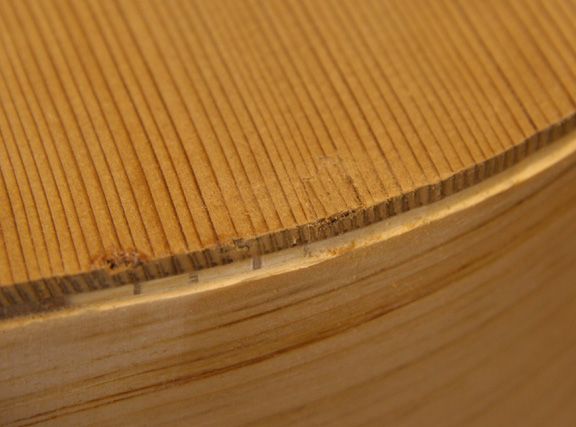 And seeing that some appreciate the steps taken to build our toys, I am currently cleaning up the neck joint, first releaving some wood on the inside of the joint. 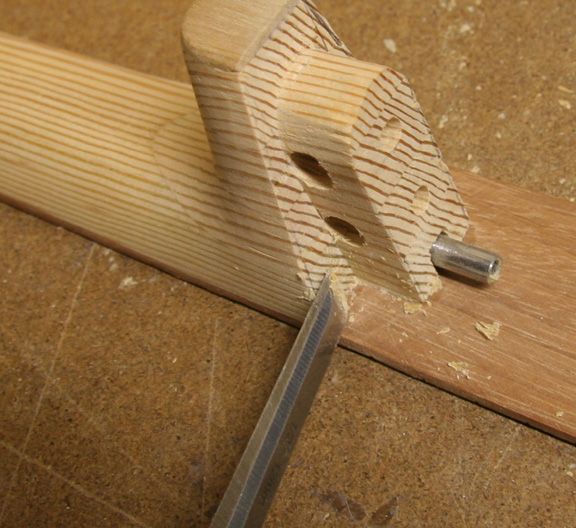 And then the normal flossing step that I just despised. 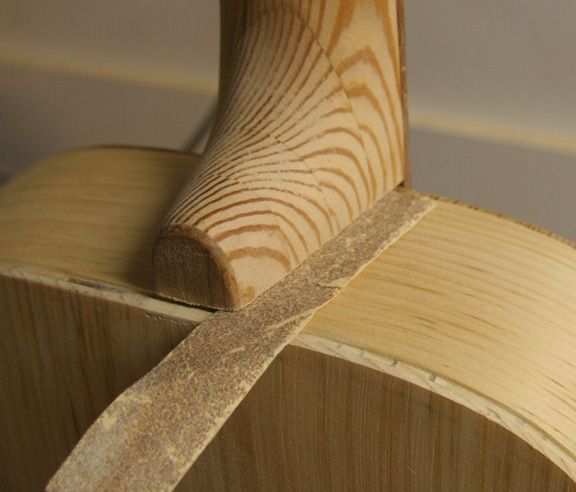 Maybe it is just cheap sandpaper but I found the paper would fray and rip after a couple of pulls and I would have a bunch of pieces of sandpaper on the bench. Using emery cloth works much better but half the time I do not have any around. Then I had the thought of taking some packing tape and putting a layer on the back side of the sandpaper. No more ripped sandpaper and as an added bonus the packing tape reduced friction on the body side.  So one done and one more to go. As you can see the grain lines and the light early wood of the fir stands out prominently at the heel. As said before, hard to get a smooth surface, this time I really mean I will hopefully never use it again.
|
|
#79
12-17-2014, 10:06 PM
|
|||
|
|||
|
I had some black and some cream binding but I could not decide which to put on these guitars. I looked at a number of other cedar topped guitars, they went both ways, tan or black. I thought the black may look a little too bold on the back with the sides being a light colour, for some reason thought to do the back in cream and the top in black. Now I am not sure, almost pulled the black off but decided to sleep on it.
|
|
#80
12-20-2014, 03:29 PM
|
|||
|
|||
|
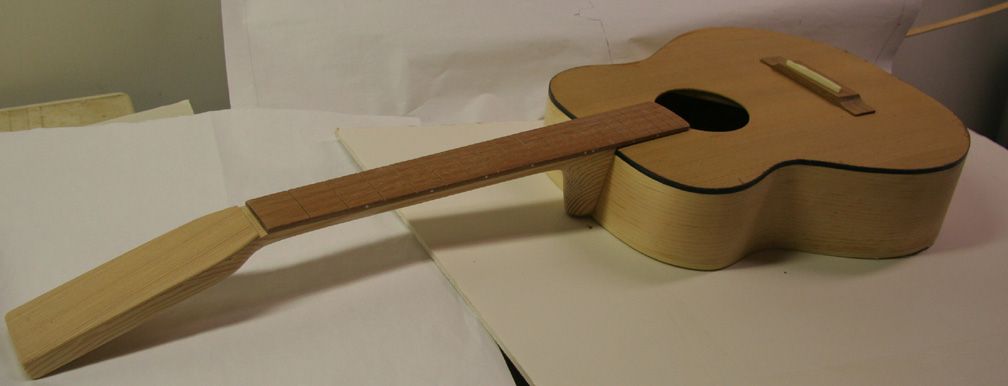
Decided to stick with the binding as is. Did some grain fill on the headstock and fretboard. Also did the back of the necks and sanded most of it off, I was looking for a more old guitar look but it did not work out all that well. Put on a number of coats of wipe on satin poly and will let it harden for the next day or two before I do the final fitting and putting it all together. Just wanted to show were I was at the moment.
|
|
#81
12-21-2014, 09:53 PM
|
|||
|
|||
|
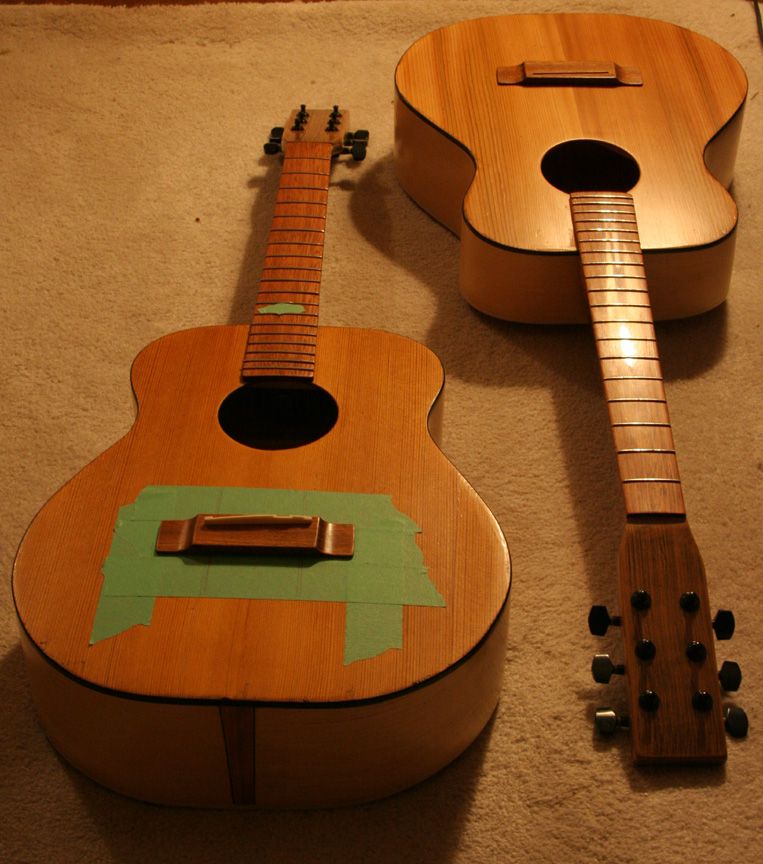
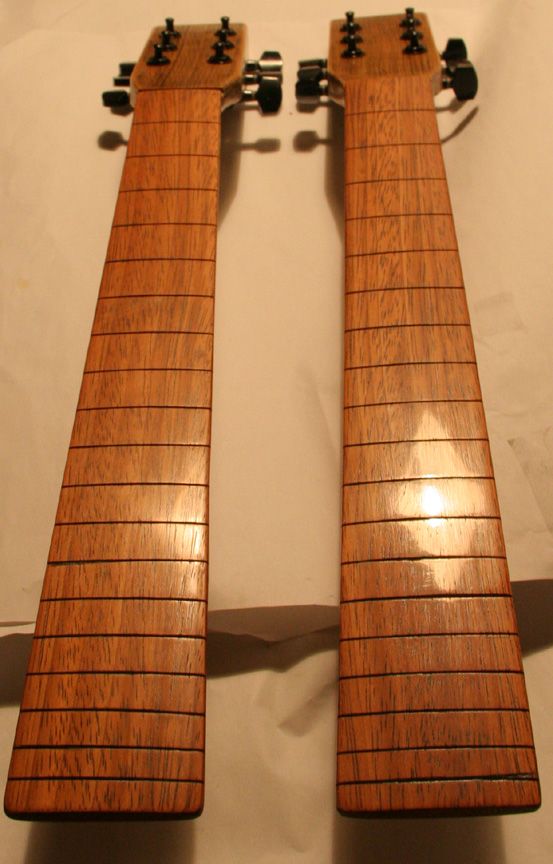
I think I am tired of guitars or at least sitting in my workshop which needs a good cleaning anyway. Think I will watch a movie tonight. Aw heck, just bring up the necks and the tuners and throw them in the holes. Start doing it and realize I need to ream out a few holes that are now undersized after finishing. Go down and ream them out, back upstairs with drill in hand to do the screw holes. Should polish up the headstock first. Use a green pad, don't know the name but same as you do dishes with. Then take some crocus cloth and buff up the necks. Mount the tuners, there went an hour and a half, too late to watch a movie. Might as well take a picture. Lot of flaws in these guitars but they will feel nice.
|
|
#82
12-22-2014, 09:13 PM
|
|||
|
|||
|
Know why I was tired yesterday, have a cold today. Dragging myself around and really not into guitars today but the clock is ticking. Just work slow and try not to do anything too stupid. A guy on the other site asked for some detail on fretting, I'm not an expert, just cut them to size and hammer them in. That probably is like a dish I asked my mother how to make. I tried what she said but it did not come out right. When asking her about it I found out she left out some ingredients. 'But of course you would put this and that in.' It was so obvious she didn't mention them. Well, maybe not so obvious.
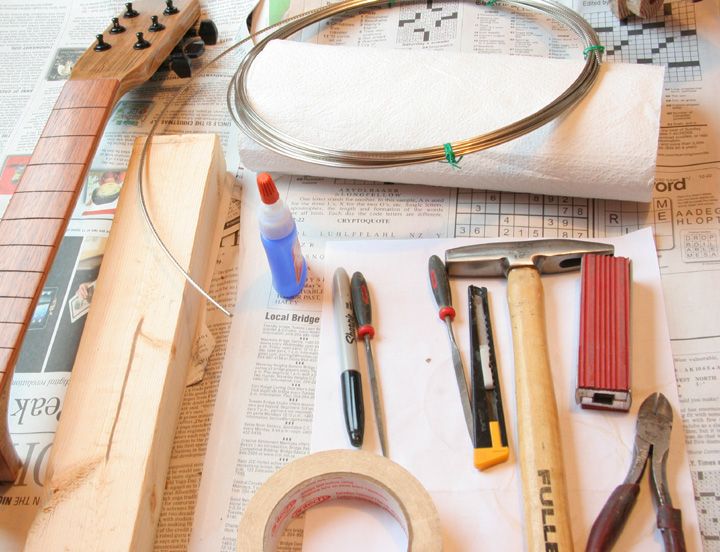 Some of the ingredients, also a triangle file and coping saw not in the picture. The first time I used this fret wire I was having a tough time getting it into the slot. I used a buddy's fret saw, worked well before. But that was different wire and this one has a wider tang. I found a coping saw with a blade with the right size kerf and life was good again. Bottle of CA, paper towel in case I end up getting it somewhere I shouldn't. Always good to be prepared in case the unexpected happens. If I was really worried I would get my can of acetone. Clean out the slots before putting in the wire. Some of the grain filler and poly I put on the neck was in there. Actually cleaned it out with a razor knife when I was buffing up the fretboard but the first fret wire did not want to go in all the way. Marked the depth of the tang on the razor knife and checked the slots. Had to clean out all of them. Close is not good enough. 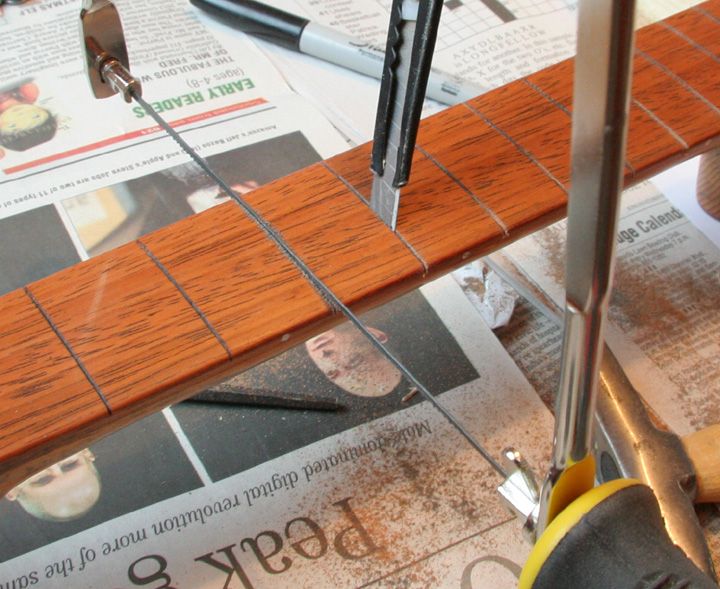 Measure and nip the tang with some side cutters. Two bends and the wire breaks off. I nibble off a bit of the tang on the ends with the side cutter and clean it up with a file. If the neck shrinks in winter you do not have some sharp thing jabbing you. 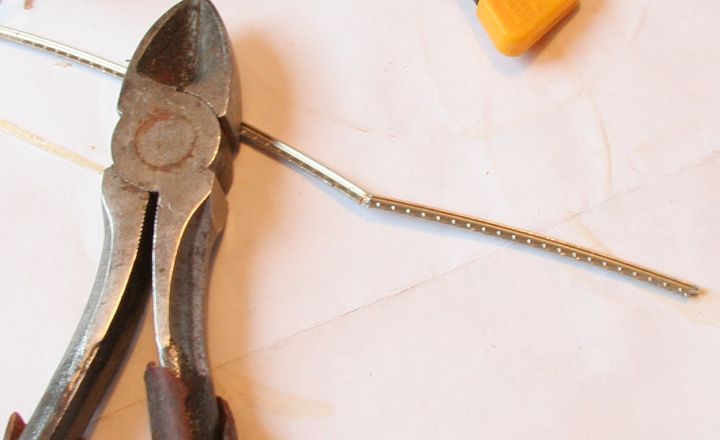 And one necks with frets, one more to go. I'll file the ends and surface them tomorrow. Going to be sneaking under the wire if I get these done. 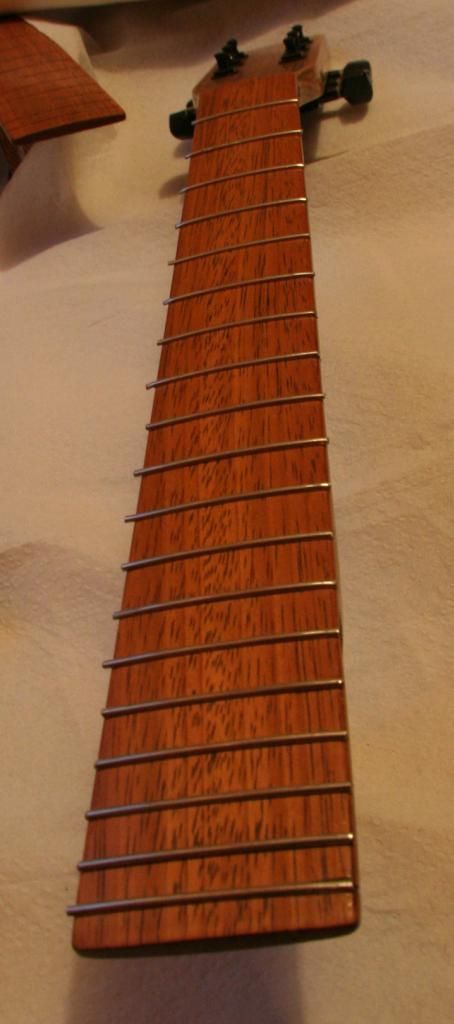
|
|
#84
12-31-2014, 01:41 PM
|
|||
|
|||
|
Side projects. There was a thread in the main forum showing a three string guitar which is an alternative to cigar box guitars that run through piddly little amps. The OP made a small guitar out of Baltic Birch ply and I was wondering if a reasonably competent person could make a solid wood one with wood from Home Depot. Nothing in the realm of guitars made of wood selected for guitar building, but as most of you know, you just can't build one. If we could make the project simple enough we can hook more unsuspecting people.
Thought about the wood selection. While I did find Cedar boards that was guitar friendly I thought the better grade of Pine might be easier to find quartered wood. The side wood is easier to find quartered as the pieces are smaller and sometimes are the left over cuts of larger rift sawn boards. So pine for the body and 1/4" Maple for the fretboard. 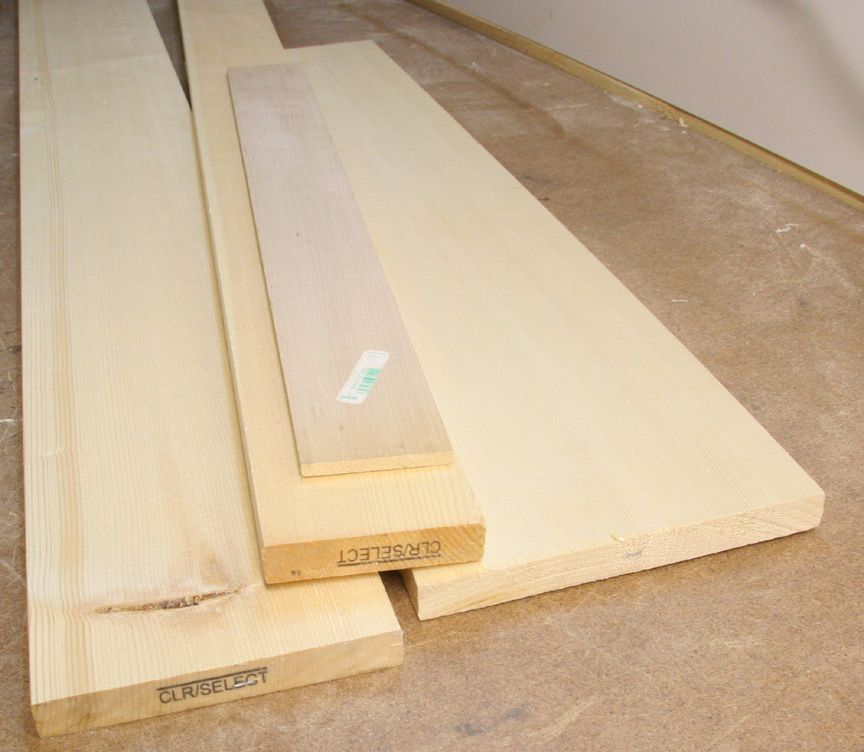 I split them on the table saw by increasing the blade height a (small) fraction of an inch at a time till both sides were cut and they met in the middle. The board for the back and top was naturally larger and I cut it the same way but stopped when I thought safety might be an issue. I could have cut them on my bandsaw but I was thinking of just using the equipment a woodworking hobbyist would have.  I thought about surfacing them down to usable height. I thought having a laminate router mounted on a sled could be used to tidy up the wood. A planing jig using a sled is just the router mounted on a board that is then run back and forth over two rails (could be just two equal height boards) with the board to be surfaced held down by double sided tap. Since I knew this would work I decided to use an old standby, a plane that I bought at a estate sale. I had to clean it up and gave it a backyard tuneup and managed to make a lot of nice curly shavings. 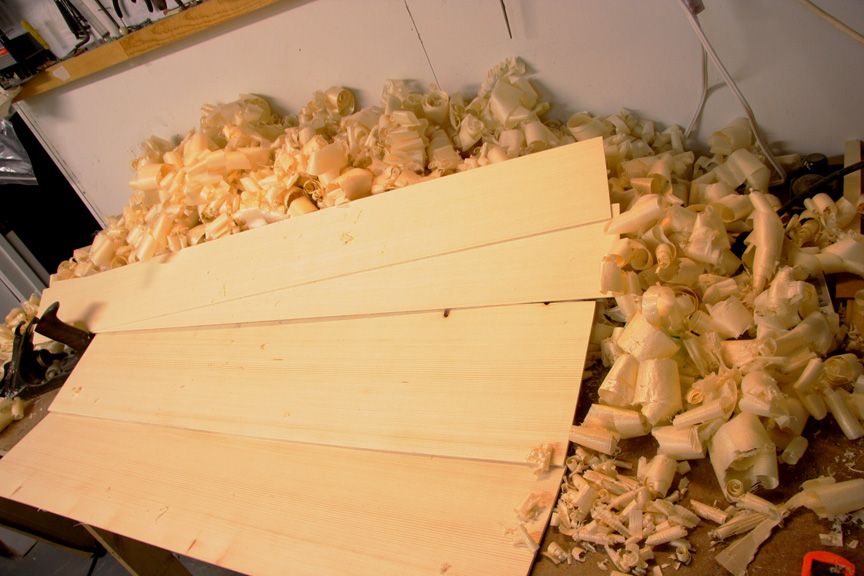 I thought I might as well bake the tops like I did with my other builds, I also put in some pine that I measured and found to be as dense as some hardwood which I then wanted to use as lining and maybe back bracing. You guys hear any music in the background? I hear some ominous music. It might have been OK if I heated the oven to temperature first (220 F) but I loaded the wood and then put the oven on. I had the top and back panels stickered above and weighed down with large steel bars (still that ominous music) with the rest of the wood on the lower level in case resin drips from a pitch pocket, it has happened before staining a back I had below a spruce top. Leave it for a minute and then smelled a smoky smell. While you do get some wood smell when baking tops, I am partial to cedar, this was different. The oven was filled with smoke and when I opened up the door a piece of wood lit on fire. I closed the door and a few seconds the oxygen in the oven was burnt out. Opened the windows to dissipate the smoke and left it till it cooled down enough. 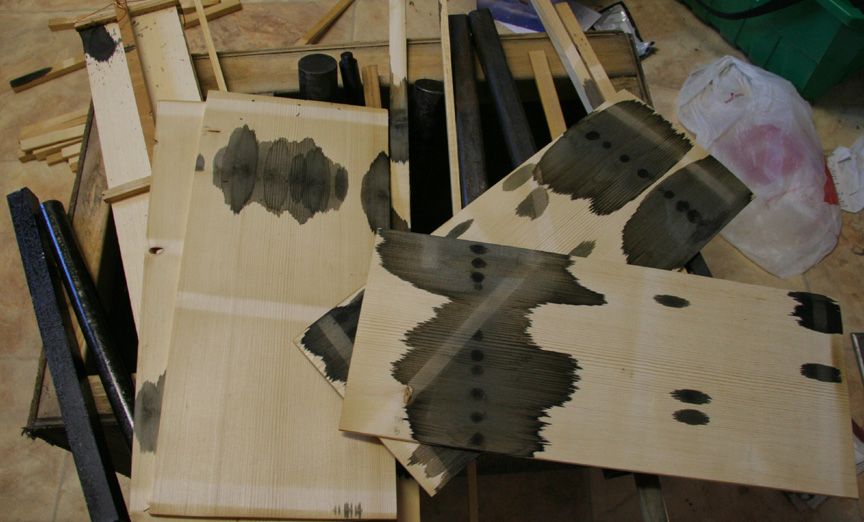 Figured out what happened. The oven was cold so it had the element on the bottom at full power giving off heat, when the oven was at temperature it would cut back the heat. The wood on the bottom got the heat, it cooked off some volitiles, they floated around and found the steel bars that were the coldest thing in the oven. They condensed, dripped down onto the element below. What a mess. Actually was not too bad as I caught it, oven cleaner made short work of the yucky stuff. But now I have this black stuff on my wood. I guess that is the end of the project. Not being one that accepts defeat easily (don't know what is good for me) I ran them a few times through my drum sander and the wood was no longer stained. Good thing I left a little extra to take off after baking. But not being too keen on putting wood in the oven anytime soon, I looked at my options. I had some heavy duty loads, nicrome wire wrapped on ceramic forms. I put two in series, put that and a fan in a wood drawer, loaded it with wood, laminated particle board on to, surround it all with bits of foam I have, control it all with a temperature controller. no smoke no muss, ended up getting to 120 C and baked my wood. I will make a more appropriate baking box, I did not know if this would get to temperature. 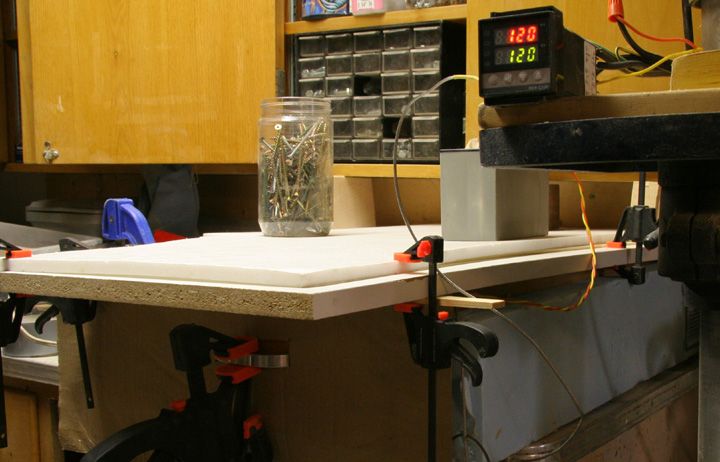 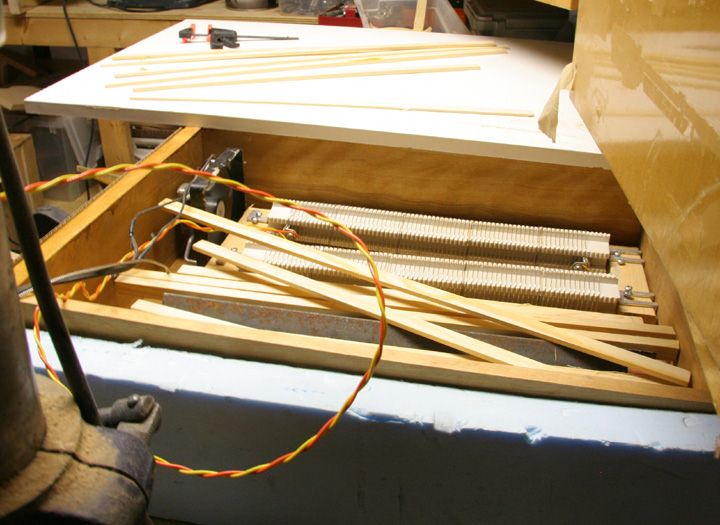 And earlier I closed off a level under my bench to make a humidity chamber with foam board. I stuck a fan in there blowing on a plate of water. I can get to about 40% RH, about right for making guitars. So I have some wood in there already getting hydrated for my next project. I'll work on what needs to be done and then stick it back in when not working on the wood. Not perfect but until I seal up the shop and control the humidity this should get me through the dry winter. 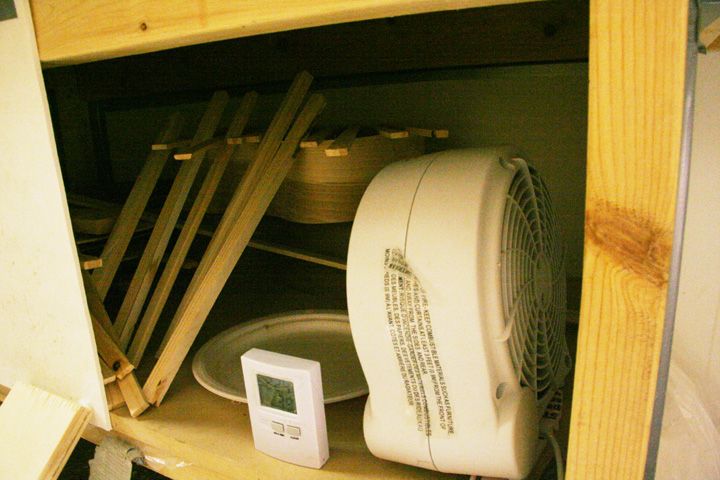
|
|
#85
01-01-2015, 08:32 PM
|
|||
|
|||
|
And there was dancing in the streets...
Alright so I exaggerated a little. I had a cherry side that I did not like how it bent at the waist, as luck had it there was also a saw mark on the inside of the waist and the wood split a little. I had a piece of the same board left and I made another side out of it. It was not perfect, there is a crack or two in it though I had little to loose. The good side was a little too tightly bent around the tail end so I used my clothes iron (not the good one for clothes but an old one) and ironed the section straight. Then I had a thought. What if you ironed the side around a curve? To see I clamped the end to a form, gave a spray of water, covered it with a piece of paper so the iron will not mark up the wood with crud (I have used the iron for many things not clothes related). While I did not get the circumference tight enough I saw some promise. If you had a smaller form to iron onto you could get the curve you want. So why not just use a regular bending iron? Well I did with the Cocobolo right after the Cherry, I got to tell you about that also. What I was thinking is that when you bend on a pipe the inside surface is hot and supported but the outside surface of the side is being stretched. And wood (I've read) would rather be compressed rather than stretched. Now if you are heating the wood on the outside with the iron you are pressing on the wood compressing the fibers. Just maybe this pressure will stop the outer fibers from being torn and you do not get a cracked side? Harebrained idea or not I don't know, it is just a thought for now. I would have to try it with a tighter radius. 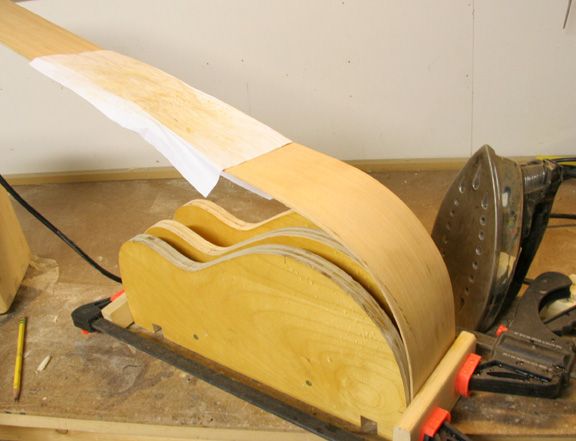 But the real exciting thing for me is the Coco. I ended up with cracks and facets on the upper bout when I bent that rift sawn stuff. I could trim some of it off on the one as the box narrows at the front but the other one does not have a gentle radius. I tried bending the sections a while ago but all I seemed to do was charred up the inside, also caused one more crack. 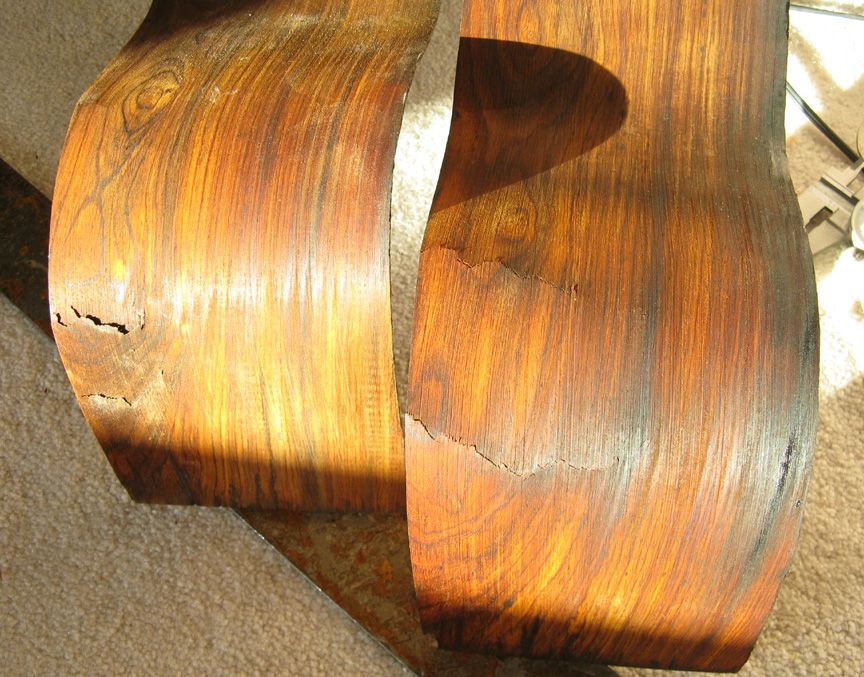 So what did I have to loose? Originally I did give the sides a shot of water with fabric softener before bending as I read it can help with difficult wood. Since I had this side that was useless to me I decided to soak the section in water and fabric softener for a couple of days. 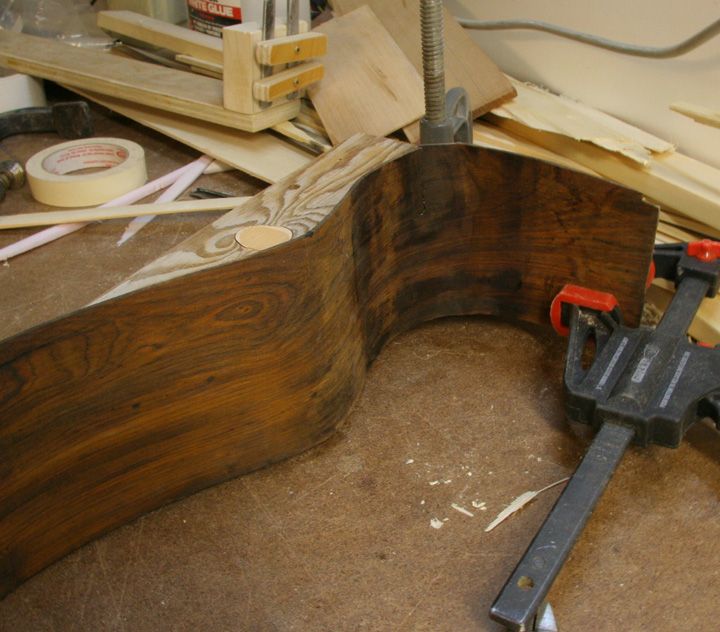 Not pretty but I did manage to bend a curve in the facets. I am going to let it dry and then give the cracks a shot of CA. There is some spring back on the rest of the body but I will deal with that later if I can get the upper bout together. While I did read about fabric softener being used like Super-Soft I only found references sort of like I heard it from a friend of a friend and nothing along the lines of I had some difficult wood and was able to soak it and bend it. Hopefully I can use these sides yet.
|
|
#86
01-03-2015, 10:35 AM
|
|||
|
|||
|
Those two small guitars are looking good! I like the dark binding, many of the old Flamenco guitars were made of cypress, which is relatively light, and banded with ebony...
I also currently use my tablesaw to resaw back and side sets as well as top woods. I had modified my tablesaw with a motor speed control and hacked the lower shroud so I can run 12" blades, yielding me 4" of cut which is just enough to make a dread set. I do have a safety fence as well as custom push block. I don't have a wide belt sander, but if the wood's quartered well enough I run it through my old jobsite thickness planer with no problems... even down to .080" or less! Looks like you did a good job saving the cocobolo. You can't always tell, but I try to flex the sides by hand first before bending. Sometimes one side is more pliable than the other; I'll use that side for the upper bout. And yes, never put steel or iron next to your woods, as the tannins in the wood will cause the metal to stain them - especially oak!
|
|
#87
01-03-2015, 10:57 AM
|
|||
|
|||
|
Quote:
|
|
#88
01-03-2015, 11:51 AM
|
|||
|
|||
|
The motor controller is a SuperPID, which basically turns any brushed motor into a servomotor. The best part about is that you won't loose torque as you reduce speed, the way you would wit a normal speed control. It was designed mainly for routers running under CNC control. Since the tablesaw motor doesn't run at those speeds some mods were necessary. The shaft of the motor usually becomes an "encoder" as part is pained white and part is painted black, and an "eye" is pointed at the shaft. On a router you'd only need to paint half-and-half. For the tablesaw I used a blade stiffener and painted 4-black and 4-white stripes. I have to do a little math since the SuperPID would read 4x the actual speed. The saw normally runs around 5400-5800RPM, which for this POS saw is too fast to handle the larger blade; the rim speed would be too fast. I only use it for resawing; it otherwise goes back to the CNC for the router.
As to planing, there are two tricks. The first trick is to use a platen the size of the entire infeed-to-outfeed area (with a stop at the outfeed to prevent it from sliding in.) My planer is only a 13"er. You want to use something hard and heavy. A piece of 3/4" melamine at the very least. I use a piece of synthetic bowling alley lane, which is 5/8" phenolic. This keeps the wheels from causing the thin stock to bounce around. The second trick is to learn the direction of runout of the wood. You can sometimes see this after ripping an edge on the table saw; the grain will "fray" predominantly in one direction. You want to feed the board opposite the direction of "fray," or in other words you want the grain to go "uphill." It's pretty rare for a board to have absolutely no runout. The third trick is to raise the end of the board as you feed it, and raise the board as it exits. This keeps the ends against the platen, using the feed wheel as the fulcrum, and prevents snipe at the ends. Now this works best for all softwoods, and woods normally easy to plane by hand, such as oak, mahogany, walnut... I would not do this with your prized boards of figured woods as the grain direction changes with figured woods and you'll tear up the board. Some woods like padauk, bubinga, ipe, shedua (ovangkol), even Indian rosewood, have grain that runs both ways no matter how well quartered it is, and you just have to judge how far you can take it down before there's not enough meat to the wood to hold itself together against the pull of the planer knives. In fact my last build, I used Indian rosewood from LMI and thinned it down with the planer. I have a nice figured cocobolo set and will probably thin that manually with my scraper plane! I had just taken down a stack of topwoods and some back and side woods just this way with great results, and will post a pic when I get a chance.
|
|
#89
01-03-2015, 02:52 PM
|
|||
|
|||
|
A brushed motor makes more sense to me. If it was a single phase induction motor I was keen to see how you did it. Mind you I have not been in that part of my field for a while so they may have come out with good single phase speed controllers. Only a 13" eh?

|
|
#90
01-06-2015, 10:24 PM
|
|||
|
|||
|
Trying to get a lot of other things done, some of my tools are in need of some care, never enough time. I did spend some time leveling the frets by running a file lengthwise up and down the neck. This creates a flat spot on the top of the frets so I need to round them over and get them smooth again.
Pretty low tech, I have a needle file which I ground down the one edge so I can run the edge against the fretboard and I limit the amount I mark it up. Two layers of masking take to protect the board, just file along the side of the fret holding a 45 degree angle give or take. Round off the edges of the frets. Clean it up with 220 grit sandpaper, up to 600 grit, then use some crocus cloth to give it somewhat of a polish. Not a $100 fret job but then again it is only a $50 guitar. 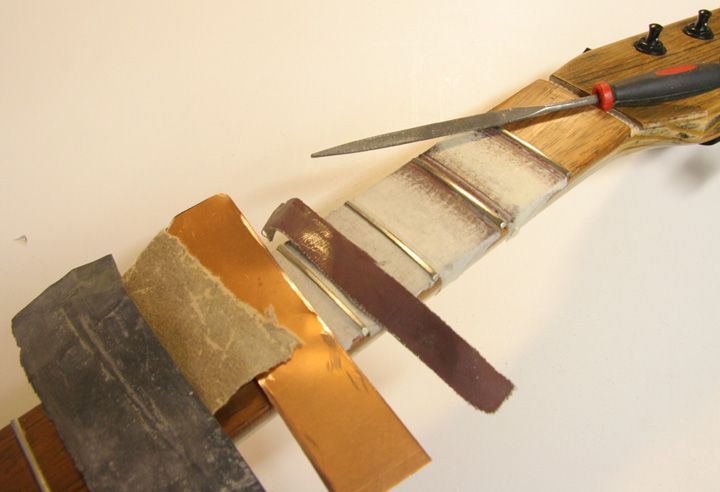 With the frets done the next thing is to determine the bridge location and remove the finish from the guitar so the bridge can be glued down. So far I have been determining if the neck angle is right and the bridge is in the middle of the guitar by stringing up the two E strings on either side of the fretboard. I have a board that gets clamped to the body at the heel and the bottom of the guitar. At the end I have a couple of blocks with the one on the outside held in place with a screw. Between the two blocks I have a pair of steel pieces that I can slide up and down and side to side. There is a hole in each piece so that I can thread one of the strings though it and up to the tuners in the headstock. 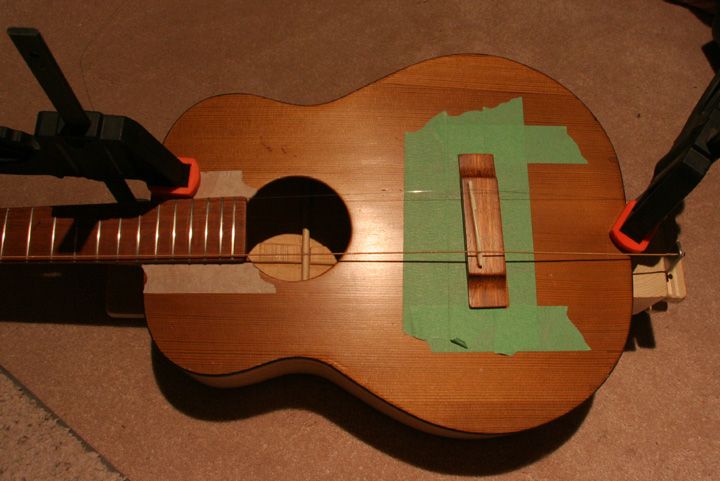 I move around the pieces until I have the strings parallel to the neck sides and the distance I want them from the edge. I make sure the bridge is the correct distance from the fretboard and make sure the strings are about the same distance from the ends of the saddle. I then take an exacto blade and scribe all the way around the bridge. I remove the bridge, take away the tape where the bridge sat, and now have to scrape the finish off of the body there so the glue has wood to stick to. Will do the scraping tomorrow using a razor knife blade. Moving along slowly.
|