
|
|
#1
 06-12-2016, 08:13 AM
|
|||
|
|||
|
I'm working on my 10th instrument, my 6th guitar. Still having trouble notching the kerfing cleanly and cutting the back braces to the right length, and since this can be seen through the soundhole, I want it to look really clean. Anyone have any tips or methods they like for this? Thanks, Danny Gray

|
|
#2
06-12-2016, 08:45 AM
|
|||
|
|||
|
Start with a razor saw, finish with a sharp chisel or Dreel and spiral endmill.
|
|
#5
06-12-2016, 11:39 AM
|
|||
|
|||
|
To properly mark the locations center the plate on the guitar rim and clamp it in place, then where the braces extend past the rim draw a line in the side of the rim to mark the location of each side of the brace. Transfer those lines to the rim top then with a straight edge connect the brace line as the brace would extent from one end to the other. Trace in the area on top of the kerfing, that is what you will rout out for your rebate.
__________________
Tim B
|
|
#6
06-12-2016, 11:56 AM
|
|||
|
|||
|
Before marking the braces for cutting to length and fitting them to the notches in the lining, I carve the top surfaces of the brace ends down to slightly greater than 1/8" tall. Then, to mark the braces both for cutting to length and to fit the notches in the lining, I place the rims on top of the back with the centerlines lined up and then use a sharp pencil to trace along the edge of the lining across the tops of the brace ends and then mark the lining above each side of each brace where it intersects with the lining. Some people use an x-acto knife to mark the lining to get a finer mark.
To cut the braces to length, I measure out from the line drawn across the top of a brace end and draw a parallel line that's a little less (1/16") than the width of the lining away from the first line and cut there. You may already know this, but some people run the tucked brace ends right through the sides and then cut them off flush with the outside surface. To get a good fit for the width of the notches, after marking the brace positions on the lining, I flip the sides over and lay a straight edge across the sides from rim to rim to line up the marks on the lining for opposite ends of a given brace and then transfer the marks on the side of the lining to the top surface of the lining. I then shade in the the area between the lines and rout between them. If the notch is not quite wide enough after routing, I use a chisel to widen it to fit. I use a Dremel to rout the notches to a fixed depth of 1/8". Once the notch widths are good, I then carve/sand the heights of the brace ends, which are slightly taller than 1/8", down gradually to match the depth of the notches.
|
|
#7
06-12-2016, 01:11 PM
|
|||
|
|||
|
I do the pockets first, then fit the braces to them, then stick bits of rolled over masking tape on the braces, and press the back down onto them. After pulling up the braces, mark where the ends are (I use more tape), and glue between the marks.
Note that there are 3 bits of tape under each brace in the last shot, and they're rolled tighter and oriented differently than the first ones. I had to redo it because that back wanted to have a bit too much of a radius and pulled up the tape in the second shot to where the positioning wouldn't be accurate enough. 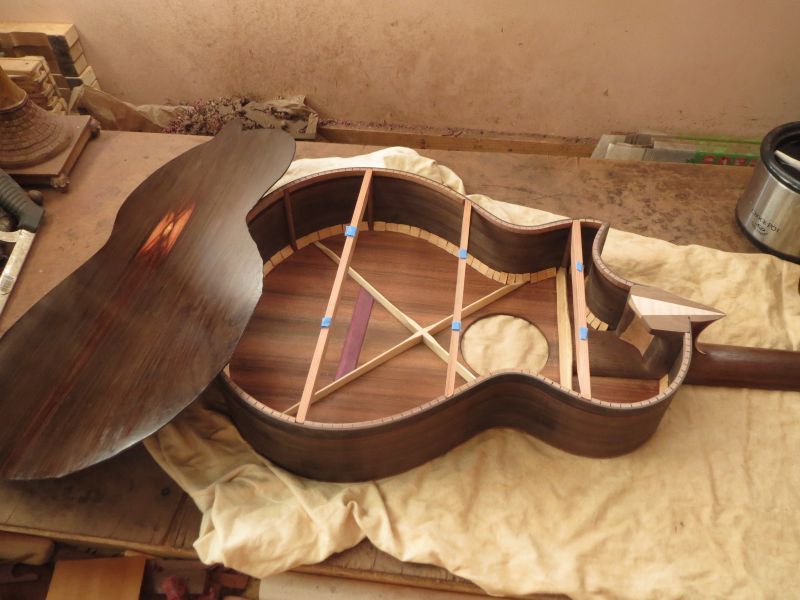 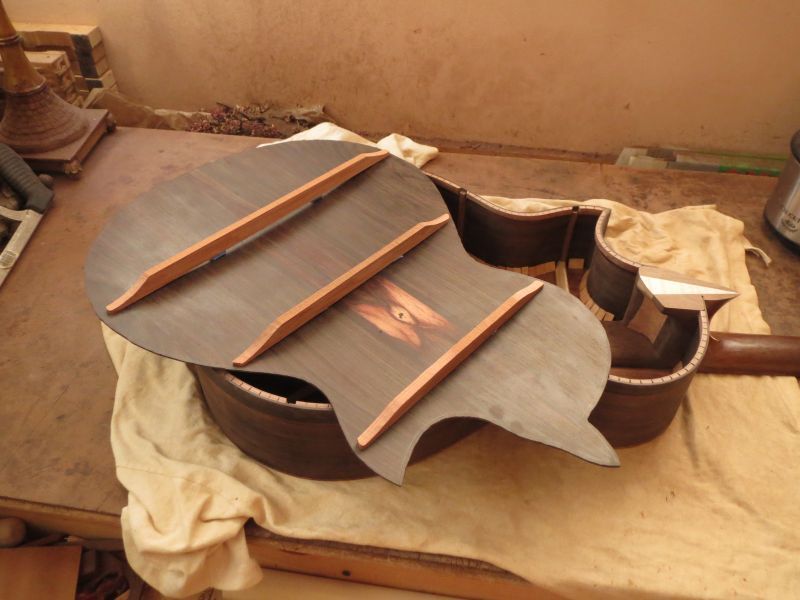 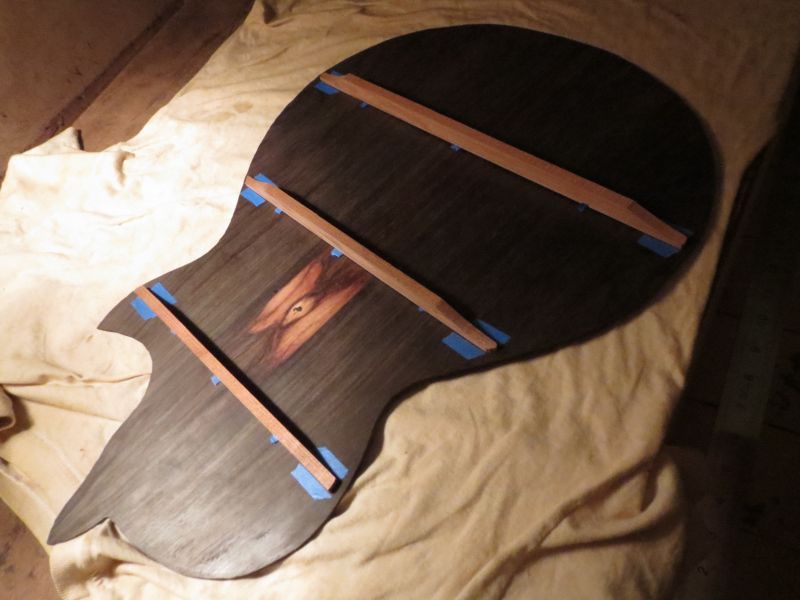
|
|
#8
06-12-2016, 05:27 PM
|
|||
|
|||
|
I leave my brace ends long that I can mark the ends from the outside. A straightedge and pencil finishes the marks, and I cut inside the marks I made.
I should add where the braces meet the linings at a sharper angle, I do as described, but clean the inside corners with an x-acto knife. I also prefer to not cut the side wood to fit the bracing, so I simply trace the outer profile on each brace, measure "in" the thickness of the sides and mark that, and cut the braces to that mark. When you do it right the back (or top) "clicks" in to position... a very satisfying feeling!
|
|
#9
06-13-2016, 07:41 AM
|
|||
|
|||
|
I've always done it like Louie too, just leave them long then it's easy to mark them off. Use a razor saw to cut the outline and always err on the side of too small. Always always always use a brand new exacto blade and mark out the depth then just chisel out the waste.
I've actually started doing things slightly different. My design philosophy lately has been to loosen the structure towards the rims on both the top and back. In regards to back bracing I taper the brace ends to near zero. The brace ends are paper thin to the edge of the back and then I just glue the linings right over that. It looks super clean because there is no notch and it sort of marries two design ideas, taper to zero reduces stress, and held down by linings.
|
|
#10
06-13-2016, 09:35 AM
|
|||
|
|||
|
On the last 3... I glued the kerf linings into the sides after bracing the top and back. I fit the brace ends to the unlined sides - then mark the sides and glue in the linings with gaps where the braces go. Then - I dry fit the top or back and fit another piece of lining onto the side over the brace end. Much more clean this time and a nice tight fit on the brace. It would be harder with solid linings or reverse kerf linings.... But I am going to do it this way for now.
 Thanks
|
|
#11
06-13-2016, 10:31 AM
|
||||
|
||||
|
I do not obsess with this fit as I would rather have it a little loose than too tight, which allows the back to find its natural position more easily when bent glued on, which closes my box.
After laying the back on the rim set, I mark the outside brace location with a pencil. Cut the perpindicular walls with a razor saw. And then I remove the waste with a chisel. I view this as an entirely non structural fit as long as the ends of the braces are retained against the possibility that the glue fails down the line. Last edited by Bruce Sexauer; 06-13-2016 at 07:01 PM.
|
|
#12
06-13-2016, 05:21 PM
|
|||
|
|||
|
I also leave the braces long and notch out a gap for the braces to fit through. Trim the braces so they have a little wiggle room in case they expand so they do not press up against the sides.
__________________
Fred
|
|
#13
06-13-2016, 10:28 PM
|
|||
|
|||
|
I do mine somewhat like dekutree, tapering the ends of the braces and fitting them into the linings. I use a single-edge razor blade to cut the edges of the pockets (only works on soft woods!), then take out the rest with a chisel. To stick the braces down on the back, I put the braces into their pockets on the rim, put the back on the dish, and put the rim with braces in place on the back. A few gobars hold the braces in place while I put tape on the back like dekutree to indicate the brace locations, using several layers of binding tape for its thickness.
 Then pull off the gobars and the rim, and glue the braces with the gobars back on, located by the tape. It sounds more complicated than it is to do. Dead on location, clean cuts in the linings. Pat
|
|
#14
06-14-2016, 07:58 AM
|
|||
|
|||
|
Use reversed linings,no blow outs. My mold has nails along the center line of the outside edge. I use large elastics for gluing both the top and back to the rims and attach them to the nails. With the rims in the mold and braced sideways and lenghtways, the back is aligned in it's correct position and elastics installed across and over the length to hold it exactly in place. Any movement during this process can easily be corrected after elastic installation. The mold is now placed back down on a carpet covered bench. The brace ends are marked next to the lining with pencil. This allows me to gauge my length later. With a sharp marking knife I mark the width of the braces. Also the length of both ends of the center reinforcement strip on the back. Back is removed and with a straight edge across the back the marks of each brace are placed. The ends of braces are shortened using the pencil marks. They are left just short of the thickness of the linings. They are then taken to a common height where the enter the linings. A dremel set to this height is used to cut the pockets. After center strip is cut to markings,the top can be tried on the rims. If you have worked carefully they will fit very nicely.I then check with a thin feeler gauge .002" to make sure none of the braces are proud. This can be corrected by sanding any brace end that does not grab the feeler.
Tom
__________________
A person who has never made a mistake has never made anything
|


