
|
|
#1
 10-01-2017, 09:40 AM
|
|||
|
|||
|
Neck is off and joint is not the doweled butt joint I expected but a sliding dovetail (or locking dado). Pics -
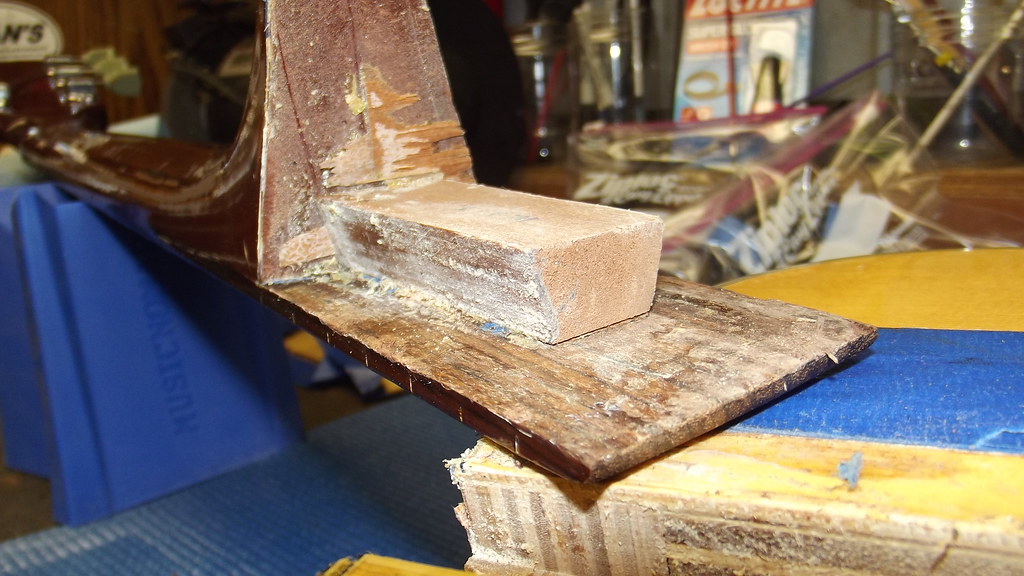  My goal is to reduce the heel for proper neck angle and leave the dovetail in place while adding a bolt-on conversion for ease of future work. There is already a factory installed bolt at the heel's bottom that they used to hold the heel in place while the glue dried, so with the kit, there'd be 3 bolts total. My questions to this point: 1. How to treat the tail and/or socket so that they allow the neck to be pulled back once the heel's reduced, while maintaining the design's integrity? So far as I can tell, the tail's part of the neck, so it will not permit the neck to be pulled back without excess tension on everything, and I don't want to force/stress it. To allow the neck to angle back, it would seem necessary to cut a slot at the top (neck side) of the tail down to the fretboard's bottom that would effectively severe the tail from the neck, but there's got to be a more pro way to handle this issue. Alternatively, it might work to reduce the thickness of the wide part of the neck-end of the tail by some amount, with a gradual tapering of the reduction to zero at some point on the tail as it approaches the soundhole end. That should allow the neck to rotate back a bit. I can't tell if material would also need to be removed from the slot to allow the needed forward movement of the tail's bottom to avoid stress on the joint from the rotation. I don't want to change the scale in any way, or impact the neck alignment the dovetail provides. I can't find anything online about resetting this neck joint, which suggests it wasn't intended to be reset - challenge accepted. 2. The tail/socket didn't appear to have much, if any, glue. I plan to lightly glue the fretboard extension to the top, and to not glue the heel. Assuming the bolt-on conversion works, is there any need to glue the dovetail? I'm trying to keep future work easily accessible, and am not as worried about tone from this plywood guitar (though it sounds good!). My goal here is the old pre-NT Taylor 2-bolt neck. Thanks for any guidance. Last edited by ChrisN; 10-31-2017 at 02:29 PM. Reason: Old title had half the views of other threads - possibly confusing 
|
|
#2
10-01-2017, 05:58 PM
|
|||
|
|||
|
Fixing the neck angle given the existing joint's geometry is going to be a challenge.. Perfect opportunity to switch over to a bolt on neck.
First thing I would want to know is... How much room do you have in the head block for adding neck bolts? Then... Since you are in it to win it with the neck reset on a cheap miscellaneous guitar - why not replace the top with a spruce top. Then you can saw off the extra huge head block extension to give yourself some room for neck bolts...
|
|
#3
10-01-2017, 07:37 PM
|
|||
|
|||
|
Quote:
Replacing the top, to me, is the same as your handing me a single back brace and saying "hey, why not build a guitar around this excellent brace?" I'm a mere rookie doing this on the cheap! In other words, a Very Big Deal that could cost $$ and leave me with a broken guitar. Resetting the neck angle will make me happy. I've got (way too many) "nice" guitars so I don't need to make this one in their image. Plus, my plan is to keep that sliding dovetail, if at all possible, hopefully without gluing it in. It's a quasi set-neck that provides a nice tight fit I wouldn't get by bolting flat surfaces together, so better sonics, plus it adds strength and stability for handling, humidity, etc. Godin went to a very similar design (more mortise/tenon, than dovetail, and epoxied) from 2006 on for those reasons (zip up to 20:43 for neck joint): Thanks for the input. I was looking for outside the box lutherie, and you delivered.
|
|
#4
10-02-2017, 02:00 PM
|
|||
|
|||
|
. . . I need to replace the wood that got pulled of the top of the guitar, something I've not done before.
I've got shim stock id'd as "mahogany veneer woodturning segments" that are pretty thin. I don't believe a mahogany shim on this "mahogany" lam-sided guitar is going to be a problem, but let me know if that's an issue. Am I correct that the procedure is for me to chisel out the stray old wood shards so there's a uniform open area in a reasonable shape, then cut that shape out of the veneer and glue it into the exposed area, followed by sanding flat after it's dried? Let me know if there's a better way. Thanks
|
|
#5
10-03-2017, 06:49 PM
|
|||
|
|||
|
Since this guitar has a bolt on the heel already - why not floss the neck heel to body joint and re-establish the correct geometry. Then bolt it back up with the existing bolt and see if it runs right.
I wouldn't make it more complicated than it needs to be...
|
|
#6
10-03-2017, 08:30 PM
|
|||
|
|||
|
Quote:
Barring hearing something neither of has thought of, your suggestion will be the way I'll go. I'd just like to confirm that's the best answer while it's apart. I assumed others had run into this joint in their as it's been around for at least 40 years, but it's likely that nobody's bothered to mess with the joint, even if they've done some degree of reset on these guitars. I'd like to learn if the tail is an extension of the original neck wood, or if it's added and simply glued to the fretboard. Given its role as a structural member, I'm guessing it's part of the neck, not an add-on piece. The learning's a big part of the reason I'm doing this repair. Thanks for your contribution to the process. Any thoughts on my query above re: installation of shim stock to fix surface damage?
|
|
#7
10-31-2017, 02:03 PM
|
|||
|
|||
|
I've finished the project to my satisfaction. In the event you can access this album, you'll see the photos showing what I did. http://www.flickr.com/photos/1542478...57687328187264
I wanted to keep the tenon to preserve scale/intonation, fretboard alignment, structural stability, sonic integrity, etc., and maybe prevent having to glue the extension down. At the same time, I was going to take a fair amount off the heel, and I didn't want to have the full tenon adding unnecessary resistance and stress to that dovetail joint. So, rather than chop off the tenon and just bolt on the neck, I used a hacksaw to cut 2/3 of the way through the tenon to give it some room to bend back with less stress. I had a nice bolt kit from LMI (though the bolts provided were 1/4" too short, necessitating a run to the store) that provided for 2 bolts/inserts, but I elected to not overstress that aged and dried out heel by putting a bolt/insert in place of the existing factory bolt/nut arrangement and instead added just 1 new bolt/insert in the middle. That, plus the rear bolt, and in combination with the intact front tenon, makes for a very strong connection that, when strung to tension, holds down the fretboard extension nicely, without glue (and no 14th fret hump). I oversized the hole for the insert and Titebonded it into place, an alternative installation suggested by LMI to avoid cracking the heel by forcing threads into the old wood, and it seems to be holding fine. So now it's a 2-bolt and 1 sliding dovetail neck that quickly and easily removes for further adjustments, or for travel. I still have to intonate the B string a bit, but the rest are fine as is. I purposely overset it a smidge so I could get to my preferred 4/64 and 3/64 while maintaining a .150" saddle height, but there's no buzzing anywhere, even with almost zero relief. It may not look like much, and I did chip the heel finish at the edge during the reduction, but this 40+ year old Martin OM knockoff from Japan plays beautifully and sounds great, to me. I'm pleased with the way it turned out, and with the learning experience the project provided. Thanks to all for the input that helped me get there.
|
|
#9
10-31-2017, 07:04 PM
|
|||
|
|||
|
Thanks TJ. I've got several Taylors that are technical perfection, but this Conn is the one I leave in the rack that gets played every day. Doing the work myself made it more my own. Very satisfying.
|


