|
|
#1
 01-10-2018, 12:02 PM
|
|||
|
|||
|
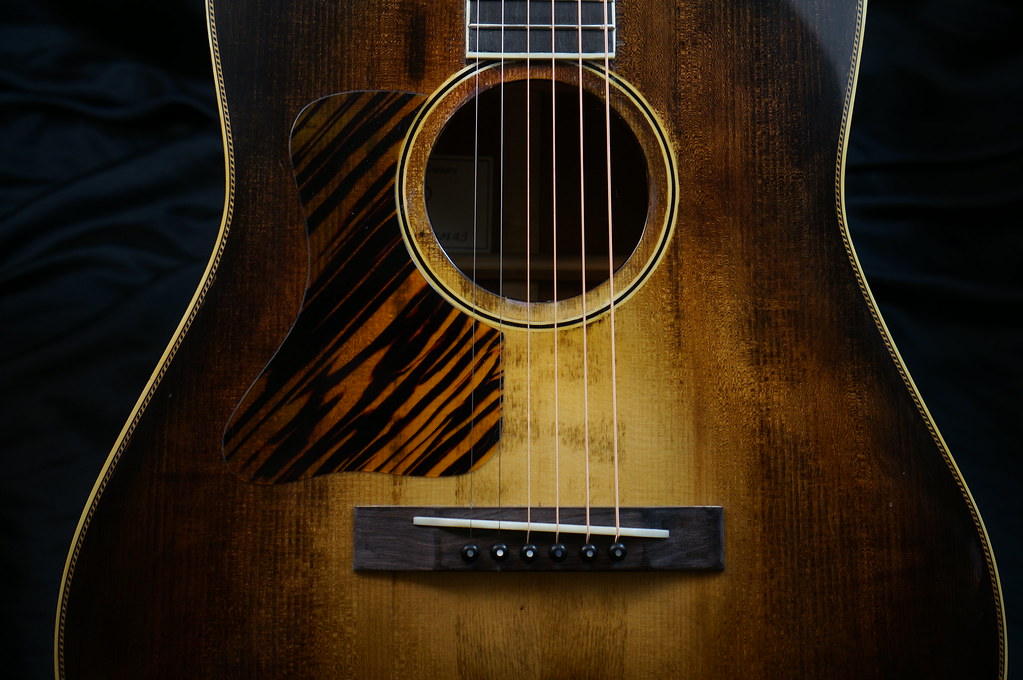
Hello agf. Just wanted to share build #8, a 12 fret jumbo with Roy Smeck stage deluxe specs, 16” lower bout, smaller (3.8”) soundhole, 4-25-4.5” thick body, etc. I did an actual build thread over on leftyfrets....because this is a lefty (not a pick guard eff up).
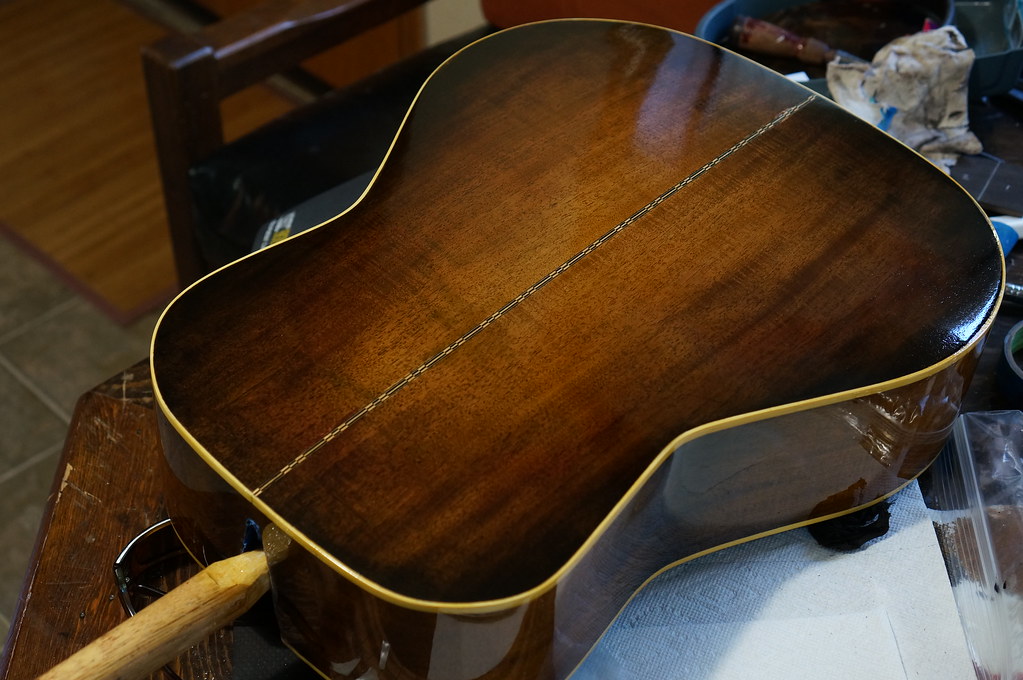
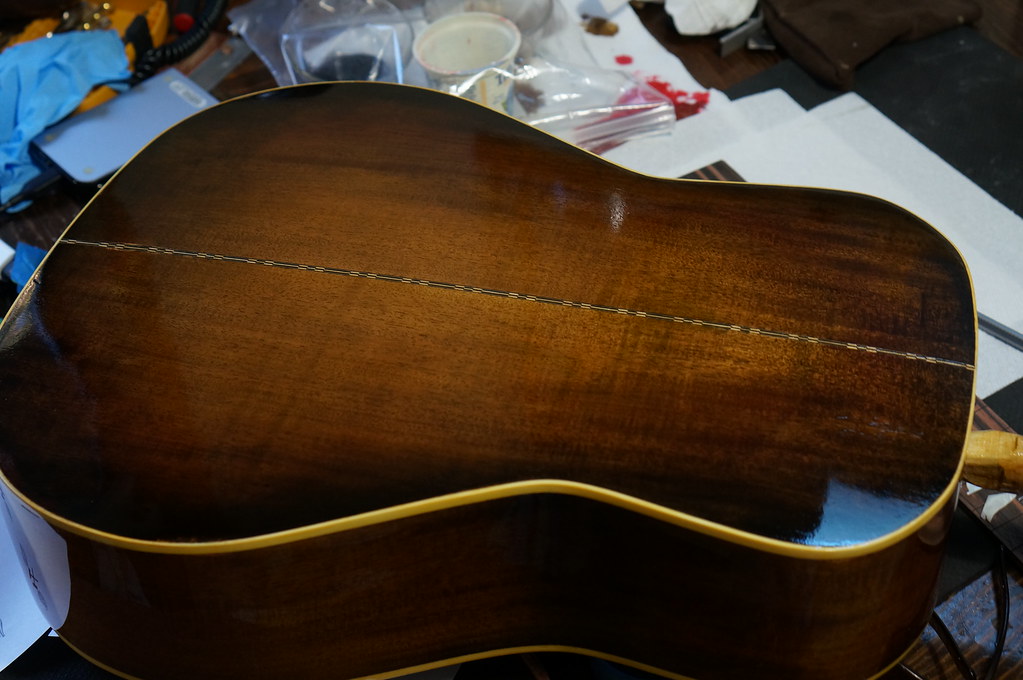
I got great info from Dale Fairbanks and Roy McCallister on Smeck specs etc (the luthier community is so open - so grateful). I originally built it with tapered X braces with the idea that if the top was too tight after building I’d do what Gibson reportedly did and what I believe Kim walker does now, and that’s trim braces after build. Indeed, the top resonance of this was 200+hz, whereas most dreads and jumbos are closer to 180 hz and sometimes lower. I did some what I’d say is relatively mild scalloping to get it to 190 hz and I really like the crisp bass and piano balance string to string. I shot some pics in my diy photo booth, did a video too and tomorrow it ships to its owner in Texas! I love this guitar and will be sad to see it go. But not too sad. It took two bursts and top finishes, 2.5 necks, 1 neck removal after glueing etc etc..... Specs: Hampton bros red spruce top (graduated top ala preston Thompson guitars) Cuban mahogany back and sides Honduras mahogany neck Gabon ebony fretboard and headplate African Blackwood bridge Ivoroid binding and rope purfling Hand rubbed sunburst Varnish finish Bone saddle and nut Red spruce bracing Hot hide glue construction Peone blocks for top join 25’ radius top, 12’ radius back 4.5 lbs VIDEO https://www.youtube.com/watch?v=cuUJKV8vIyE&sns=em 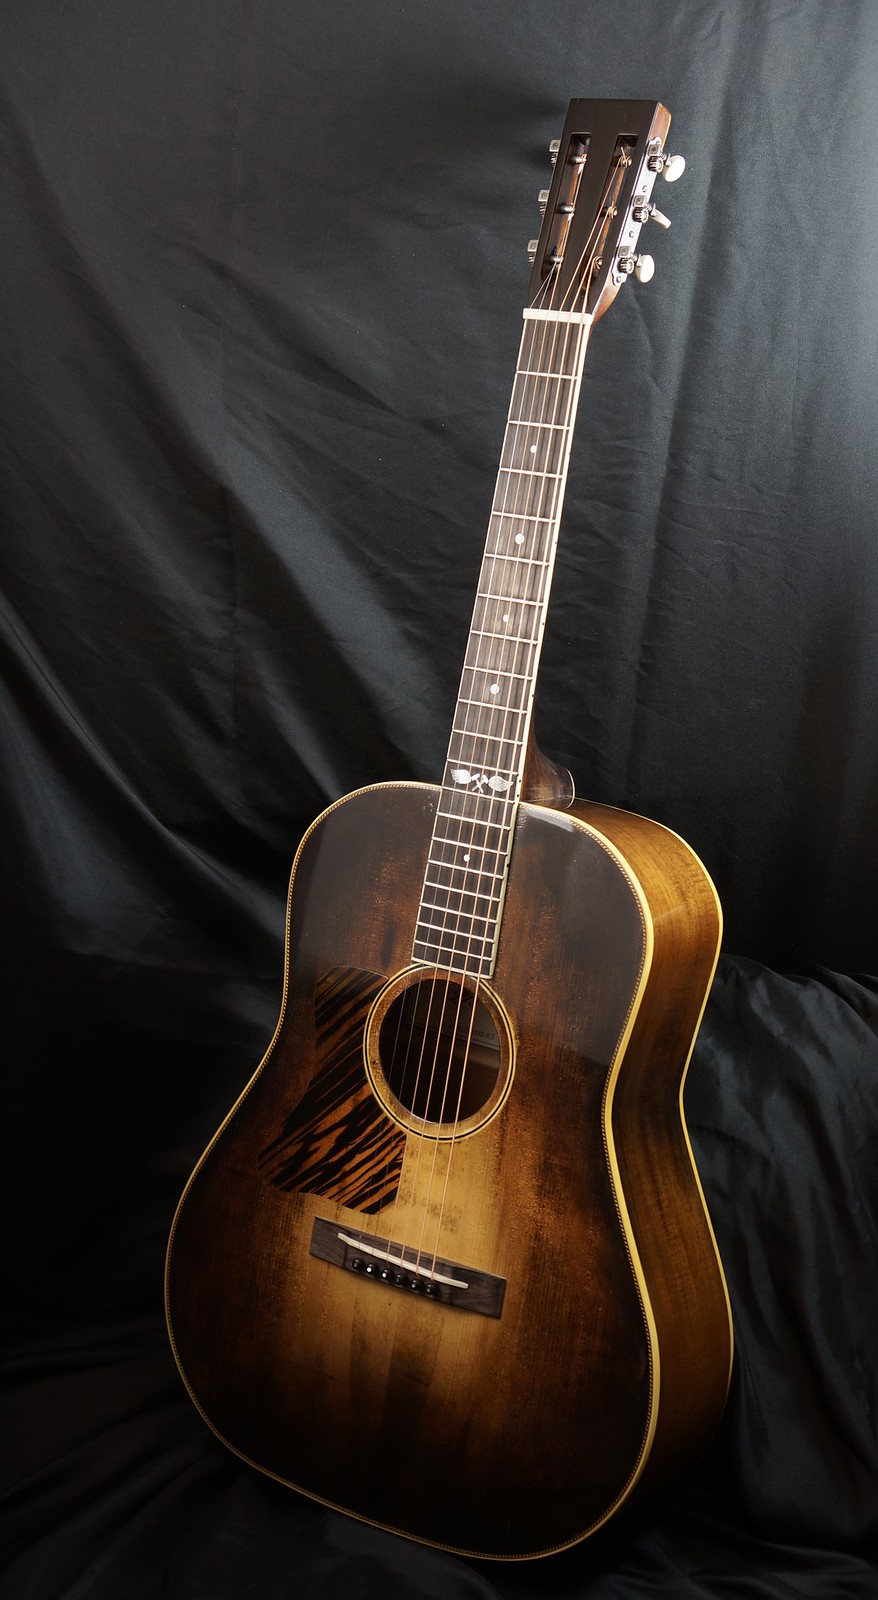 Untitled by Sam Van, on Flickr Untitled by Sam Van, on Flickr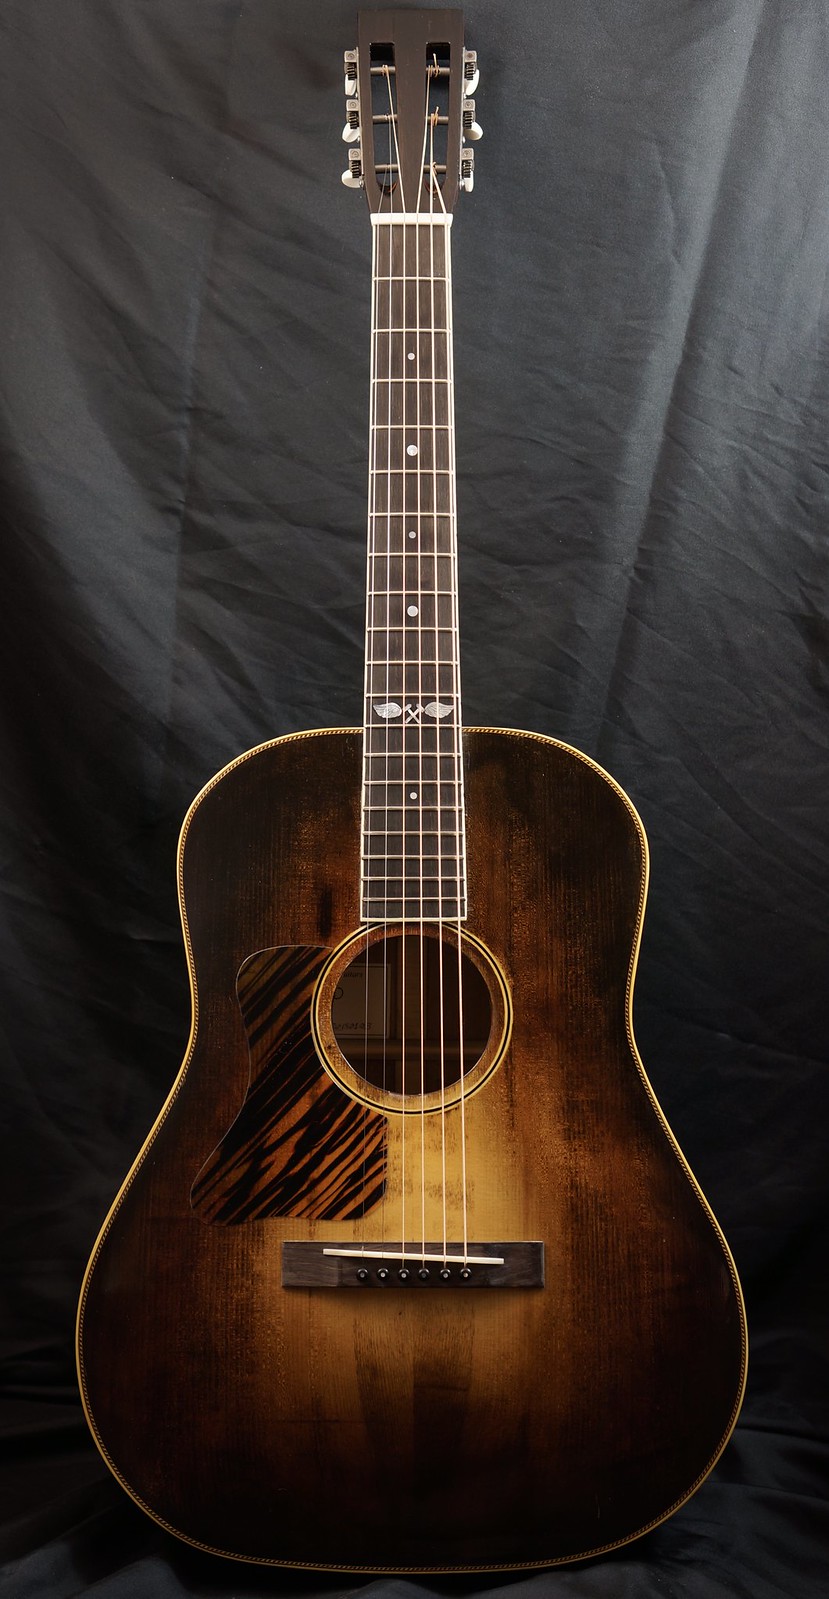 Untitled by Sam Van, on Flickr Untitled by Sam Van, on Flickr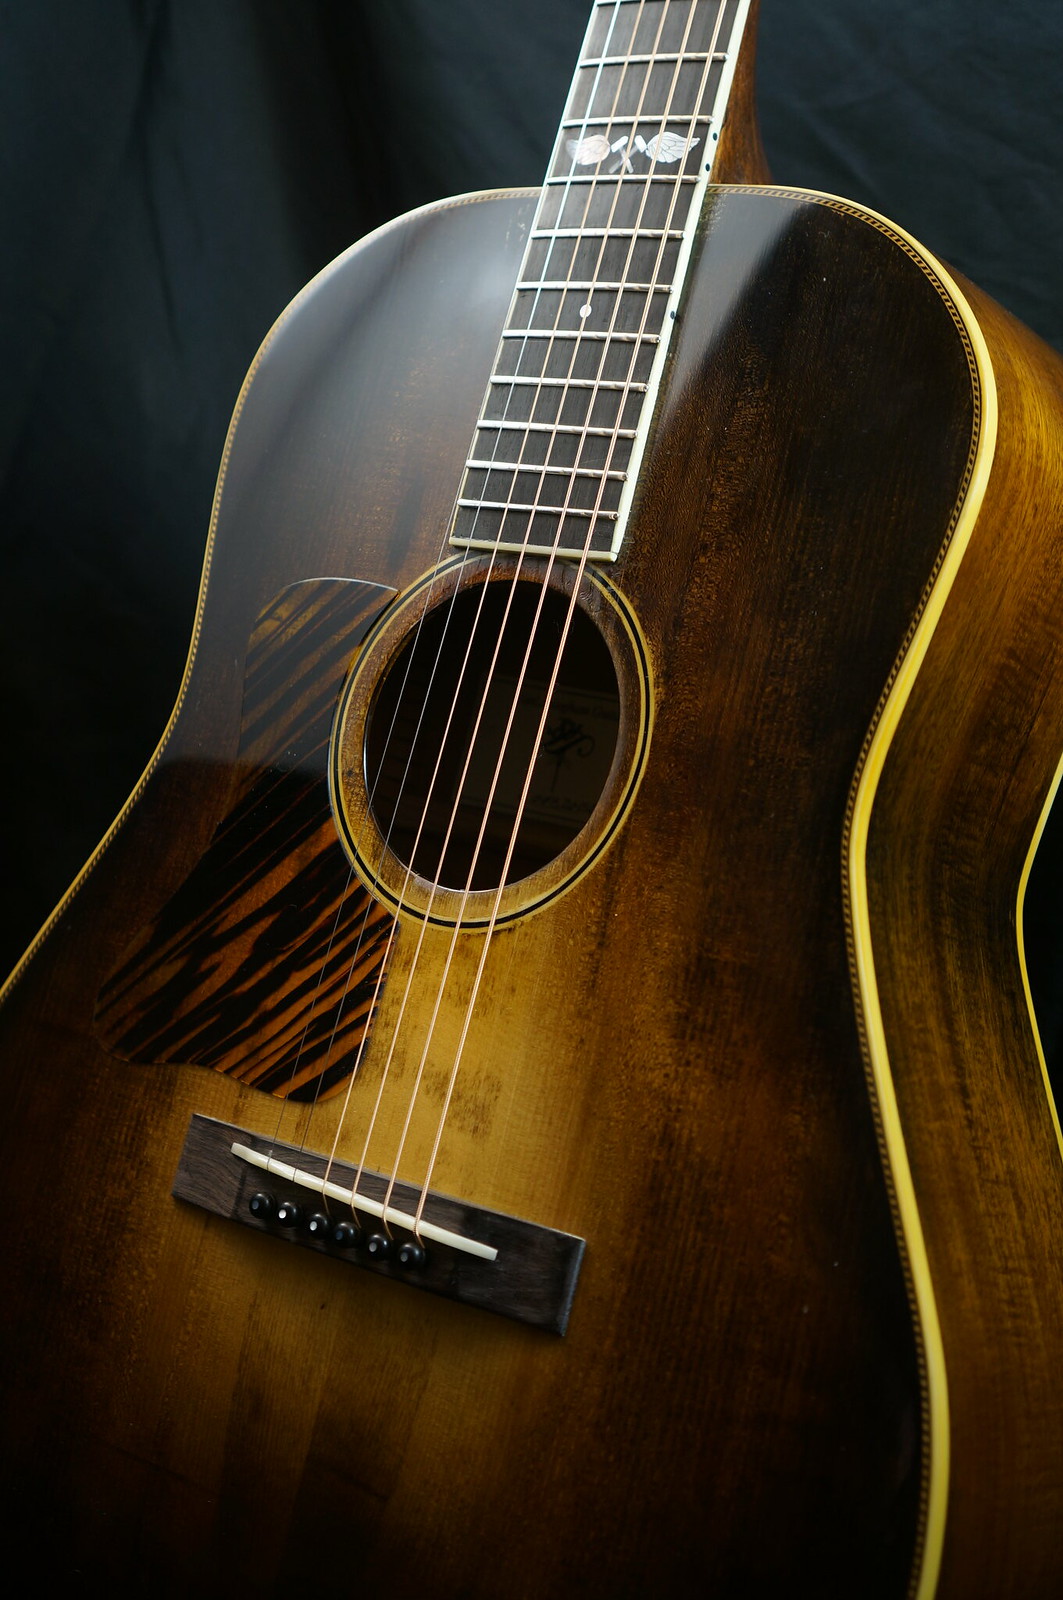 Untitled by Sam Van, on Flickr Untitled by Sam Van, on Flickr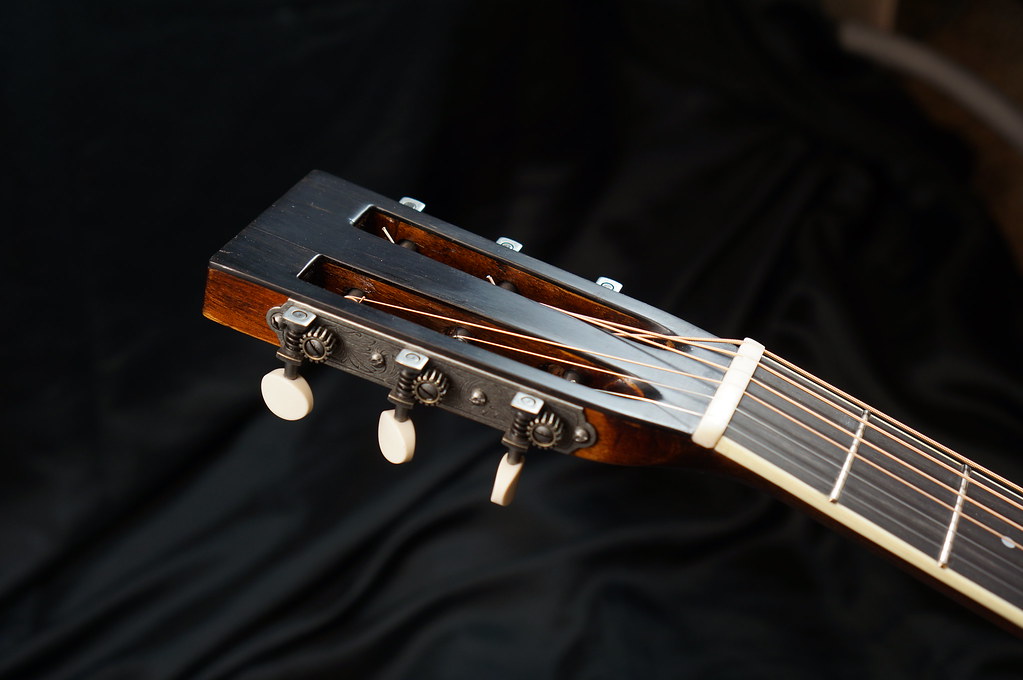 Untitled by Sam Van, on Flickr Untitled by Sam Van, on Flickr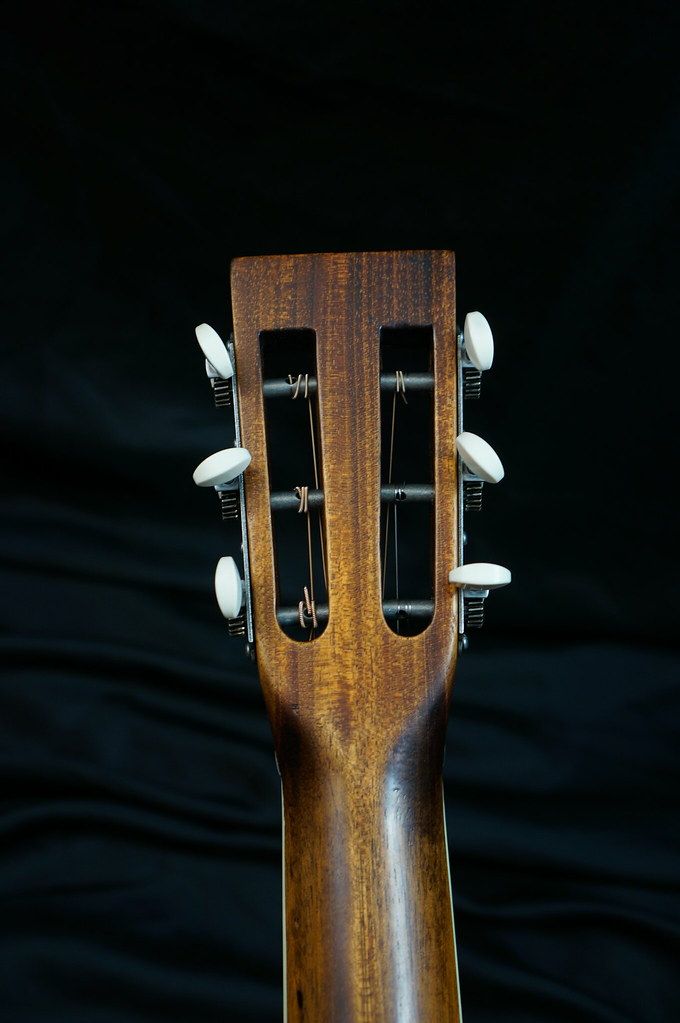 Untitled by Sam Van, on Flickr Untitled by Sam Van, on Flickr
Last edited by Sam VanLaningham; 01-10-2018 at 01:05 PM. 
|
|
#2
01-10-2018, 12:03 PM
|
|||
|
|||
 Untitled by Sam Van, on Flickr Untitled by Sam Van, on Flickr Untitled by Sam Van, on Flickr Untitled by Sam Van, on Flickr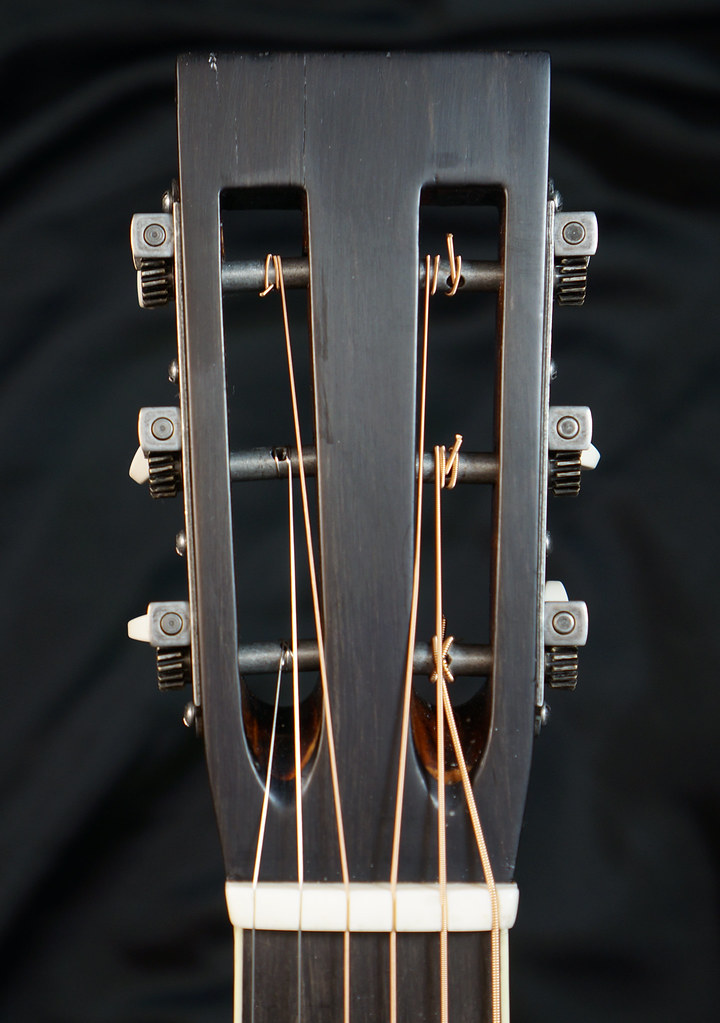 Untitled by Sam Van, on Flickr Untitled by Sam Van, on Flickr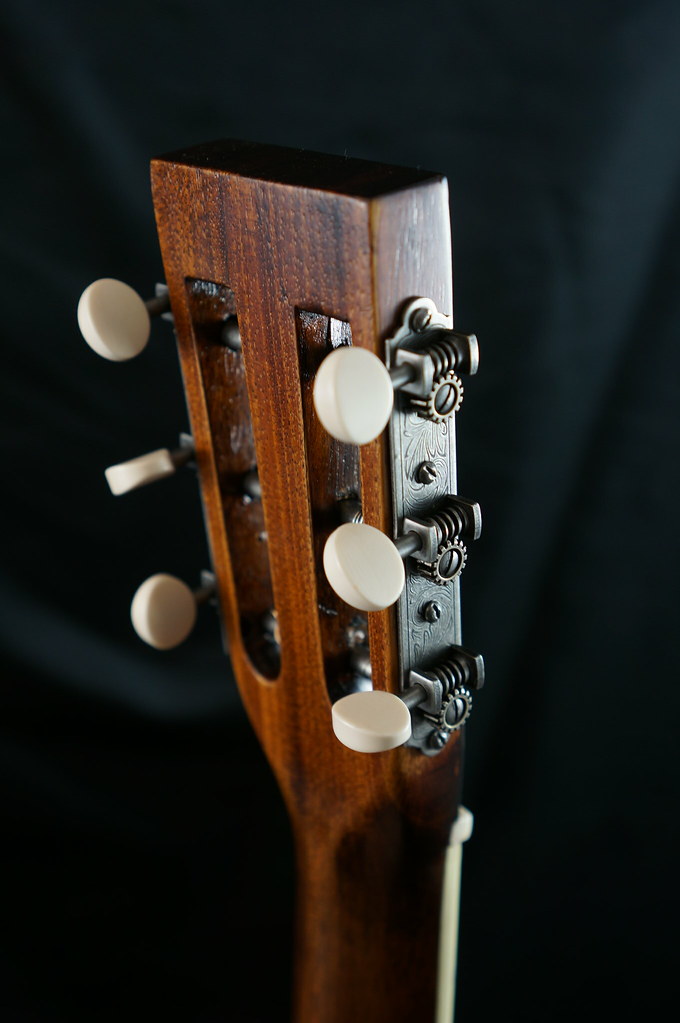 Untitled by Sam Van, on Flickr Untitled by Sam Van, on Flickr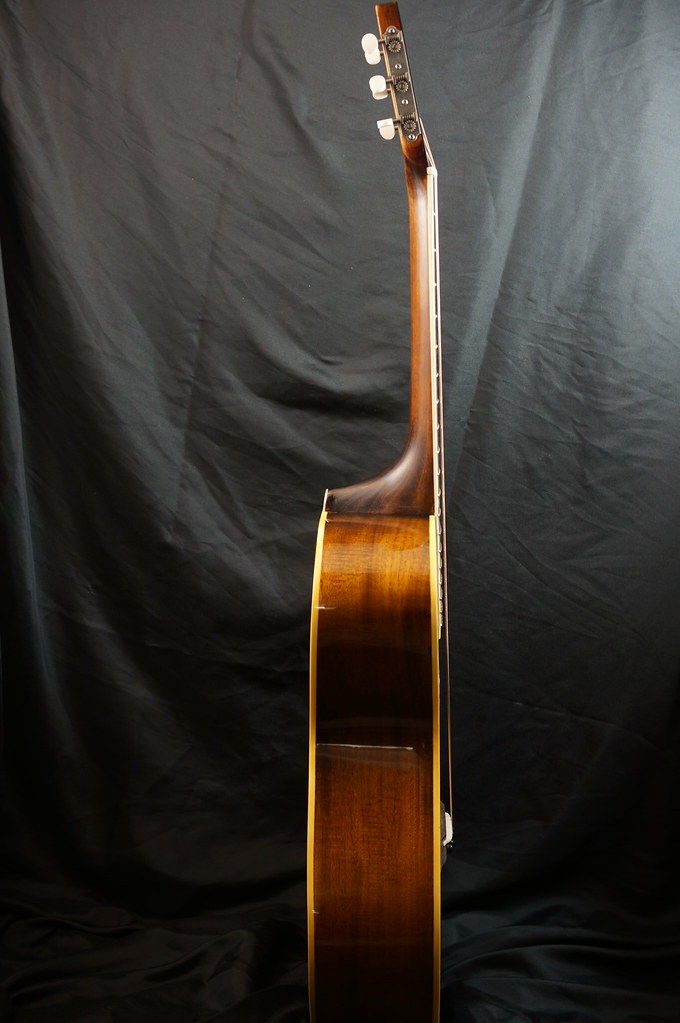 Untitled by Sam Van, on Flickr Untitled by Sam Van, on Flickr 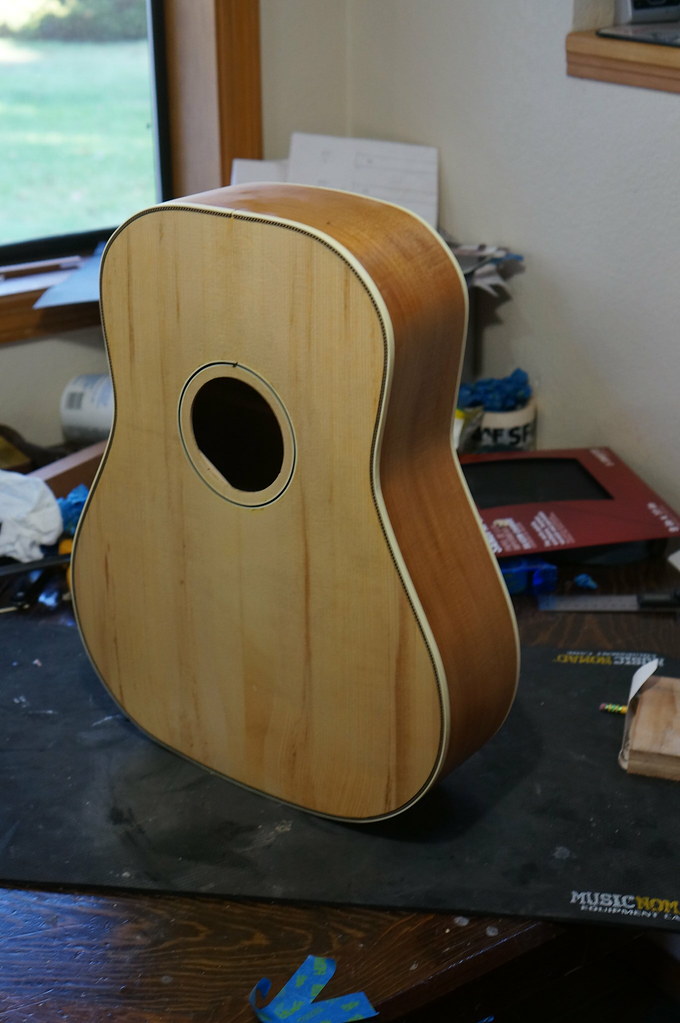
Last edited by Sam VanLaningham; 01-10-2018 at 01:16 PM.
|
|
#3
01-10-2018, 08:36 PM
|
|||
|
|||
|
Beautiful job, Sam! The burst has a lovely "vintage" look to it that I like. Only thing is you put the pickguard in the wrong place!
 Otterhound would approve, however! Otterhound would approve, however!
|
|
#4
01-11-2018, 12:23 PM
|
|||
|
|||
|
Thanks Louie! Its shipping to Texas today and Ill be sad to say goodbye to it being Im a lefty myself.....and indeed otter might approve!
Sam
|
|
#5
01-11-2018, 05:11 PM
|
|||
|
|||
|
I really like that sunburst too and was imagining something similar for the build Im doing now (a howe-orme style cylinder top).
Would you mind sharing what you use for it and any tips for getting the application right? I didn't see many details in the lefty build thread either.
|
|
#6
01-11-2018, 09:55 PM
|
|||
|
|||
|
Yeah no prob Carl! And can’t wait to see the Howe-Orme progress.
So I use the water based aniline dyes. Got mine from lmi. I add to just boiled water, say in this case, Black, Brown, and Amber in separate containers and of course mix each one to dissolve all particulates. I use old cotton tee shirts to rub the stain. Although the first couple times I followed a YouTube that suggested starting in center and working way out, that is NOT the way to go in my experience. I always work dark to light, out to in. In fact, I’m now going to always mask off center of the burst, as I did on this one. I did it in a tear drop shape centered around bridge. I will do this forever more because it has proven to be impossible for me to not significantly and inadvertently get the center too dark through the rub process. So I’ll start with black and wipe it around edge in say a 1/2” wide swath, pretty much as damp as I want but ideally to the consistency that allows it to go on smooth and complete ish. Then I’ll come back with medium damp tee of dark brown pretty much overlapping with the edge of the black, and maybe that brown will be a bit wider because I also might begin a half arse but tight looping rubbing pattern. At this point I might try to fade the black and dark brown, maybe not. I think I end up redoing that a zillion times anyways to get as good a fade as possible. Then amber comes in, and on this particular burst I’d say thats the main color, if there is one. I think now I usually rub a swath of medium damp amber in between the tape edge and the dark brown edge and not necessarily touching either side, probsbly ideally not. When I like the shape and color consistency of the Amber then I’ll look for a part of the amber or dark brown rag that’s a perfect moisture consistency that’s good for fading but not for adding or taking away too much color. I might use the edge of color of the now moist dark brown and begin trying to fade the dark brown into the Amber. Using the amber rag if it’s nit too dry not too wet works as well. Judgement call here I suppose, shooting for what looks right to you. Then, the rest of the party is fading all three colors (in this case). This step always involves more rubbing that also adds a bit of color (i.e likely re dipping a rag in color) to get the right color consistency and is definitely the hard part. Again not too dry and not too damp in the transitional areas of black to dark brown and dark brown to Amber. It’s not a huge problem to re lay down a fairly wet swath of black as long as it doesn’t go all the way to the dark brown and same for amber. But I’d say I never trying to get too much moisture going from here on out unless I’m desperate because that ultimately guarantees re fading..... And now with this new to me tape step, when I think I’m close to done, then I’ll take tape off and fade amber to bare wood. This works best with a moist rag with NO color. But the color can be used too. Circular motions with all fingertips with a balled up (but smooath ended) rag sort of fashion is the main move but then I do also just use a concave up index finger (so pressure emphasis is on pad of first digit not end) seems to also be something I do for light fading...recollecting here  . .Be prepared that spruce is going to grab the stain in unpredictable and basically irreversible ways (if you’ve prepared your top to a specific thickness-if not sand it off but even then there will still be linear stain leftovers deeper in the grain = best to not sand though I’ve had to do it ). Englemann is way friendlier to stain than red spruce (and if you want some actual wedges of englemann (or the widest grained Sitka you might ever see) I got some for you for price of shipping). Ok fire away with more wuestions since I just streamed that. Take care. Sam 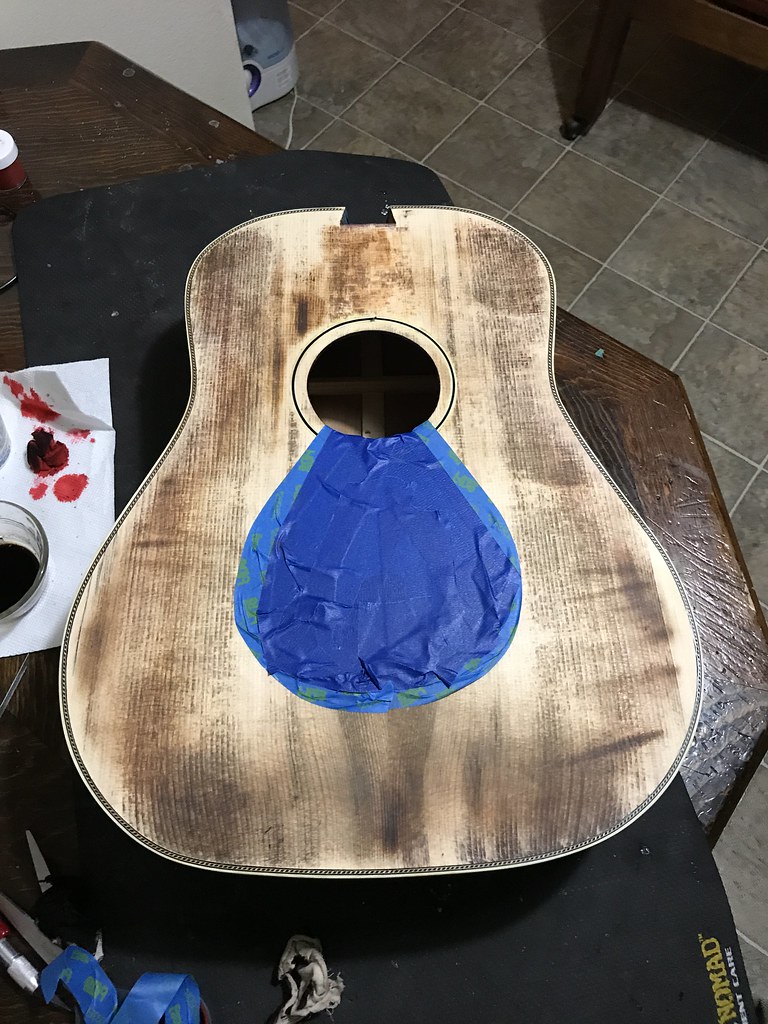 Untitled by Sam Van, on Flickr Untitled by Sam Van, on Flickr
Last edited by Sam VanLaningham; 01-12-2018 at 11:54 AM.
|
|
#7
01-13-2018, 02:11 PM
|
|||
|
|||
|
Thanks for all the info and the generous offer on the spruce, I got plenty of spruce or fir 2x6s so Ill try it out on that first. And yeah the top is already <2mm so I really only got one shot at this. I can just dye it solid black if I really drop the ball I guess. I need to build an electric one of these days to play around with the finishing so I can just run it through the planer and try again when I mess it up. They're just so boring compared to acoustics from a woodworking and engineering perspective though.
What concentration do you use the dye at? the LMI dye packs are 1/2 oz and they suggest 1-2 qt of water so do you use it straight like that or cut it again? Seems like a lower concentration might take longer but could be a little more forgiving and easier to blend. Im making some good progress on the howe-orme and should have some new pics uploaded later today or tomorrow.
|
|
#9
01-14-2018, 05:01 PM
|
|||
|
|||
|
Quote:
Yo Carl! I dont measure anything. I use single serving yogurt containers or similarly small vessels hehe. I add a couple oz of just boiled water and then add must not be more than an 1/8 teaspoon.....there's definitely NO risk in having it too thin or too thick because as your applying it, you'll see if its in the shade range your hoping for if that makes sense. Sam
|