
|
|
#1
 03-13-2013, 05:22 PM
|
|||
|
|||
|
In another thread, I mentioned that CNC was on my bucket list. I'm a gadget geek, a software weenie, and a guitar-building noob, so it's like a marriage made in heaven.
 Turns out that Jeff at Lobo CNC is based not too far from me, so we chatted about trying out his kit. He makes a small CNC mill kit. Comparable to something like the Zen Toolworks router kit I was already considering, but his mill has a few advantages:
Both the Lobo and the Zen are pretty much in the "toy" class compared to the big boys, and both are pretty limited in terms of range, but I figured this would let me get my feet wet as well as allowing me to work on stuff like bridges, inlay, and other small tasks. The Lobo kit can be ordered with most of the parts you need, including the motors and controller board, but the spindle (router), power supply, and steel rods used as drive shafts have to be ordered separately. A couple days after I talked to Jeff, this arrived from Lobo:  And the packing list sent me running to his site for instructions.... 
__________________
gits: good and plenty chops: snickers Last edited by gitnoob; 03-13-2013 at 06:09 PM. 
|
|
#2
03-13-2013, 05:28 PM
|
|||
|
|||
|
Good news, bad news. The good news is that the number of parts isn't overwhelming -- most of the box is packing material.
The bad news is that I got stuck after the first step, and the first step gave me a fit. There is no manual, just Jeff's comprehensive online instructions, so that meant I needed a computer in my workspace. Even with the computer, it's not obvious where to find the parts you need. For example, it took me a while to find the first set of brackets I needed (hidden in the router mount), and it wasn't clear which screws I should use to install them.  I assume everybody has one of these Mil-Spec dust-proof laptops, right? The robust heavy-gauge steel frame comes with holes pre-drilled but untapped. So Jeff provides self-tapping screws, and he warns about keeping them perfectly perpendicular to avoid cross-threading them. Three of the first four self-tapped just fine. The fourth was cross-threaded, and the force needed for the Right Way vs the Wrong Way isn't much different at first, so it's not obvious until you're in deep. Almost too deep for me, but I managed to get the screw out and correct the threading with a new screw.  Those were the 20 hardest screws in my life. 2 of those 20 screws were cross-threaded -- I used a pry bar to help get them out. I'd recommend pre-tapping the threads for less frustration. I didn't have any SAE taps in my tool box, so I had to run to Ace and buy a few.
__________________
gits: good and plenty chops: snickers Last edited by gitnoob; 03-13-2013 at 05:41 PM.
|
|
#3
03-13-2013, 05:32 PM
|
|||
|
|||
|
It gets easier after the frame is assembled.
The motors went on with few issues.  As well as all of the carriage plates and the final axes assembly.... 
__________________
gits: good and plenty chops: snickers
|
|
#4
03-13-2013, 05:35 PM
|
|||
|
|||
|
The router is held in place via the spindle mount.
 My router just arrived today, so I haven't a chance to install it yet. I went ahead and assembled the controller box next:  And mounted it: 
__________________
gits: good and plenty chops: snickers
|
|
#5
03-13-2013, 05:38 PM
|
|||
|
|||
|
I just got the power supply today, so I hooked the CNC rig up to the computer via USB, powered it up, and it worked!
That almost never happens. So far, I haven't done anything but verify operation and have the machine find its home position. I'm impressed with the kit, and Jeff was very responsive to my questions. I'll continue to play with it and try to come up to speed on the CAD/CAM aspects next.
__________________
gits: good and plenty chops: snickers Last edited by gitnoob; 03-13-2013 at 05:44 PM.
|
|
#6
03-13-2013, 07:38 PM
|
|||
|
|||
|
I suggest you try to learn a little G code as well. Makes program adjustments simple as well as being able to understand what the machine is going to do. If u have any questions let me know and I can try to help. I know Jeff will too
|
|
#8
03-13-2013, 10:00 PM
|
|||
|
|||
|
Quote:
http://jrkerr.com/lobocnc/parts.html So you're looking at around $800 for his full kit (including motors and controller), another $150 or so for the spindle and other parts, and then possibly third-party software costs on top of that (his free software includes the basic control and g-code interpreter). Worth it to me just for the education (and I don't want to go back to college), and I also happen to LOVE robotic toys. You might be able to do it cheaper on your own, and Jeff can probably chime in on cost reduction via different motors, etc., but this is clearly a robustly designed and well debugged kit. I think his background is robotics, and this looks like it started out as sort of an app note for his main business. It's nice to have hardware and software this complex work out of the box. One of the cool features, which I'm not sure other kits have, is that any manual control feeds back through the controller, so the software displays manual coordinate changes in real time. Sort of a built in digital micrometer.
__________________
gits: good and plenty chops: snickers Last edited by gitnoob; 03-13-2013 at 10:05 PM.
|
|
#9
03-14-2013, 02:54 AM
|
|||
|
|||
|
Absolutely fascinating. Incredible. I had no idea A Cnc could be that cheap. You are a wild man in the best sense I can think of! I cannot wait to see what you make with it. What's in the plans?
Sam
|
|
#10
03-14-2013, 01:57 PM
|
|||
|
|||
|
No grand plans yet, but I do want to eventually experiment with some bracing ideas I have that are a little hard to do with hand-carving.
Right now I'm staring at a steep learning curve for G-code, CAD/CAM, bit selection, cutting depths/speeds, greasing schedules, dust collection, etc. I hope to one day be able to make a simple cube.
__________________
gits: good and plenty chops: snickers
|
|
#11
03-14-2013, 05:16 PM
|
|||
|
|||
|
I really like what I see here. I used to do a lot of NC programming for aerospace using large CNC machines and have been wanting so bad to take up a project such as yours. I have not followed the pricing link you provided but wonder what the x,y,z travels are and it is full 3-axis?
|
|
#12
03-14-2013, 06:22 PM
|
|||
|
|||
|
Quote:
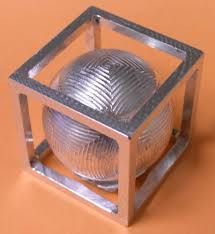 I made a couple when I was in machining school. They are pretty simple and good practice for designing parts and making toolpath. Plust they are cool to have around. People are always trying to find the joint. They never believe that the ball was cut out inside the block.
|
|
#13
03-14-2013, 07:30 PM
|
|||
|
|||
|
Quote:
Quote:
__________________
gits: good and plenty chops: snickers
|
|
#14
03-14-2013, 08:24 PM
|
|||
|
|||
|
To run it you will need to rotate 6 times. One run per side of the cube. The trick to a nice even sphere is to be sure you have a perfectly square cube to start with. Everything will hold together fine until the last operation where it will finally separate. When making tool path be sure it cuts from the center of the sphere outward so the last cut separates the sphere. On the last operation you will need to have the ball clamped as well as the cage to ensure the ball does not move. To do this I just used some hard rubber between the vice jaws and the part. It was hard enough for secure clamping yet had enough give to conform to the ball and grip it tightly. There are other methods to hold it but I found that to be the simplest.
|


