
|
|
#46
 10-15-2012, 11:23 AM
|
|||
|
|||
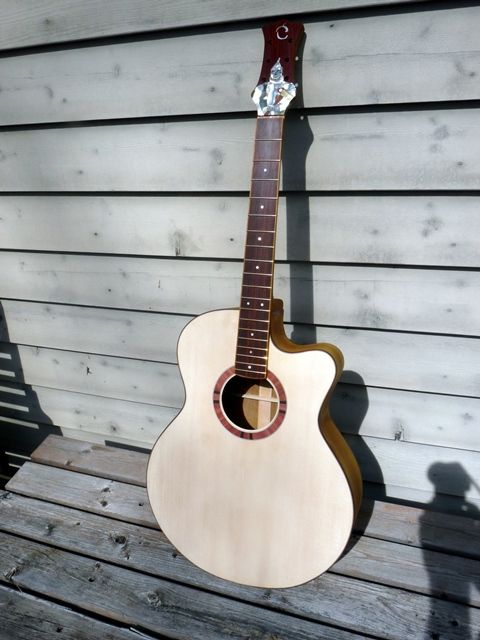
 Getting Ahead Ive talked about the process of building the neck before, but Ive added a couple of tweaks to the process (and a thunk), so Ill give it another go. In the good old days, when the forests were endless and wood was cheap, the necks (and heads) would be made from one solid piece of wood; a couple of bandsaw cuts, some shaping, and youre done. Unfortunately, this results in a considerable amount of waste. Now, with the rain forests becoming depleted, a number of species on the endangered list, and the cost of wood becoming dearer and dearer, it becomes more and more important to conserve as much as possible. So, necks are usually made from multiple glueups. For the commissioned guitar, the customer wanted a mahogany neck, and I found a very nice board of reclaimed Honduran mahogany that had been rescued from the bottom of a river, where it had lain for decades. This was an ideal choice in a couple of ways. One: because of the reclaiming process, the wood is incredibly dense and stable, easily the heaviest mahogany Ive ever encountered. Two: the customer is a heart transplant patient and intends to use the guitar to help others as they wait for new hearts, so the recycled wood fits in with the theme. The first step was to make the basic sandwich of two pieces of the mahogany (cut to minimize waste) with a creamy maple filling. (Shown here with the maple neck sandwich of the second build.) 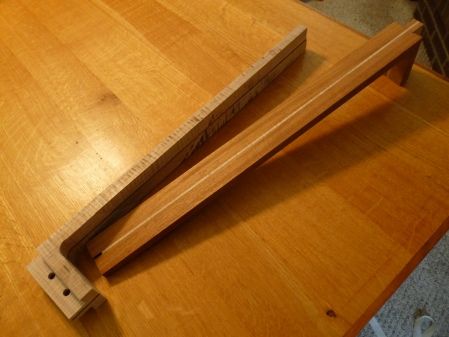 Next, the top part is cut off at a 15° angle and, after planing the scarfed surfaces flush, the two pieces are glued together with a scarf joint to provide the head. This also ensures that there are no short grain areas in the head that would be prone to break from the tension of the strings. 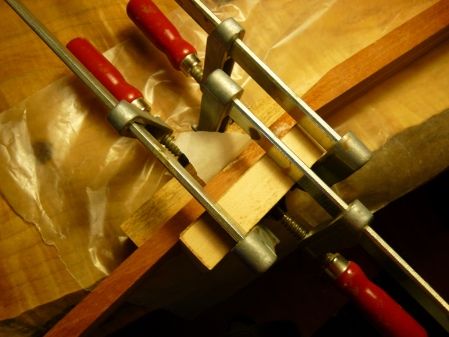 Since the width of the neck assembly is too narrow for the shape of the headstock, wings must be glued on to provide the extra width. The waste material of the original neck stock is used. This also helps to further reinforce the scarf joint. 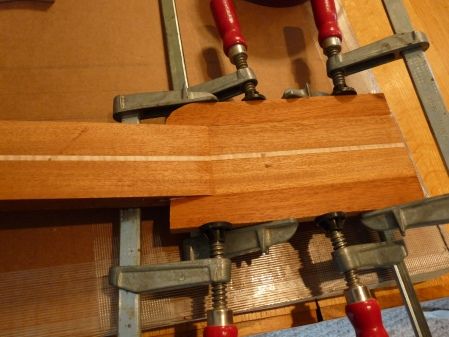 The final pieces of the puzzle are the headstock overlay and underlay (a new element with this build). Aside from providing the contrasting wood to house the inlays, these pieces further strengthen the head joints, with plenty of long grain to resist the strings pull. I used cocobolo for the overlay and osage orange for the underlay. 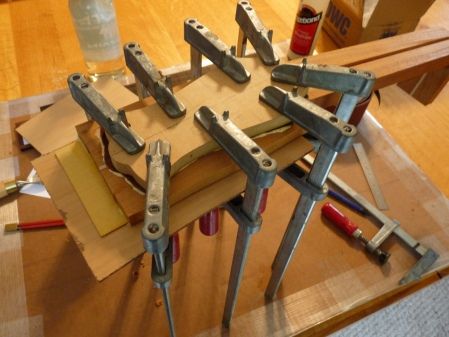 With the sandwich all glued up, its now time to cut the headstock to profile. This headstock has a very special element, an inlay by Jimi Wingert, a well known artist who usually is providing inlay for her mothers guitars, Kathy Wingert. The customer had commissioned her to inlay an image of the Tinman, from the Wizard of Oz, which, because of his own search for a heart, had become his nickname.  This inlay upped the ante for the next step, since any slips could ruin the artwork (and cost me a considerable amount of $!) I cut the outline of the head at the bandsaw, and then dutifully taped the pattern to the headstock using double sided tape. I set up the router table with a pattern bit and started on the first side. Maybe it was the cool morning temperature, maybe it was the fact that I had used the pattern to rout a number of shapes previously and the glueing surfaces had been compromised, but as I reached the end of the first side, I had the sickening feel of the pattern slipping. After a string of expletives, I tore the pattern off and surveyed the damage. A nice divot that, THANKFULLY, stopped shy of the inlay. A disaster, but not a complete disaster. I would have to rework the headstock shape to a thinner waist to get past the slip, but it was still useable. 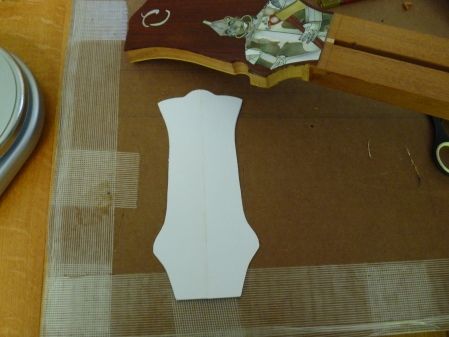 I consulted with the client (ever so understanding) and layed out the tuner holes carefully (they were tight, but they did fit) and prepared a new pattern. This time, I would use the tuner hole position to screw the pattern to the headstock before routing. (Since I had used the old pattern for both guitar and bass, I hadnt done this before, and the tape had held before. It only takes one time!) This time, the routing went smoothly, with no problems. After drilling the pilot holes to the final size for the tuners, I could finally breath a sigh of relief. A couple of thin coats of blonde shellac to seal everything, and I can turn my attention to the fingerboard. 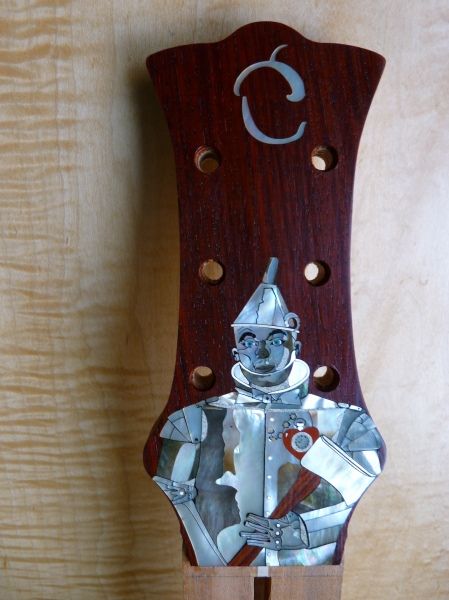 Both Tinmen had a terminal scare, but both emerged, hopefully for good!
__________________
RW Skaggs, the tinman  : :Acorn House Custom by Chris Kenney:Tinman "Heart Guitar" SJ McKnight Mini-Mac V; Madagascar RW, Italian/Carpathian top; exquisite! John Helton Custom OM; Honduran Mahogany Burl "the Growler" Rainsong H-DR1100N2 Journey travel guitar in Nashville high tuning "The music lives in the musician; not the instrument." 
|
|
#49
10-15-2012, 01:28 PM
|
|||
|
|||
|
Quote:
Sign your organ donor box on your next driver's license everyone! And be sure to let your loved ones know your wishes - they will be consulted if the worst happens. I found when I asked the docs in the OR prior to my transplant that they can re-transplant this heart into another patient if I die from other circumstances. I'm signed up! Planning to take this new guitar on my coffee-shop / hospital circuit and promote this life-giving effort....
__________________
RW Skaggs, the tinman :Acorn House Custom by Chris Kenney:Tinman "Heart Guitar" SJ McKnight Mini-Mac V; Madagascar RW, Italian/Carpathian top; exquisite! John Helton Custom OM; Honduran Mahogany Burl "the Growler" Rainsong H-DR1100N2 Journey travel guitar in Nashville high tuning "The music lives in the musician; not the instrument."
|
|
#50
10-31-2012, 03:04 PM
|
|||
|
|||
|
Well, the builder (Chris Kenney - Acornhouseworkshop) met me in Columbus last Saturday to show me the neck and discuss the final profile for my big hands. I didn't have a decent camera, but....wow! The inlay of the tinman is awesome in person, and the neck is going to feel great.
Maybe before the Mayan prophecies????
__________________
RW Skaggs, the tinman :Acorn House Custom by Chris Kenney:Tinman "Heart Guitar" SJ McKnight Mini-Mac V; Madagascar RW, Italian/Carpathian top; exquisite! John Helton Custom OM; Honduran Mahogany Burl "the Growler" Rainsong H-DR1100N2 Journey travel guitar in Nashville high tuning "The music lives in the musician; not the instrument." Last edited by rwskaggs; 10-31-2012 at 03:11 PM.
|
|
#51
11-09-2012, 08:27 AM
|
|||
|
|||
|
Here's some updated information on the guitar from Chris Kenney's blog at http://acornhouseworkshop.com/2012/1...ittle-necking/
With the head shaped, the next step is to bind the fingerboard. Since the guitar body will be osage orange with cocobolo binding, we decided on a cocobolo fingerboard with osage orange binding. After cutting the fingerboard to length and the tapered width (according to the nut width and the join at the 12th fret), first I curved the end that will overhang the soundhole, and curved a strip of OO to match it. Thats glued and trimmed flush, then the side strips are glued on. 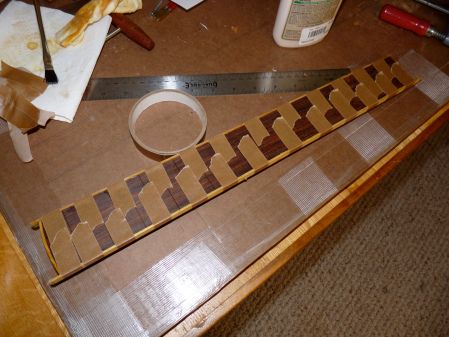 Then, the sides are flushed with the ends and the whole bound fingerboard get a trip through the drum sander to bring the bindings level with the top and bottom. Then the fingerboard gets glued to the rough neck, with the truss rod in its slot. After the glue cures, the neck is taken to the router and, using the flush trim bit, the sides of the neck are brought to the width of the fingerboard. Its now time to work on carving the neck. This is one of my most enjoyable parts of the build; every stroke of the rasp has an immediate effect. Theres no glueing, its all shaping the neck, checking it, making adjustments, testing again, until finally, youve gone from a square block that would be very uncomfortable to hold, to something that fits the hand to a tee! One thing that made this neck especially enjoyable to carve, was the purchase of a specialty vise to hold guitar necks. It was so easy to hold it secure, work on any part of it, shift positions, reclamp, etc. Previously, Id had to clamp it to the edge of my bench and work on one side at a time. Changing position to work on another part became a major production! This was a piece of cake as I attacked the neck with spokshave, rasps, and sandpaper. 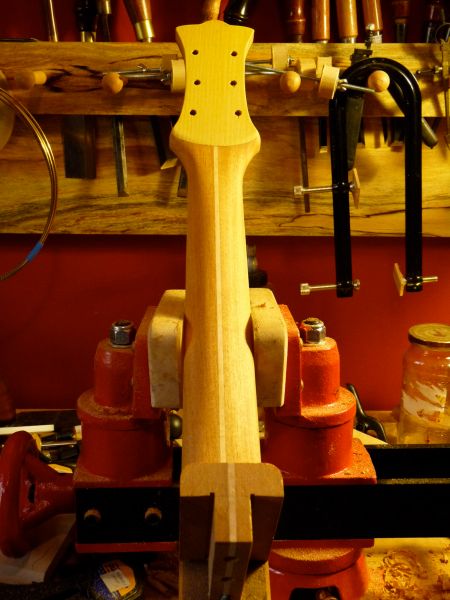 After the initial shaping, I was able to meet with my client, so he could get a feel for the neck, and see how it was fitting his hands. On the whole, he was pleased, noting just a couple of small spots to address. Thats the benefit of a true custom guitar; youre not selecting from a short list of options, everything is tailor made just for you! Next, I did an initial radiusing of the fingerboard to a 12″ radius. Then I marked out and drilled the holes for the mother of pearl position dots. After they were glued (with gel CA glue), I did the final passes with the radius block, to bring everything to a nice silky smoothness, leveling the dots at the same time. 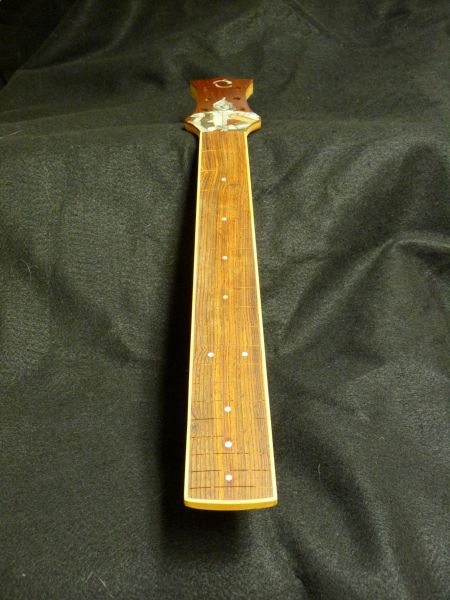 Then I marked, drilled and glued the black side dot material into the binding. After leveling, its ready for a final sanding and frets. 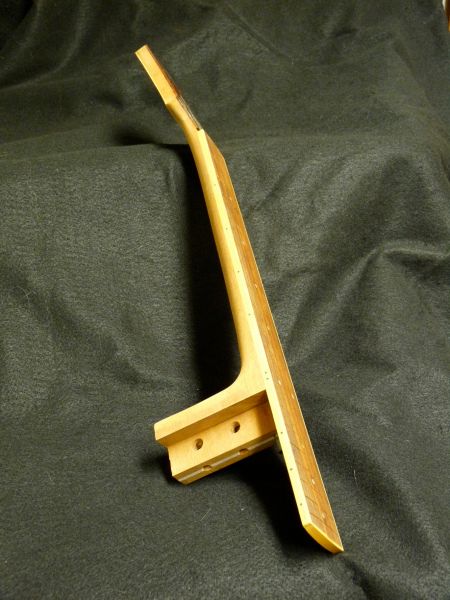
__________________
RW Skaggs, the tinman :Acorn House Custom by Chris Kenney:Tinman "Heart Guitar" SJ McKnight Mini-Mac V; Madagascar RW, Italian/Carpathian top; exquisite! John Helton Custom OM; Honduran Mahogany Burl "the Growler" Rainsong H-DR1100N2 Journey travel guitar in Nashville high tuning "The music lives in the musician; not the instrument."
|
|
#52
11-18-2012, 03:17 PM
|
|||
|
|||
|
Latest from Chris Kenney at http://acornhouseworkshop.com/in-the-workshop/
Fretting this fingerboard is a bit more involved than past builds due to the fretboard binding. Instead of the fret tang (the barbed tongue that holds the frets in their slots) extending all the way out the side, they must be trimmed where the fret will extend over the binding. This means a lot of prep work before the relatively easy task of hammering them in can take place. First, I like to add a fingerboard finish to the radiused and sanded board, especially with cocobolo. This seals the wood and provides a nice smooth feel. Of course, before any sealing can take place, the slots have to be cleared of any of the sanding dust that has accumulated during the radiusing process. This requires a special tool that can get in the narrow slot without widening it. Then a couple coats of the finish is wiped on and buffed to a satin sheen. 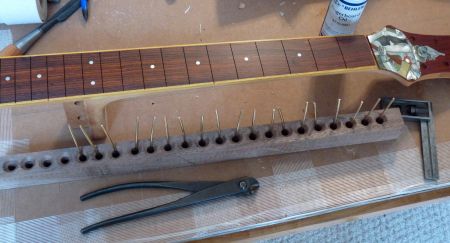 Since each fret will have to be sized for length and trimmed, a staging board helps keep the frets organized. Then comes the fun (insert sarcastic comment here!) of trimming the barbs to the correct length. They have to be long enough to hold the entire fret firmly in its slot, but still leave enough of a gap so that any seasonal contraction of the wood doesnt push them through the binding. Using the EVO fretwire, which is harder and more long lasting than conventional nickel-silver wire, means using a bit more force to clip them all, but with the right tools, even that can be done. (I just hope Im never asked to use stainless steel fretwire. That just eats tools for breakfast!)  After trimming the tangs, any rough remnants of the cut need to be filed flush. Then, after one final slot cleaning, the hammering can begin. This is the easy bit. The cocobolo holds the frets nice and tight, with no need for glue. All you need is a good support for the neck and a firm hand. 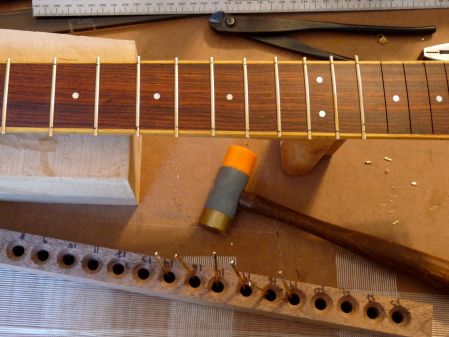 When I get to the fingerboard that will extend over the guitar body, extra support must be used under the hammer to avoid snapping the extension. 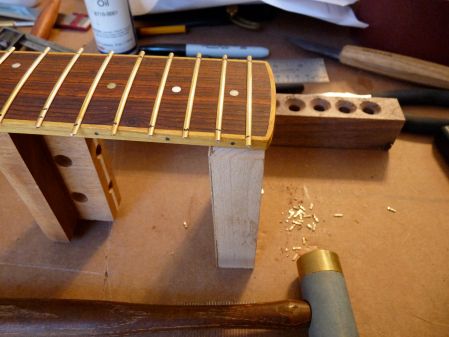 The ends are clipped close to the bindings and then filed flush. (Also not a task I enjoy. I much prefer to work wood rather than metal.) 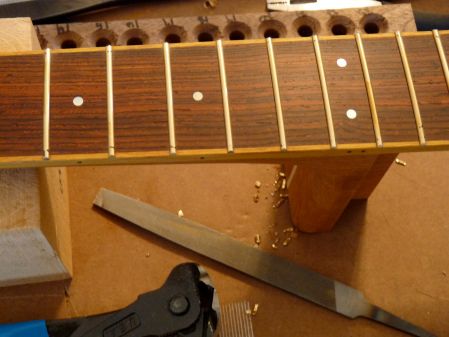 Thats it for the neck, until its ready to be attached to the body for the last time. Then the frets will be levelled and the ends dressed. (In a nice casual ensemble!)
__________________
RW Skaggs, the tinman :Acorn House Custom by Chris Kenney:Tinman "Heart Guitar" SJ McKnight Mini-Mac V; Madagascar RW, Italian/Carpathian top; exquisite! John Helton Custom OM; Honduran Mahogany Burl "the Growler" Rainsong H-DR1100N2 Journey travel guitar in Nashville high tuning "The music lives in the musician; not the instrument."
|
|
#54
11-18-2012, 07:37 PM
|
|||
|
|||
|
Quote:
__________________
RW Skaggs, the tinman :Acorn House Custom by Chris Kenney:Tinman "Heart Guitar" SJ McKnight Mini-Mac V; Madagascar RW, Italian/Carpathian top; exquisite! John Helton Custom OM; Honduran Mahogany Burl "the Growler" Rainsong H-DR1100N2 Journey travel guitar in Nashville high tuning "The music lives in the musician; not the instrument."
|
|
#56
03-25-2013, 09:09 AM
|
|||
|
|||
|
Well, it's been a while since my last update. My luthier had a series of health issues that delayed progress, but here's the latest....
"....I got the binding scraped, smoothed, filled and sanded. I added a sealer coat of shellac to the back and sides, but not to the front."   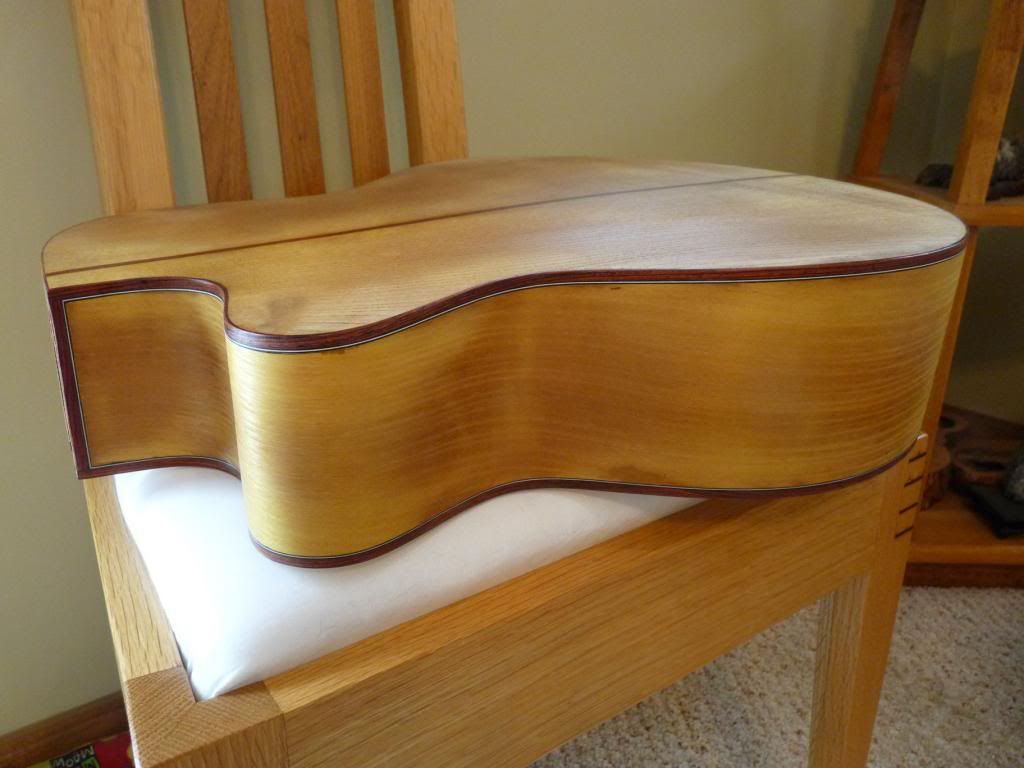
__________________
RW Skaggs, the tinman :Acorn House Custom by Chris Kenney:Tinman "Heart Guitar" SJ McKnight Mini-Mac V; Madagascar RW, Italian/Carpathian top; exquisite! John Helton Custom OM; Honduran Mahogany Burl "the Growler" Rainsong H-DR1100N2 Journey travel guitar in Nashville high tuning "The music lives in the musician; not the instrument."
|
|
#57
03-29-2013, 02:22 AM
|
|||
|
|||
|
Quote:

|
|
#58
04-01-2013, 08:47 AM
|
|||
|
|||
|
My new heart is beginning to beat faster!
__________________
RW Skaggs, the tinman :Acorn House Custom by Chris Kenney:Tinman "Heart Guitar" SJ McKnight Mini-Mac V; Madagascar RW, Italian/Carpathian top; exquisite! John Helton Custom OM; Honduran Mahogany Burl "the Growler" Rainsong H-DR1100N2 Journey travel guitar in Nashville high tuning "The music lives in the musician; not the instrument."
|
|
#59
04-26-2013, 08:36 AM
|
|||
|
|||
|
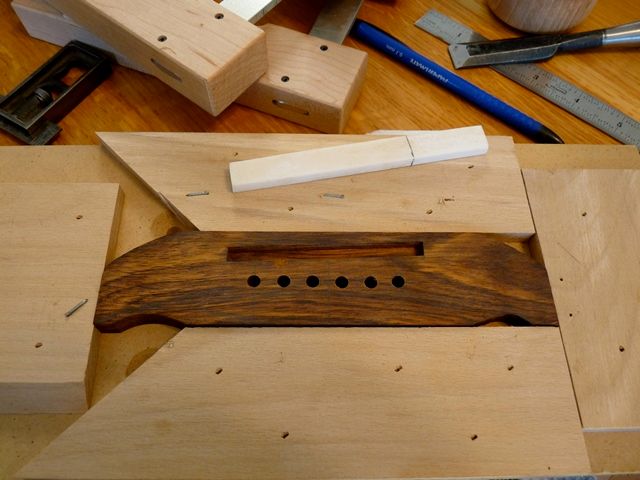
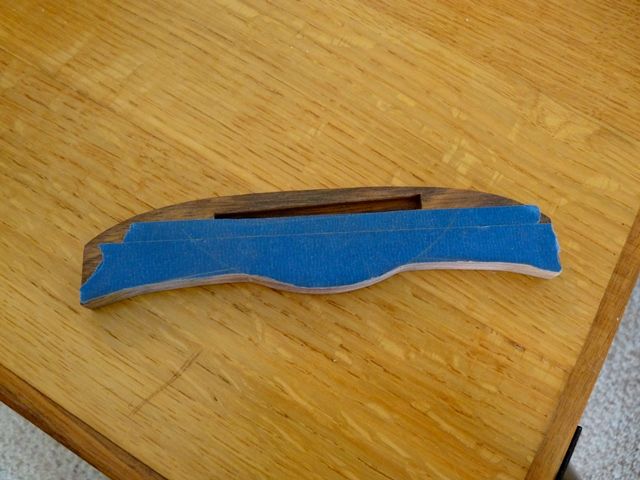
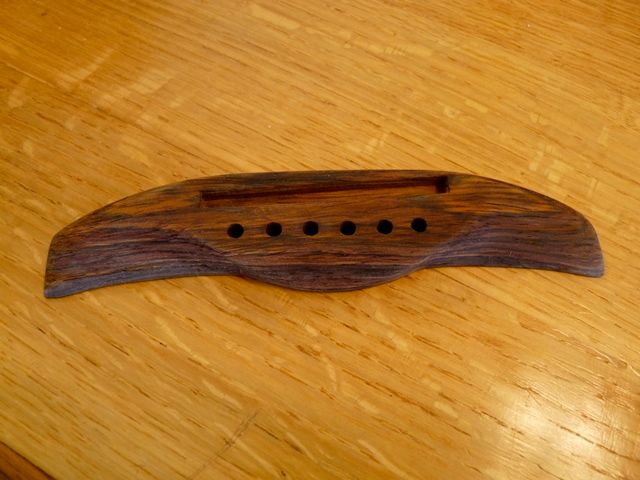
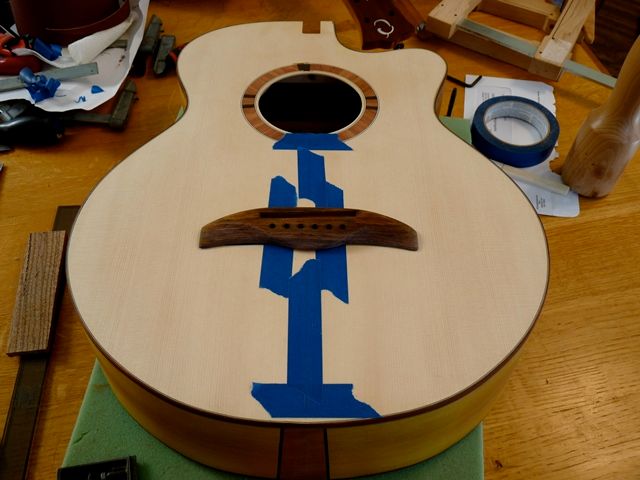
Inching forward - just got these shots of the unique bridge Chris has carved for the Heart Guitar. Progress is good!
__________________
RW Skaggs, the tinman :Acorn House Custom by Chris Kenney:Tinman "Heart Guitar" SJ McKnight Mini-Mac V; Madagascar RW, Italian/Carpathian top; exquisite! John Helton Custom OM; Honduran Mahogany Burl "the Growler" Rainsong H-DR1100N2 Journey travel guitar in Nashville high tuning "The music lives in the musician; not the instrument."
|


